Introduction
Inserting a SIM card into your Moto G5 Plus is a fundamental step in setting up your device for mobile communication. Whether you're activating a new phone or switching to a different SIM card, this process is crucial to ensure that your device can connect to your mobile network and access voice, text, and data services.
The SIM card, or Subscriber Identity Module, is a small chip that securely stores your mobile subscriber information. It is essential for identifying your account and connecting to the mobile network. Without a SIM card, your phone would not be able to make calls, send text messages, or access mobile data.
In this tutorial, we will guide you through the step-by-step process of inserting a SIM card into your Moto G5 Plus. By following these instructions, you will be able to seamlessly install or replace a SIM card, enabling your device to function as a fully operational mobile communication tool.
Ensuring that the SIM card is correctly inserted into your Moto G5 Plus is a foundational step in setting up your device for seamless mobile communication. Let's dive into the process of inserting a SIM card to unlock the full potential of your Moto G5 Plus.
Step 1: Locate the SIM card tray
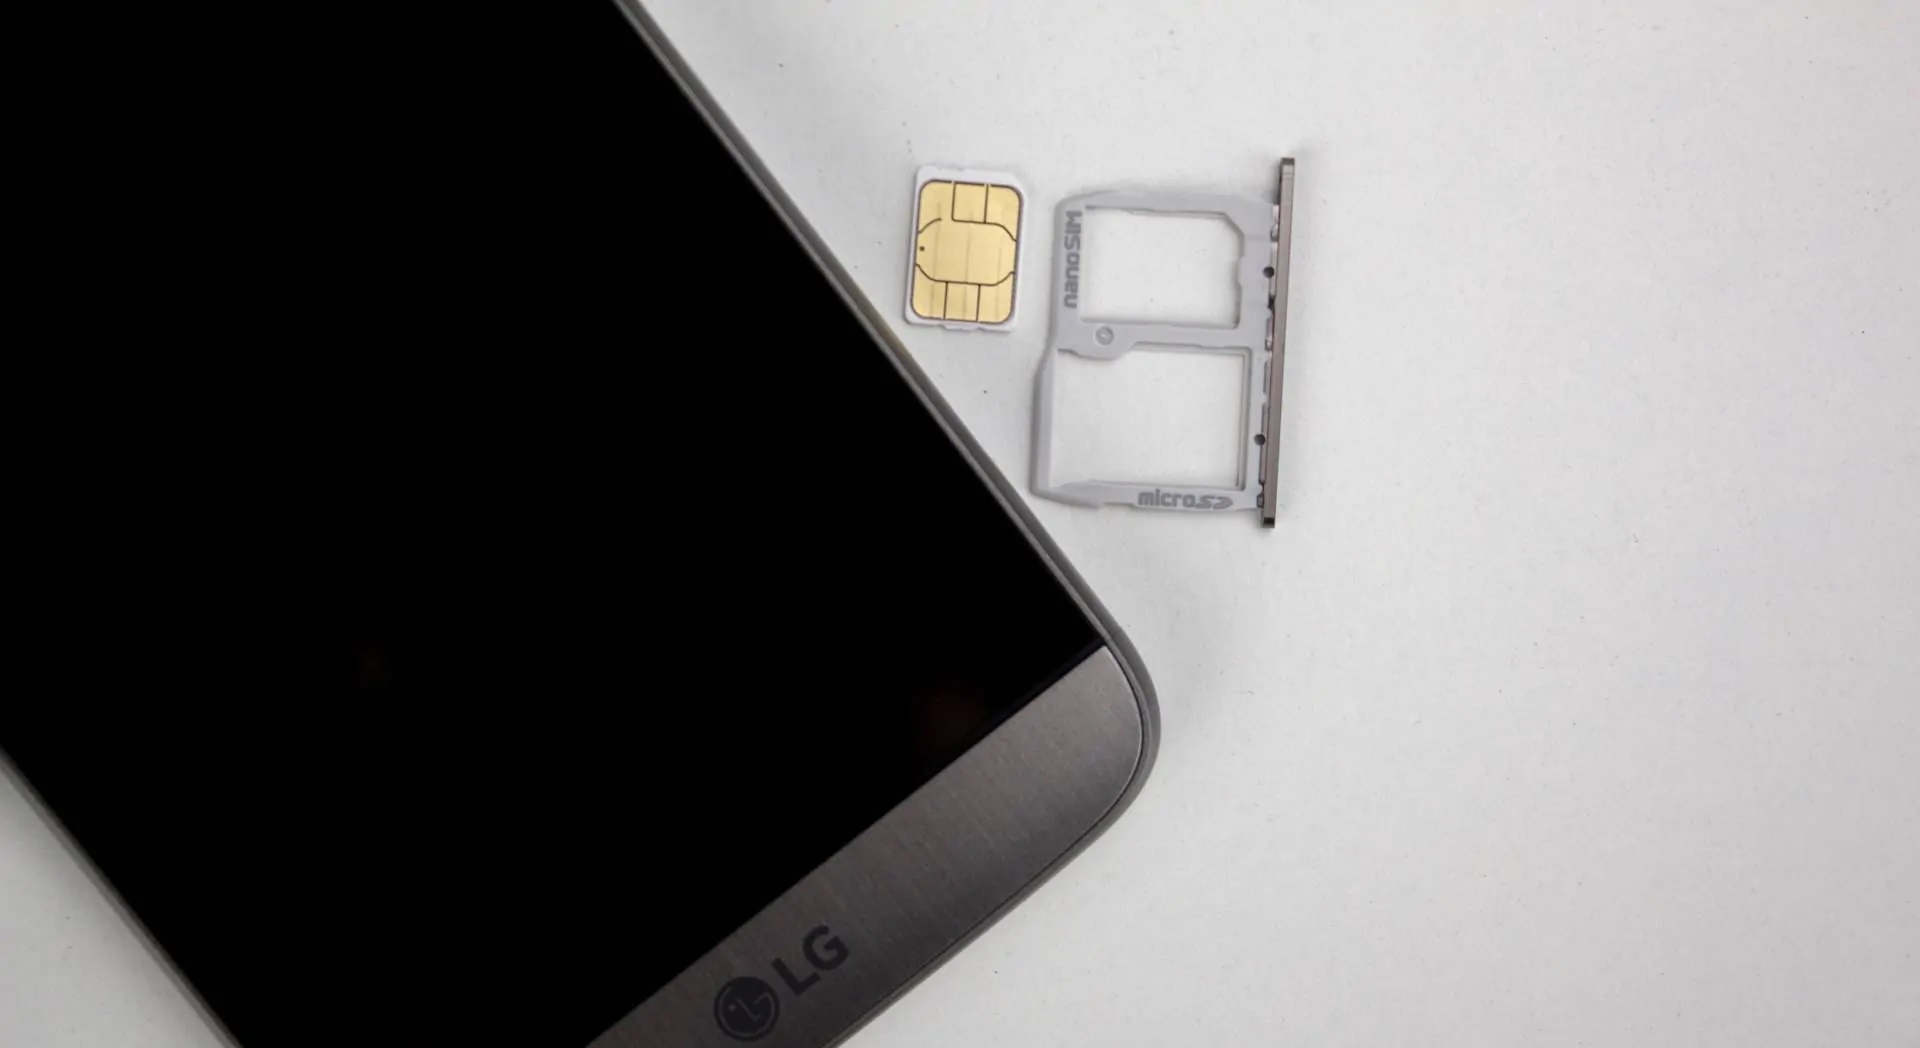
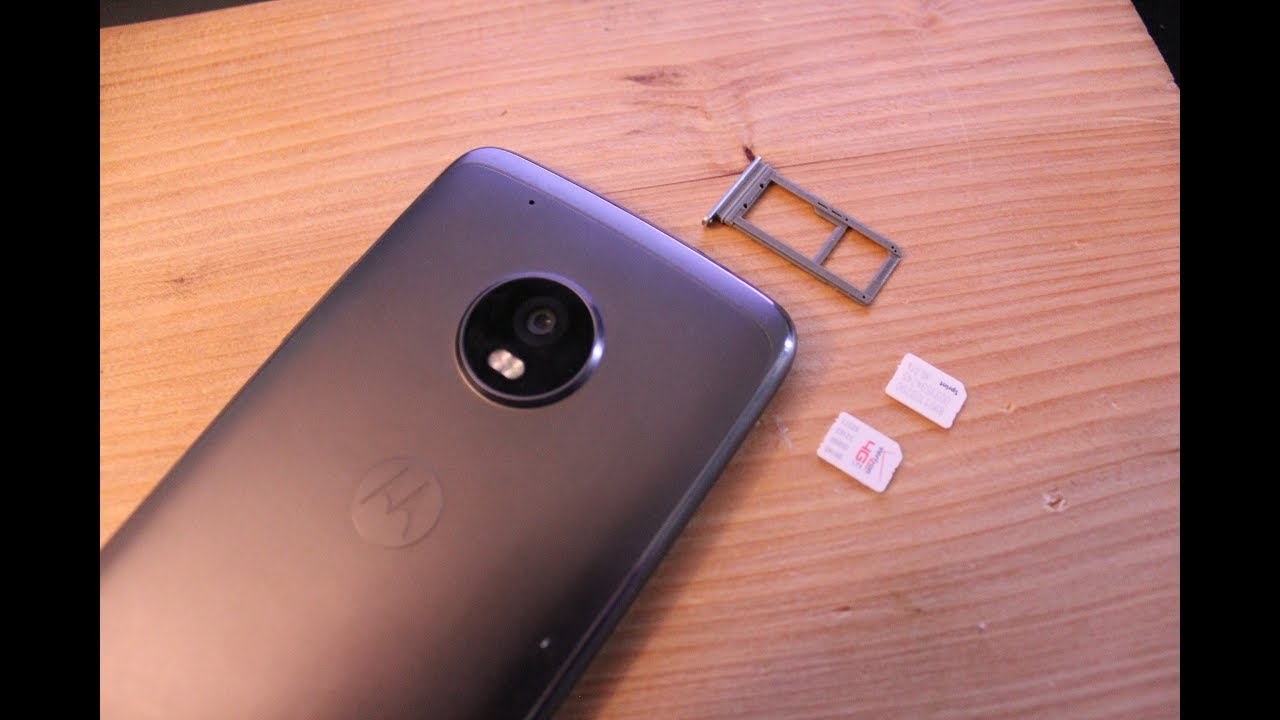
The first step in inserting a SIM card into your Moto G5 Plus is to locate the SIM card tray. The SIM card tray is a small, rectangular slot typically found on the side of the device. It is designed to securely hold the SIM card and ensure proper contact with the device's internal SIM card reader.
To locate the SIM card tray on your Moto G5 Plus, you will need to identify the SIM card slot. The Moto G5 Plus features a convenient SIM card slot that is easily accessible, allowing for straightforward installation and removal of the SIM card.
The SIM card tray on the Moto G5 Plus is typically located on the upper side of the device, near the top edge. You can easily identify the SIM card tray by the small pinhole next to it, which is used to eject the tray. The pinhole is strategically placed to accommodate the SIM ejection tool, allowing for seamless removal and insertion of the SIM card tray.
Once you have located the SIM card tray, take a moment to familiarize yourself with its position and orientation. The SIM card tray is designed to securely hold the SIM card in place, ensuring a stable connection with the device's SIM card reader. By locating the SIM card tray, you are one step closer to successfully inserting the SIM card into your Moto G5 Plus.
Locating the SIM card tray is the initial step in the process of setting up your device for mobile communication. By identifying the SIM card slot and becoming familiar with its location, you are ready to proceed to the next step of inserting the SIM ejection tool to access the SIM card tray.
With the SIM card tray located, you are now prepared to move on to the next step of the tutorial, where we will guide you through the process of inserting the SIM ejection tool to access the SIM card tray and begin the installation of your SIM card.
Step 2: Insert the SIM ejection tool
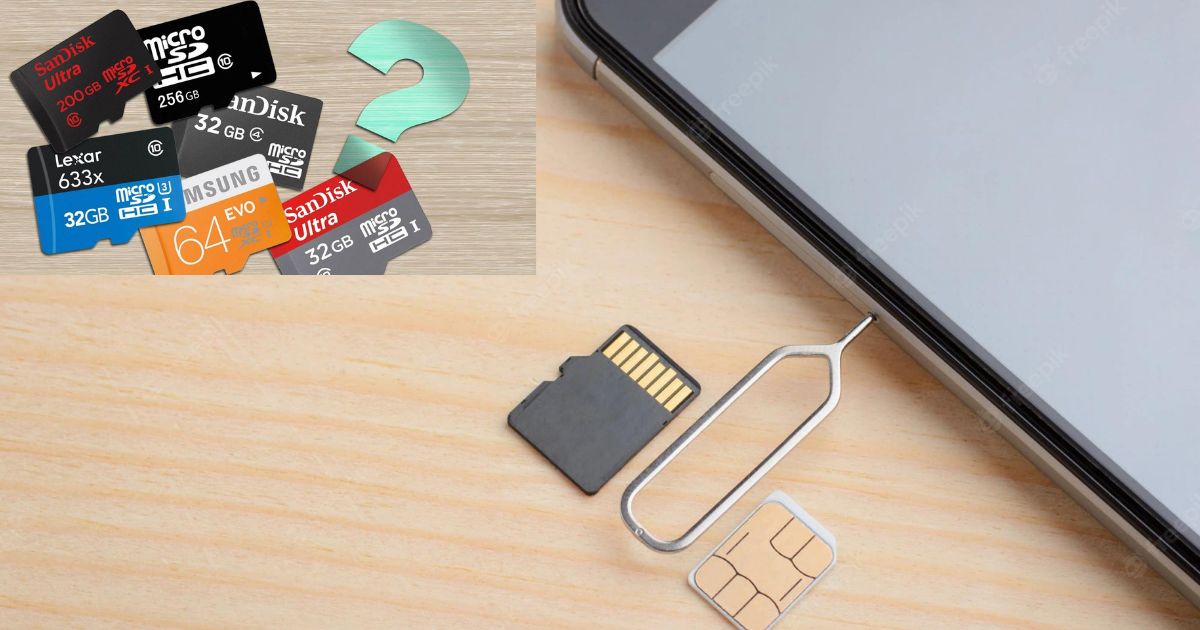
To proceed with the installation of your SIM card into the Moto G5 Plus, you will need to utilize the SIM ejection tool provided with the device. The SIM ejection tool is a small, pointed instrument specifically designed for accessing the SIM card tray and facilitating the insertion and removal of the SIM card.
The SIM ejection tool is typically included in the packaging of your Moto G5 Plus and is essential for safely handling the SIM card tray. Its compact and slender design enables it to fit snugly into the pinhole located near the SIM card tray. This precision-crafted tool ensures that you can effortlessly access the SIM card tray without causing any damage to the device.
To insert the SIM ejection tool, locate the pinhole next to the SIM card tray on your Moto G5 Plus. The pinhole is strategically positioned to align with the SIM ejection tool, allowing for seamless insertion and removal. Gently insert the pointed end of the SIM ejection tool into the pinhole, applying light pressure to engage the internal mechanism.
As you insert the SIM ejection tool into the pinhole, you will feel a subtle resistance, indicating that the tool has engaged with the internal mechanism of the SIM card tray. Continue to apply gentle pressure until you feel a slight click, signifying that the SIM card tray has been unlocked and is ready to be accessed.
The SIM ejection tool serves as a key component in the process of installing or replacing a SIM card in your Moto G5 Plus. Its purposeful design and functionality ensure that you can safely and effectively manage the SIM card tray without the risk of causing any damage to the device.
With the SIM ejection tool securely inserted into the pinhole, you are now prepared to proceed to the next step of removing the SIM card tray from your Moto G5 Plus, setting the stage for the seamless installation of your SIM card.
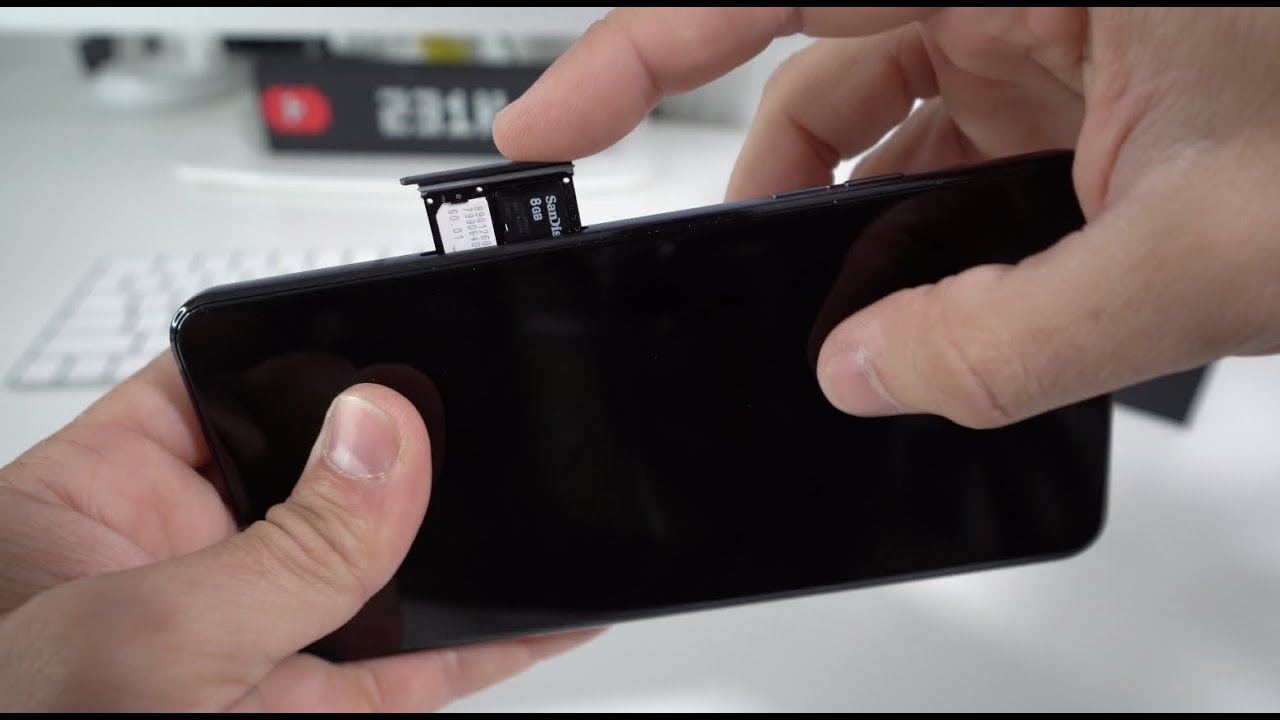
Step 3: Remove the SIM card tray
With the SIM ejection tool securely inserted into the pinhole, gently exert pressure to initiate the ejection process. Applying light, consistent pressure to the SIM ejection tool will prompt the SIM card tray to disengage from its locked position within the Moto G5 Plus. As you continue to exert pressure, you will feel the SIM card tray gradually protruding from the device, indicating that it is ready to be removed.
Once the SIM card tray has been partially ejected, carefully grasp the exposed edge of the tray and gently pull it out of the device. It's essential to exercise caution and precision during this step to avoid any damage to the SIM card tray or the device itself. By utilizing a delicate yet firm grip, you can smoothly remove the SIM card tray from the Moto G5 Plus without encountering any resistance or difficulty.
As the SIM card tray is fully removed from the device, take a moment to inspect it for any debris or obstructions that may have accumulated. It's important to ensure that the SIM card tray is clean and free from any foreign particles that could potentially interfere with the proper installation of the SIM card. If necessary, gently wipe the SIM card tray with a soft, lint-free cloth to maintain its pristine condition.
Removing the SIM card tray from your Moto G5 Plus marks a pivotal stage in the process of installing or replacing a SIM card. With the tray now accessible, you are poised to proceed to the subsequent step of inserting the SIM card into the tray, thereby establishing a seamless connection between the SIM card and your device.
By following these detailed instructions, you can confidently navigate the process of removing the SIM card tray from your Moto G5 Plus, setting the stage for the successful installation of your SIM card. With the SIM card tray in hand, you are ready to proceed to the next step and seamlessly integrate the SIM card into your device, enabling it to harness the full spectrum of mobile communication capabilities.
Step 4: Insert the SIM card
With the SIM card tray in hand, the next crucial step is to insert the SIM card into the tray of your Moto G5 Plus. The SIM card serves as the gateway to your mobile network, containing vital subscriber information that enables your device to connect to the cellular network and access voice, text, and data services. Ensuring the correct orientation and secure placement of the SIM card within the tray is essential for seamless functionality and reliable connectivity.
Before proceeding with the insertion of the SIM card, take a moment to examine the SIM card tray. You will notice a designated area within the tray that accommodates the SIM card. This area is typically marked with an outline or icon representing the shape and size of the SIM card, providing a visual guide for proper alignment.
Carefully align the SIM card with the designated area within the SIM card tray, ensuring that it matches the shape and size indicated. Most SIM cards are designed with beveled edges, allowing for easy alignment within the tray. Place the SIM card into the designated area, taking note of the orientation to ensure a proper fit.
It's important to adhere to the correct orientation when inserting the SIM card. Many SIM cards feature a notched corner or a specific cutout that corresponds to the SIM card tray, ensuring that the card can only be inserted in one direction. Align the notched corner of the SIM card with the corresponding area within the tray, ensuring a precise fit that prevents any misalignment.
Once the SIM card is aligned and positioned within the tray, gently press down to secure it in place. You should feel a subtle click, indicating that the SIM card is securely seated within the tray. It's essential to ensure that the SIM card is firmly in place, as any loose connection could potentially disrupt the functionality of your device.
By following these meticulous steps, you have successfully inserted the SIM card into the tray of your Moto G5 Plus, setting the stage for the next phase of the process. With the SIM card securely positioned within the tray, you are now prepared to reinsert the tray into the device, finalizing the installation of the SIM card and enabling your Moto G5 Plus to establish a seamless connection with the mobile network.
With the SIM card securely in place within the tray, you are now ready to proceed to the subsequent step, where we will guide you through the process of reinserting the SIM card tray into your Moto G5 Plus, culminating in the successful integration of the SIM card and the restoration of full mobile communication capabilities to your device.
Step 5: Reinsert the SIM card tray
With the SIM card securely positioned within the tray, the final step in the process of installing or replacing a SIM card in your Moto G5 Plus is to reinsert the SIM card tray into the device. This pivotal step marks the culmination of the installation process, ensuring that the SIM card is seamlessly integrated with the device and ready to facilitate mobile communication capabilities.
To reinsert the SIM card tray, carefully align the tray with the corresponding slot on the side of your Moto G5 Plus. The tray is designed to fit snugly into the slot, ensuring a secure and stable connection with the device. Take note of the orientation of the tray, aligning it in accordance with the designated slot to ensure a proper fit.
Gently guide the SIM card tray back into the slot, applying light pressure to facilitate its smooth insertion. As the tray slides back into place, you may feel a subtle resistance, indicating that it is securely seated within the device. Ensure that the tray is flush with the exterior of the device, maintaining a seamless and uniform profile.
Once the SIM card tray is reinserted, take a moment to verify that it is securely positioned within the device. Confirm that the tray sits flush with the exterior, with no protrusions or misalignments. This ensures that the SIM card is in close contact with the device's internal SIM card reader, enabling reliable communication with the mobile network.
With the SIM card tray successfully reinserted into your Moto G5 Plus, the installation process is now complete. The SIM card is securely integrated with the device, empowering it to harness the full spectrum of mobile communication capabilities. Your Moto G5 Plus is now primed to make calls, send text messages, and access mobile data, leveraging the seamless connectivity facilitated by the installed SIM card.
By meticulously following these steps, you have effectively navigated the process of installing or replacing a SIM card in your Moto G5 Plus, ensuring that your device is fully equipped to connect to the mobile network and deliver a seamless communication experience. With the SIM card tray securely reinserted, your Moto G5 Plus is now ready to empower you with reliable and efficient mobile communication capabilities.
Conclusion
Congratulations! You have successfully navigated the comprehensive process of inserting or replacing a SIM card in your Moto G5 Plus. By following the step-by-step instructions outlined in this tutorial, you have equipped your device with the essential component that enables seamless connectivity to the mobile network and unlocks the full spectrum of mobile communication capabilities.
The journey of inserting a SIM card into your Moto G5 Plus began with the crucial task of locating the SIM card tray, a small yet pivotal component that securely holds the SIM card and ensures its proper interaction with the device's internal SIM card reader. By familiarizing yourself with the location and orientation of the SIM card tray, you set the stage for a smooth and efficient installation process.
Utilizing the SIM ejection tool, you expertly accessed the SIM card tray, demonstrating precision and care in handling the delicate yet essential components of your device. The purposeful design and functionality of the SIM ejection tool facilitated seamless access to the SIM card tray, ensuring that the installation process proceeded with ease and precision.
The subsequent steps of removing the SIM card tray, inserting the SIM card, and reinserting the tray into the device showcased your meticulous attention to detail and commitment to ensuring a secure and reliable connection. By aligning and positioning the SIM card with precision and care, you have guaranteed that your Moto G5 Plus is primed to deliver a seamless mobile communication experience.
With the SIM card securely integrated into your Moto G5 Plus, your device is now fully equipped to access voice, text, and data services, enabling you to stay connected and engaged with the world around you. Whether making calls, sending messages, or accessing online content, your Moto G5 Plus is now empowered to deliver a seamless and reliable mobile communication experience.
As you embark on your journey with your Moto G5 Plus, equipped with a securely installed SIM card, you can rest assured that your device is primed to deliver a seamless and efficient mobile communication experience. With the essential task of inserting a SIM card successfully accomplished, your Moto G5 Plus stands ready to connect you with the world, ensuring that you can stay connected, informed, and engaged with ease and reliability.
By completing the process of inserting or replacing a SIM card in your Moto G5 Plus, you have taken a significant step in setting up your device for optimal performance and connectivity. Your commitment to mastering this essential task reflects your dedication to maximizing the potential of your device, ensuring that it can seamlessly integrate with the mobile network and deliver a reliable and efficient communication experience.