Common Causes of a PC Not Turning On
Is your PC refusing to power up? It can be a frustrating experience, especially when you rely on your computer for work, entertainment, or personal use. Several factors can lead to a computer not turning on, and understanding the common causes can help you troubleshoot and fix the issue in a timely manner.
One of the most common reasons for a PC not turning on is a faulty power supply. If the power supply is defective or doesn’t provide enough power to the components, the computer won’t receive the necessary electrical current to start up. Similarly, a loose power cable or a power strip that isn’t properly connected can also prevent the computer from turning on.
Another possible cause is a malfunctioning motherboard. The motherboard acts as the central hub that connects all the components of the computer, and if it’s damaged or faulty, it can prevent the PC from booting up. Issues with the CPU, RAM, or other hardware components can also cause the computer not to turn on.
Sometimes, the problem lies with the software rather than the hardware. A corrupted operating system or a software conflict can prevent the computer from starting up. In such cases, performing a system restore or reinstalling the operating system might resolve the issue.
Overheating can also lead to a computer not turning on. If the cooling system fails or if there’s excessive dust buildup in the computer, it can cause the components to overheat and trigger a safety mechanism that prevents the PC from starting up. Keeping the computer clean and ensuring proper airflow can help prevent overheating issues.
Finally, a faulty display connection can give the impression that the computer is not turning on when, in fact, it is. Checking the cables connecting the computer to the monitor and ensuring they are secure can help resolve this issue.
It’s important to note that these are just a few common causes of a PC not turning on, and there can be other factors at play. Troubleshooting the problem can sometimes be a complex task, requiring technical expertise. If you’re unsure about how to proceed or if the issue persists, it’s recommended to seek professional assistance.
Troubleshooting Steps to Fix a PC That Won’t Turn On
Encountering a PC that won’t turn on can be frustrating, but there are several troubleshooting steps you can take to diagnose and potentially fix the issue. Here are some steps you can follow:
- Check the power source: Ensure that the power outlet is working by plugging in another electronic device. If it’s functioning properly, move on to the next step.
- Verify power connections: Double-check all power connections, including the power cord from the outlet to the power supply and the cables connecting the power supply to the motherboard. Ensure they are secure and properly inserted.
- Reset the power supply: If your PC has a built-in power supply reset button, press it to discharge any remaining power. Alternatively, you can unplug the power cord from the back of the computer and hold down the power button for about 15 seconds to drain any residual power.
- Remove unnecessary peripherals: Disconnect all non-essential peripheral devices, such as external hard drives, printers, and USB devices. These peripherals can sometimes cause conflicts during startup.
- Check the RAM: Remove and reseat the RAM modules. Sometimes, faulty or improperly seated RAM can prevent the computer from turning on. Ensure that the RAM modules are securely inserted into their slots.
- Inspect for physical damage: Carefully check the motherboard, CPU, and other components for any signs of physical damage, such as burnt capacitors or loose connections. If you notice any damage, it may be necessary to replace the affected part.
- Test with a different power supply: If you have access to a spare power supply, try connecting it to your PC to see if the issue lies with the power supply unit.
- Consult a professional: If you have exhausted all troubleshooting options and your PC still won’t turn on, it’s recommended to seek assistance from a professional computer technician. They will have the necessary expertise and tools to diagnose and fix the issue.
Remember, these troubleshooting steps can help you identify and potentially resolve the problem. However, if you’re uncertain about performing any of the steps or the issue persists, it’s best to consult a professional to avoid causing further damage to your computer.
Hardware Related Issues Preventing PC from Turning On
When your PC refuses to turn on, hardware-related issues could be at the root of the problem. Understanding these common hardware issues can help you troubleshoot and potentially fix the issue. Here are some potential hardware-related causes:
1. Faulty power supply: The power supply unit (PSU) is responsible for supplying power to your PC’s components. If the PSU is defective, worn out, or unable to provide sufficient power, your computer may not turn on. Testing the power supply with a multimeter or replacing it with a known working PSU can help identify if this is the culprit.
2. Malfunctioning motherboard: The motherboard acts as a central hub that connects all your computer’s components. If it’s damaged or faulty, it can prevent your PC from starting up. Inspect the motherboard for physical damage, such as burnt or swollen capacitors, and consider replacing it if necessary.
3. Faulty RAM: Random Access Memory (RAM) allows your computer to store and access data quickly. If one or more RAM modules are faulty, improperly seated, or incompatible with your motherboard, it can prevent your PC from booting up. Try removing and reseating the RAM modules, or testing them one by one in different slots to identify any issues.
4. Failed hard drive or storage device: If your computer’s hard drive or another storage device fails, it may prevent your PC from turning on. Check for any unusual noises or clicking sounds coming from the hard drive. Consider connecting the drive to another computer or using a bootable USB drive to determine if the storage device is the cause.
5. Overheating issues: When your computer overheats, it can trigger built-in safety mechanisms that prevent it from turning on. Insufficient airflow due to dust build-up, a malfunctioning CPU fan, or a defective cooling system can lead to overheating. Clean out any dust from your computer, ensure fans are functioning properly, and consider using cooling pads or additional case fans to improve airflow.
6. Loose or damaged cables: Check all internal and external cables connecting your PC’s components. Loose or damaged cables, such as the power cable, SATA cables, or display cables, can cause power or data transfer issues, leading to your PC not turning on. Ensure all cables are securely connected and intact.
Remember, troubleshooting hardware-related issues can sometimes be complex, and if you’re unsure about performing any of the steps or lack technical expertise, it’s always advisable to seek professional assistance. They will have the necessary tools and knowledge to accurately diagnose and repair hardware-related problems.
Software Related Issues Preventing PC from Turning On
While it’s easy to assume that hardware is solely responsible for a PC not turning on, software-related issues can also be the culprit. Understanding these common software issues can help you troubleshoot and potentially resolve the problem. Here are some possible scenarios:
1. Corrupted operating system: If your operating system files become corrupted, it can prevent your PC from successfully booting up. This can happen due to malware infections, sudden power outages, or improper system shutdowns. Try performing a system restore or using recovery tools to fix the corrupted files.
2. Software conflicts: Conflicts between different software applications or incompatible drivers can lead to system instability and prevent your PC from turning on. Uninstall any recently installed programs or drivers and check if the issue is resolved. Updating drivers and keeping your software up to date can also help prevent conflicts.
3. BIOS misconfiguration: The Basic Input/Output System (BIOS) is responsible for initializing hardware components during startup. Incorrect BIOS settings can cause your PC to fail to boot. Check BIOS settings for any changes or resets, and ensure they are properly configured for your hardware.
4. Virus or malware infections: Malicious software can infiltrate your PC, causing system instability and preventing it from booting up properly. Run a full system scan using a reputable antivirus software to detect and remove any malware or viruses that may be affecting your system.
5. Damaged or missing system files: Important system files are essential for the proper functioning of your operating system. If these files become damaged or go missing, your PC may not turn on. Using Windows recovery tools or performing a repair installation can help restore these missing or damaged files.
6. Boot device selection: Ensure that your PC is set to boot from the correct device, such as the internal hard drive with the operating system installed. Incorrect boot device selection, such as booting from a USB drive or CD/DVD, can prevent your PC from turning on. Adjust the boot order in the BIOS settings if necessary.
When troubleshooting software-related issues, it’s important to be cautious and perform backups of important data to avoid potential data loss. If you’re unsure about performing any of the steps or if the issue persists, it’s recommended to seek professional help from a computer technician who can assist you in diagnosing and resolving software-related problems.
Power Supply Problems Leading to PC Not Turning On
One of the most common causes of a PC not turning on is power supply problems. The power supply unit (PSU) is responsible for supplying electrical power to all the components in your computer. When the power supply encounters issues, it can prevent your PC from booting up. Here are some common power supply problems that can lead to your PC not turning on:
1. Insufficient power output: If the power supply doesn’t provide enough power to the components in your PC, it can prevent proper startup. Over time, as you add more components or upgrade existing ones, the power requirements may exceed the capabilities of your current power supply. Consider upgrading to a higher wattage PSU to meet the power demands of your system.
2. Faulty power cables: Loose or damaged power cables can cause intermittent power supply or a complete power failure. Check the power cables connecting the PSU to the motherboard and other components, ensuring they are securely plugged in. Replace any frayed or damaged cables that you come across.
3. Power surges and fluctuations: Power surges or fluctuations can damage the power supply and other components of your PC. It’s essential to use a surge protector or an uninterruptible power supply (UPS) to protect your system from sudden voltage spikes. Additionally, avoid plugging your PC directly into fluctuating power sources to minimize the risk of power-related issues.
4. Overheating of the power supply: A power supply with inadequate cooling or obstructed ventilation can overheat, triggering built-in protection mechanisms that shut down the power supply. Ensure that the power supply fan is working correctly and free of dust or debris. Proper airflow in the computer case can also help prevent power supply overheating.
5. Failed internal components: Internal components within the power supply, such as capacitors or voltage regulators, can fail over time. This can result in a power supply that is unable to deliver the necessary electricity to your PC’s components. If you suspect a faulty power supply, it may be necessary to replace it with a new one.
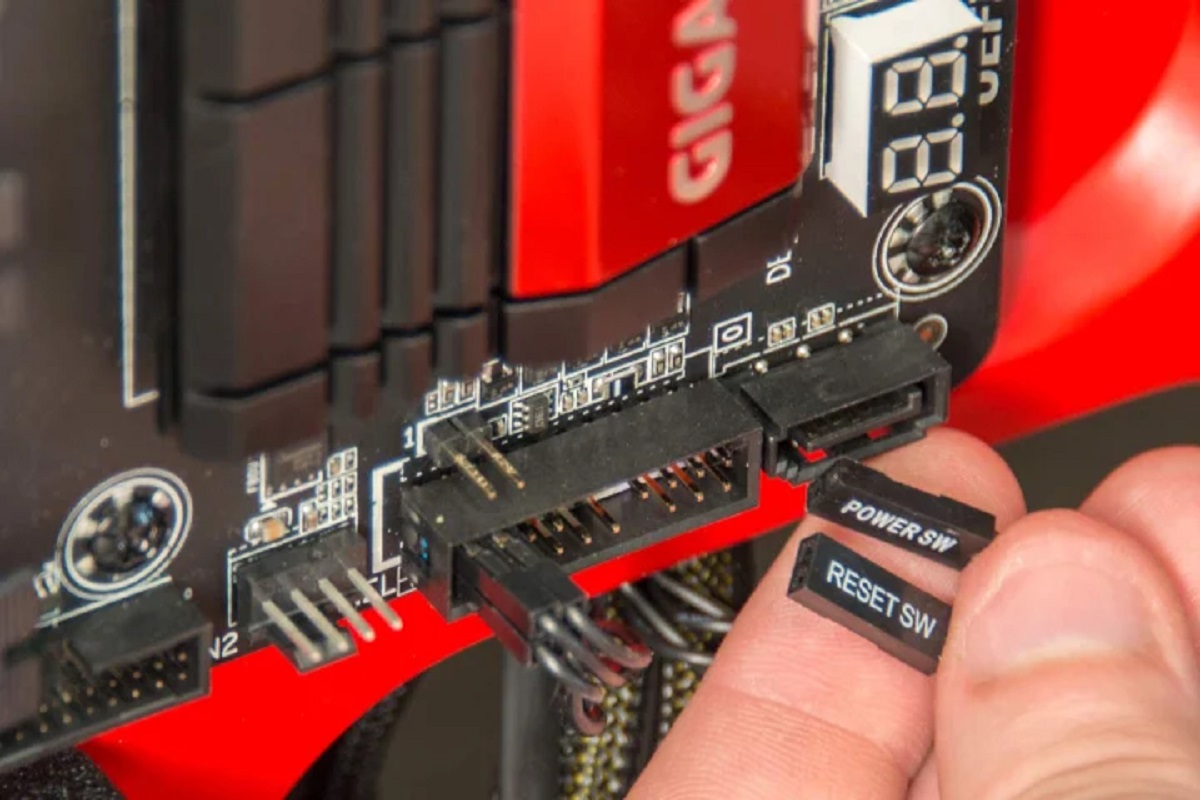
6. Power supply switch or button issues: In some cases, the power supply switch or button can become stuck or faulty, preventing it from properly turning on the PC. Test the switch by using a small screwdriver to bridge the two pins on the motherboard responsible for the power switch. If the PC powers on, then the switch may need to be replaced.
When troubleshooting power supply problems, it’s important to exercise caution as dealing with electrical components can be dangerous. If you’re unsure about handling power supply issues or if the problem persists, it’s best to consult a professional computer technician who can accurately diagnose and repair power-related problems to ensure the safety of both you and your PC.
Overheating Issues Preventing a PC from Turning On
Overheating can be a significant problem that prevents a PC from turning on. Excessive heat can lead to various issues, including system instability and component failure. When a computer detects that the temperature has reached a critical level, it may refuse to turn on to prevent further damage. Here are some common causes and solutions for overheating issues:
1. Dust accumulation: Over time, dust and debris can accumulate in your computer’s case, blocking airflow and causing components to overheat. Regularly cleaning the computer’s interior using compressed air or a vacuum cleaner can help prevent overheating related to dust buildup.
2. Inadequate cooling system: If your PC doesn’t have sufficient cooling, components such as the CPU and GPU can quickly overheat. Ensure that your computer has adequate cooling, including fans and heatsinks. Consider adding additional case fans or upgrading to more efficient cooling solutions to improve airflow.
3. Malfunctioning fans: Faulty or malfunctioning fans can lead to reduced airflow, causing components to overheat. Check that all fans, including CPU and case fans, are functioning correctly. Replace any faulty fans to maintain proper cooling.
4. Thermal paste degradation: Thermal paste is a compound that facilitates heat transfer between the CPU and its heatsink. Over time, thermal paste can dry up or degrade, leading to poor heat dissipation. Cleaning off the old thermal paste and applying a fresh layer can improve heat transfer and prevent overheating.
5. Insufficient space around the PC: When a computer is placed in a confined space or enclosed cabinet, the airflow can be restricted, leading to overheating. Ensure that your PC has enough space around it for proper ventilation. Avoid placing it near heat sources, such as radiators or direct sunlight.
6. Overclocking: Overclocking involves running computer components at higher speeds than their stock settings. While this can boost performance, it also increases heat generation. If your PC is not properly cooled or if the overclocking settings are too aggressive, it can lead to overheating issues. Consider reverting to default clock speeds or adjusting settings to more conservative levels.
7. Failed or clogged cooling system: If the cooling system fails or becomes clogged, such as a malfunctioning water pump in a liquid cooling setup or a dust-filled heatsink, the components can quickly overheat. Regularly inspect and maintain your cooling system to avoid such failures.
Preventing overheating is crucial for the proper functioning and longevity of your PC. Regular cleaning, maintaining proper airflow, and investing in adequate cooling solutions can help keep temperatures in check. If the overheating issue persists or you aren’t confident in performing these tasks, it’s recommended to seek assistance from a computer technician to avoid potential damage to your PC.
Steps to Fix a PC That Turns on but Doesn’t Display Anything
It can be frustrating when your PC turns on, but you’re greeted with a blank screen. This issue can occur due to various reasons, ranging from minor glitches to hardware problems. Here are some steps you can take to troubleshoot and potentially fix a PC that turns on but doesn’t display anything:
1. Check monitor connections: Ensure that the monitor is properly connected to your PC. Confirm that the power cable, video cable (such as HDMI, VGA, or DisplayPort), and any other necessary cables are securely plugged in. Consider trying a different cable or connecting the monitor to another computer to rule out any connectivity issues.
2. Verify monitor power: Double-check that the monitor is receiving power by ensuring the power cable is securely connected to a working power outlet and that the power indicator light on the monitor is on. If the monitor is displaying an error message or entering sleep mode, try pressing the necessary buttons to wake it up.
3. Troubleshoot the graphics card: If your PC has a dedicated graphics card, ensure that it is properly seated in its slot on the motherboard. Remove and reinsert the graphics card to establish a secure connection. If you have an integrated graphics card, consider removing and reseating the RAM modules as they can sometimes interfere with the display output.
4. Clear CMOS: Resetting the BIOS settings by clearing the CMOS (Complementary Metal-Oxide-Semiconductor) can help resolve display-related issues. Refer to your motherboard’s manual on how to clear the CMOS. This step can vary depending on your specific motherboard model.
5. Test with a different monitor: If available, try connecting your PC to a different monitor to check if the problem lies with the display itself. If the alternate monitor works fine, it indicates a potential issue with your original monitor and not your PC.
6. Update graphics drivers: Outdated or corrupted graphics drivers can cause display problems. Visit the manufacturer’s website and download the latest graphics drivers for your specific graphics card. Install the updated drivers and restart your PC to see if it resolves the issue.
7. Inspect hardware components: Check for any physical damage or loose connections on your PC’s hardware components, such as the motherboard, RAM, or graphics card. Ensure that all components are securely inserted and that there are no signs of damage or corrosion.
8. Seek professional help: If you have exhausted all troubleshooting steps and the issue still persists, it’s advisable to seek assistance from a professional technician. They will have the necessary expertise and diagnostic tools to accurately identify and resolve the problem.
Remember to approach these troubleshooting steps cautiously and be mindful of any potential risks associated with handling hardware components. If you’re uncertain about performing any of the steps or lack technical expertise, it’s best to seek professional assistance to avoid causing further damage to your PC.
How to Fix a PC That Turns on and Immediately Shuts Off
Experiencing a PC that turns on and then immediately shuts off can be frustrating and perplexing. This issue can be caused by various factors, including hardware and software problems. Here are some steps you can take to troubleshoot and potentially fix a PC that exhibits this behavior:
1. Check the power supply: Ensure that the power supply unit (PSU) is functioning correctly. Check the power connections and make sure they are secure. Test the PSU using a multimeter or try connecting a known working PSU to your computer to rule out any issues with power delivery.
2. Inspect hardware connections: Check all internal hardware connections, including the motherboard cables, RAM modules, and expansion cards. Ensure that everything is properly seated in their respective slots. Reseat any loose connections to establish a secure connection.
3. Remove unnecessary hardware: Disconnect any unnecessary hardware components, such as additional hard drives, PCI cards, or USB devices. These peripherals can sometimes cause conflicts or draw excessive power, leading to the immediate shutdown of the PC.
4. Clear CMOS: Resetting the BIOS settings by clearing the CMOS (Complementary Metal-Oxide-Semiconductor) can help resolve issues related to incorrect settings. Refer to your motherboard’s manual for instructions on how to clear the CMOS.
5. Check for overheating: Overheating can cause a PC to shut down as a safety measure. Ensure that the CPU heatsink and fans are clean and functioning properly. Remove any dust buildup in the case and ensure adequate airflow. Consider reapplying thermal paste and upgrading cooling solutions if necessary.
6. Test with minimal hardware: Disconnect all non-essential hardware components, including external peripherals, and leave only the essential components connected (such as the motherboard, CPU, RAM, and power supply). Turn on the PC to see if it stays on. If the PC remains on, gradually reconnect the disconnected components to identify the problematic hardware.
7. Update BIOS and drivers: Outdated BIOS firmware or drivers can cause compatibility issues and system instability. Check your motherboard manufacturer’s website for any available BIOS updates and install the latest version. Additionally, update other relevant drivers, such as those for the graphics card or chipset.
8. Perform a system restore: If the PC was working fine before, consider performing a system restore to a previous point when the issue was not present. This can help revert any recent software changes that may have caused the problem.
9. Seek professional assistance: If you have tried all the above steps and the issue persists, it’s recommended to consult a professional technician. They have the expertise and diagnostic tools to identify and resolve more complex hardware or software-related problems.
Keep in mind that troubleshooting a PC that abruptly shuts off can be a delicate process, and improper handling of hardware components can lead to further damage. If you are unsure about performing any of the steps or lack technical expertise, it’s best to seek professional assistance to avoid exacerbating the issue.