Introduction
Lost AirPods can be a frustrating experience, especially considering their small size and wireless nature. However, Apple has provided a handy feature called “Mark as Lost” to help users locate their missing AirPods. This feature is part of the Find My app, which allows you to track your Apple devices and even play a sound on them to aid in locating them.
When you mark your AirPods as lost, you can take advantage of various functionalities that can assist in finding them. This includes playing a sound on the AirPods to help you locate them in your surroundings, enabling a lock to prevent unauthorized use of the AirPods, and even activating Lost Mode to display a custom message on the connected iPhone’s screen.
In this article, we will delve into the details of how to use the “Mark as Lost” feature on your AirPods and explore the various options available to help you locate them. We will also discuss what happens when you mark your AirPods as lost and what you should do if your AirPods are eventually found.
So, if you’re constantly misplacing your AirPods or want to be prepared in case they go missing, read on to learn everything you need to know about using the “Mark as Lost” feature on AirPods.
How to Mark AirPods as Lost
If you find yourself unable to locate your AirPods, marking them as lost is the first step in trying to recover them. Follow these steps to mark your AirPods as lost:
- Open the Find My app on your iPhone or iPad. If you don’t have the app installed, you can download it from the App Store.
- Sign in with your Apple ID and password. This should be the same Apple ID that is linked to your AirPods.
- Tap on the “Devices” tab at the bottom of the screen and select your AirPods from the list of devices.
- On the AirPods detail screen, you will see the option to mark your AirPods as lost. Tap on it.
- You will be prompted to enter a custom message that will be displayed on the connected iPhone’s screen when someone finds your AirPods. This message can include contact information or any other relevant details.
- Once you’ve entered the message, tap on “Turn On” to activate the “Mark as Lost” feature.
By following these simple steps, you can quickly mark your AirPods as lost and initiate the process of locating them. It is worth noting that you will need to have an active internet connection on your iPhone or iPad, as this is necessary for the Find My app to communicate with your AirPods.
Now that you know how to mark your AirPods as lost, let’s explore the different options available to help you locate them.
Locating Lost AirPods
After marking your AirPods as lost, there are several methods you can use to help locate them. Here are a few ways to track down your missing AirPods:
- Play a Sound: One of the most effective ways to find your AirPods is by using the “Play Sound” feature. This plays a high-pitched sound on your AirPods, making it easier to locate them if they are within range. To do this, go to the Find My app, select your AirPods, and tap on the “Play Sound” option. Be sure to listen carefully and follow the sound to find your AirPods.
- View Location: Another useful feature is the ability to view the last known location of your AirPods. This can be helpful if you have a general idea of where you might have misplaced them. In the Find My app, select your AirPods and tap on the “Actions” button. Then, choose “View Location” to see the approximate location on a map.
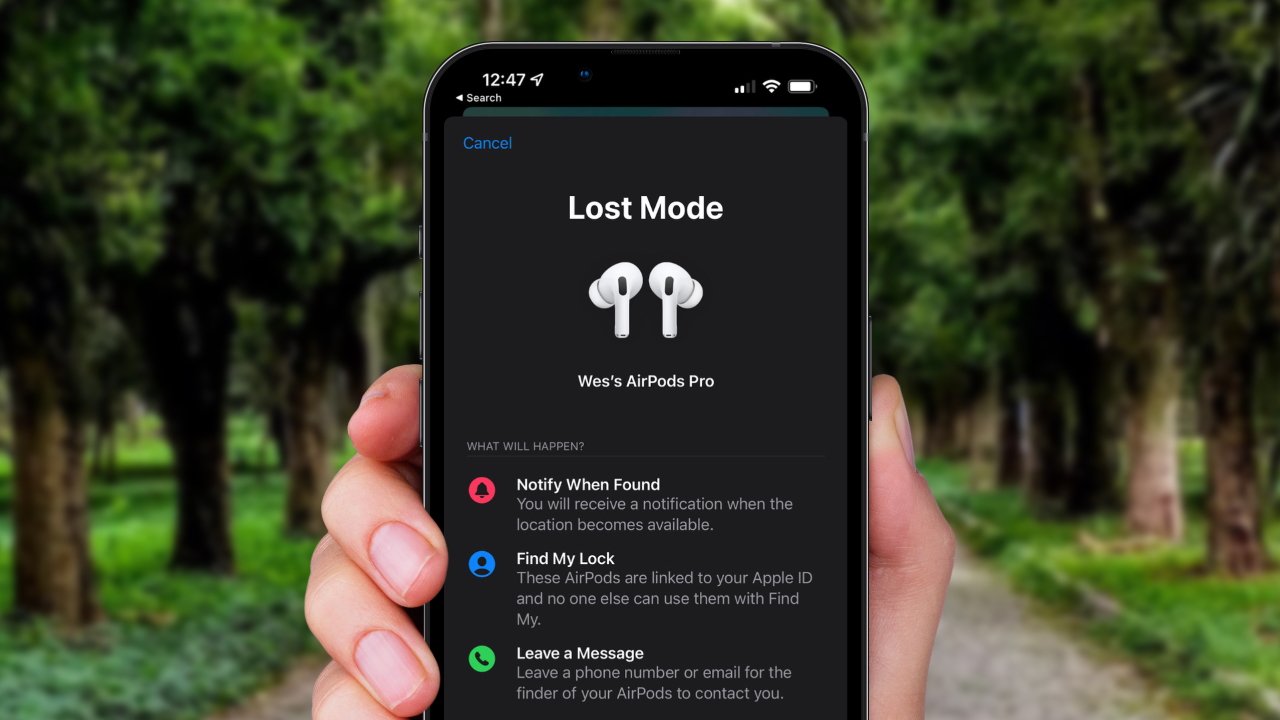
- Enable Lost Mode: If you are unable to locate your AirPods through the methods mentioned above, activating Lost Mode can provide an additional layer of security. This feature will lock your AirPods, preventing anyone else from using them. To enable Lost Mode, go to the Find My app, select your AirPods, and tap on the “Actions” button. Then, choose “Lost Mode” and follow the on-screen instructions to set a passcode and display a custom message on your connected iPhone’s screen.
Using these features, you have a higher chance of locating your lost AirPods. However, it is important to keep in mind that these methods rely on your AirPods being within range and connected to a device with an active internet connection. If your AirPods are out of range or disconnected, these tracking features may not work.
Now that you know how to locate your AirPods using the Find My app, you can increase your chances of finding them if they ever go missing.
Playing a Sound on Lost AirPods
One of the most effective features of the Find My app is the ability to play a sound on your lost AirPods. This feature can be incredibly useful in helping you locate your AirPods if they are within range. Here’s how you can play a sound on your lost AirPods:
- Open the Find My app on your iPhone or iPad.
- Select your AirPods from the list of devices.
- Tap on the “Play Sound” option.
Once you’ve initiated the sound, your AirPods will start emitting a loud chirping sound. This sound is designed to be easily audible, allowing you to follow the sound and locate your AirPods.
If you have misplaced your AirPods within your home or a nearby location, playing a sound can be incredibly helpful. It eliminates the need for trial and error searching and gives you a clear indication of where your AirPods are located. The sound will continue to play until you locate your AirPods and pause it manually.
It’s important to note that playing the sound is only effective if your AirPods are within range and connected to your iPhone or iPad. If they are out of range or disconnected, the sound may not reach your AirPods. Additionally, ensure that your iPhone or iPad’s volume is turned up so that you can hear the sound clearly.
By using the “Play Sound” feature in the Find My app, you can significantly increase your chances of finding your lost AirPods. It’s a simple yet effective tool that takes advantage of the AirPods’ built-in speaker to help you locate them.
Locking Lost AirPods
If you’ve marked your AirPods as lost and want an added level of security, you can utilize the lock feature available in the Find My app. Locking your lost AirPods prevents unauthorized use and provides peace of mind while you search for them. Here’s how you can lock your lost AirPods:
- Open the Find My app on your iPhone or iPad.
- Select your AirPods from the list of devices.
- Tap on the “Actions” button.
- Choose the “Lock” option.
- Follow the on-screen instructions to set a passcode for your AirPods.
- Once you’ve set the passcode, your AirPods will be locked, and anyone who finds them will be unable to use them without the passcode.
Locking your AirPods provides an added level of security by ensuring that even if someone finds your lost AirPods, they won’t be able to use them without the passcode. This helps protect your personal information and ensures that your AirPods can only be used by you.
If you manage to locate your AirPods, you can unlock them using the same passcode that you set. Additionally, if you no longer need to keep your AirPods locked, you can remove the passcode by following the same steps and selecting the “Unlock” option instead.
Keep in mind that locking your AirPods does not physically prevent them from being used or moved. It simply adds an extra layer of security by requiring a passcode for access. Therefore, it is still important to continue searching for your AirPods and take necessary precautions to safeguard them until they are found.
By utilizing the lock feature in the Find My app, you can have peace of mind knowing that your lost AirPods are protected against unauthorized use while you work on locating them.
Enabling Lost Mode on AirPods
If your AirPods have gone missing and you are unable to locate them using the other available methods, enabling Lost Mode is a recommended course of action. Lost Mode provides additional features to secure your AirPods and increase the chances of them being recovered. Here’s how you can enable Lost Mode on your AirPods:
- Open the Find My app on your iPhone or iPad.
- Select your AirPods from the list of devices.
- Tap on the “Actions” button.
- Choose the “Lost Mode” option.
- Follow the on-screen instructions to set a passcode and configure a custom message to be displayed on your connected iPhone’s screen.
- Once enabled, Lost Mode activates several crucial features:
- Lock AirPods: Lost Mode locks your AirPods, ensuring that only you can access them with the set passcode.
- Display Message: The custom message you set will be shown on the lock screen of your connected iPhone or iPad if someone finds your AirPods.
- Track Location: Lost Mode will periodically update the location of your AirPods, allowing you to track their movements through the Find My app.
Enabling Lost Mode on your AirPods adds an extra layer of security and increases the chances of them being returned to you if found. The displayed message can include information such as a contact number or a reward offer, potentially encouraging the finder to reach out and return your AirPods.
If, by any chance, you recover your AirPods after enabling Lost Mode, you can easily disable it by following the same steps and selecting the “Turn Off Lost Mode” option.
It’s essential to note that Lost Mode requires an active internet connection on your iPhone or iPad to communicate with your AirPods. Additionally, keeping a lookout for any location updates or communication from the Find My app can greatly aid in the recovery process.
By enabling Lost Mode on your AirPods, you increase the likelihood of their safe return and have access to essential features to assist in the recovery efforts.
Using Find My App to Track Lost AirPods
When you can’t locate your AirPods using conventional methods, the Find My app becomes a valuable tool for tracking their whereabouts. By leveraging the power of the Find My network and GPS technology, you can increase your chances of finding your lost AirPods. Here’s how to use the Find My app to track your lost AirPods:
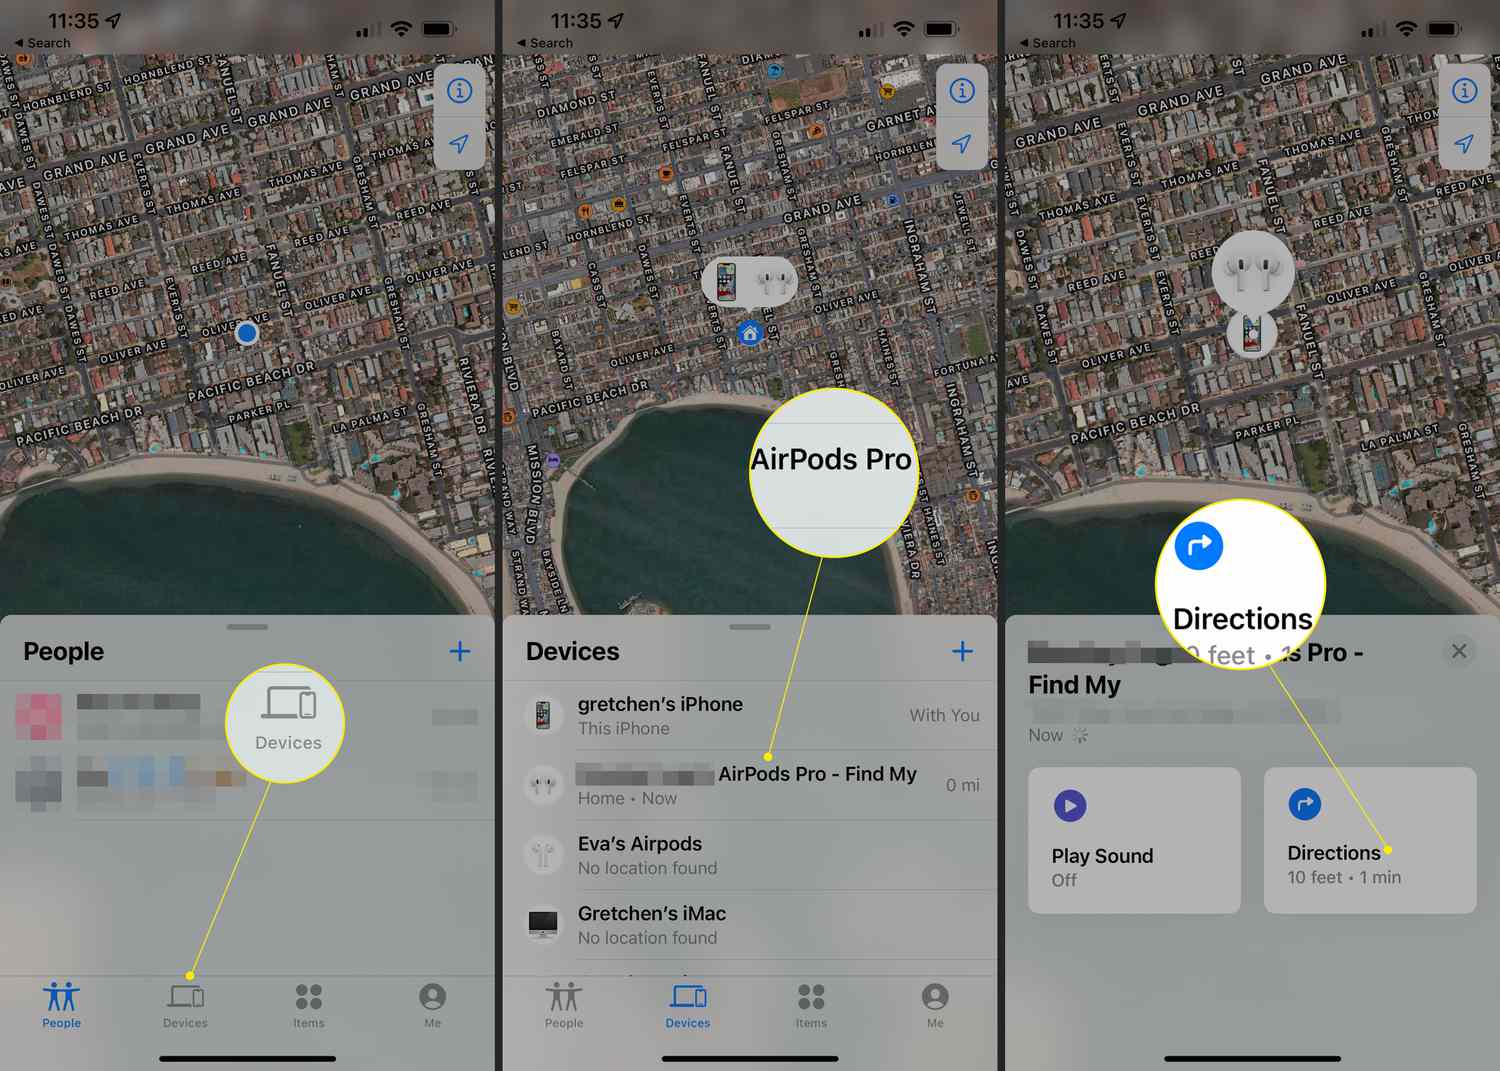
- Open the Find My app on your iPhone or iPad.
- Select the “Devices” tab at the bottom of the screen.
- Choose your AirPods from the list of devices.
- If your AirPods are within range and connected, you will see their location on the map. This will help you get a general idea of where they might be.
- If your AirPods are out of range or disconnected, the Find My app will display the last known location.
- Utilize the “Directions” feature within the Find My app to navigate to the approximate location of your AirPods.
By following these steps, you can use the Find My app to track the location of your lost AirPods. This feature can be especially helpful if you have a rough idea of where they might be, such as in a specific area within your home or workplace.
It’s important to note that the accuracy of the location data in the Find My app depends on several factors. If your AirPods are within range and connected to your iPhone or iPad, the location information will be more precise. However, if your AirPods are out of range or disconnected, the app will display the last known location, which may not be current.
Furthermore, the Find My app relies on a network of Apple devices to help locate your lost AirPods. So, if your AirPods are in an area with fewer Apple devices or outside of populated areas, the accuracy of the location data may be affected.
Nevertheless, by using the Find My app’s tracking features, you can narrow down the search area and increase the possibility of finding your lost AirPods.
What Happens When You Mark AirPods as Lost
When you mark your AirPods as lost using the “Mark as Lost” feature in the Find My app, several actions take place to help you locate your missing AirPods and safeguard your personal information. Here’s what happens when you mark AirPods as lost:
- Play Sound: The “Play Sound” feature becomes available, allowing you to play a sound on your AirPods to help locate them if they are within range.
- Display Custom Message: You have the option to set a custom message that will be displayed on the connected iPhone’s screen when someone finds your AirPods. This message can include contact information or any other relevant details.
- Lock AirPods: You can choose to lock your AirPods, preventing unauthorized use while you search for them. A passcode is required to unlock them.
- Track Location: The Find My app will periodically update the location of your AirPods if they are within range and connected to a device with an active internet connection.
By marking your AirPods as lost, you activate these features and increase your chances of recovering your AirPods. The ability to play a sound, display a custom message, lock your AirPods, and track their location provides valuable support during the search process.
It’s important to note that these features are dependent on factors such as the AirPods’ connection to a device and their proximity to an internet-enabled device within the Find My network range. If the AirPods are out of range or disconnected, some features may not be available or up-to-date.
Furthermore, marking AirPods as lost does not physically prevent them from being moved or used by someone else. It serves as a proactive measure to assist in their recovery and protect your personal information.
Now that you understand what happens when you mark AirPods as lost, you can make use of these features and take the necessary steps to increase the likelihood of finding your missing AirPods.
What to Do if Your Marked AirPods Are Found
If someone finds your marked AirPods and reads the custom message displayed on the connected iPhone’s screen, there are specific steps you can take to retrieve your AirPods and ensure their safe return. Here’s what you should do if your marked AirPods are found:
- Contact Information: Make sure your custom message includes your contact information, such as your phone number or email address. This will allow the finder to get in touch with you directly.
- Respond Promptly: If you receive a message or call from someone claiming to have found your AirPods, respond as soon as possible. Arrange a convenient and safe location to meet and retrieve your AirPods.
- Verify the AirPods: When meeting the finder, verify that the AirPods they have found are indeed yours. Check the unique identifiers, such as the serial number or engraving, to ensure they match your marked AirPods.
- Express Gratitude: Show appreciation to the person who found and returned your AirPods. A simple “thank you” can go a long way in acknowledging their honesty and efforts.
Remember that not everyone may have the intention to return your lost AirPods. It’s essential to take necessary precautions when meeting the finder and prioritize your safety. Choose public locations for exchanges, inform a friend or family member of the meeting, and be cautious while providing personal information.
If, after marking your AirPods as lost, you are unable to locate them or contact the finder, you can report the incident to local authorities. Provide them with the necessary information and any evidence, such as timestamps of communication, to assist in the investigation.
By following these guidelines and taking the appropriate steps, you can increase the chances of recovering your marked AirPods if they are found by someone honest enough to return them.
Conclusion
Losing your AirPods can be a source of frustration and inconvenience, but with the “Mark as Lost” feature in the Find My app, you have a powerful tool to aid in their recovery. By following the steps outlined in this article, you can mark your AirPods as lost, play a sound on them, lock them, and even enable Lost Mode to display a custom message on your connected iPhone’s screen.
The Find My app provides additional features such as tracking the location of your AirPods and displaying the last known location if they are out of range or disconnected. These features offer valuable assistance in your search efforts.
Remember to take necessary precautions when meeting someone who claims to have found your marked AirPods. Verify the AirPods’ unique identifiers and prioritize your safety during the exchange process.
While the “Mark as Lost” feature and the Find My app greatly increase the likelihood of finding your lost AirPods, it’s important to be proactive in preventing loss as well. Keep your AirPods secure and make use of the charging case and other accessories to keep them intact when not in use. Additionally, developing habits like designating a specific place to store your AirPods when not in use can help reduce the chances of misplacing them.
In conclusion, by utilizing the “Mark as Lost” feature and familiarizing yourself with the Find My app’s functionalities, you can increase your chances of recovering your AirPods and enjoy a more seamless and worry-free experience with these wireless earbuds.