Introduction
Welcome to the era of wireless connectivity, where Wi-Fi networks have become an essential part of our daily lives. Whether you’re at home, in a café, or at the office, having access to a Wi-Fi network is crucial for staying connected and getting work done. But what happens when you need to view the Wi-Fi password on your Android device? Perhaps you want to connect a new device to the network, or maybe you just want to share the password with a friend.
In this article, we will explore several methods that can help you view the Wi-Fi password on your Android device. From accessing the router’s admin page to using Wi-Fi password recovery apps and file managers, we’ve got you covered. We will also delve into how you can use Android Debug Bridge (ADB) to retrieve the Wi-Fi password. With these methods, you’ll be able to access the Wi-Fi password on your Android device in no time.
It’s important to note that the methods described in this article may require certain permissions or technical knowledge, so proceed with caution. Additionally, please keep in mind that accessing someone else’s Wi-Fi password without their permission is not only unethical but also illegal. Make sure you have the necessary authority or consent before using these methods.
Now, let’s dive into the various methods you can use to view the Wi-Fi password on your Android device.
Method 1: Using the Router’s Admin Page
One of the most straightforward ways to view the Wi-Fi password on your Android device is by accessing the router’s admin page. This method requires you to connect to the Wi-Fi network but doesn’t involve any third-party apps or technical knowledge.
To get started, follow these steps:
- Step 1: Connect to the Wi-Fi network
Make sure your Android device is connected to the Wi-Fi network for which you want to view the password. It’s important to have an active connection before proceeding to the next steps. - Step 2: Access the router’s admin page
Open a web browser on your Android device and enter the router’s IP address in the address bar. The IP address is usually printed on a sticker on the router or can be found in the router’s manual. Once you’ve entered the IP address, press Enter to access the admin page of your router. - Step 3: Find the Wi-Fi password
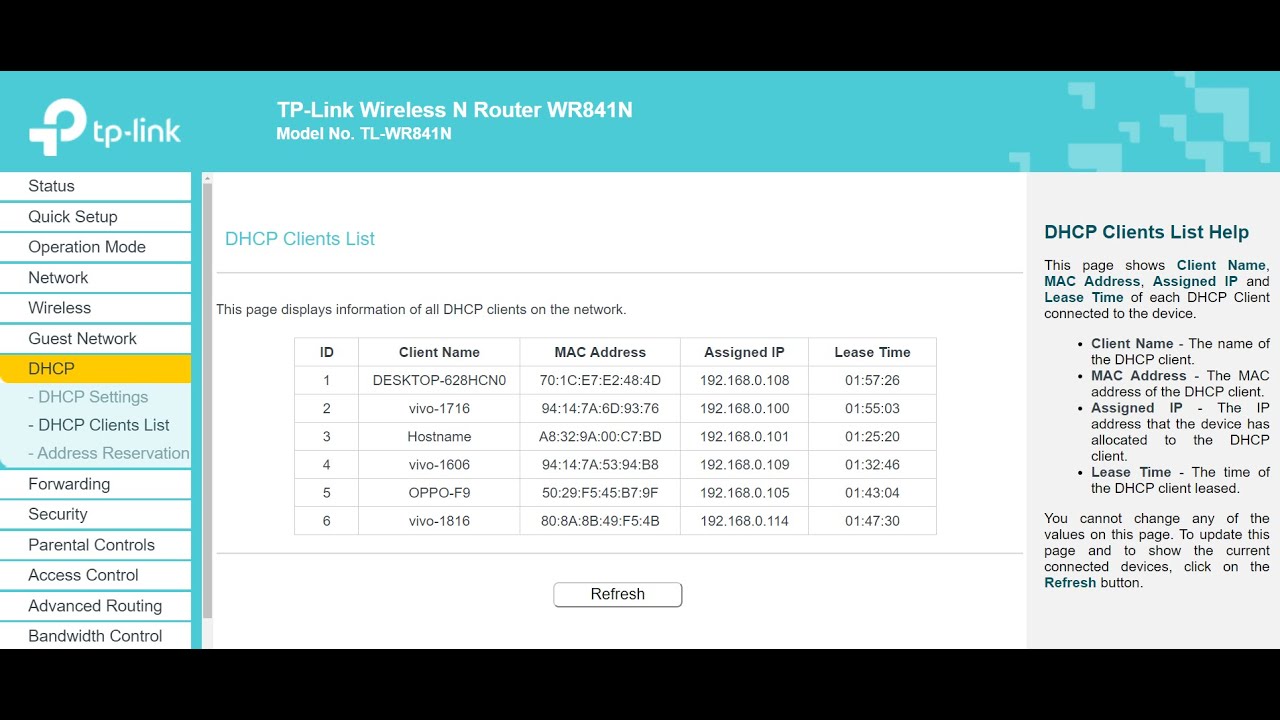
Once you’re on the router’s admin page, navigate to the Wi-Fi settings or security settings section. Look for an option labeled “Wireless,” “Wi-Fi,” or “Security.” Within this section, you should find the Wi-Fi password listed. The password may be displayed as plain text or hidden behind asterisks. If it’s hidden, there may be an option to reveal the password. Take note of the password or use the option to copy it to the clipboard for future reference.
By following these steps, you can easily access the Wi-Fi password on your Android device through the router’s admin page. Remember to keep this information secure and use it responsibly.
Step 1: Connect to the Wi-Fi network
Before you can access the router’s admin page to view the Wi-Fi password, you need to ensure that your Android device is connected to the Wi-Fi network for which you want to retrieve the password. This step is essential as it establishes a connection between your device and the network, allowing you to access the necessary settings.
To connect to the Wi-Fi network on your Android device, follow these simple steps:
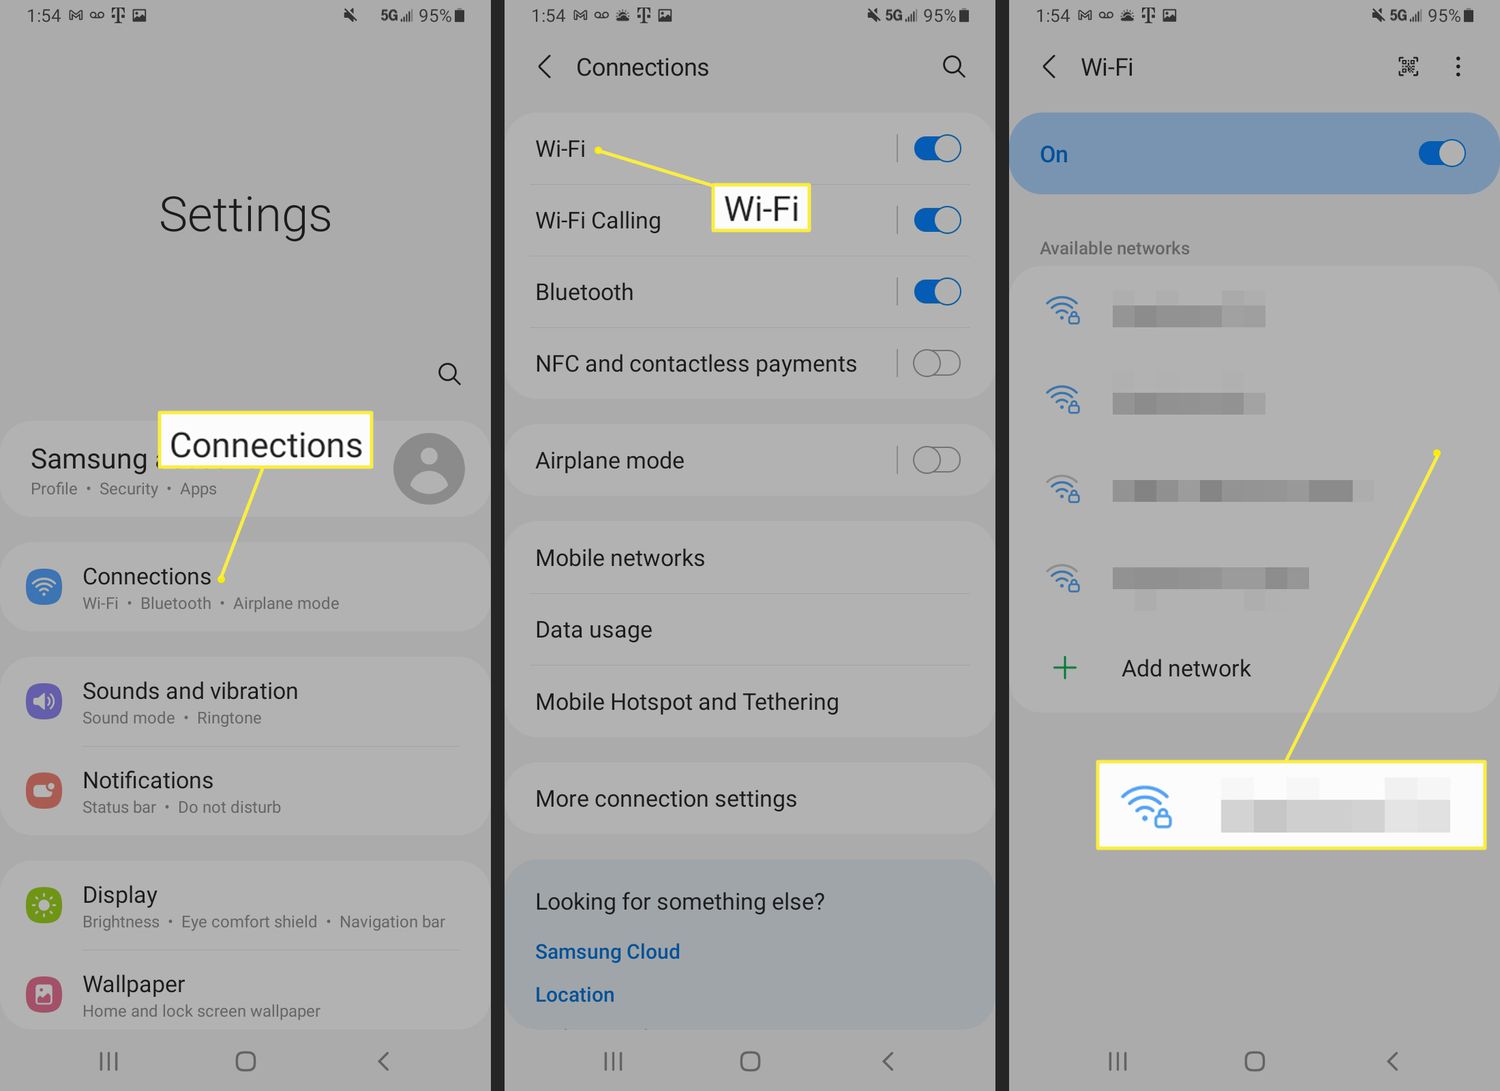
- Unlock your Android device and go to the home screen.
- Swipe down on the notification shade at the top of the screen to reveal the quick settings panel.
- Look for the Wi-Fi icon and tap on it to open the Wi-Fi settings.
- A list of available Wi-Fi networks will be displayed. Locate the network you want to connect to and tap on it.
- If the network is password-protected, you will be prompted to enter the password. Simply type in the correct password and tap “Connect.”
- Your Android device will attempt to connect to the Wi-Fi network. Once the connection is successful, you will see a notification confirming the connection.
It’s important to ensure that you have the correct Wi-Fi password for the network you want to connect to. If you don’t have the password, you may need to seek assistance from the network administrator or the owner of the router.
Once you have successfully connected to the Wi-Fi network, you can proceed to access the router’s admin page to view the Wi-Fi password using the steps described in the next section.
Step 2: Access the router’s admin page
After connecting to the Wi-Fi network on your Android device, the next step in the process of viewing the Wi-Fi password is to access the router’s admin page. The admin page is where you can customize various settings of your Wi-Fi router, including the security settings and Wi-Fi password.
Here’s how you can access the router’s admin page:
- Open a web browser on your Android device. You can use any browser that you have installed, such as Chrome, Firefox, or Safari.
- In the address bar of the browser, enter the IP address of your router. The IP address is a unique identifier assigned to your router that allows you to communicate with it. The IP address is usually provided by your Internet Service Provider (ISP) or can be found on a sticker on the router itself.
- Once you’ve entered the IP address, press Enter or tap the Go button.
After performing the above steps, the web browser will attempt to establish a connection with the router’s admin page. If successful, you will be redirected to a login page or the main interface of the router’s admin page.
Note that the login process may vary depending on the make and model of your router. In most cases, you will be prompted to enter a username and password. If you don’t know the login credentials, you can try the default username and password provided by the manufacturer. Common default usernames are “admin” or “administrator,” and common default passwords are “password” or “admin.”
Once you have entered the correct username and password, you will gain access to the router’s admin page, where you can make changes to various router settings, including the Wi-Fi password.
In the next step, we will guide you on how to find the Wi-Fi password on the router’s admin page.
Step 3: Find the Wi-Fi password
Once you have successfully accessed the router’s admin page, you are now ready to locate the Wi-Fi password. The exact location of the Wi-Fi password may vary depending on the router’s make and model, but it is typically found within the wireless or security settings section.
Follow these steps to find the Wi-Fi password on the router’s admin page:
- Look for a tab or option labeled “Wireless,” “Wi-Fi,” or “Security.” This is where you will find the settings related to your Wi-Fi network.
- Navigate to the wireless or security settings section and locate the option that refers to the Wi-Fi password. It may be labeled as “Wireless Password,” “Network Key,” or “WPA/WPA2 Password.”
- If the password is hidden, you may see a series of asterisks or dots. In that case, click on the option to reveal the password in plain text.
- Take note of the Wi-Fi password or use the option available to copy it to the clipboard. This will allow you to easily share or use the password on other devices.
It’s important to remember that the Wi-Fi password is case-sensitive, so ensure that you enter it correctly when connecting new devices to the network.
Once you have retrieved the Wi-Fi password from the router’s admin page, you can use it to connect your Android device or share it with others who need to connect to the network.
Keep in mind that changing the Wi-Fi password on the router’s admin page will disconnect all devices currently connected to the network. If you plan to change the password, make sure to inform other connected devices of the new password to avoid any interruption in their internet service.
Now that you have successfully found the Wi-Fi password on the router’s admin page, you can proceed to connect new devices or share the password as needed.
Method 2: Using the Wi-Fi Password Recovery App
If accessing the router’s admin page seems too complex or time-consuming, you can use a Wi-Fi password recovery app to retrieve the Wi-Fi password on your Android device. These apps are designed to scan your device and locate saved Wi-Fi passwords, making the process quick and hassle-free.
Follow these steps to use a Wi-Fi password recovery app:
- Step 1: Download and install the app
Navigate to the Google Play Store on your Android device and search for a Wi-Fi password recovery app. There are various apps available, so choose one that has good reviews and ratings. Once you’ve found a suitable app, tap on the “Install” button to download and install it on your device. - Step 2: Grant necessary permissions to the app
After the app is installed, open it and grant any necessary permissions it requires. These permissions may include access to your Wi-Fi settings, storage, or device information. It’s important to note that these permissions are necessary for the app to scan and retrieve the Wi-Fi passwords stored on your device. - Step 3: Retrieve the Wi-Fi password
Once you’ve granted the necessary permissions, the Wi-Fi password recovery app will scan your device for saved Wi-Fi passwords. It will display a list of all the Wi-Fi networks you’ve connected to in the past, along with their corresponding passwords. Simply locate the Wi-Fi network for which you want to view the password and take note of it.
With the help of a Wi-Fi password recovery app, you can easily retrieve the Wi-Fi password on your Android device without the need to access the router’s admin page. This method is especially useful if you don’t have access to the router’s admin page or if you have forgotten the router’s login credentials.
Make sure to keep your Wi-Fi passwords secure and avoid sharing them with unauthorized individuals.
In the next section, we will explore another method to view the Wi-Fi password on your Android device using file managers.
Step 1: Download and install the app
The first step in using a Wi-Fi password recovery app is to download and install the app on your Android device. These apps are available on the Google Play Store and can be easily accessed and installed.
Follow these steps to download and install a Wi-Fi password recovery app:
- Unlock your Android device and go to the home screen.
- Tap on the Google Play Store app to open it.
- In the search bar at the top of the screen, type in “Wi-Fi password recovery.”
- A list of apps related to Wi-Fi password recovery will appear on the screen. Take a moment to read the reviews and ratings of each app to determine which one suits your needs.
- Select the desired app by tapping on its icon or name.
- On the app’s page, you will see a blue “Install” button. Tap on it to begin the installation process.
- Wait for the app to download and install on your device. The download progress will be displayed in the notification bar.
- Once the installation is complete, you will see an “Open” button. Tap on it to open the Wi-Fi password recovery app.
Now that you have successfully downloaded and installed the Wi-Fi password recovery app on your Android device, you are one step closer to retrieving your Wi-Fi passwords. Proceed to the next step to grant the necessary permissions to the app.
Step 2: Grant necessary permissions to the app
After downloading and installing the Wi-Fi password recovery app on your Android device, the next step is to grant the necessary permissions to the app. These permissions allow the app to access certain features and information on your device, allowing it to scan for and retrieve saved Wi-Fi passwords.
Follow these steps to grant the necessary permissions to the Wi-Fi password recovery app:
- Open the Wi-Fi password recovery app by tapping on its icon on your device’s home screen or in the app drawer.
- Upon launching the app, you may be presented with a pop-up window or a prompt requesting specific permissions.
- Read through the permissions carefully to understand what access the app requires. Common permissions include accessing Wi-Fi connections, storage, or device information.
- Tap on the “Allow” or “Grant” button to give the app the necessary permissions it needs to function properly.
- Depending on the app, you may be prompted to provide additional permissions or to follow specific instructions during the setup process. Follow the on-screen instructions and provide the necessary permissions as instructed.
- Once you have granted the required permissions, the Wi-Fi password recovery app will be able to scan your device for saved Wi-Fi passwords and display them to you.
It’s important to note that granting permissions to an app allows it to access certain areas of your device and potentially view sensitive information. Ensure that you are downloading apps from trusted sources and only grant permissions to apps that you trust.
Now that you’ve granted the necessary permissions to the Wi-Fi password recovery app, you can proceed to the next step to retrieve the Wi-Fi password from your Android device.
Step 3: Retrieve the Wi-Fi password
With the Wi-Fi password recovery app downloaded, installed, and necessary permissions granted, you can now proceed to retrieve the Wi-Fi password from your Android device. These apps are designed to scan your device and display a list of saved Wi-Fi networks along with their corresponding passwords.
Follow these steps to retrieve the Wi-Fi password using the Wi-Fi password recovery app:
- Open the Wi-Fi password recovery app on your Android device. You can find the app icon on your device’s home screen or in the app drawer.
- Once the app is open, it will automatically start scanning your device for saved Wi-Fi passwords.
- The app will present you with a list of Wi-Fi networks that you have previously connected to, along with their respective passwords.
- Locate the Wi-Fi network for which you want to retrieve the password.
- Take note of the Wi-Fi password displayed by the app.
It’s important to note that the Wi-Fi password recovery app will only display the passwords for the Wi-Fi networks that are saved on your Android device. If you haven’t connected to a specific network before, the app won’t be able to retrieve its password.
By following these steps, you can easily retrieve the Wi-Fi passwords stored on your Android device using a Wi-Fi password recovery app. It’s a convenient solution, especially when you need to connect new devices to your Wi-Fi network or share the password with friends or family members.
Remember to use these apps responsibly and avoid using them for unauthorized purposes.
In the next section, we will explore another method to view the Wi-Fi password on your Android device using file managers.
Method 3: Using File Managers
If you prefer a more manual approach to view the Wi-Fi password on your Android device, you can use file managers. File managers allow you to navigate through your device’s internal storage and locate specific files. By accessing the right file, you can retrieve the saved Wi-Fi passwords on your Android device.
Here’s how you can use file managers to view the Wi-Fi password:
- Step 1: Download and install a file manager app
Go to the Google Play Store on your Android device and search for a reputable file manager app. Install the app of your choice by following the on-screen instructions. - Step 2: Grant necessary permissions to the app
Launch the file manager app and grant it the necessary permissions to access your device’s storage. These permissions are required for the app to view and navigate through your files. - Step 3: Locate and open the Wi-Fi password file
Using the file manager, navigate to the system files or root directory of your Android device. The exact path may vary based on the file manager app and device model you are using. - Look for a file named “wpa_supplicant.conf” or “wpa_supplicant.conf.bak.” This file contains the saved Wi-Fi passwords on your device.
- Tap on the file to open it using a text editor or file viewer.
- In the file, locate the name of your Wi-Fi network. The password should be listed next to it in plain text.
By following these steps, you can manually view the Wi-Fi password saved on your Android device using a file manager. However, it’s important to note that editing or modifying system files can have unintended consequences and may cause issues with your device’s functionality. Make sure to proceed with caution and avoid altering any files or settings if you’re unsure.
Now that you’ve explored the method of using file managers, you can now proceed to view the Wi-Fi password on your Android device.
Step 1: Download and install a file manager app
To begin the process of using file managers to view the Wi-Fi password on your Android device, you will need to download and install a file manager app from the Google Play Store. File manager apps provide you with the ability to navigate through your device’s internal storage and access specific files.
Follow these steps to download and install a file manager app on your Android device:
- Unlock your Android device and go to the home screen.
- Open the Google Play Store app by tapping on its icon.
- In the search bar at the top of the screen, type in “file manager.”
- A list of file manager apps will appear on the screen. Take a moment to read through the descriptions, reviews, and ratings to identify the app that suits your needs.
- Select the desired file manager app by tapping on its icon or name.
- On the app’s page, you will see a blue “Install” button. Tap on it to begin the download and installation process.
- Wait for the app to download and install on your device. The progress will be displayed in the notification bar.
- Once the installation is complete, you will see an “Open” button. Tap on it to open the file manager app.
Now that you have successfully downloaded and installed the file manager app, you can proceed to the next step to grant the necessary permissions to the app.
Step 2: Grant necessary permissions to the app
After installing the file manager app on your Android device, the next step is to grant the necessary permissions to the app. These permissions are required to allow the file manager app to access and navigate through your device’s storage, including system files and directories.
Here’s how you can grant the necessary permissions to the file manager app:
- Open the file manager app on your Android device. You can find the app icon on your device’s home screen or in the app drawer.
- Upon launching the app, you may be prompted with a pop-up window or a prompt requesting specific permissions.
- Read through the permissions carefully to understand what access the app requires. Common permissions include accessing storage, managing files, or granting root access if applicable.
- Tap on the “Allow” or “Grant” button to give the file manager app the necessary permissions it needs to function properly.
- Depending on the file manager app you are using, you may be prompted to provide additional permissions or to follow specific instructions during the setup process. Follow the on-screen instructions and provide the necessary permissions as instructed.
- Once you have granted the required permissions, the file manager app will have the necessary access to navigate through your device’s internal storage and explore system files.
It’s important to pay attention to the permissions being requested and only grant permissions to the file manager app from trusted developers. This ensures the security and privacy of your device and data.
Now that you’ve granted the necessary permissions to the file manager app, you can proceed to the next step and locate the Wi-Fi password file on your Android device.
Step 3: Locate and open the Wi-Fi password file
After granting the necessary permissions to the file manager app on your Android device, you can proceed to locate and open the Wi-Fi password file. This file contains the saved Wi-Fi passwords for the networks you have connected to in the past.
Follow these steps to locate and open the Wi-Fi password file using the file manager app:
- Open the file manager app on your Android device. You can find the app icon on your device’s home screen or in the app drawer.
- Once the app is open, it will present you with a user interface displaying your device’s internal storage and directory structure.
- Navigate through the folders and directories to reach the system files or root directory of your Android device. The exact path may vary depending on the file manager app and device model you are using.
- Look for a file named “wpa_supplicant.conf” or “wpa_supplicant.conf.bak.” This file typically resides in the “etc” folder or a similar location within the system files.
- Tap on the file to open it using a built-in text editor or an external application.
- In the file, you will find a list of saved Wi-Fi networks along with their corresponding passwords. Look for the Wi-Fi network for which you want to view the password.
- The password for the Wi-Fi network will be displayed in plain text or encoded format, depending on the file format and your device’s settings.
Make sure to only view the Wi-Fi password and avoid making any unintended changes to the file or its contents. Modifying system files can result in unexpected behavior or even cause harm to your device.
By following these steps, you can locate and open the Wi-Fi password file on your Android device using the file manager app. This method provides a more manual approach to accessing your saved Wi-Fi passwords, giving you greater control over the process.
Now that you have successfully located the Wi-Fi password file, you can proceed to view the Wi-Fi password for the network you are interested in.
Method 4: Using ADB (Android Debug Bridge)
If you’re comfortable with using more technical methods, you can view the Wi-Fi password on your Android device using ADB (Android Debug Bridge). ADB is a command-line tool that allows you to communicate with and control your Android device from a computer.
Here’s how you can view the Wi-Fi password on your Android device using ADB:
- Step 1: Enable USB debugging on your Android device
Go to your device’s “Settings” and locate the “About phone” or “About device” section. Look for the “Build number” and tap on it seven times to enable developer options. Once developer options are enabled, go back to the main “Settings” menu and scroll down to find the “Developer options” or “Developer settings.” Open it, and toggle on the “USB debugging” option. - Step 2: Connect your device to the computer
Using a USB cable, connect your Android device to your computer. Ensure that USB debugging is still enabled on your device. - Step 3: Run ADB commands to access the Wi-Fi password
Open Command Prompt (Windows) or Terminal (macOS/Linux) on your computer and navigate to the directory where ADB is installed. Enter the following command:adb shell "su -c 'cat /data/misc/wifi/wpa_supplicant.conf'" - A list of saved Wi-Fi networks along with their passwords will be displayed in the command prompt or terminal window. Look for the network you’re interested in to find its corresponding password.
By following these steps, you can use ADB to access the Wi-Fi password on your Android device. This method requires some technical knowledge and the use of various command-line commands. Therefore, it’s important to exercise caution when using ADB and ensure that you follow the instructions carefully.
Make sure to keep your Wi-Fi passwords secure and avoid sharing them with unauthorized individuals.
Now that you have explored the method of using ADB, you can proceed to view the Wi-Fi password on your Android device.
Step 1: Enable USB debugging on your Android device
In order to view the Wi-Fi password on your Android device using ADB (Android Debug Bridge), you will first need to enable USB debugging. USB debugging allows your device to establish a connection with a computer, making it possible to use ADB commands to retrieve information from your device.
Follow these steps to enable USB debugging on your Android device:
- Unlock your Android device and go to the home screen.
- Open the “Settings” app.
- Scroll down and locate the “About phone” or “About device” option. Tap on it.
- In the “About phone” or “About device” menu, look for the “Build number” or “Build version” option. Tap on it seven times in rapid succession.
- You will see a message indicating that you are now a developer. This action enables the developer options on your device.
- Go back to the main “Settings” menu and scroll down to find the “Developer options” or “Developer settings” option. Tap on it.
- In the “Developer options” menu, locate the “USB debugging” option and toggle it on. You may be prompted with a warning message; simply select “OK” or “Allow” to proceed.
- Once USB debugging is enabled, connect your Android device to your computer using a USB cable.
Note that the exact steps to enable USB debugging may vary slightly depending on your device’s manufacturer and Android version. If you are having trouble finding the USB debugging option, refer to your device’s user manual or search online for specific instructions relevant to your device.
Now that you have successfully enabled USB debugging on your Android device, you can proceed to the next step and connect your device to the computer to continue the process of viewing the Wi-Fi password using ADB commands.
Step 2: Connect your device to the computer
Once you have successfully enabled USB debugging on your Android device, the next step in viewing the Wi-Fi password using ADB is to connect your device to the computer. The connection allows your computer to communicate with your device and run ADB commands to retrieve information.
Follow these steps to connect your Android device to the computer:
- Using a USB cable, connect one end to your Android device and the other end to an available USB port on your computer.
- Ensure that the USB debugging option, which you enabled in the previous step, is still enabled on your device.
- Once the device is connected, you may see a pop-up notification on your Android device asking for permission to allow USB debugging. Select “OK” or “Allow” to grant the permission and establish the connection.
- On your computer, wait for a moment while the drivers for your device are installed. This process may take a few seconds or a couple of minutes, depending on your computer’s configuration.
- If prompted, choose the option to use your Android device for file transfer (MTP) mode or to simply charge your device (PTP mode).
Once the connection is established between your Android device and the computer, you are ready to proceed with running ADB commands to view the Wi-Fi password.
It’s important to use a reliable USB cable and ensure that the connection is stable throughout the process. A disrupted connection may result in errors or incomplete information retrieval.
Now that your Android device is connected to the computer, you can move on to the next step and run ADB commands to access the Wi-Fi password.
Step 3: Run ADB commands to access the Wi-Fi password
After successfully establishing a connection between your Android device and the computer, the next step in viewing the Wi-Fi password using ADB is to run specific ADB commands. These commands allow you to access the necessary files on your device and retrieve the saved Wi-Fi password.
Follow these steps to run ADB commands and access the Wi-Fi password:
- Open Command Prompt (Windows) or Terminal (macOS/Linux) on your computer. You can search for “Command Prompt” or “Terminal” in the Start menu (Windows) or Applications folder (macOS/Linux) to find and open the respective program.
- Navigate to the directory where the ADB executable is located in the Command Prompt or Terminal. This may vary depending on your computer’s configuration and where you installed ADB.
- Connect your Android device to the computer if you haven’t already done so.
- In the Command Prompt or Terminal, enter the following command:
adb devices. This command will display a list of connected devices. If your device is correctly detected, its unique device ID will be shown. - Once your device is recognized, enter the following command to access the ADB shell:
adb shell. - Next, run the following command to access the file containing the saved Wi-Fi passwords:
su -c 'cat /data/misc/wifi/wpa_supplicant.conf'. - The command will retrieve and display the content of the “wpa_supplicant.conf” file, which includes the saved Wi-Fi network details along with their respective passwords.
- Look for the Wi-Fi network you are interested in, and note the password listed next to it.
By following these steps and running the provided ADB commands, you can access the Wi-Fi password on your Android device. However, it’s important to exercise caution when using ADB and ensure that you are following the instructions correctly to avoid causing any issues to your device.
Now that you have successfully run the ADB commands and accessed the Wi-Fi password, you can use it to connect other devices or share it with others as needed.
Conclusion
Accessing and retrieving the Wi-Fi password on your Android device is crucial for various situations, whether you need to connect a new device to your network or share the password with others. In this article, we explored four different methods to view the Wi-Fi password on your Android device: using the router’s admin page, Wi-Fi password recovery apps, file managers, and ADB commands.
Using the router’s admin page allows you to access the Wi-Fi password by logging into the router’s settings. This method is straightforward and doesn’t require any additional apps, making it a convenient option for many users.
Wi-Fi password recovery apps provide a simple and quick solution to retrieve the saved Wi-Fi passwords on your device. By scanning your device for saved networks, these apps display the passwords for easy access.
File managers offer a more manual approach, allowing you to navigate through your device’s files to find the Wi-Fi password. By opening the appropriate file, you can view the saved passwords stored on your device.
Advanced users may opt for using ADB commands to access the Wi-Fi password. Although this method requires technical knowledge, it provides a deeper level of control and access to the device’s files.
Regardless of the method you choose, it is essential to respect privacy and security. Make sure you have the necessary authority to access the Wi-Fi password, and be mindful not to share it with unauthorized individuals.
We hope this article has provided you with the guidance and information you need to view the Wi-Fi password on your Android device. Remember to exercise caution, follow the instructions carefully, and enjoy a seamless Wi-Fi experience!