Introduction
Welcome to our guide on how to use unallocated space on an SSD! Solid State Drives (SSDs) have become increasingly popular due to their faster performance and higher reliability compared to traditional hard drives. However, if you have recently purchased an SSD or have been using one for a while, you might have noticed the presence of unallocated space on your drive.
Unallocated space refers to the portion of your SSD that has not been assigned to any partition or file system. This space is essentially unused and can be viewed as a blank canvas, ready to be used to expand existing partitions, create new ones, or merge with other partitions to optimize storage capacity. It is a valuable resource that can significantly enhance the efficiency and functionality of your SSD.
In this guide, we will explore the benefits of utilizing unallocated space on your SSD and walk you through the various methods you can employ to make the most out of it. Whether you are a tech-savvy enthusiast or a novice user, we will provide clear step-by-step instructions to help you effectively manage and allocate your unallocated space.
Before we delve into the methods of using unallocated space on an SSD, it is essential to understand why it is worth utilizing this available resource. Let’s take a closer look at the advantages of harnessing the potential of unallocated space on your SSD.
What is Unallocated Space on an SSD?
Unallocated space on an SSD refers to the portion of the drive that has not been assigned to any specific partition or file system. When you format a new SSD or delete partitions from an existing one, it can leave behind unallocated space. This space essentially acts as a blank canvas, ready to be used for various purposes such as extending existing partitions, creating new ones, or merging with other partitions.
Unallocated space exists on an SSD due to the dynamic nature of storage allocation. As you install and uninstall programs, create and delete files, the available space on your drive can change. This can result in unallocated space that may not be automatically utilized by the operating system. Hence, it is up to you to manage and allocate this space effectively to optimize your storage capacity.
Unallocated space can be found by examining the partition layout of your SSD. You can use disk management utilities or third-party software to check the status of your partitions and identify any unallocated space. Depending on the size of your SSD and how you have used it, you may have varying amounts of unallocated space at any given time.
It is important to note that unallocated space is different from free space. Free space refers to the available storage within a partition, while unallocated space is untouched and unallocated by any partition or file system. Therefore, you cannot simply store files directly in unallocated space; you need to allocate it first by creating a new partition or extending an existing one.
Understanding the concept of unallocated space is crucial for effectively managing your SSD’s storage capacity. In the next section, we will explore the reasons why you should use unallocated space on your SSD and the benefits it can bring.
Why Should You Use Unallocated Space on an SSD?
Utilizing unallocated space on your SSD can bring several benefits and help you optimize your storage capacity. Here are a few reasons why you should consider using the unallocated space on your SSD:
- Increased Storage Capacity: By utilizing unallocated space, you can effectively expand the storage capacity of your SSD. This is particularly useful if you are running out of space on existing partitions and want to avoid the hassle of transferring or deleting files. Instead of investing in a new SSD, you can repurpose the unallocated space to meet your storage needs.
- Improved Performance: Allocating unallocated space to existing partitions can enhance the performance of your SSD. When a partition is nearing its maximum capacity, it may start to slow down as it struggles to find contiguous space for new data. By extending the partition into the adjacent unallocated space, you create a larger and more contiguous storage area, allowing for smoother and faster operations.
- Flexibility in Partitioning: Using unallocated space allows you to have greater flexibility in partitioning your SSD. You can create new partitions for specific purposes, such as allocating separate storage for different operating systems, creating a dedicated partition for media files, or partitioning your drive for backup purposes. This flexibility enables you to organize and manage your data more effectively.
- Data Separation and Organization: Allocating unallocated space helps in separating and organizing your data. By creating dedicated partitions for different types of files or applications, you can easily locate and access specific data without the need for extensive searching. This can be particularly useful for professionals or individuals who work with large amounts of data and require a well-organized storage system.
- Future-proofing: Allocating unallocated space allows you to future-proof your SSD. As your storage needs evolve and expand in the future, having available unallocated space gives you the flexibility to adapt to those changes without having to repartition the entire drive. It saves you time, effort, and potential data loss.
These are just a few of the compelling reasons why you should consider using the unallocated space on your SSD. Next, we will discuss how to check for unallocated space on your SSD to determine how much you have available for allocation.
Check Unallocated Space on Your SSD
Before you can start utilizing the unallocated space on your SSD, it is important to check how much unallocated space is available. Here’s how you can do it:
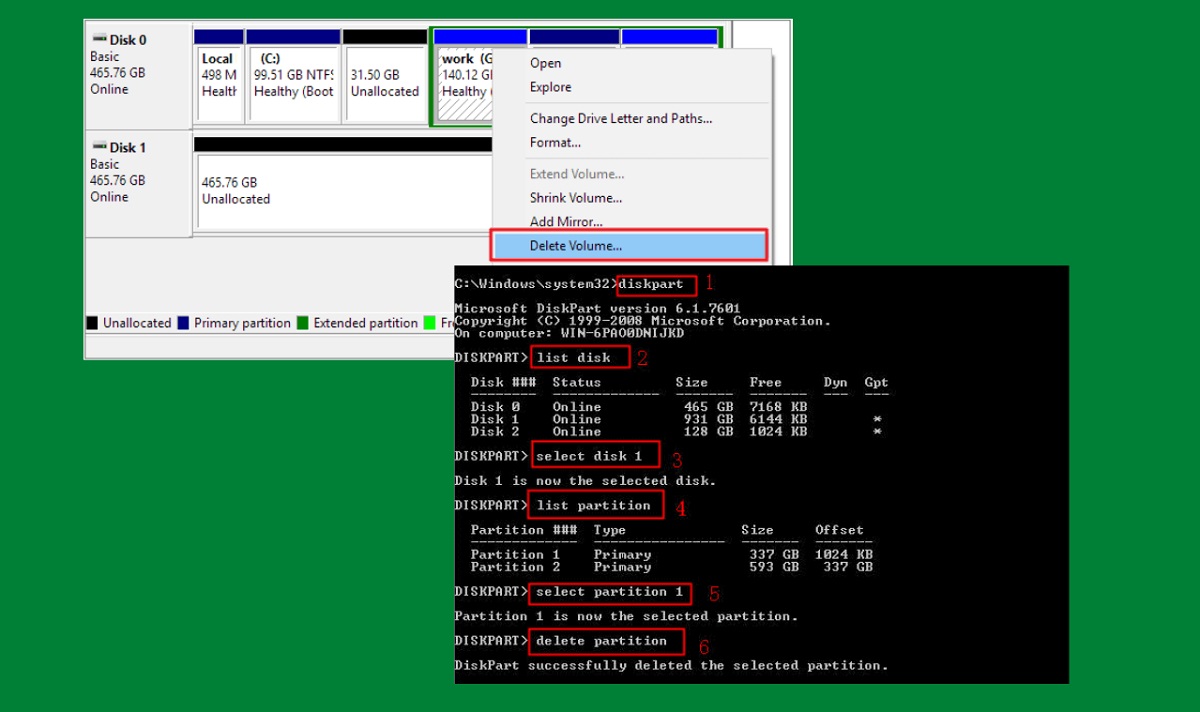
- Using Windows Disk Management: If you are using a Windows operating system, you can check for unallocated space using the built-in Disk Management tool. To access Disk Management, right-click on the Start button and choose “Disk Management” from the menu. In the Disk Management window, you will see a graphical representation of your SSD and its partitions. Unallocated space will appear as a black bar without any partition assigned to it.
- Using Third-Party Software: There are various third-party software options available that provide more advanced features and a user-friendly interface for managing disk partitions. Some popular choices include MiniTool Partition Wizard, EaseUS Partition Master, and AOMEI Partition Assistant. These tools offer detailed information about your SSD’s partitions and unallocated space, allowing you to easily identify and manage it.
Once you have identified the unallocated space on your SSD, you can proceed to allocate it based on your storage needs. In the next section, we will explore the different methods you can use to allocate the unallocated space, including extending existing partitions, creating new partitions, and merging with other partitions.
Preparing Unallocated Space for Use
Before you can start using the unallocated space on your SSD, it is essential to prepare it for use. There are a few steps you should take to ensure that the unallocated space is ready to be allocated to partitions. Here’s what you need to do:
- Backup Your Data: It is always a good practice to back up your important data before making any changes to your SSD’s partitions. While the methods we will discuss are generally safe, there is always a slight risk of data loss or corruption during the partitioning process. Having a backup ensures that your data is protected in case anything goes wrong.
- Defragment Existing Partitions: If you are planning to extend existing partitions into the unallocated space, it is recommended to defragment those partitions first. This helps in optimizing the data layout and ensures that the partition can be extended smoothly, without any fragmentation issues or data loss.
- Plan Your Partitioning Strategy: Before allocating the unallocated space, it is beneficial to plan your partitioning strategy. Consider your storage needs, the size of the unallocated space, and how you want to organize your data. Think about whether you want to extend existing partitions, create new ones, or merge unallocated space with other partitions. Having a clear plan in mind will make the partitioning process smoother and help you make optimal use of the space.
- Create a Partitioning Backup: Once you have everything planned out and ready, it is advisable to create a backup of your SSD’s partition layout. This can serve as an additional safety net in case something goes wrong during the partitioning process. You can use disk imaging software, such as Acronis True Image or Macrium Reflect, to create a full backup of your partitions.
By following these steps and preparing your unallocated space, you can ensure a smooth and safe partitioning process. In the next sections, we will explore different methods to allocate the unallocated space, including extending existing partitions, creating new partitions, and merging unallocated space with other partitions.
Method 1: Extending Existing Partition
One common method of utilizing the unallocated space on your SSD is by extending an existing partition. This method allows you to merge the unallocated space with an adjacent partition, effectively increasing its size and storage capacity. Here’s how you can extend an existing partition:
- Open Disk Management: In Windows, right-click on the Start button and choose “Disk Management” from the menu. Alternatively, you can use third-party partition management software if you prefer.
- Locate the Existing Partition: In the Disk Management window, you will see a graphical representation of your SSD and its partitions. Identify the partition that you want to extend.
- Right-click on the Partition: Right-click on the existing partition that you want to extend and select the “Extend Volume” option from the context menu.
- Follow the Wizard: The Extend Volume Wizard will open. Click “Next” to proceed.
- Select the Unallocated Space: In the wizard, you will be prompted to select the unallocated space that you want to add to the existing partition. Make sure you choose the correct unallocated space. Click “Next” to continue.
- Complete the Process: Follow the remaining steps in the wizard to complete the process of extending the partition. Once the process is finished, the selected partition will be extended, and the unallocated space will be merged with it.
- Confirm the Changes: After the process is complete, double-check in Disk Management to ensure that the partition has been extended and that the unallocated space has been successfully allocated.
It is important to note that not all partitions can be extended, as certain limitations may apply depending on the file system or the location of other partitions on your SSD. Additionally, some third-party partition management software might offer more advanced features and flexibility in extending partitions. Take your time to familiarize yourself with the options available and choose the method that best suits your needs.
In the next section, we will discuss another method of using unallocated space: creating a new partition.
Method 2: Creating a New Partition
If you have unallocated space on your SSD and want to allocate it as a separate partition, you can use the method of creating a new partition. This allows you to allocate the unallocated space for a specific purpose or to organize your data more efficiently. Follow these steps to create a new partition:
- Open Disk Management: In Windows, right-click on the Start button and choose “Disk Management” from the menu. Alternatively, you can use third-party partition management software.
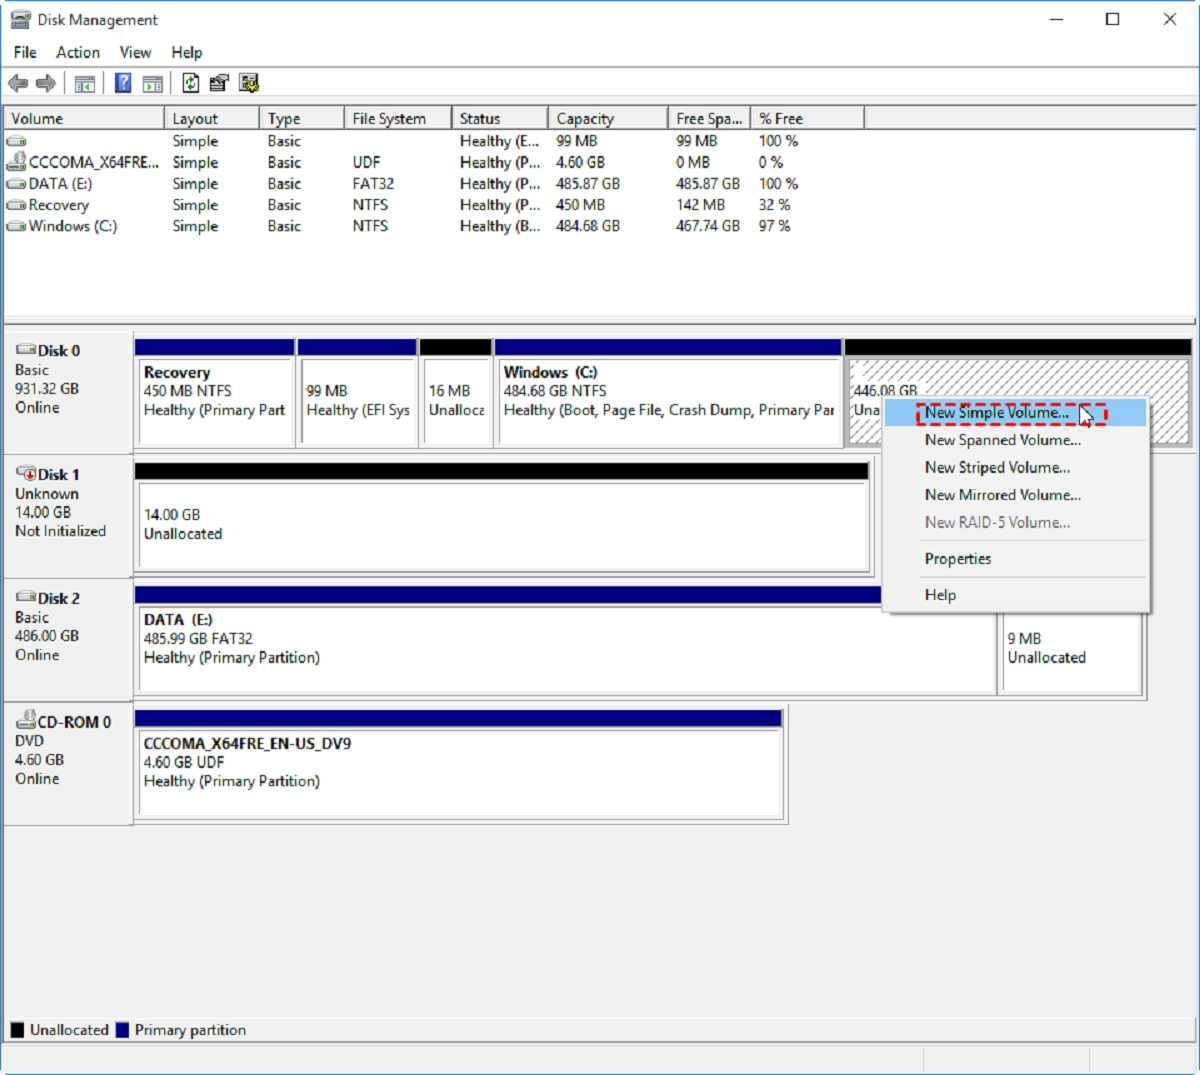
- Identify the Unallocated Space: In the Disk Management window, locate the unallocated space on your SSD. It will appear as a black bar without any partition assigned to it.
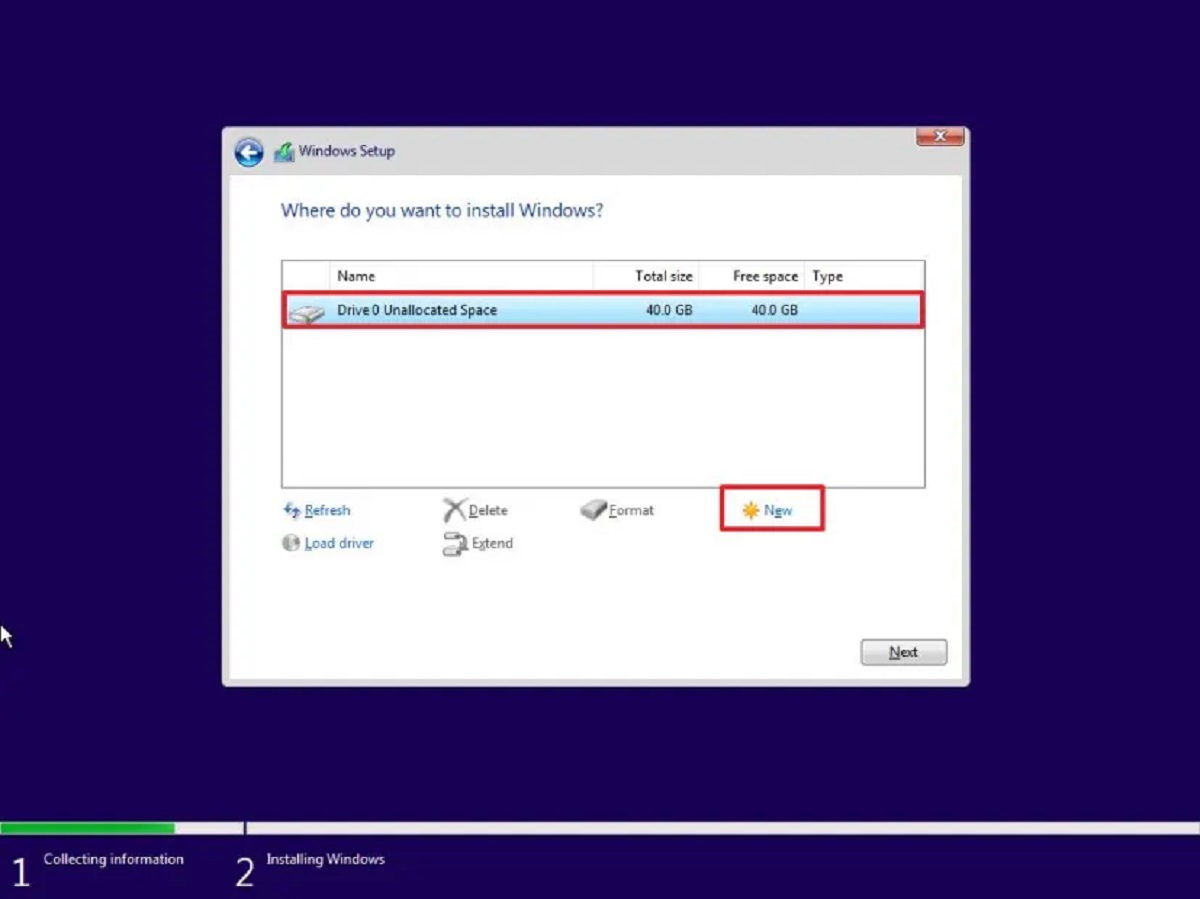
- Right-click on the Unallocated Space: Right-click on the unallocated space and select the “New Simple Volume” option from the context menu. This will open the New Simple Volume Wizard.
- Follow the Wizard: The New Simple Volume Wizard will guide you through the process of creating a new partition. Click “Next” to proceed.
- Specify the Partition Size: In the wizard, you will be prompted to specify the size of the new partition. You can allocate the entire unallocated space or specify a smaller size according to your needs. Click “Next” to continue.
- Assign a Drive Letter or Path: Choose a drive letter or path that will be assigned to the new partition. Alternatively, you can select the option to mount the partition into an empty NTFS folder. Click “Next” to proceed.
- Format the Partition: In this step, you can choose the file system and specify the allocation unit size for the new partition. For most cases, the default options are suitable. Click “Next” to continue.
- Complete the Process: Follow the remaining steps in the wizard to complete the process of creating the new partition. Once finished, the unallocated space will be allocated as a new partition with the specified settings.
- Confirm the Changes: After the process is complete, check in Disk Management to ensure that the new partition has been created and that the unallocated space has been successfully utilized.
Creating a new partition allows you to allocate the unallocated space for a specific purpose, such as separating different types of data or organizing your files more efficiently. In our next section, we will discuss merging unallocated space with other partitions.
Method 3: Merging Unallocated Space
If you have unallocated space on your SSD that is not adjacent to any existing partition, you can still make use of it by merging it with another partition. This method allows you to combine the unallocated space with a neighboring partition, effectively increasing its size and storage capacity. Follow these steps to merge unallocated space:
- Open Disk Management: In Windows, right-click on the Start button and choose “Disk Management” from the menu. Alternatively, you can use third-party partition management software.
- Identify the Unallocated Space and the Adjacent Partition: In the Disk Management window, locate the unallocated space on your SSD and the adjacent partition that you want to merge it with.
- Right-click on the Adjacent Partition: Right-click on the adjacent partition and select the “Extend Volume” option from the context menu. This will open the Extend Volume Wizard.
- Follow the Wizard: The Extend Volume Wizard will guide you through the process of extending the partition. Click “Next” to proceed.
- Specify the Size: In the wizard, you will be prompted to specify the additional size for the partition. You can allocate the entire unallocated space or choose a smaller size. Click “Next” to continue.
- Complete the Process: Follow the remaining steps in the wizard to complete the process of merging the unallocated space with the adjacent partition. Once finished, the unallocated space will be merged with the existing partition, effectively increasing its size.
- Confirm the Changes: After the process is complete, check in Disk Management to ensure that the partition has been extended and that the unallocated space has been successfully merged.
Merging unallocated space allows you to effectively utilize the unused space and increase the storage capacity of a neighboring partition. This method is particularly useful when the unallocated space is not adjacent to any existing partition. However, it is important to note that not all partitions can be extended or merged, depending on the file system or the location of other partitions on your SSD.
Now that you know how to merge unallocated space with other partitions, you can effectively optimize your SSD’s storage capacity. In the next section, we will discuss some important considerations to keep in mind when using unallocated space on an SSD.
Important Considerations
When using unallocated space on an SSD, there are several important considerations to keep in mind. These considerations will help ensure that you make the most out of your allocated space while maintaining the integrity and performance of your SSD. Here are some key factors to consider:
- Backup Your Data: Before making any changes to your partitions or allocating unallocated space, it is crucial to back up your important data. This serves as a safety net in case of any unforeseen errors or data loss during the partitioning process.
- Compatibility and File System: Ensure that the existing partitions and the unallocated space are compatible. Different file systems have limitations on extension and merging. It is important to choose the appropriate file system and determine if the desired actions are possible.
- Fragmentation: If you choose to extend existing partitions, ensure that the partitions are defragmented beforehand. This helps optimize the data layout and ensures a smoother extension process without fragmentation issues or data loss.
- Partition Alignment: When creating or extending partitions, pay attention to partition alignment. Proper alignment can improve overall performance and avoid potential issues. Most modern partition management tools automatically align the partitions, but it’s good practice to verify the alignment.
- Operating System Limitations: Be aware of any limitations imposed by your operating system. Some operating systems may have restrictions on the maximum partition size or the number of partitions that can be created. Understanding these limitations will help you plan your partitioning strategy effectively.
- Data Organization: Take the opportunity to organize your data effectively within the newly allocated space. Consider segregating data into specific partitions based on their types or usage, such as separating system files, applications, and personal files. This can make it easier to locate and manage your data in the future.
- Future Expansion: Anticipate your future storage needs and allocate space accordingly. While it is essential to make the most out of your unallocated space, it’s also important to leave room for future expansion. Allocate space in a way that allows you to adapt and grow without having to repartition frequently.
By considering these factors, you can make informed decisions when utilizing unallocated space on your SSD. Remember to proceed with caution and double-check any changes before finalizing them. Keeping these considerations in mind will help you effectively manage your SSD’s storage capacity and optimize its performance.
Now that you have a thorough understanding of the important considerations, let’s summarize the key points discussed in this guide.
Conclusion
In conclusion, unallocated space on an SSD refers to the portion of the drive that has not been assigned to any partition or file system. It is essentially unused space that can be utilized to expand existing partitions, create new ones, or merge with adjacent partitions. By making use of this unallocated space, you can maximize the storage capacity and optimize the performance of your SSD.
Throughout this guide, we have discussed various methods of utilizing unallocated space on an SSD. These methods include extending existing partitions, creating new partitions, and merging unallocated space with adjacent partitions. Each method offers different advantages and can be chosen based on your specific storage needs.
However, before making any changes to your SSD’s partitions or allocating unallocated space, it is crucial to back up your data to prevent any potential loss. Additionally, considerations such as compatibility, file system limitations, fragmentation, partition alignment, and future expansion should be taken into account to ensure smooth partition management.
By effectively managing the unallocated space on your SSD, you can increase your storage capacity, improve performance, and organize your data more efficiently. Remember to plan your partitioning strategy carefully, keeping in mind your current and future needs.
With the knowledge and understanding gained from this guide, you are now equipped to make the most out of the unallocated space on your SSD. So go ahead and unleash the full potential of your SSD by utilizing every inch of its unallocated space.