Introduction
QuickBooks Online is a powerful accounting software that helps businesses manage their finances. One of the features that sets QuickBooks Online apart is the ability to use tags. Tags are a flexible and customizable way to categorize and track transactions within QuickBooks Online.
Unlike traditional accounting categories, such as accounts or classes, tags allow users to create their own labels and apply them to transactions. This makes it easier to organize and analyze data based on specific criteria that are relevant to your business.
In this article, we will explore what tags are and why you should use them in QuickBooks Online. We will also provide step-by-step instructions on how to enable and create tags, assign them to transactions, filter transactions using tags, and run reports based on tags. Finally, we will share best practices for using tags effectively in QuickBooks Online.
Whether you are a small business owner, a bookkeeper, or an accountant, understanding how to use tags in QuickBooks Online can help you gain better insights into your financial data and make more informed business decisions.
What are Tags in QuickBooks Online?
Tags in QuickBooks Online are customizable labels that you can assign to transactions, such as invoices, expenses, or sales receipts. They provide a flexible way to categorize and track transactions based on specific criteria that are important to your business.
Unlike fixed accounting categories like accounts or classes, tags allow you to create your own labels that align with your unique business needs. For example, you can create tags for different products, departments, locations, projects, or even marketing campaigns. The possibilities are endless, and you have complete control over the tags you create and how you use them.
Tags can be applied to both income and expense transactions, and you can add multiple tags to a single transaction. This enables you to capture multiple dimensions of your business data, making it easier to analyze and understand your financial information.
Tags in QuickBooks Online are highly customizable. You can create and manage tags from within the Tags settings menu in QuickBooks Online. You can also choose to make tags global, which means they can be used across all your QuickBooks Online company files, or specific to a particular company file.
By using tags, you can gain a more granular view of your financial data and easily track and analyze transactions based on different criteria. Whether you want to monitor the performance of specific products, track expenses by department, or compare sales by location, tags provide a versatile solution for organizing and segmenting your data.
Why use Tags in QuickBooks Online?
Tags offer a number of benefits that make them a valuable tool for organizing and analyzing your financial data in QuickBooks Online:
1. Customization:
Tags allow you to create labels that are tailored to your business needs. You can define tags based on your specific products, departments, projects, or any other criteria that are relevant to your organization. This level of customization provides flexibility in organizing transactions in a way that makes sense for your unique business setup.
2. Enhanced Reporting:
By using tags, you can generate more detailed and targeted reports in QuickBooks Online. You can filter and sort transactions based on specific tags, enabling you to gain insights into different aspects of your business. For example, you can run a report to see the performance of a particular product or compare expenses across different departments.
3. Streamlined Analysis:
Tags simplify the process of analyzing your financial data. Instead of manually sorting through transactions based on different criteria, tags allow you to group and view data instantly. This streamlined analysis saves you time and effort, empowering you to make data-driven decisions quickly.
4. Segmentation and Comparison:
Tags enable you to segment your transactions based on different attributes. You can easily compare the performance of different products, projects, or marketing campaigns by filtering transactions based on their respective tags. This segmentation provides valuable insights and helps you identify areas of success and areas that may require improvement.
5. Improved Collaboration:
If you work with a team or collaborate with others on your financial data, tags can be immensely useful. By assigning tags to transactions, everyone involved can easily understand the context of each transaction, making collaboration more efficient and effective.
6. Scalability:
As your business grows and evolves, tags can adapt to your changing needs. You can create new tags or modify existing ones to reflect any updates in your business structure. This scalability ensures that you can continue using tags to organize and analyze your financial data as your business expands.
In summary, using tags in QuickBooks Online offers customization, enhanced reporting capabilities, streamlined analysis, segmentation and comparison of data, improved collaboration, and scalability. By utilizing tags effectively, you can gain deeper insights into your financial information and make well-informed decisions to drive your business forward.
How to Enable and Create Tags in QuickBooks Online
Enabling and creating tags in QuickBooks Online is a straightforward process. Follow these steps to get started:
Step 1: Enable Tags
Before you can start creating and using tags, you need to ensure that the Tags feature is enabled in your QuickBooks Online account. Here’s how:
- Log in to your QuickBooks Online account and go to the Gear icon in the top right corner.
- Select “Account and Settings” from the drop-down menu.
- Click on “Advanced” from the left-hand menu.
- Scroll down to the “Categories” section and check the box next to “Track classes”.
- Click “Save” to enable the Tags feature.
Step 2: Create Tags
Now that the Tags feature is enabled, you can proceed to create your own tags. Here’s how:
- Go to the Gear icon again and select “All Lists” from the drop-down menu.
- Choose “Tags” from the list of available options.
- Click on the “New” button to create a new tag.
- Enter a name for your tag in the “Tag Name” field.
- Optionally, you can choose to make the tag global, which allows it to be used across all your QuickBooks Online company files.
- Click “Save” to create the tag.
Repeat these steps to create as many tags as you need for your business. You can create tags for different products, departments, locations, projects, or any other criteria that you find relevant.
Once you have enabled and created tags in QuickBooks Online, you are ready to start assigning them to transactions and using them for data organization and analysis.
How to Assign Tags to Transactions in QuickBooks Online
Assigning tags to transactions in QuickBooks Online allows you to categorize and track your financial data based on specific criteria. Here’s how you can assign tags to transactions:
Step 1: Open a Transaction
First, open the transaction that you want to assign a tag to. This can be an invoice, expense, sales receipt, or any other transaction type in QuickBooks Online.
Step 2: Locate the Tags Field
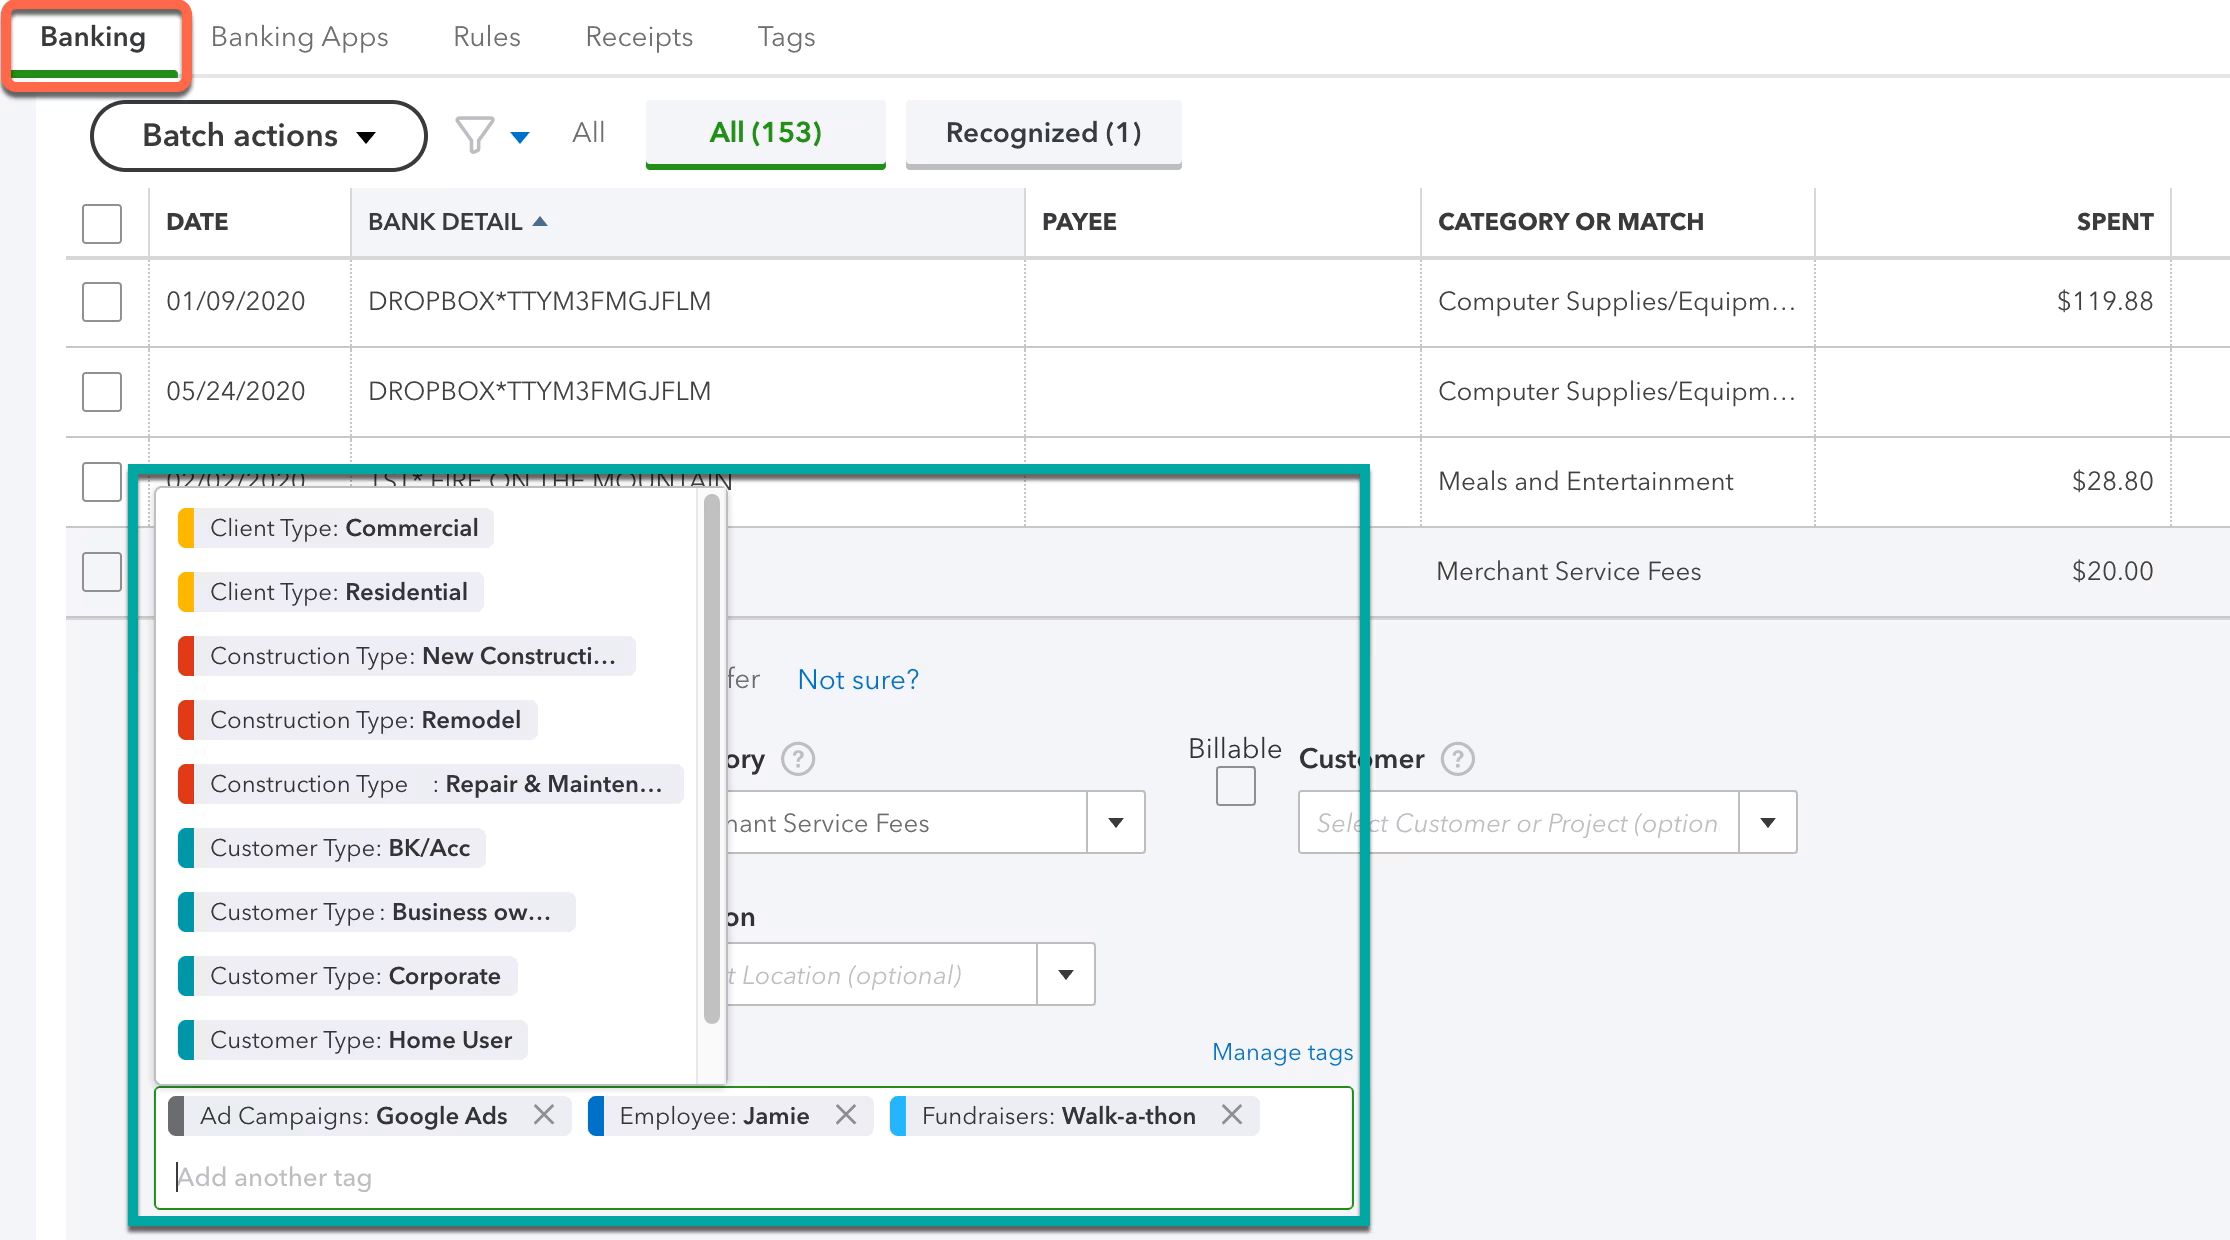
In the transaction form, locate the “Tags” field. This field is typically located next to other fields like “Customer,” “Account,” or “Class.”
Step 3: Choose a Tag
Click on the “Tags” field to reveal a drop-down menu of available tags. Select the tag that you want to assign to the transaction. You can assign multiple tags to a single transaction if desired.
Step 4: Save and Complete the Transaction
Once you have assigned the tag(s) to the transaction, save the transaction. Depending on the transaction type, this could involve clicking “Save,” “Save and Close,” or a similar option. The transaction will now be associated with the assigned tag(s).
Repeat these steps for every transaction that you want to tag in QuickBooks Online. By assigning tags to transactions, you can easily categorize and track them based on your chosen criteria.
Note that you can also assign tags to transactions when importing them into QuickBooks Online through a CSV file or other integrations. Simply make sure that the appropriate tag is mapped to the corresponding column in your import settings.
Assigning tags to transactions is a powerful way to organize your financial data and gain valuable insights into different aspects of your business.
How to Filter Transactions using Tags in QuickBooks Online
Filtering transactions using tags in QuickBooks Online allows you to view and analyze specific subsets of your financial data. By applying filters based on tags, you can focus on transactions that meet specific criteria. Here’s how you can filter transactions using tags:
Step 1: Access the Transaction List
Start by accessing the transaction list where you want to apply the filters. This could be the Sales, Expenses, or Banking tab, depending on the type of transactions you want to filter.
Step 2: Click on “Filter”
In the transaction list, look for the “Filter” button. This button is typically located at the top right corner of the page. Click on it to open the filtering options.
Step 3: Select “Tags” as a Filter
Within the filtering options, there will be a section dedicated to selecting tags. Look for the “Tags” section and click on it to expand the options related to tags.
Step 4: Choose Tag(s) to Filter
Within the expanded tag options, you will see a list of available tags. Select the tag(s) you want to filter by. You can choose multiple tags to narrow down the results further.
Step 5: Apply the Filter
After selecting the desired tag(s), click on the “Apply” or “Filter” button to apply the tag filter to the transaction list. The list will refresh, displaying only the transactions that match the selected tag(s).
You can also combine tag filters with other filters, such as date range or transaction type, to further refine your search and get more specific results.
By filtering transactions using tags in QuickBooks Online, you can easily isolate and view transactions based on specific criteria that are meaningful to your business. This allows you to perform focused analysis and gain insights into different segments of your financial data.
How to Run Reports with Tags in QuickBooks Online
Running reports with tags in QuickBooks Online allows you to analyze and gain insights into your financial data based on specific criteria. By utilizing tags in your reports, you can generate customized reports that focus on the transactions associated with particular tags. Here’s how you can run reports with tags:
Step 1: Accessing the Reports Center
Start by accessing the Reports Center in QuickBooks Online. You can do this by clicking on the “Reports” option in the left-hand navigation menu.
Step 2: Select a Report
Within the Reports Center, choose the report that you want to run. Depending on your analysis needs, you can select a Profit and Loss report, Transaction Detail report, Sales by Customer report, or any other relevant report.
Step 3: Customize the Report
Once you have selected the report, look for the customization options. Click on the “Customize” button or the gear icon to access the report’s customization settings.
Step 4: Add Filter and Select Tags
In the customization settings, navigate to the Filters section. Look for the option to add a filter and select “Tags” as the filter type. From the available tags, choose the specific tag(s) you want to include in the report.
Step 5: Run and View the Report
After selecting the desired tag(s) and setting other customization options as needed, click on the “Run” or “View” button to generate the report. The report will now display data based on the selected tag(s) and any other filters or parameters you have applied.
You can further refine the report by adjusting other options such as date range, columns, and sorting. This will help you tailor the report to your specific needs and obtain the insights you are looking for.
By running reports with tags in QuickBooks Online, you can analyze your financial data based on your own customized criteria. This allows you to dig deeper into the performance of specific tags and gain valuable insights into various aspects of your business.
Best Practices for Using Tags in QuickBooks Online
When it comes to using tags in QuickBooks Online, there are several best practices you can follow to maximize their effectiveness and efficiency. Here are some tips to consider:
1. Plan your tagging strategy:
Before creating tags, take the time to plan and define a clear tagging strategy. Identify the specific criteria that are relevant to your business and what you want to track or analyze. This will ensure consistency and make it easier to use tags effectively.
2. Keep tags consistent and meaningful:
Consistency is key in using tags. Establish consistent naming conventions for your tags to ensure clarity and avoid confusion. Make sure your tags accurately represent the categories or attributes you are trying to capture.
3. Limit the number of tags:
While tags provide flexibility, it’s important to avoid creating an overwhelming number of tags. Keep your tag list focused and manageable to ensure ease of use and avoid cluttering your reports and filters.
4. Train your team:
If you’re working with a team or collaborating with others, make sure everyone understands the importance of using tags consistently. Provide training on how to apply tags to transactions and run reports with tags. This will help create alignment and ensure accurate data analysis.
5. Regularly review and update tags:
Periodically review your tags to ensure they remain relevant and align with your evolving business needs. Remove any outdated or unused tags and create new ones as required. This will keep your tags organized and up-to-date.
6. Leverage tag-based reporting:
Utilize the power of tag-based reporting to gain insights into specific segments of your business. Combine tags with other filters and parameters to create custom reports that focus on the criteria that matter most to you. This will help you make data-driven decisions based on relevant and targeted information.
7. Regularly analyze tagged data:
Make it a habit to regularly analyze tagged data in your reports. This will allow you to track trends, identify patterns, and make informed decisions based on specific categories or attributes. Regular analysis will help uncover opportunities for improvement and highlight areas that require attention.
By following these best practices, you can harness the full potential of tags in QuickBooks Online and streamline your financial data analysis process. Tags provide a powerful tool for organizing, tracking, and analyzing transaction data, allowing you to gain valuable insights and make informed business decisions.
Conclusion
Tags in QuickBooks Online provide a flexible and customizable way to categorize and track transactions based on specific criteria that are relevant to your business. By enabling and creating tags, assigning them to transactions, filtering transactions, and running reports based on tags, you can gain deeper insights into your financial data.
Tags offer several benefits, including customization, enhanced reporting capabilities, streamlined analysis, segmentation and comparison of data, improved collaboration, and scalability. By using tags effectively, you can organize your financial data in a way that makes sense for your business and easily track and analyze transactions based on different criteria.
To make the most of tags in QuickBooks Online, it is important to plan your tagging strategy, keep tags consistent and meaningful, limit the number of tags, train your team, regularly review and update tags, leverage tag-based reporting, and regularly analyze tagged data. Following these best practices will enable you to maximize the effectiveness and efficiency of using tags.
Whether you are a small business owner, a bookkeeper, or an accountant, utilizing tags in QuickBooks Online can help you gain better insights into your financial data and make more informed business decisions. By harnessing the power of tags, you can improve your financial management processes and drive the success of your business.


