Introduction
Welcome to the world of Technic Launcher! If you’re an avid gamer who enjoys exploring modpacks and creating your own customized gameplay experience, Technic Launcher is the perfect platform for you. With its vast collection of modpacks, it offers endless possibilities to enhance your favorite games.
When it comes to running Technic Launcher smoothly and enjoying a lag-free gaming experience, having enough RAM is crucial. RAM, or Random Access Memory, is a form of computer memory that stores data temporarily, but it is essential for executing programs and running games efficiently.
In this article, we’ll guide you through the process of allocating 2GB of RAM specifically for Technic Launcher. This will ensure that your gameplay remains smooth, lag-free, and enjoyable.
Before we dive into the steps, let’s first take a moment to check your computer’s available RAM to ensure you have enough resources to allocate.
With Technic Launcher, you’ll be able to unleash the full potential of modpacks and enjoy a seamless gaming experience. So, let’s get started and make sure your computer is ready to handle the power!
What is Technic Launcher
Technic Launcher is a popular gaming platform that provides access to a wide range of modpacks for popular games like Minecraft. It offers a convenient and user-friendly way to install, manage, and play modpacks with ease.
Modpacks are collections of modifications, or mods, that enhance the gameplay experience by adding new features, items, creatures, and more to the base game. However, manually installing and managing these mods can be a daunting task for many players.
This is where Technic Launcher comes in. It simplifies the process by providing an all-in-one platform that handles the installation and management of modpacks. With just a few clicks, you can explore and play a vast selection of modpacks created by the community or even create your own.
Technic Launcher offers a wide variety of modpacks, ranging from adventure and exploration-focused packs to those that emphasize technology and automation. Whatever your gaming preferences may be, you’ll find a modpack that suits your interests.
One of the notable features of Technic Launcher is its ability to handle resource-intensive modpacks that require a significant amount of RAM. These modpacks can enhance the graphics, introduce complex systems, and provide a more immersive gaming experience, but they also require more system resources to run smoothly.
With Technic Launcher, you can easily allocate the appropriate amount of RAM to ensure optimal performance when running these resource-intensive modpacks. By dedicating more RAM to Technic Launcher, you’ll experience faster loading times, reduced lag, and an overall improved gameplay experience.
Now that you have a better understanding of what Technic Launcher is and its significance in the world of modpacks, let’s move on to the next step: checking your available RAM.
Why is RAM important for Technic Launcher
RAM, or Random Access Memory, plays a crucial role in the performance and smooth operation of Technic Launcher. It is a form of computer memory that allows for the temporary storage and quick access of data by the CPU.
When you launch Technic Launcher and load a modpack, it needs to retrieve various files and resources from your computer’s storage. These files include the game code, textures, models, and other assets required to run the modpack. The more RAM available, the more data Technic Launcher can store and access, resulting in faster loading times and improved gameplay.
One of the primary benefits of allocating sufficient RAM for Technic Launcher is the reduction of lag. Some modpacks demand a significant amount of resources to function properly, especially those with high-resolution textures, complex mods, or extensive world modifications. Without enough RAM, the game may struggle to load and render these assets efficiently, leading to frustratingly low frame rates and gameplay stuttering.
Additionally, allocating more RAM can enhance the overall stability of the game. Modpacks often introduce new features, mechanics, and interactions that require additional computational power. By providing Technic Launcher with ample RAM, you can ensure a smoother gaming experience with fewer crashes, freezes, and other technical issues.
RAM management is also crucial when running multiple mods simultaneously. Each mod consumes a certain amount of memory, and combining multiple mods can quickly exhaust the available RAM. Allocating more RAM to Technic Launcher allows it to handle the increased memory requirements of these mods, preventing conflicts and performance bottlenecks.
It’s important to note that allocating too little RAM may result in inadequate resources for Technic Launcher to run optimally, leading to lag, slow loading times, and reduced overall performance. On the other hand, allocating too much RAM can also be counterproductive, as it may consume excessive system resources and leave less memory available for other applications running in the background.
By finding the right balance and allocating an appropriate amount of RAM to Technic Launcher, you can fully enjoy the immersive and dynamic gameplay experience that modpacks have to offer. Now that you understand the importance of RAM, let’s move on to the next step and check the available RAM on your computer.
Checking your available RAM
Before allocating RAM to Technic Launcher, it’s important to determine how much RAM your computer currently has available. This will help you determine whether you have enough resources to allocate the desired 2GB to Technic Launcher.
There are several ways to check your available RAM on different operating systems:
- Windows: On Windows, you can check your available RAM by opening the Task Manager. Right-click on the taskbar and select “Task Manager.” In the “Performance” tab, you’ll find a section called “Memory.” Here, you can view the total amount of RAM installed on your system, as well as the amount currently in use and available.
- macOS: On macOS, you can check your available RAM by opening the Activity Monitor. To do this, go to the “Applications” folder, then open the “Utilities” folder and launch “Activity Monitor.” In the “Memory” tab, you’ll see a graph displaying the amount of RAM in use and the amount available.
- Linux: On Linux, you can check your available RAM by using the “free” command in the terminal. Open the terminal and type “free -h” to display the total, used, and available memory on your system.
Once you’ve determined your available RAM, ensure that you have at least 2GB of free memory to allocate to Technic Launcher. If you have less than 2GB available, you may need to close unnecessary applications or consider upgrading your RAM to ensure optimal performance.
It’s worth noting that allocating too much RAM to Technic Launcher can impact the performance of other applications running concurrently. Therefore, it’s essential to strike a balance and leave enough RAM for your operating system and other programs you may be using.
With your available RAM checked and confirmed, you’re ready to allocate the desired 2GB to Technic Launcher. In the next section, we’ll guide you through the step-by-step process of adjusting the RAM settings in Technic Launcher.
How to allocate 2GB of RAM on Technic Launcher
Now that you’ve checked your available RAM, it’s time to allocate 2GB of RAM specifically for Technic Launcher. By dedicating this amount of memory, you’ll ensure optimal performance and a lag-free experience while playing your favorite modpacks.
Here are the step-by-step instructions to allocate 2GB of RAM on Technic Launcher:
Step 1: Opening Technic Launcher
Launch Technic Launcher by double-clicking on the desktop shortcut or searching for it in your applications folder. Ensure that you have the latest version of Technic Launcher installed for the best experience.
Step 2: Accessing Launcher Options
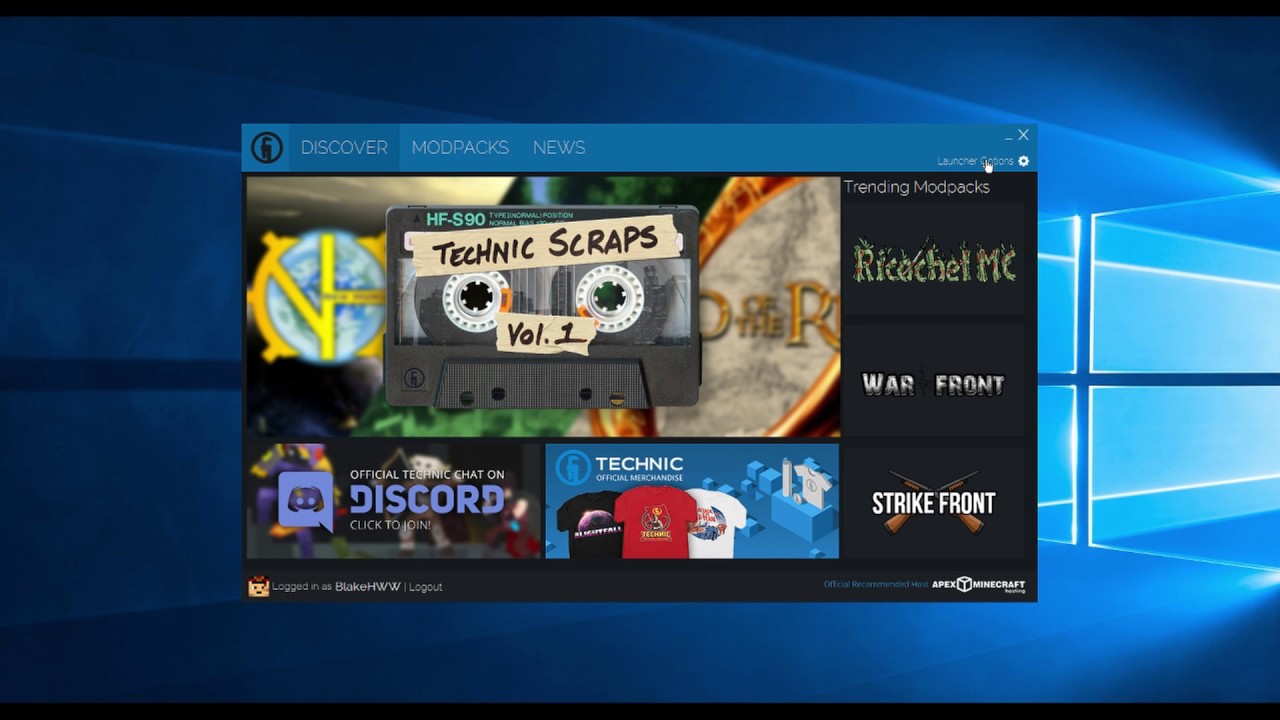
Once Technic Launcher is open, you’ll see the interface with a list of modpacks. Look for the gear-shaped icon located at the top right corner of the launcher. Click on it to access the launcher options.
Step 3: Adjusting RAM settings
In the launcher options, you’ll find a section called “Java Settings” or “Java/Minecraft Settings.” Within this section, locate the “Memory” or “RAM” settings. Here, you’ll see two fields: “Initial Memory/RAM Allocation” and “Maximum Memory/RAM Allocation.”
Set the “Initial Memory/RAM Allocation” field to “2G” or “2048M” to allocate 2GB of RAM for Technic Launcher. Ensure that the “Maximum Memory/RAM Allocation” field is also set to the same value (2G or 2048M).
Please note that the exact naming of the fields may vary depending on the version of Technic Launcher you are using. However, the concept remains the same – locate the memory allocation settings and adjust them accordingly.
Step 4: Save and Launch Technic Launcher
After adjusting the RAM settings, don’t forget to save the changes by clicking the “Save” or “Apply” button at the bottom of the options menu. Once saved, exit the options menu and return to the main launcher interface.
Now, you’re all set to launch Technic Launcher with the allocated 2GB of RAM. Click on the desired modpack you want to play, and Technic Launcher will automatically launch and load the modpack with the allocated RAM.
Keep in mind that certain modpacks may require more or less RAM, depending on their requirements. Adjust the RAM allocation accordingly if you encounter any performance issues or if the modpack documentation suggests a different allocation.
With your RAM allocation adjusted, you’re ready to embark on your modded gameplay adventure. If you encounter any issues or need further assistance, check out the troubleshooting section or consult the Technic Launcher support resources.
Step 1: Opening Technic Launcher
The first step in allocating 2GB of RAM on Technic Launcher is to open the launcher itself. Follow these instructions to get started:
- Locate the Technic Launcher icon on your desktop or in your applications folder. It is usually represented by a blue “T” logo.
- Double-click on the Technic Launcher icon to launch the application. Alternatively, you can right-click on the icon and select “Open” from the context menu.
- Wait for Technic Launcher to initialize and load the main interface. This process may take a few moments, depending on your computer’s speed and performance.
Once Technic Launcher is open, you’ll be greeted with a visually appealing interface that displays a variety of modpacks available for you to explore and play.
It’s important to ensure that you have the latest version of Technic Launcher installed to take advantage of the newest features and improvements. If you’re unsure about the version you have, you can check for updates within the launcher or visit the official Technic website to download the latest version.
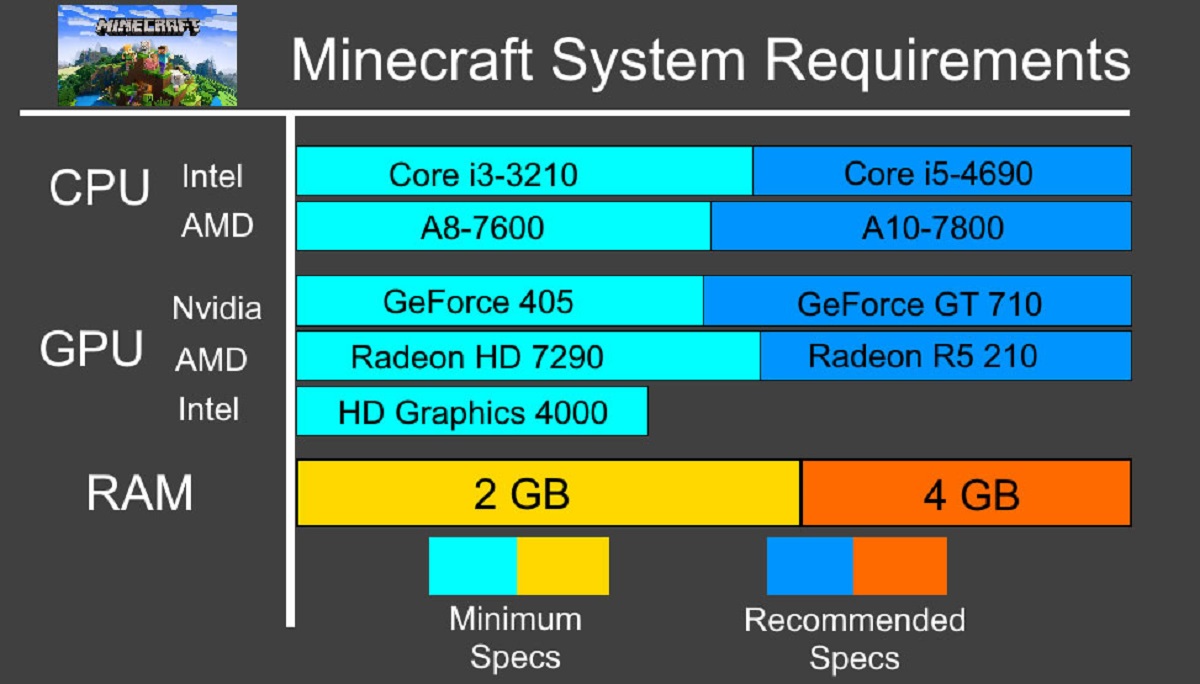
If you encounter any issues while launching Technic Launcher, such as error messages or the launcher not opening at all, make sure your computer meets the minimum system requirements and that you have the necessary Java version installed. Troubleshooting steps can be found in the later sections of this article.
Now that you have Technic Launcher open and ready to go, let’s move on to the next step: accessing the launcher options to allocate the desired amount of RAM.
Step 2: Accessing Launcher Options
After opening Technic Launcher, the next step is to access the launcher options. This is where you’ll find the settings to adjust the RAM allocation. Follow these instructions to access the launcher options:
- Look for the gear-shaped icon located at the top-right corner of the Technic Launcher interface. It is usually positioned next to the “Sandbox” or “Modpacks” tab.
- Click on the gear-shaped icon to open the launcher options menu. This menu contains a variety of settings that you can adjust according to your preferences and system specifications.
- Once the options menu opens, you’ll see several tabs or sections, including settings for modpacks, accounts, and more. Look for a section specifically labeled “Java Settings” or “Java/Minecraft Settings.” This is where you’ll find the RAM allocation settings.
- Click on the “Java Settings” or “Java/Minecraft Settings” section to access the RAM allocation settings. Depending on the version of Technic Launcher you have, the naming of this section may vary, but it should be related to Java and Minecraft configurations.
By accessing the launcher options, you gain control over various aspects of Technic Launcher, including modpack settings, resolution, Java settings, and more. It’s important to navigate to the correct section to ensure that you adjust the RAM allocation correctly.
If you’re unable to find the launcher options or encounter any difficulties, double-check to make sure you’re using the latest version of Technic Launcher. Older versions may have a slightly different interface or organization of settings.
Now that you’ve successfully accessed the launcher options, you’re ready to proceed to the next step of adjusting the RAM settings. This will allow you to allocate the desired 2GB of RAM for Technic Launcher, improving performance and ensuring a seamless gaming experience.
Step 3: Adjusting RAM settings
Once you’ve accessed the launcher options in Technic Launcher, you’re ready to adjust the RAM settings to allocate the desired amount of memory for optimal performance. Follow these instructions to adjust the RAM settings:
- Within the launcher options, navigate to the section labeled “Java Settings” or “Java/Minecraft Settings.” This is where you’ll find the settings related to the Java virtual machine used by Technic Launcher.
- Look for the fields labeled “Memory” or “RAM.” These fields allow you to manually adjust the amount of RAM allocated to Technic Launcher.
- Locate the field labeled “Initial Memory/RAM Allocation” or a similar name. In this field, enter “2G” or “2048M” to allocate 2GB of RAM to Technic Launcher. The “G” stands for gigabytes, and the “M” stands for megabytes. Make sure to enter the value as “2G” or “2048M” for the desired allocation.
- Next, find the field labeled “Maximum Memory/RAM Allocation” or a similar name. Set this field to the same value as the initial allocation, which is “2G” or “2048M.” This ensures that Technic Launcher can make use of the allocated RAM up to the specified amount.
- After adjusting the RAM settings, review the other options in the Java settings section. You may find additional options related to Java parameters or VM arguments. However, these are more advanced settings and should only be modified if you have specific knowledge and requirements.
It’s important to note that the specific names and locations of the RAM settings may vary depending on the version of Technic Launcher you’re using. However, the concept remains the same – locate the fields that allow you to adjust the initial and maximum RAM allocation.
Keep in mind that allocating too much RAM to Technic Launcher can decrease the system resources available for other applications and impact overall performance. It’s recommended to strike a balance and not allocate all available RAM to Technic Launcher, leaving some for the operating system and other concurrent processes.
Once you’ve adjusted the RAM settings to the desired allocation, you’re ready to save the changes and apply them. Make sure to double-check the allocated RAM values before proceeding to the next step.
With the RAM settings adjusted, you’ve taken a crucial step towards ensuring optimal performance in Technic Launcher. In the next step, we’ll guide you through saving the changes and launching Technic Launcher with the allocated RAM.
Step 4: Save and Launch Technic Launcher
After adjusting the RAM settings in Technic Launcher, the final step is to save the changes and launch the application. Follow these instructions to complete the process:
- Ensure that you have reviewed and confirmed the RAM settings you adjusted in the previous step. Double-check that the initial and maximum RAM allocations are set to the desired amount, such as “2G” or “2048M” for a 2GB allocation.
- Look for the “Save” or “Apply” button located at the bottom of the launcher options menu. This button is usually present to confirm any changes you’ve made to the settings.
- Click on the “Save” or “Apply” button to save the adjusted RAM settings. This ensures that Technic Launcher will utilize the allocated RAM when running modpacks.
- Exit the launcher options menu by clicking the “Close” or “X” icon at the top-right corner of the menu. This will bring you back to the main Technic Launcher interface, where you can select and launch modpacks.
- To launch Technic Launcher with the allocated RAM, click on the desired modpack from the list of available options. Technic Launcher will automatically launch the selected modpack, initializing it with the allocated RAM and ensuring optimal performance.
After launching Technic Launcher with the allocated RAM, you’ll experience improved loading times, reduced lag, and smoother gameplay in the modpacks you choose to play. The amount of allocated RAM may vary depending on the specific modpack requirements, so some modpacks may require more or less RAM. Adjust the RAM allocation accordingly if you encounter any performance issues or if the modpack documentation suggests a different allocation.
By saving and launching Technic Launcher with the adjusted RAM settings, you’ve successfully optimized the performance of the platform and modpacks. Enjoy your enhanced gaming experience, explore the vast collection of modpacks, and dive into thrilling adventures with a smoother and more responsive gameplay environment!
Troubleshooting Common Issues
While allocating RAM to Technic Launcher can greatly enhance your gaming experience, there may be instances where you encounter issues or face challenges. Here are a few common problems and their troubleshooting solutions:
- Technic Launcher not opening: If you’re having trouble launching Technic Launcher, make sure your computer meets the minimum system requirements. Additionally, check that you have the latest version of Technic Launcher installed. Restarting your computer or reinstalling Technic Launcher can also help resolve this issue.
- Technic Launcher crashing or freezing: If Technic Launcher crashes or freezes during startup or while launching a modpack, ensure that you have allocated an appropriate amount of RAM. Allocating too much RAM can overwhelm your system, so try adjusting the allocation to a lower value. Additionally, make sure you have the latest version of Java installed and that your graphics drivers are up to date.
- Modpack not loading or experiencing performance issues: If a modpack fails to load or you encounter performance issues, check the modpack’s documentation for specific requirements regarding RAM allocation. Some modpacks may require more RAM than others. It’s also worth considering closing any unnecessary background programs to free up system resources.
- Out of memory errors: If you receive an “Out of Memory” error when launching Technic Launcher or a modpack, it indicates that the allocated RAM is insufficient for the modpack’s requirements. Try increasing the RAM allocation in Technic Launcher by following the steps outlined earlier in this article.
- Conflicting mods: If you experience conflicts between different mods within a modpack, it can lead to crashes or unexpected behavior. To troubleshoot this issue, try disabling certain mods or checking modpack forums or documentation for any known conflicts and recommended compatibility configurations.
If you continue to experience issues despite following these troubleshooting suggestions, you may want to reach out to the Technic Launcher support team or the modpack’s community for further assistance. They can provide specific guidance tailored to your situation and help resolve any persistent problems.
Remember, troubleshooting issues can be a trial-and-error process, so don’t get discouraged. With patience and persistence, you’ll be able to overcome obstacles and enjoy a smooth and immersive gaming experience with Technic Launcher and your favorite modpacks.
Conclusion
Allocating 2GB of RAM to Technic Launcher is a crucial step in enhancing your gaming experience and ensuring smooth, lag-free gameplay. By following the steps outlined in this article, you can optimize the performance of Technic Launcher and enjoy the vast array of modpacks available.
We started by introducing Technic Launcher as a platform that simplifies the installation and management of modpacks, allowing you to create a customized gameplay experience. We then explored why RAM is important for Technic Launcher, highlighting its role in reducing lag, improving stability, and handling resource-intensive modpacks.
We then guided you through the process of checking your available RAM, ensuring that you have enough resources to allocate the desired 2GB. After confirming your available RAM, we provided a step-by-step guide on adjusting the RAM settings in Technic Launcher, allowing you to allocate the appropriate amount of memory.
In the troubleshooting section, we addressed common issues that you may encounter and provided solutions to overcome them. From Technic Launcher not opening to modpack conflicts, we offered troubleshooting suggestions to help you navigate potential challenges.
Remember, adjusting RAM settings is just one aspect of optimizing your gaming experience. Make sure you have the latest versions of Technic Launcher and Java installed, and keep your graphics drivers up to date for optimal performance.
Now that you’re equipped with the knowledge and steps to allocate 2GB of RAM on Technic Launcher, you can embark on your modded gameplay adventure with confidence. Explore modpacks, create your own customized experiences, and immerse yourself in the limitless possibilities that Technic Launcher has to offer.
Enjoy your modded gaming experience, and may your adventures in the world of Technic Launcher be filled with excitement, creativity, and unforgettable moments!