Introduction
Avast Antivirus is a popular security software that helps protect your computer from malware, viruses, and other online threats. While Avast offers a range of advanced features and effective protection, there may be instances where you want to uninstall it from your system. Whether you’re experiencing compatibility issues or simply looking to switch to a different antivirus program, uninstalling Avast is a straightforward process.
In this article, we will guide you through the steps to properly uninstall Avast Antivirus from your computer. We will cover both the basic method of uninstalling through the Control Panel and the more thorough method of removing any leftover files and registry entries using the Avast Clear utility. By following these steps, you can ensure a clean and complete removal of Avast from your system.
It is important to note that uninstalling Avast Antivirus will leave your computer vulnerable to potential threats. Therefore, if you decide to uninstall Avast, make sure you have an alternative antivirus solution installed or plan to install one immediately after the removal process.
Now, let’s get started with the step-by-step guide to uninstalling Avast Antivirus from your computer.
Step 1: Close Avast Antivirus
Before uninstalling Avast Antivirus, it is important to ensure that the program is not running in the background. Closing Avast will help prevent any conflicts or interruptions during the uninstallation process. Here’s how you can close Avast Antivirus:
- Locate the Avast icon in the system tray, typically found in the bottom-right corner of your screen.
- Right-click on the Avast icon to open the context menu.
- In the context menu, select the “Avast Shield Control” option. This will open a sub-menu.
- In the sub-menu, choose the option to “Disable Permanently.” This will temporarily disable Avast Antivirus.
Alternatively, you can also close Avast Antivirus by opening the main Avast application window. To do this, double-click on the Avast icon in the system tray. Once the application window is open, navigate to the “Menu” or “Settings” tab and select the option to “Turn Off” or “Exit” Avast.
It is important to note that temporarily disabling Avast Antivirus will leave your computer vulnerable to potential threats. Make sure to proceed with caution and only disable Avast temporarily during the uninstallation process.
Once you have successfully closed Avast Antivirus, you are ready to move on to the next step of the uninstallation process.
Step 2: Uninstall Avast using the Control Panel
The Control Panel in Windows provides a convenient method for uninstalling applications, including Avast Antivirus. Follow these steps to uninstall Avast Antivirus using the Control Panel:
- Open the Control Panel by clicking on the Start menu and searching for “Control Panel.”
- In the Control Panel window, select “Programs” or “Programs and Features.”
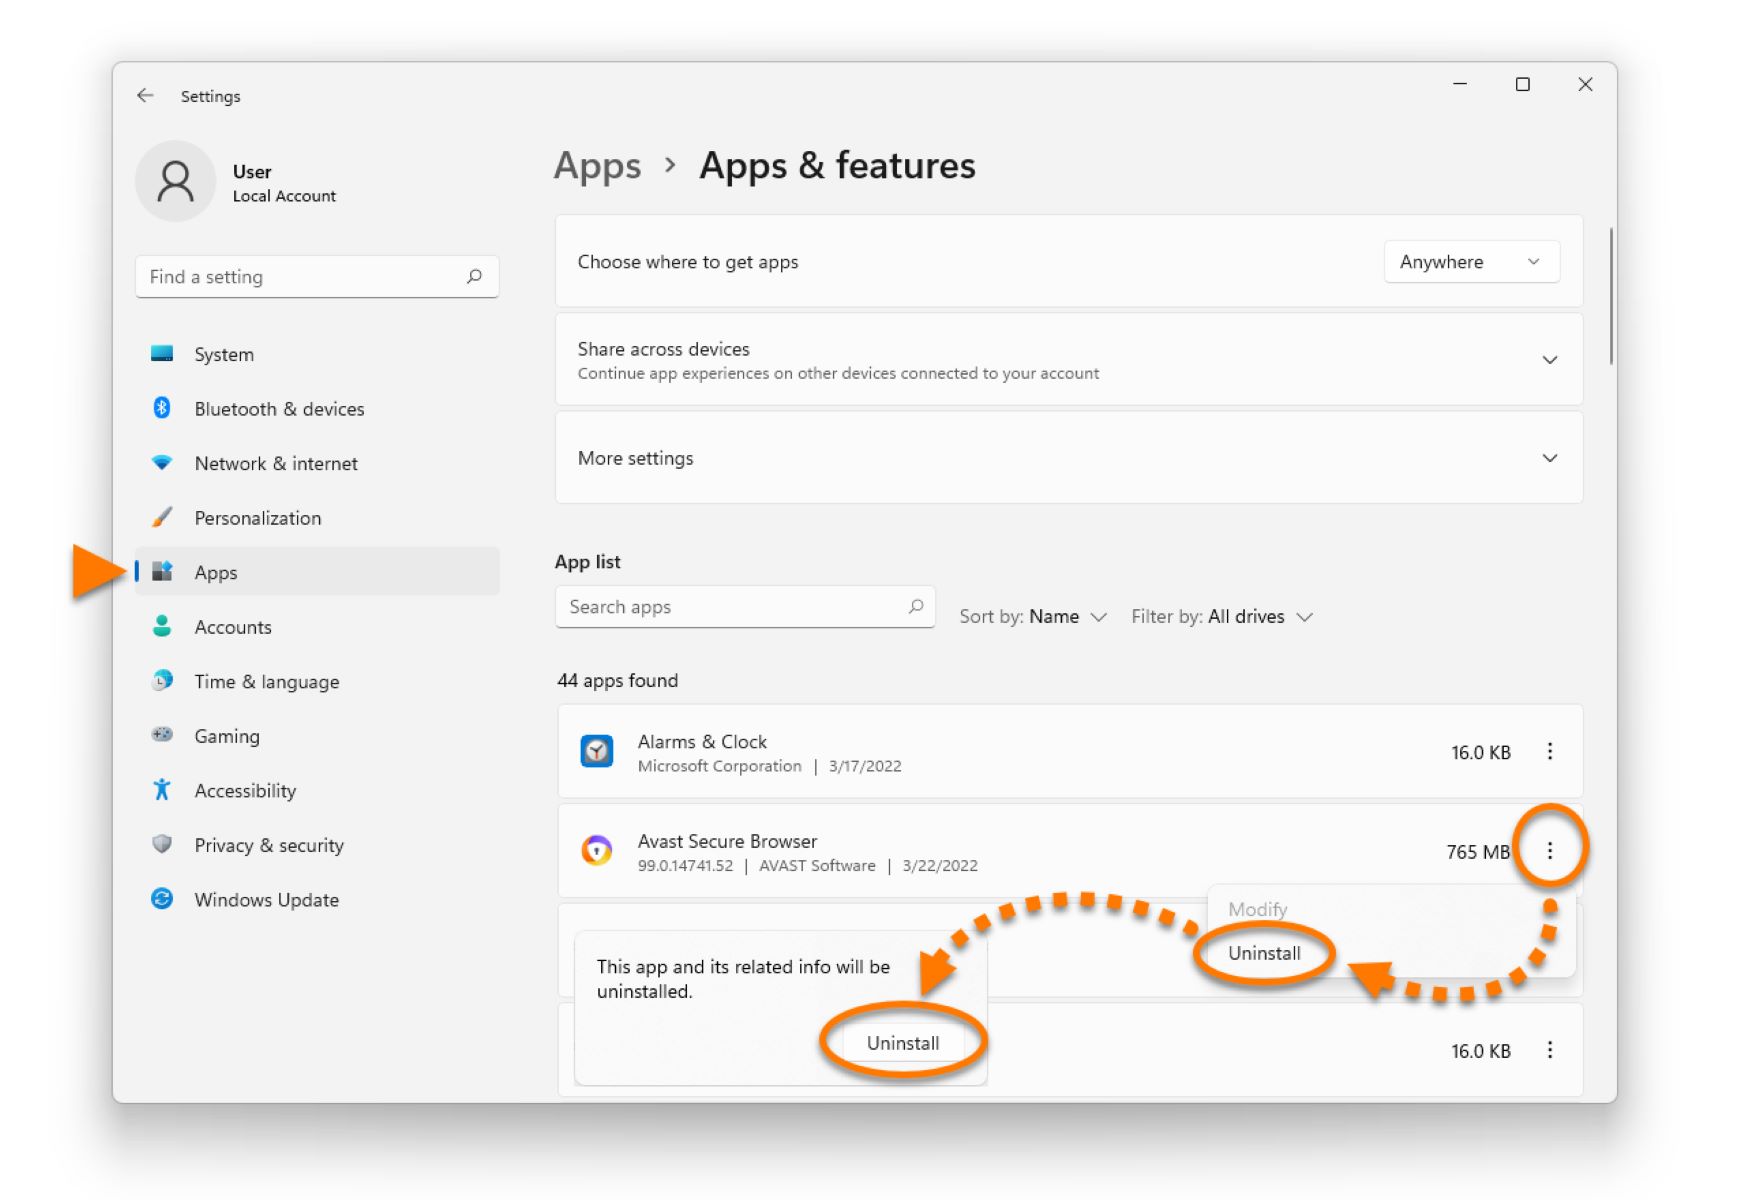
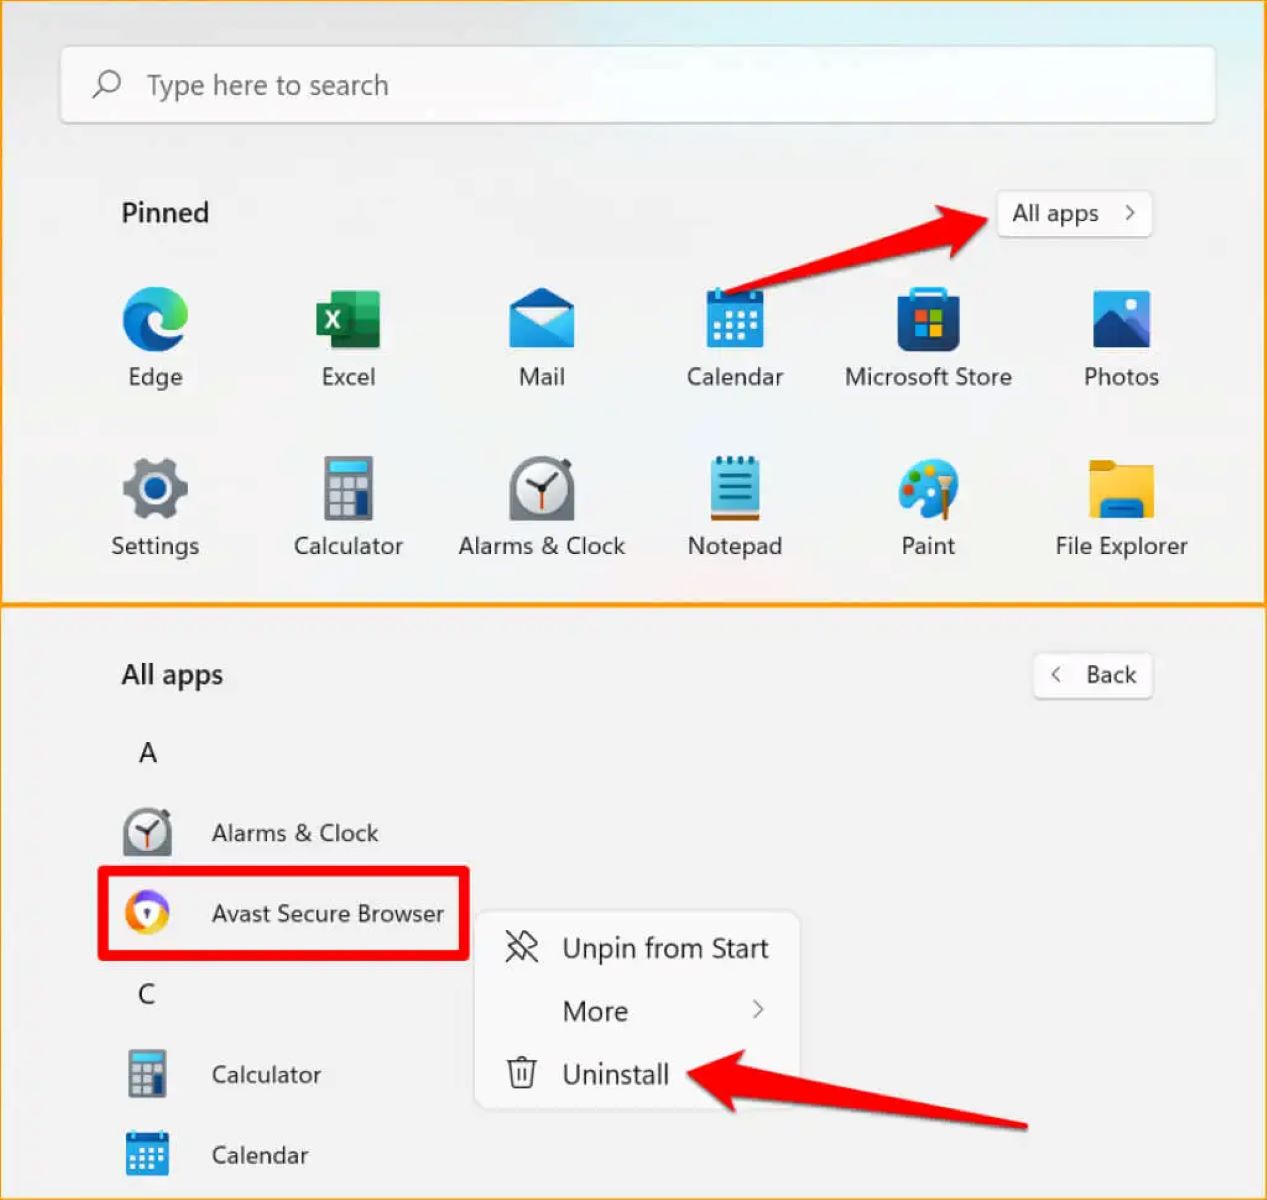
- Locate Avast Antivirus in the list of installed programs.
- Right-click on Avast Antivirus and select the “Uninstall” or “Remove” option.
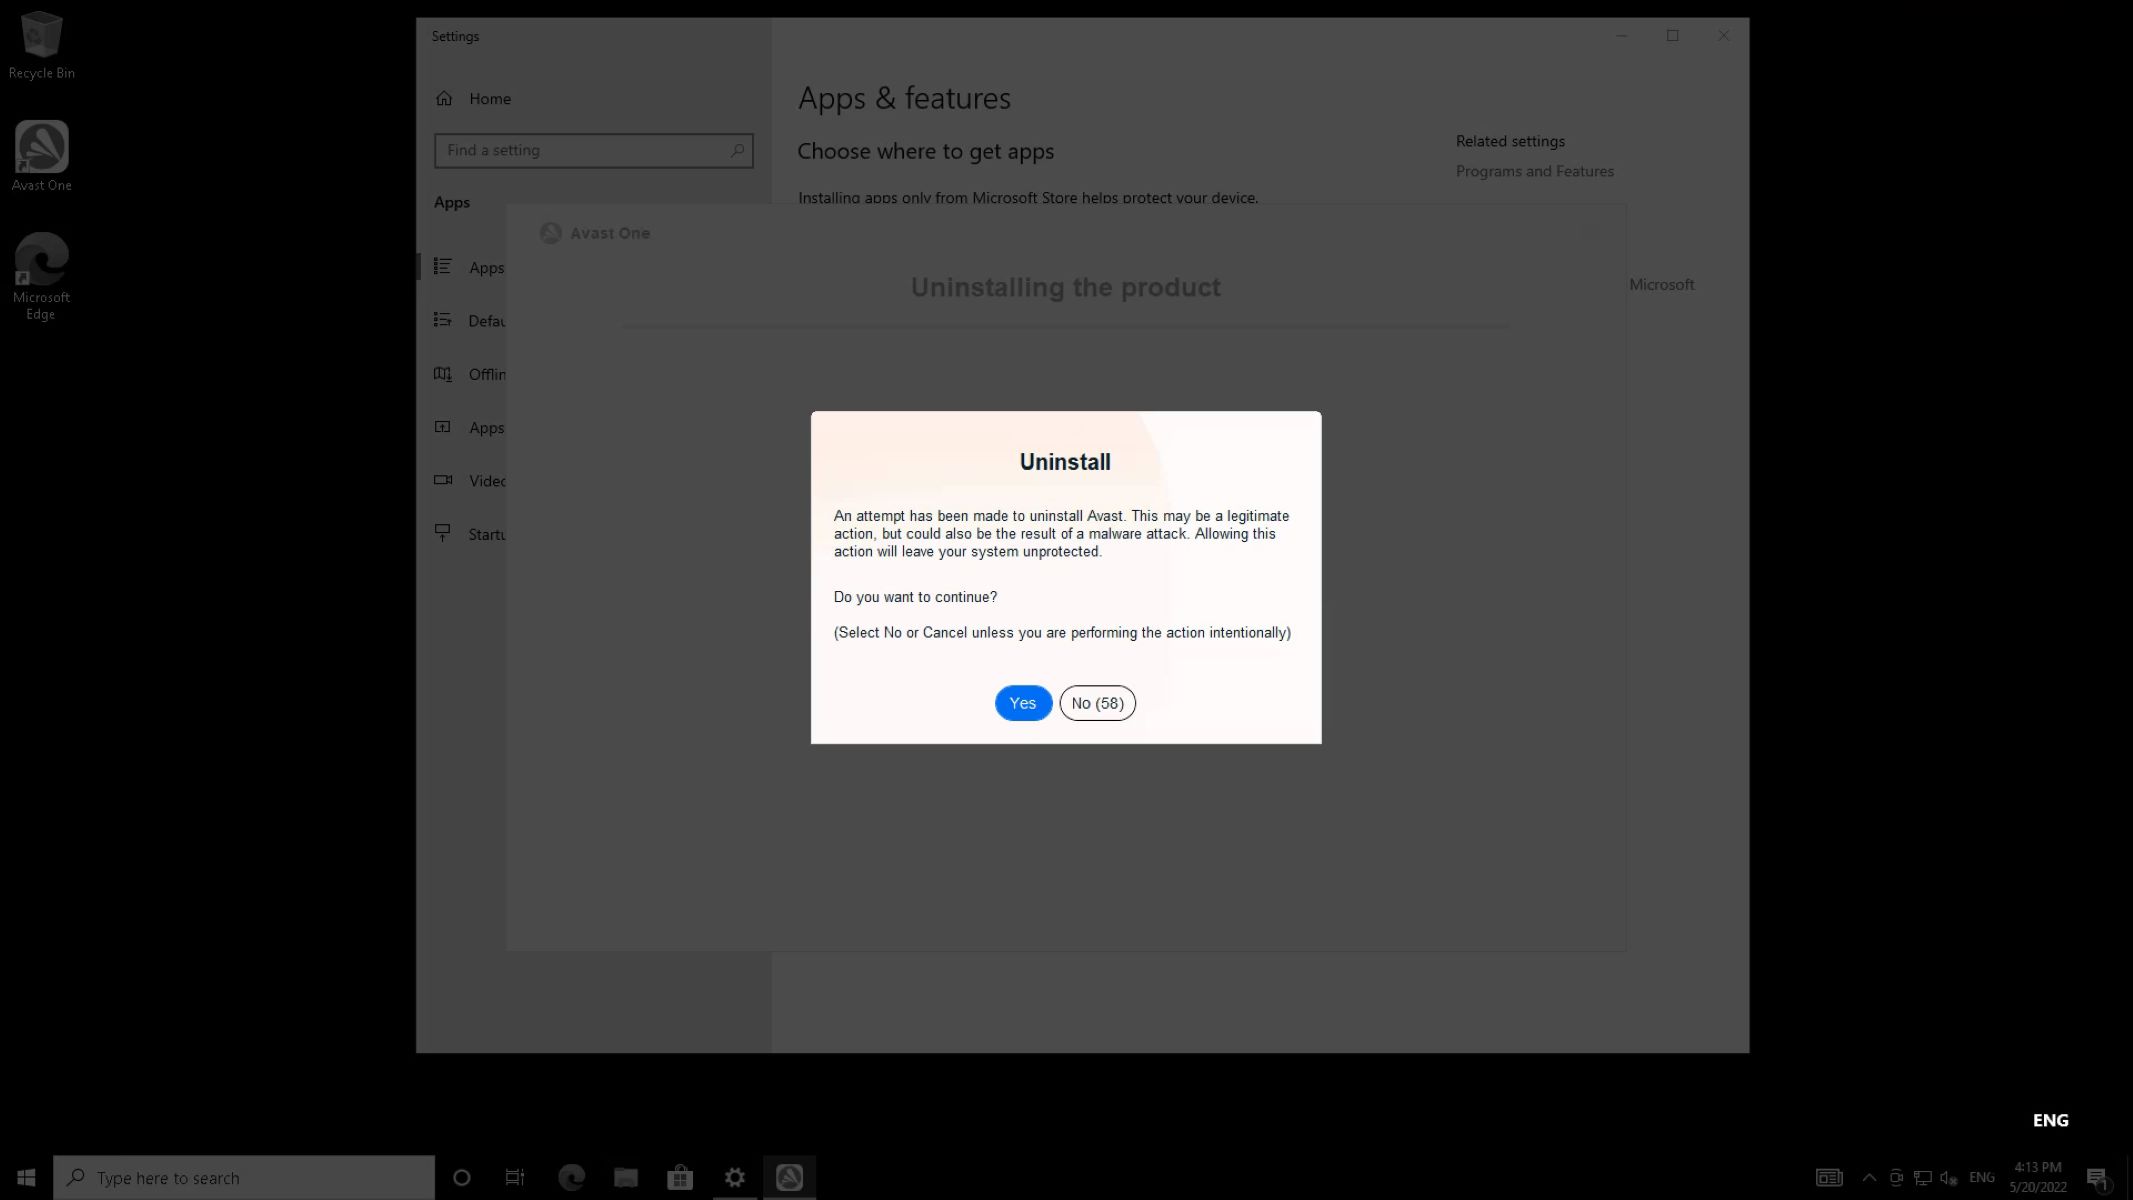
- Follow the on-screen instructions to proceed with the uninstallation process.
- During the uninstallation, you may be prompted to choose whether you want to keep your Avast settings and data. Choose according to your preference.
- Wait for the uninstallation process to complete. This may take a few moments.
Once the uninstallation process is finished, Avast Antivirus will be successfully removed from your computer. It is recommended to restart your computer to ensure that all traces of Avast are fully removed.
If you encounter any issues during the uninstallation process or if Avast Antivirus does not appear in the list of installed programs, you may need to use an alternative method to uninstall Avast, such as the Avast Clear utility, which we will cover in the next step.
Now that you have successfully uninstalled Avast using the Control Panel, you can proceed to the next step to remove any leftover files using the Avast Clear utility.
Step 3: Remove Avast leftovers using the Avast Clear utility
If you have encountered any issues or if Avast Antivirus was not completely removed using the Control Panel, you can use the Avast Clear utility to remove any leftover files and registry entries. Here’s how to remove Avast leftovers using the Avast Clear utility:
- First, ensure that you are logged in to your Windows user account with administrator privileges.
- Visit the official Avast website and download the Avast Clear utility. Make sure to download the latest version compatible with your operating system.
- Once the Avast Clear utility is downloaded, close all other programs and ensure that Avast is not running in the background.
- Run the Avast Clear utility as an administrator by right-clicking on the downloaded file and selecting the “Run as administrator” option.
- In the Avast Clear utility window, select the installation folder of Avast Antivirus. The default location is usually “C:\Program Files\AVAST Software\Avast”.
- Click on the “Uninstall” button to initiate the removal process. This may take a few moments.
- Wait for the Avast Clear utility to remove all leftover files, folders, and registry entries associated with Avast Antivirus.
- Once the removal process is complete, restart your computer to ensure that all remnants of Avast are fully removed.
By using the Avast Clear utility, you can ensure a thorough removal of Avast Antivirus, even if the traditional uninstallation method did not completely remove all associated files and registry entries.
If you encounter any difficulties or issues during the removal process, it is recommended to consult the official Avast support resources or the Avast community forums for further assistance.
Now that you have successfully removed any leftover files using the Avast Clear utility, you can proceed to the next step to restart your computer.
Step 4: Restart your computer
After uninstalling Avast Antivirus and removing any leftover files using the Avast Clear utility, it is important to restart your computer. Restarting your computer will ensure that all changes take effect and that any remaining traces of Avast are completely eliminated. Here’s how you can restart your computer:
- Save any important files or documents you may be working on.
- Close all open programs and windows.
- Click on the Start menu icon, typically located in the bottom-left corner of your screen.
- Click on the power icon, which is usually represented by a small gear or a power symbol.
- In the power options menu, select the “Restart” option.
- Wait for your computer to shut down and restart.
Once your computer has restarted, it will boot up with the changes made during the uninstallation process. This ensures that Avast Antivirus is completely removed from your system and that any conflicts or issues caused by the software are resolved.
Upon restarting, it is recommended to check if Avast Antivirus is still present on your computer. You can do this by searching for Avast files or folders, as well as checking the list of installed programs in the Control Panel. If any remnants of Avast are found, you may need to repeat the uninstallation process or seek further assistance from Avast support resources.
Now that you have restarted your computer, you can proceed to the final step to confirm the successful removal of Avast Antivirus.
Step 5: Confirm the removal of Avast Antivirus
After following the previous steps to uninstall Avast Antivirus and restart your computer, it’s important to confirm that the removal process was successful. Here’s how you can check if Avast Antivirus has been completely removed from your system:
- Open File Explorer by clicking on the folder icon in the taskbar or by pressing the Windows key + E on your keyboard.
- Navigate to the default installation folder for Avast Antivirus, which is typically located at “C:\Program Files\AVAST Software\Avast”.
- If you find any files or folders that are related to Avast, right-click on them and select “Delete” to remove them from your computer.
- Next, open the Control Panel by clicking on the Start menu and searching for “Control Panel”.
- In the Control Panel window, select “Programs” or “Programs and Features”.
- Scan through the list of installed programs and ensure that Avast Antivirus is no longer present.
If you are unable to find any remaining files or folders related to Avast Antivirus and Avast does not appear in the list of installed programs, this indicates that the removal process was successful. You can now proceed with installing an alternative antivirus solution or continue using the default Windows Defender if you feel it provides adequate protection for your computer.
If, however, you still find remnants of Avast Antivirus on your system or encounter any issues during the removal process, it is advisable to seek further assistance from Avast support or refer to their official documentation and forums.
By confirming the successful removal of Avast Antivirus, you can ensure that your computer is free from any leftover traces of the software and that it is ready for a new antivirus solution, if desired.
Conclusion
Uninstalling Avast Antivirus from your computer can be necessary for various reasons, such as compatibility issues or a desire to switch to a different antivirus program. Through the step-by-step guide provided in this article, you have learned how to properly uninstall Avast using the Control Panel, remove any leftover files with the Avast Clear utility, restart your computer, and confirm the successful removal of Avast Antivirus.
By following these steps, you can ensure that Avast is completely removed from your system, eliminating any potential conflicts or issues associated with the software. It is crucial to remember that your computer may be vulnerable to possible threats after uninstalling Avast, so it is highly recommended to install an alternative antivirus solution or activate Windows Defender as a baseline protection.
If you encounter any difficulties during the uninstallation process or have any concerns, it is advisable to consult the official Avast support resources, documentation, or community forums for additional guidance. The Avast support team will provide assistance tailored to your specific situation and help resolve any issues you may face.
Remember to regularly update your new antivirus software or Windows Defender to ensure continuous protection against evolving threats. Additionally, stay vigilant while browsing the internet and downloading files to further safeguard your computer’s security.
With the completion of the uninstallation process, you can now confidently proceed with alternative antivirus software or other solutions that meet your specific needs. Your computer will be optimized for smoother performance and fortified against potential threats.