Introduction
Welcome to our guide on how to turn on Bluetooth on Windows 10. Bluetooth is a wireless technology that allows you to connect devices such as keyboards, mice, speakers, and headphones to your computer without the need for cables. Whether you want to pair a new device or troubleshoot connectivity issues, knowing how to enable Bluetooth on your Windows 10 computer is essential.
Turning on Bluetooth on Windows 10 is a simple process that can be done in several ways. In this guide, we will walk you through various methods to help you enable Bluetooth on your Windows 10 device, whether you use the Action Center, the Settings app, the Control Panel, the Device Manager, or even a keyboard shortcut.
Before we proceed, please ensure that your computer has Bluetooth capabilities. Some older computers or laptops may not have built-in Bluetooth, in which case you will need to use a USB Bluetooth adapter to enable Bluetooth functionality.
Once you have confirmed that your computer supports Bluetooth, let’s dive into the different methods of turning it on!
Method 1: Using the Action Center
The Action Center is a quick and convenient way to access various settings on your Windows 10 computer, including Bluetooth. Follow these steps to turn on Bluetooth using the Action Center:
- Click on the “Action Center” icon located in the bottom-right corner of your taskbar. It looks like a speech bubble.
- The Action Center will pop up on the right side of your screen. Look for the “Bluetooth” tile. If it is grayed out or not visible, it means your computer does not have Bluetooth capabilities.
- Click on the “Bluetooth” tile once to turn it on. The tile will turn blue, indicating that Bluetooth is now enabled.
Once you have enabled Bluetooth, you can pair your device by clicking on the “Connect” option that appears below the Bluetooth tile in the Action Center.
Using the Action Center is a quick and efficient way to enable Bluetooth on your Windows 10 computer. However, if your computer does not have a Bluetooth tile in the Action Center, don’t worry! There are other methods you can use to turn on Bluetooth, which we will explore in the following sections.
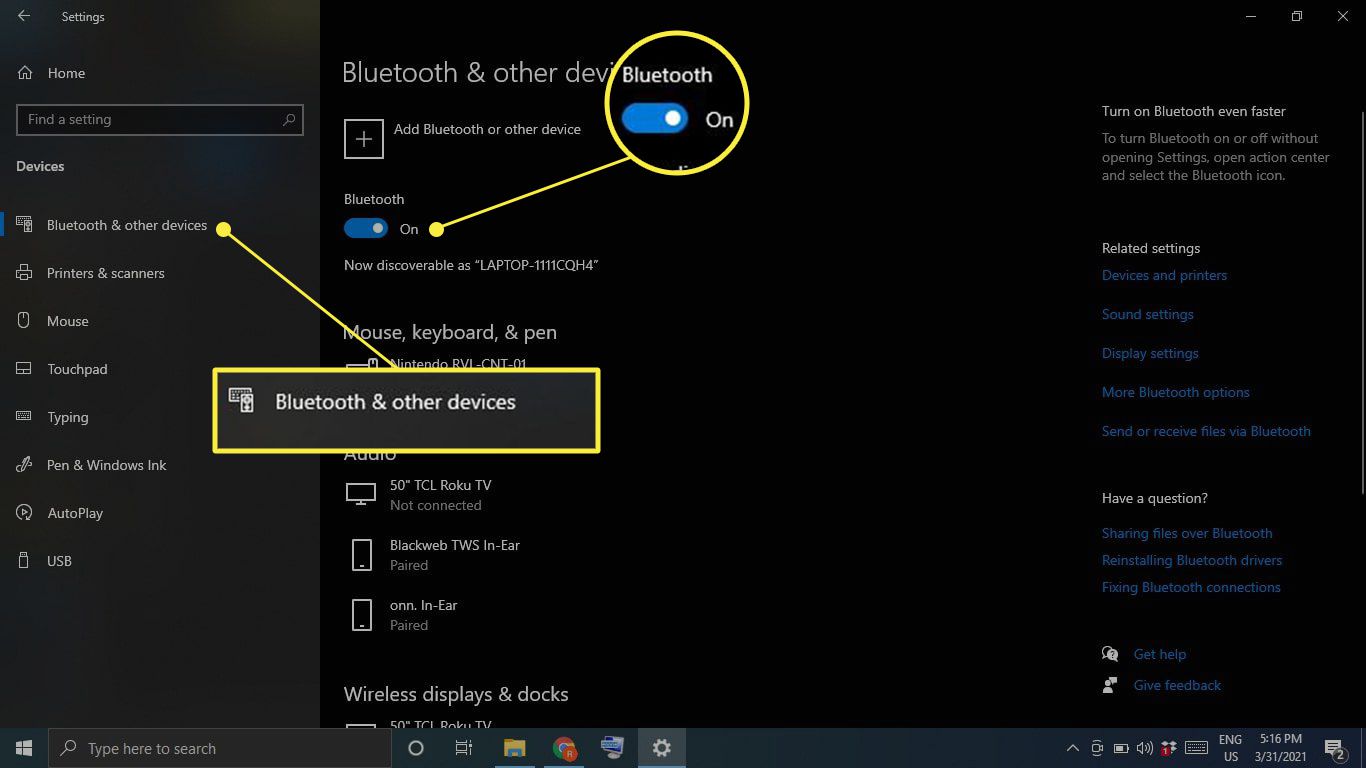
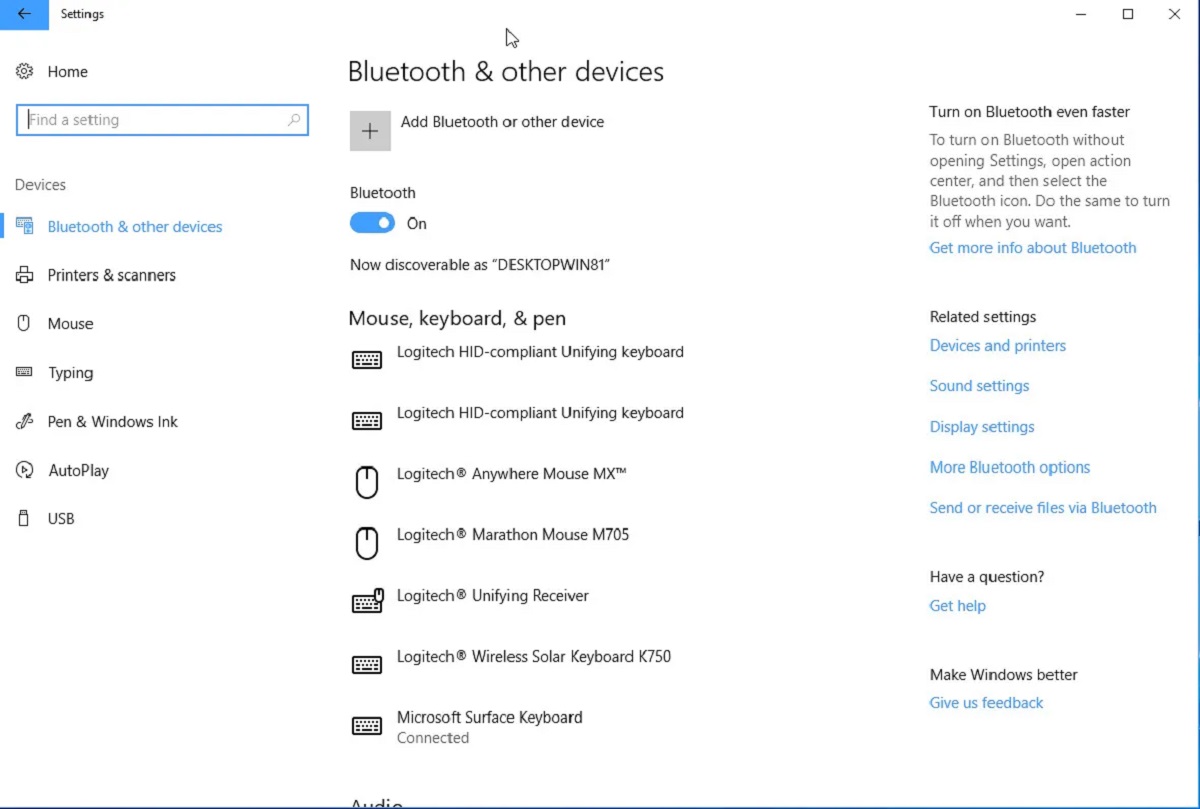
Method 2: Using the Settings App
The Settings app in Windows 10 provides a centralized location for managing various system settings, including Bluetooth. Here’s how you can turn on Bluetooth using the Settings app:
- Open the “Start” menu by clicking on the Windows logo in the bottom-left corner of your screen.
- Click on the “Settings” gear icon to open the Settings app. Alternatively, you can press the “Windows key + I” on your keyboard as a shortcut to open the Settings app.
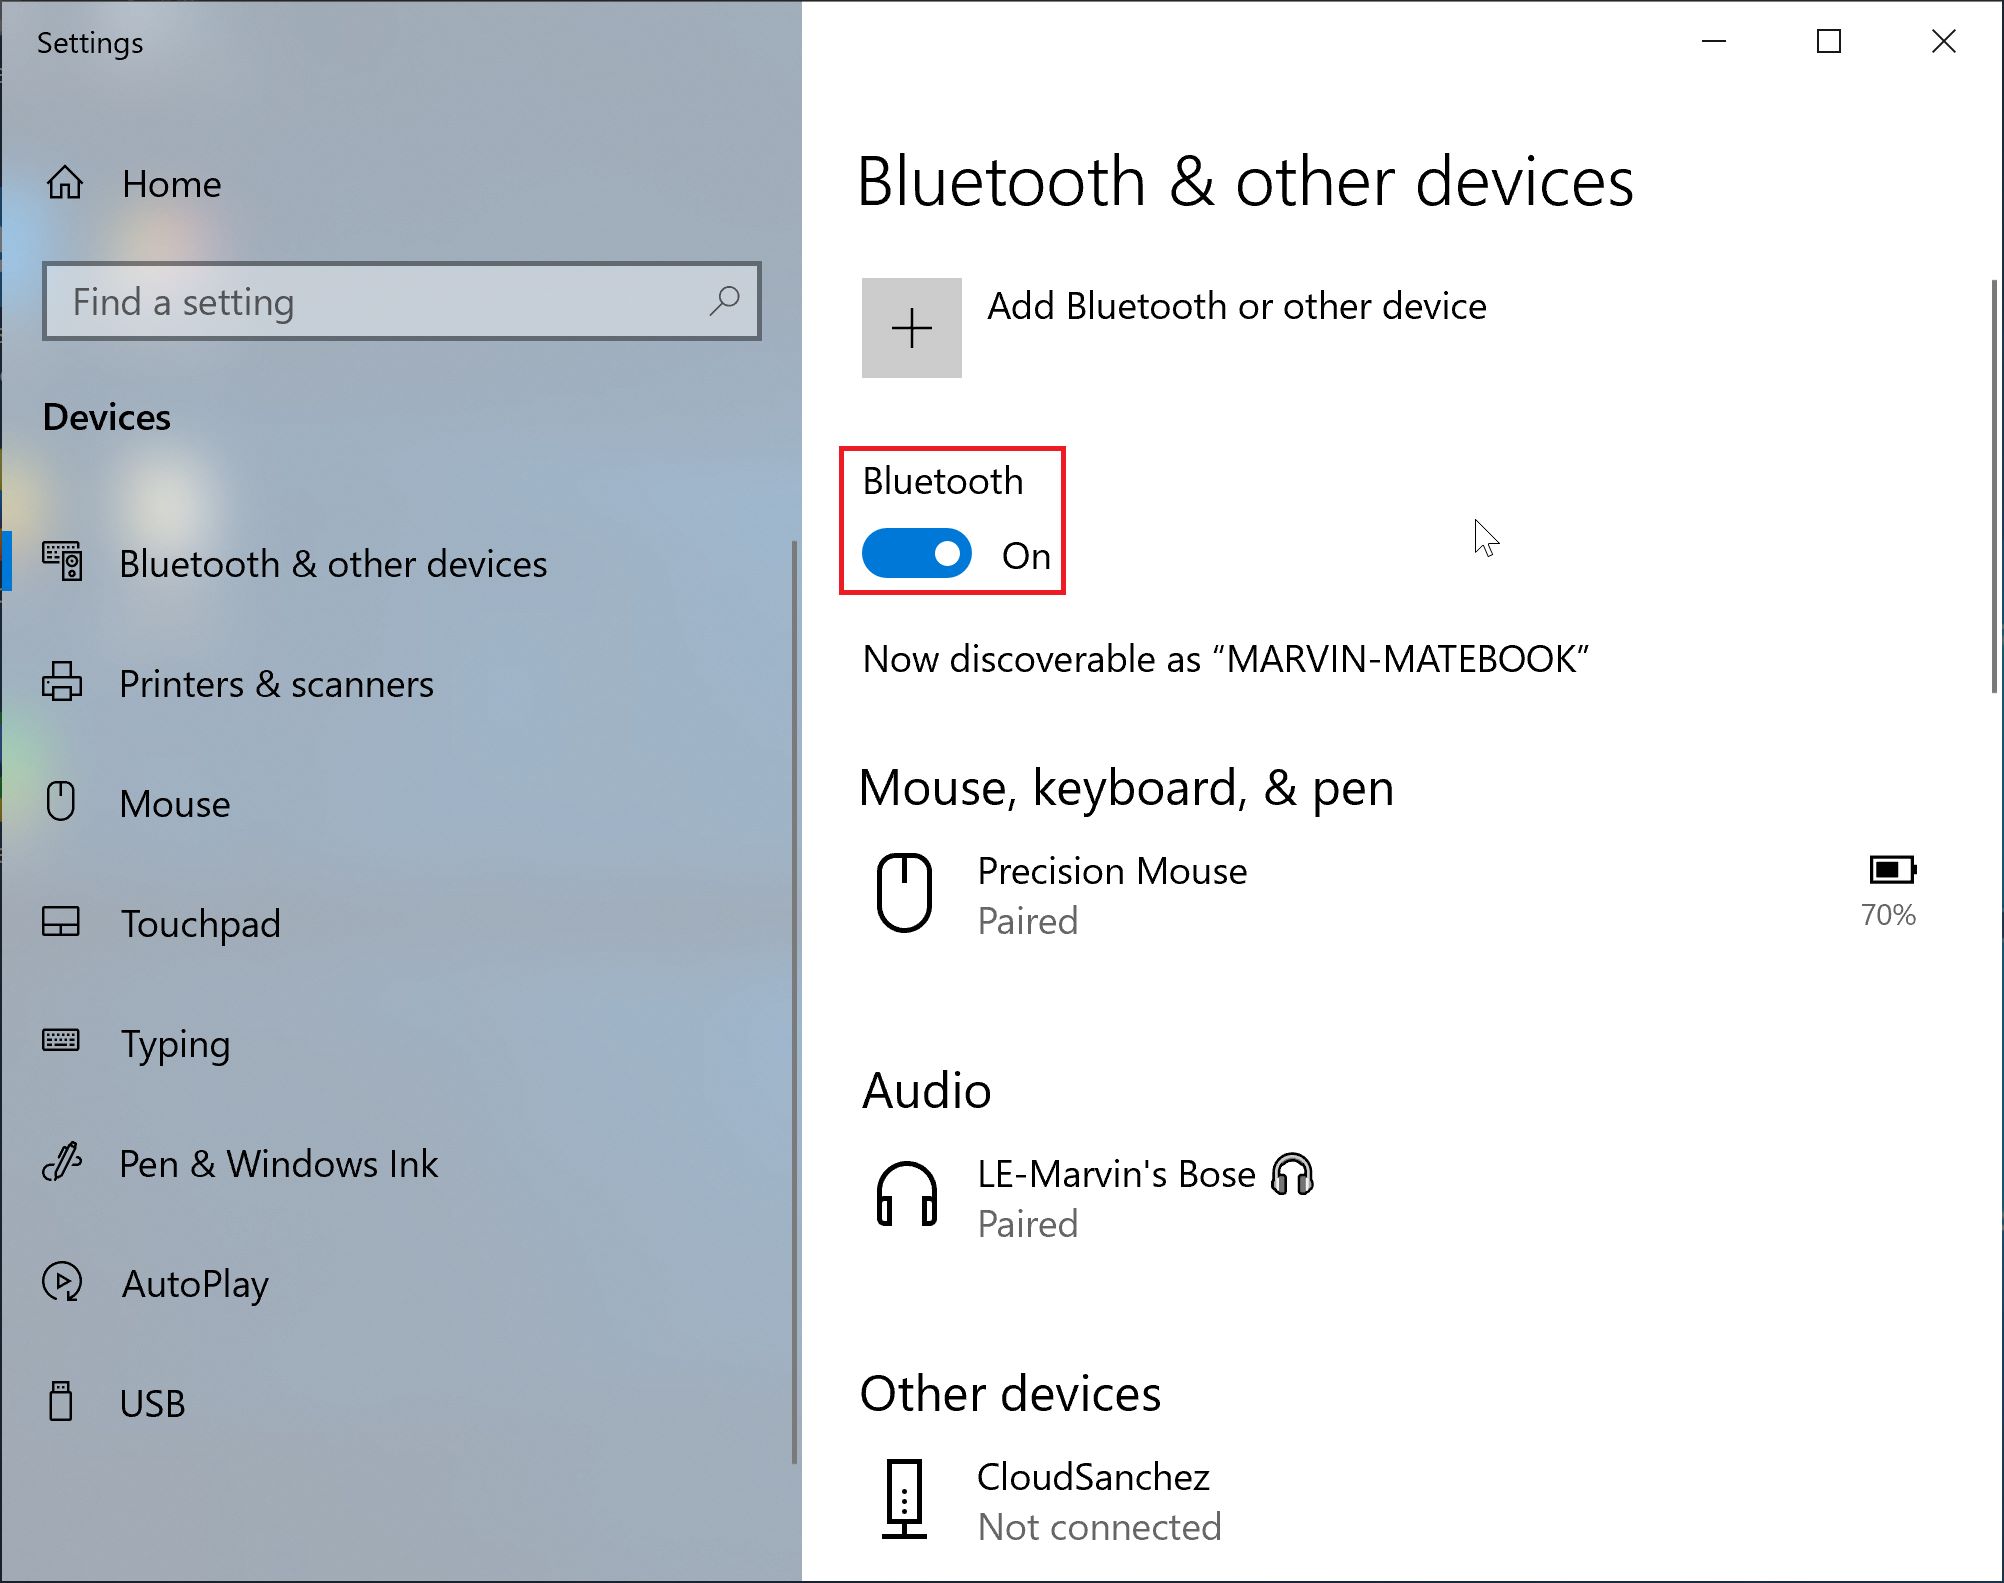
- In the Settings app, click on the “Devices” option.
- In the left sidebar, click on “Bluetooth & other devices.”
- On the right side, make sure that the “Bluetooth” toggle switch is set to “On.”
Once you have enabled Bluetooth using the Settings app, you can start the pairing process by clicking on the “Add Bluetooth or other device” button under “Bluetooth & other devices.”
The Settings app provides a more comprehensive and customizable interface for managing Bluetooth and other device settings. It also allows you to manage existing connected devices and remove any unwanted Bluetooth connections.
If you couldn’t find the Bluetooth settings in the Settings app, it may indicate that your computer does not have built-in Bluetooth capabilities, or there may be an issue with your Bluetooth drivers.
In the next section, we will explore another method to enable Bluetooth on your Windows 10 computer using the Control Panel.
Method 3: Using the Control Panel
The Control Panel is a traditional Windows tool that provides access to various system settings. If you prefer a more familiar interface, you can enable Bluetooth using the Control Panel. Just follow these steps:
- Open the “Start” menu by clicking on the Windows logo in the bottom-left corner of your screen.
- Type “Control Panel” in the search bar and click on the corresponding result to open the Control Panel.
- In the Control Panel, make sure that the view is set to “Category” by clicking on the drop-down menu in the top-right corner and selecting “Category.”
- Under the “Hardware and Sound” section, click on “Devices and Printers.”
- In the Devices and Printers window, you will see a list of connected devices. Look for the “Bluetooth” section.
- If Bluetooth is not enabled, right-click on the “Bluetooth” icon and select “Properties.”
- In the Bluetooth Properties window, go to the “Options” tab and check the box that says “Allow Bluetooth devices to find this computer.”
- Click on “Apply” and then “OK” to save the changes.
Now that you have enabled Bluetooth using the Control Panel, you can proceed with pairing your devices or searching for nearby Bluetooth devices to connect to.
The Control Panel provides a more traditional and comprehensive approach to managing device settings, including Bluetooth. It is a useful alternative if you prefer a more familiar interface or if the other methods don’t work for you.
In the next section, we will explore another method to enable Bluetooth on your Windows 10 computer using the Device Manager.
Method 4: Using the Device Manager
The Device Manager is a powerful utility in Windows that allows you to manage and control hardware devices on your computer. If none of the previous methods work or if you need to troubleshoot Bluetooth connectivity issues, you can try enabling Bluetooth using the Device Manager. Follow these steps:
- Open the “Start” menu by clicking on the Windows logo in the bottom-left corner of your screen.
- Type “Device Manager” in the search bar and click on the corresponding result to open the Device Manager.
- In the Device Manager window, look for the “Bluetooth” category. If you don’t see it, expand the “Network adapters” or “Other devices” category.
- Right-click on your Bluetooth adapter and select “Enable” from the context menu. If it is already enabled, you will see the option to “Disable” instead.
Enabling Bluetooth through the Device Manager can help resolve any issues related to the Bluetooth adapter on your computer. If you encounter problems with your Bluetooth connectivity, you can also try updating the driver for your Bluetooth adapter from the Device Manager.
Once you have enabled Bluetooth using the Device Manager, you can proceed with pairing your devices or troubleshooting any connectivity problems.
In the next section, we will explore a quick and easy method to enable Bluetooth on Windows 10 using a keyboard shortcut.
Method 5: Using a Keyboard Shortcut
If you prefer using keyboard shortcuts to quickly access and control system settings, you’ll be glad to know that there is a keyboard shortcut to enable Bluetooth on Windows 10. Here’s how you can do it:
- Press the “Windows key + A” on your keyboard to open the Action Center.
- In the Action Center, you will see various quick action buttons, including the Bluetooth button.
- Press the “B” key on your keyboard to directly navigate to the Bluetooth button.
- Press the “Enter” key to toggle the Bluetooth on or off. If it was previously off, pressing “Enter” will turn it on, and vice versa.
Using the keyboard shortcut to enable Bluetooth is a convenient method that saves you time and effort. This method is especially useful if you frequently need to toggle Bluetooth on and off quickly.
Keep in mind that the availability of the Bluetooth button in the Action Center depends on your computer’s hardware and whether it has built-in Bluetooth capabilities.
Now that you are equipped with various methods to enable Bluetooth on your Windows 10 computer, you can easily connect your devices wirelessly and enjoy the convenience and freedom Bluetooth technology offers.
Conclusion
Enabling Bluetooth on your Windows 10 computer is a straightforward process that can be done using different methods. Whether you prefer using the Action Center, the Settings app, the Control Panel, the Device Manager, or a keyboard shortcut, you have multiple options to choose from.
The Action Center provides a quick and convenient way to enable Bluetooth with just a few clicks. The Settings app offers a more comprehensive interface for managing Bluetooth and other device settings. The Control Panel provides a familiar and customizable approach, while the Device Manager allows you to troubleshoot and control hardware devices. Lastly, using a keyboard shortcut is a quick and efficient method for those who prefer using shortcuts.
Remember to check if your computer has built-in Bluetooth capabilities before attempting to enable Bluetooth. In case your computer doesn’t have Bluetooth, you can use a USB Bluetooth adapter to add Bluetooth functionality.
Once Bluetooth is enabled, you can easily pair devices such as keyboards, mice, speakers, and headphones, allowing for a clutter-free and seamless user experience.
We hope this guide has been helpful in guiding you through the process of turning on Bluetooth on your Windows 10 computer. Enjoy the convenience of wireless connections and explore the possibilities that Bluetooth technology brings to your computing experience.