Introduction
Windows Update is an essential component of the Windows operating system, designed to keep your computer up to date with the latest security patches, bug fixes, and new features. It helps ensure a smooth and secure user experience by automatically installing updates in the background. However, there may be instances where you need to turn off Windows Update temporarily or permanently. Whether it’s to stop updates from interrupting your work, conserving bandwidth, or avoiding compatibility issues, there are several methods you can use to disable Windows Update.
In this article, we will explore various ways to turn off Windows Update on your computer. We will guide you through the process step by step, explaining each method in detail. Please note that disabling Windows Update can leave your system vulnerable to security risks and may prevent you from accessing the latest features and improvements provided by Microsoft. It is recommended to keep Windows Update enabled and only disable it when absolutely necessary.
Before proceeding with any of the methods mentioned in this article, it’s important to create a system restore point or backup your data to avoid any potential issues. Additionally, keep in mind that the options to disable Windows Update may vary depending on the version of Windows you are using. We will cover methods that are applicable to the latest versions of Windows, including Windows 10 and Windows 11. Now, let’s dive into the different methods you can use to turn off Windows Update.
Method 1: Using the Windows Update settings
The easiest and most straightforward way to turn off Windows Update is by utilizing the built-in Windows Update settings. Follow these simple steps to disable Windows Update temporarily or permanently:
- Open the Start menu and search for “Settings”. Click on the “Settings” app to open it.
- In the Settings window, click on “Update & Security”.
- From the left-hand menu, select “Windows Update”.
- Click on the “Advanced options” link.
- Under the “Pause updates” section, you can choose to temporarily pause updates for up to 7 days. Keep in mind that this option will only delay the updates and they will resume automatically after the specified period.
- If you want to disable updates for a longer duration, you can click on the “Pause until” dropdown menu and select a specific date.
- If you wish to turn off updates permanently, you can scroll down and click on the “Advanced options” link again.
- Under the “Choose when updates are installed” section, select the radio button for “Semi-Annual Channel” or “Extended Channel”. This option allows you to delay feature updates for a longer period.
- Once you have made your selection, close the Settings window.
By following these steps, you have successfully disabled Windows Update using the built-in settings. However, it is important to note that this method may not be available on all versions of Windows. If you do not see the “Pause updates” or “Choose when updates are installed” options, you can try one of the alternative methods we will discuss next.
Method 2: Using the Group Policy Editor
If you are using Windows 10 Pro, Enterprise, or Education editions, you can utilize the Group Policy Editor to disable Windows Update. The Group Policy Editor provides more advanced options and allows for greater control over Windows Update settings. Here’s how you can use it:
- Press the Windows key + R on your keyboard to open the Run dialog box.
- Type “gpedit.msc” in the Run dialog box and press Enter to open the Group Policy Editor.
- In the Group Policy Editor window, navigate to “Computer Configuration” > “Administrative Templates” > “Windows Components” > “Windows Update”.
- On the right-hand side, you will see various policies related to Windows Update.
- Double-click on the policy named “Configure Automatic Updates”.
- In the policy settings window, select the “Disabled” radio button to turn off Windows Update.
- Click on “Apply” and then “OK” to save the changes.
Once you have completed these steps, the Group Policy settings will prevent Windows Update from automatically installing updates on your system. It is important to note that this method is only available on specific editions of Windows 10 and may not be applicable to all users. If you do not have access to the Group Policy Editor, you can try an alternative method to disable Windows Update.
Method 3: Using the Registry Editor
Another method to disable Windows Update is by accessing the Registry Editor. The Registry Editor contains settings and configurations for various aspects of the Windows operating system, including Windows Update. Here’s how you can use the Registry Editor to turn off Windows Update:
- Press the Windows key + R on your keyboard to open the Run dialog box.
- Type “regedit” in the Run dialog box and press Enter to open the Registry Editor.
- In the Registry Editor window, navigate to the following path:
HKEY_LOCAL_MACHINE\SOFTWARE\Policies\Microsoft\Windows\WindowsUpdate - If the “WindowsUpdate” key does not exist, you may need to create it. Right-click on the “Windows” key, select “New”, and then click on “Key”. Name the new key as “WindowsUpdate”.
- In the “WindowsUpdate” key, right-click on the right-hand side panel and select “New” > “DWORD (32-bit) Value”. Name the new value as “AUOptions”.
- Double-click on the “AUOptions” value and set the value data as follows:
- 0 – Windows Update is enabled (default)
- 1 – Windows Update is disabled
- 2 – Windows Update is set to notify before downloading and installing updates
- 3 – Windows Update is set to automatically download and notify for installation
- Click on “OK” to save the changes.
After making these changes in the Registry Editor, Windows Update will be disabled based on the value you have set for “AUOptions”. Keep in mind that modifying the Registry incorrectly can cause system issues, so always be cautious and create a backup before making any changes. If you prefer a simpler method, continue reading to discover an alternative way to disable Windows Update.
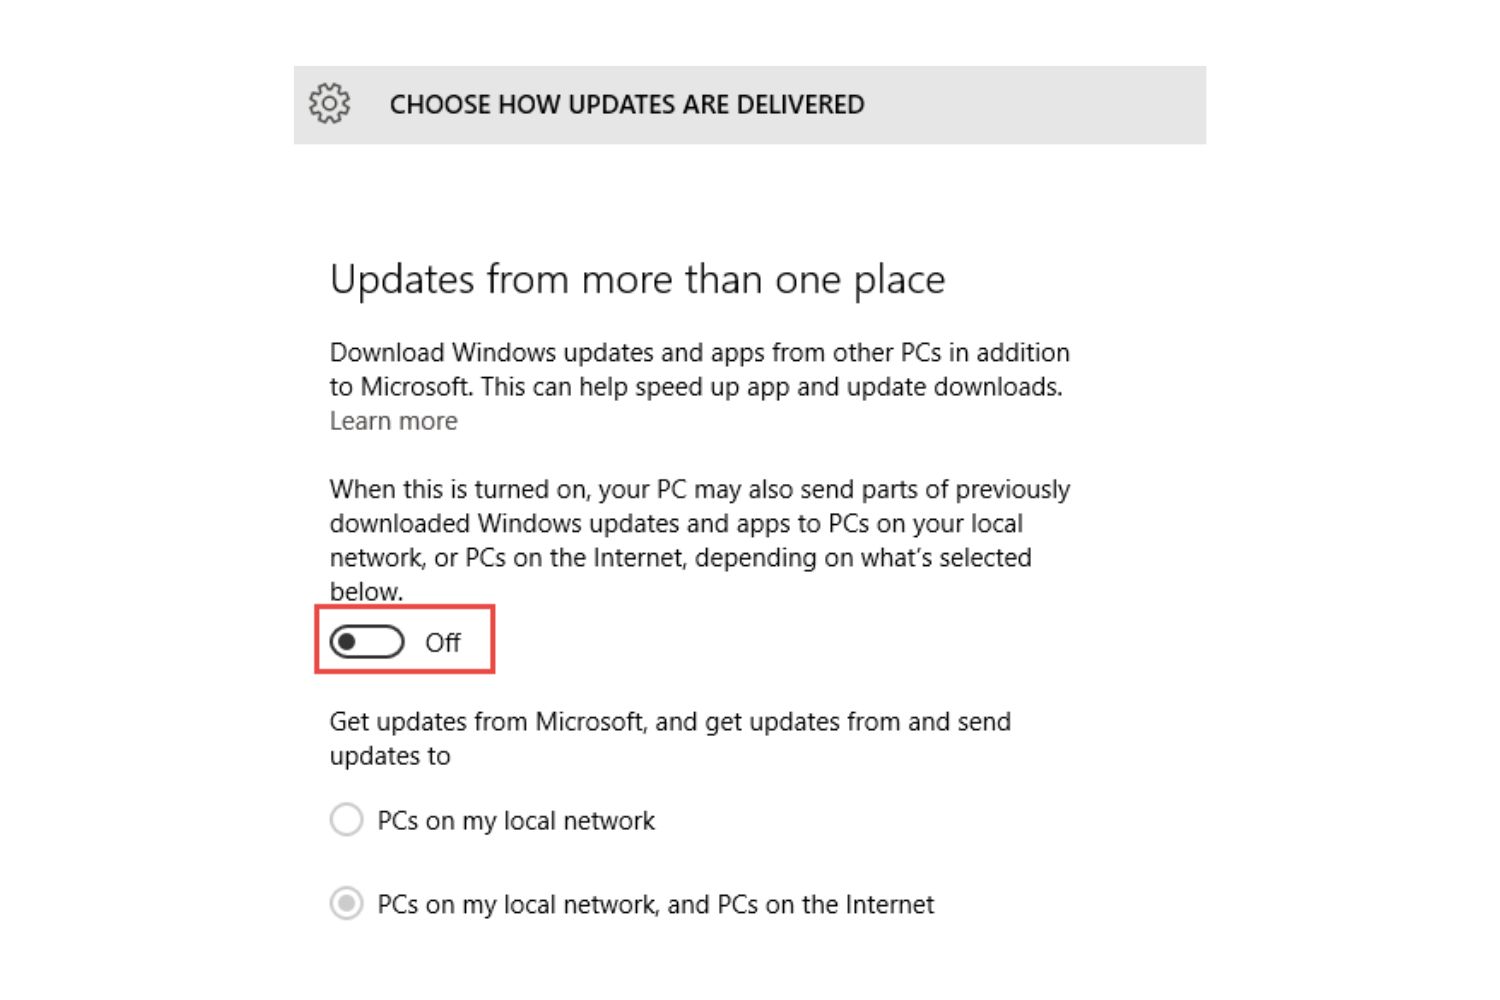
Method 4: Setting up a metered connection
If you’re running Windows 10, you can take advantage of the metered connection feature to control Windows Update behavior. By setting your network connection as metered, you can limit data usage and prevent Windows Update from automatically downloading updates. Here’s how to set up a metered connection:
- Open the Start menu and click on “Settings”.
- In the Settings window, click on “Network & Internet”.
- From the left-hand menu, select “Wi-Fi” or “Ethernet” depending on your connection type.
- Click on the network connection you want to set as metered.
- Toggle the “Set as metered connection” switch to the “On” position.
Once you have set your connection as metered, Windows Update will not download updates automatically over that network. You will have more control over when and how updates are installed. However, keep in mind that this method only applies to the specific network connection you have chosen. If you connect to a different network that is not set as metered, Windows Update will resume its usual behavior.
It’s worth noting that setting a connection as metered may also affect other aspects of Windows, such as limiting app downloads and syncing. If you need to download updates or sync your devices, you can temporarily unset the connection as metered, and then set it back after you’re done.
Setting up a metered connection provides a convenient way to control Windows Update activity on a specific network. However, if this method doesn’t suit your needs, there is another option we’ll discuss next for disabling Windows Update.
Method 5: Using a third-party tool to disable Windows Update
If you’re looking for a simpler and more user-friendly way to disable Windows Update, you can consider using a third-party tool specifically designed for this purpose. These tools often provide a more intuitive interface and additional customization options. Here’s how you can use a third-party tool to disable Windows Update:
- Search for a reputable third-party tool that allows you to disable Windows Update. There are various options available, such as “Windows Update Blocker” and “StopUpdates10”.
- Download and install the selected tool from the official website or a trusted source.
- Launch the tool and look for the option to disable Windows Update. The specific steps may vary depending on the tool you are using.
- Follow the instructions provided by the tool to disable Windows Update. This may involve toggling a switch, selecting a specific setting, or applying a patch.
- After disabling Windows Update, the tool may provide options to enable it again if needed in the future.
- Close the tool and verify that Windows Update is disabled by checking the Windows Update settings or using the appropriate system notifications.
Using a third-party tool can be a convenient solution for those who prefer a more straightforward approach to disabling Windows Update. However, it’s important to choose a reliable tool from a trusted source to ensure the security and stability of your system. It’s also worth noting that third-party tools may not receive regular updates or support, so you should exercise caution when using them.
Remember that disabling Windows Update can leave your computer vulnerable to security risks and may prevent you from accessing important feature updates and bug fixes. It is recommended to only disable Windows Update temporarily and enable it again when necessary or consider alternative methods like those mentioned earlier.
Conclusion
In this article, we have explored various methods to turn off Windows Update on your computer. Disabling Windows Update can be useful in certain situations, such as when you need to conserve bandwidth, avoid compatibility issues, or prevent updates from interrupting your work. However, it’s important to exercise caution when disabling Windows Update, as it can leave your system vulnerable to security risks and hinder access to important updates.
We discussed several methods to disable Windows Update. You can utilize the built-in Windows Update settings to pause updates temporarily or delay feature updates for a longer duration. For Windows 10 Pro, Enterprise, or Education users, the Group Policy Editor offers even greater control over Windows Update settings. The Registry Editor allows for more advanced customization options, but caution should be exercised when modifying the registry.
Another approach is to set up a metered connection, which limits data usage and prevents automatic downloading of updates on that network. Additionally, if you prefer a simpler solution, you can explore third-party tools specifically designed to disable Windows Update, although it’s essential to choose a reputable tool from a trusted source.
Before implementing any of these methods, it is recommended to create a system restore point or backup your data to mitigate the risk of potential issues. It’s also important to remember that keeping Windows Update enabled ensures your system stays secure with the latest patches and improvements from Microsoft.
Ultimately, the decision to disable Windows Update should be made carefully and based on your specific needs. It is advisable to weigh the benefits and drawbacks of disabling Windows Update and consider alternative measures, such as setting active hours or configuring update installation options, to minimize disruptions while still maintaining the security and performance of your system.