Introduction
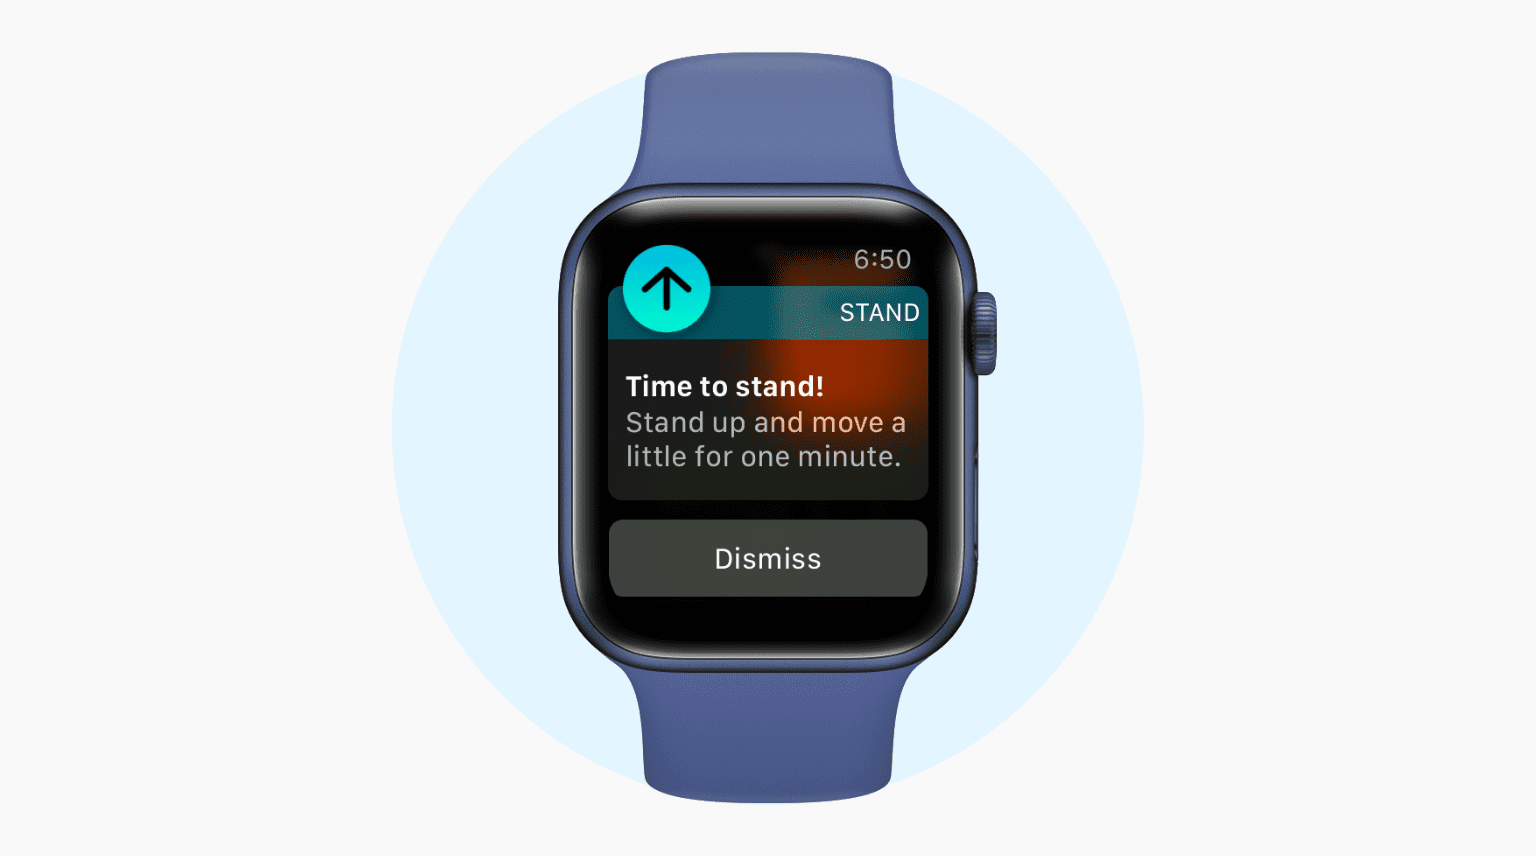
Welcome to our guide on how to turn off the Stand Up notification on your Apple Watch. The Stand Up feature prompts you to stand and move around for at least a minute every hour, aiming to promote a more active and healthy lifestyle. While this feature can be helpful for many, some users may find it unnecessary or prefer to disable it for various reasons.
Whether you are in a meeting, working on a project, or simply don’t want to be disrupted by constant reminders to stand up, we’ve got you covered. In this article, we will walk you through different methods to turn off the Stand Up notification on your Apple Watch.
By following these methods, you can regain control over your Apple Watch notifications and customize your experience to suit your specific needs. Whether you want to disable the Stand Up feature temporarily or permanently, we have the solutions for you.
Keep in mind that turning off the Stand Up notification doesn’t mean you shouldn’t incorporate movement and exercise into your daily routine. It simply offers you the freedom to decide when and how you want to be reminded to stand up and move around.
So, let’s dive into the various methods you can use to disable the Stand Up notification and tailor your Apple Watch to your preferences.
Method 1: Using the Apple Watch app on iPhone
One of the easiest ways to disable the Stand Up notification on your Apple Watch is by utilizing the Apple Watch app on your paired iPhone. Follow these simple steps to turn off the Stand Up notification:
- Open the Apple Watch app on your iPhone.
- Select the “My Watch” tab at the bottom of the screen.
- Scroll down and tap on “Activity”.
- Under the “Stand Reminders” section, toggle off the switch next to “Stand Reminders”.
- Confirm the action by tapping on “Turn Off” in the pop-up window.
The Stand Up notification will now be disabled, and you will no longer receive reminders to stand up on your Apple Watch.
It’s important to note that by using this method, you are turning off the Stand Up notification globally for all of your paired Apple devices. If you have multiple devices, make sure to perform these steps on the iPhone that is paired with the Apple Watch you want to adjust.
If you ever decide to re-enable the Stand Up notification in the future, simply follow the same steps and toggle the switch back on.
Now that you have learned how to disable the Stand Up notification using the Apple Watch app on your iPhone, let’s explore another method you can use directly on your Apple Watch itself.
Method 2: Using the Apple Watch settings on the watch
If you prefer to adjust settings directly on your Apple Watch, you can disable the Stand Up notification by following these steps:
- On your Apple Watch, open the Settings app by tapping on the icon located on the home screen.
- Scroll down and tap on “Activity”.
- Select “Stand Reminders”.
- Toggle off the switch next to “Stand Reminders” to disable the feature.
Once you have turned off the Stand Up notification, your Apple Watch will no longer send you reminders to stand up.
This method is particularly useful if you don’t have immediate access to your paired iPhone or prefer to make adjustments directly on your Apple Watch. It allows you to customize your settings based on your preferences and needs.
If you ever decide to enable the Stand Up notification again, follow the same steps and toggle the switch back on.
Now that you know how to disable the Stand Up notification using the Apple Watch settings on the watch, let’s explore another method to manage notifications related to the Stand Up feature.
Method 3: Disabling notifications for the Stand Up feature
If you still want to receive the Stand Up notifications but prefer to have them silenced or hidden, you can disable the notifications specifically for the Stand Up feature. Follow these steps to customize your notifications:
- On your Apple Watch, open the Settings app.
- Scroll down and tap on “Notifications”.
- Select “Activity”.
- Under the “Notifications” section, you can choose from the following options:
- “Mirror iPhone” will mirror the Stand Up notifications based on your iPhone’s settings.
- “Custom” allows you to customize the notification settings for the Stand Up feature.
- “Off” will completely disable notifications for the Stand Up feature.
Choose the option that best suits your preference. If you select “Custom”, you can adjust specific notification settings, such as turning off sound or hiding the notification previews.
By disabling or customizing the notifications for the Stand Up feature, you can still receive reminders to stand up on your Apple Watch without being interrupted or distracted by constant alerts.
Remember, you can always revisit these settings and make changes whenever you want to modify how the Stand Up notifications appear on your Apple Watch.
Now that you know how to manage notifications for the Stand Up feature, let’s explore one more method to customize your Apple Watch experience.
Method 4: Enabling Theater Mode
Another way to temporarily disable the Stand Up notification and other interruptions on your Apple Watch is by enabling Theater Mode. Theater Mode is designed to mute sounds and disable the raise-to-wake feature, ideal for situations where you don’t want to be disturbed by notifications.
Here’s how you can enable Theater Mode on your Apple Watch:
- Swipe up on the watch face to access the Control Center.
- Tap on the theater mask icon to enable Theater Mode.
When Theater Mode is enabled, your Apple Watch will remain silent and only show the time when you raise your wrist. Notifications, including the Stand Up reminders, will still appear on your watch, but they will not make sounds or activate the raise-to-wake feature.
This method allows you to have control over when you want to engage with your Apple Watch notifications while preventing any disruptions during specific activities or events.
To exit Theater Mode and return to normal functionality, simply swipe up on the watch face to access the Control Center again and tap on the theater mask icon to disable Theater Mode.
Now that you are familiar with enabling Theater Mode, you have learned four different methods to turn off or customize the Stand Up notification on your Apple Watch.
Remember, it’s essential to find the balance that works for you, promoting a healthy lifestyle while managing your notifications effectively.
Conclusion
Managing notifications on your Apple Watch is crucial to tailor the device to your preferences and lifestyle. The Stand Up notification can be helpful for encouraging regular movement and promoting a healthier routine. However, if you find it unnecessary or disruptive, you can easily turn it off using various methods.
In this guide, we explored four ways to disable or customize the Stand Up notification on your Apple Watch:
- Using the Apple Watch app on your iPhone
- Utilizing the Apple Watch settings on the watch itself
- Disabling notifications for the Stand Up feature
- Enabling Theater Mode
By following these methods, you can regain control over your Apple Watch notifications, allowing you to focus on what matters most to you without constant interruptions.
Remember, even if you disable the Stand Up notification, it’s essential to incorporate movement and exercise into your daily routine. Listen to your body and take breaks to stretch and move around, enhancing your overall well-being.
Lastly, feel free to revisit these methods at any time to adjust your Apple Watch settings based on your evolving needs and preferences. Customize your Apple Watch experience to best suit your lifestyle and ensure a seamless and enjoyable user experience.
Now that you have the knowledge and tools to manage the Stand Up notification on your Apple Watch, it’s time to take control of your device and create a personalized experience that aligns with your goals and preferences.