Introduction
Welcome to the world of technology, where devices become an integral part of our lives. If you’ve recently purchased a new tablet and are wondering how to transfer your valuable data from your old tablet, you’ve come to the right place. In this article, we will guide you through the process of transferring data from one tablet to another, ensuring that your important files, photos, and apps make a seamless transition.
Transferring data from one tablet to another may seem like a daunting task, but with the right methods and tools, it can be a straightforward and hassle-free process. Whether you’re switching to a new tablet due to an upgrade, or simply want to transfer your data to a different device, we have you covered.
Throughout this article, we will explore different methods to transfer your data. We will guide you through the steps of connecting both tablets to the same Wi-Fi network, creating a backup of your data on the old tablet, and restoring the backup on the new tablet. Additionally, we will discuss alternative methods such as using cloud storage services, USB cables, and external storage devices to transfer your data with ease.
By following these step-by-step instructions, you’ll be able to transfer your data efficiently, ensuring that no valuable files or memories get left behind. So, let’s dive into the world of tablet data transfer and explore the various methods available to make your transition seamless and stress-free.
Whether you’re an avid photographer with a collection of cherished images, a student with important study materials, or a professional needing access to critical files, our methods will ensure that your data is safely transferred to your new tablet. Let’s get started!
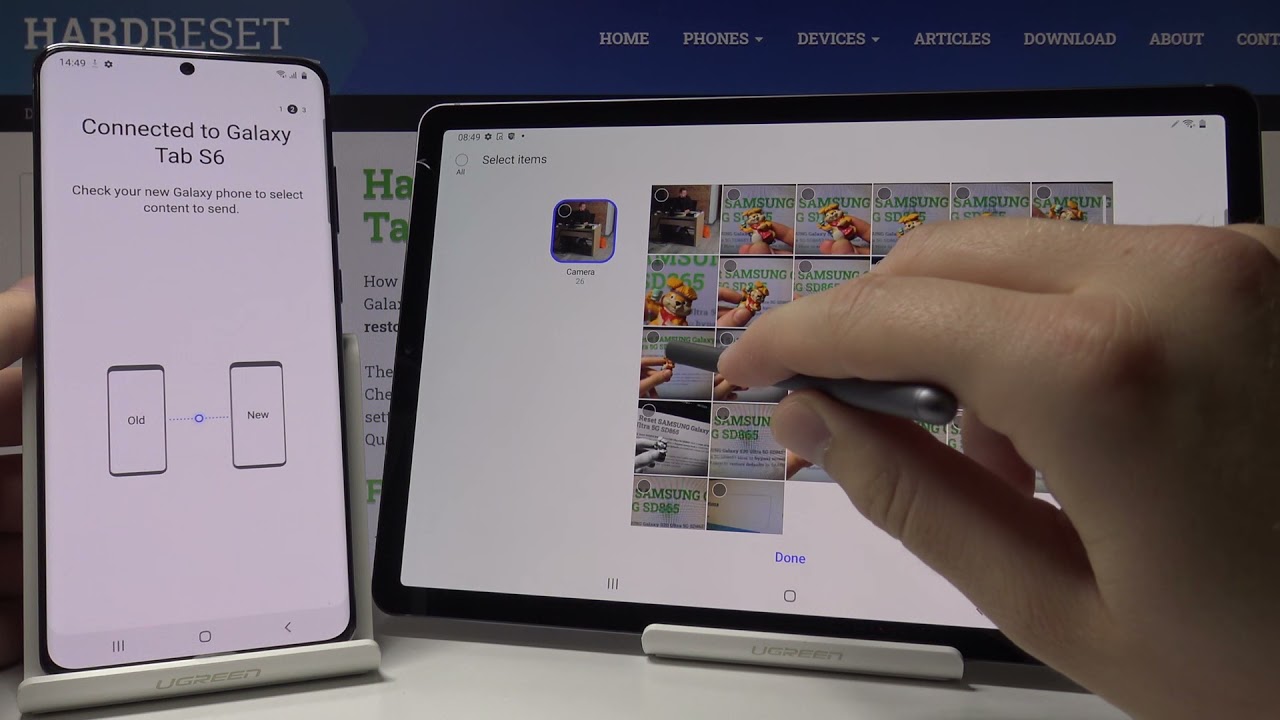
Step 1: Connect both tablets to the same Wi-Fi network
The first step in transferring data from your old tablet to your new one is to ensure that both devices are connected to the same Wi-Fi network. Connecting to the same network allows for seamless communication between the tablets, enabling the transfer of data.
To connect to a Wi-Fi network on your tablet, follow these simple steps:
- Go to the Settings menu on your tablet. This can typically be found in the app drawer or by swiping down from the top of the screen and tapping on the gear icon.
- Locate and tap on the Wi-Fi option. This will display a list of available Wi-Fi networks in your vicinity.
- Select the Wi-Fi network that you want to connect to. If the network is password-protected, enter the password when prompted.
- Wait for your tablet to connect to the selected Wi-Fi network. Once connected, you will see a Wi-Fi signal indicator in the status bar at the top of your tablet’s screen.
Repeat these steps on both the old and new tablet to ensure that they are connected to the same Wi-Fi network. It is important to note that both tablets need to be connected to the same network simultaneously for the data transfer to take place smoothly.
Connecting both tablets to the same Wi-Fi network establishes a direct connection between the devices, allowing for the transfer of data without the need for any additional cables or external devices. This method is particularly useful when transferring smaller files or when you have a stable and reliable Wi-Fi connection.
Once you have successfully connected both tablets to the same Wi-Fi network, you are ready to proceed to the next step of creating a backup of your data on the old tablet. This will ensure that none of your valuable data is lost during the transfer process. So, let’s move on to the next step and secure your data before making the switch to your new tablet!
Step 2: Create a backup of your data on the old tablet
Before transferring data to your new tablet, it is crucial to create a backup of your data on the old tablet. This will ensure that none of your important files, photos, or apps are lost during the transfer process. Creating a backup provides an additional layer of security and peace of mind.
There are several ways you can create a backup of your data on the old tablet. Let’s explore a couple of popular methods:
- Cloud Backup: One of the easiest and most convenient ways to create a backup is by using cloud backup services. Many tablets come with built-in cloud backup options, such as iCloud for Apple devices or Google Drive for Android devices. Simply go to the settings of your tablet and enable the automatic backup feature. This will ensure that your data, including contacts, photos, app data, and settings, is continuously backed up to the cloud. If your tablet doesn’t have a built-in backup option, you can also install and use third-party backup apps, like Dropbox or OneDrive, to create a backup of your data.
- External Storage: Another option is to create a backup of your data on an external storage device, such as an SD card, USB flash drive, or external hard drive. Insert the external storage device into your old tablet and follow the prompts to transfer your data. Most tablets have a file manager app that allows you to easily copy and move files between the internal storage and the external device. Make sure to select all the necessary files, including photos, documents, videos, and app data, for the backup.
Whichever method you choose, ensure that your backup is complete and up-to-date before proceeding to the next step. Take your time, double-check your files, and ensure that all important data is included in the backup.
By creating a backup of your data on the old tablet, you are taking a proactive approach to safeguarding your information. In the unfortunate event of any data loss or transfer issues, you can simply restore the backup and retrieve your data on the new tablet without any hassle or frustration.
Now that you’ve created a backup of your data, it’s time to move on to the next step and restore the backup on your new tablet. Stay tuned to learn how to seamlessly transfer your data from the backup to your new device!
Step 3: Restore the backup on the new tablet
Now that you have successfully created a backup of your data on the old tablet, it’s time to restore that backup on your new tablet. Restoring the backup will transfer all your files, settings, apps, and other data from the old tablet to the new one, making the transition smooth and seamless.
Restoring the backup typically involves a few simple steps. Here’s how you can do it:
- Cloud Backup: If you created a backup using a cloud backup service, such as iCloud or Google Drive, the process of restoring the backup is usually straightforward. On your new tablet, go to the settings and locate the backup and restore options. Select the option to restore from a backup and choose the backup file you previously created. Follow the on-screen prompts to complete the restoration process. Make sure your new tablet is connected to the internet for a seamless cloud backup restore.
- External Storage: If you backed up your data on an external storage device, such as an SD card, USB flash drive, or external hard drive, the restoration process may vary depending on the device and operating system. Insert the external storage device into your new tablet and navigate to the file manager app. Locate the backup file and select the option to restore or import data from the external storage. Follow the on-screen instructions to complete the restoration process, ensuring that all necessary files and settings are transferred to your new tablet.
During the restoration process, it is important to be patient and avoid interrupting the transfer. Depending on the size of your backup and the speed of your devices, the process may take some time. Make sure your new tablet is adequately charged or connected to a power source to prevent any disruptions or unexpected shutdowns.
Once the restoration is complete, your new tablet should contain all the data from your old tablet, including contacts, messages, photos, apps, and settings. Take some time to explore your new device and ensure that all your important files and settings have been successfully transferred.
By restoring the backup on your new tablet, you are ensuring that none of your valuable data gets left behind. The restoration process allows for a seamless transition, enabling you to pick up right where you left off on your old tablet.
Now that you have successfully restored the backup on your new tablet, it’s time to proceed to the next steps and explore alternative methods to transfer data between tablets. Stay tuned to discover additional options to make your data transfer experience even more flexible and convenient!
Step 4: Transfer data using a cloud storage service
If you prefer not to create a backup and restore it on your new tablet, another convenient method of transferring data is by using a cloud storage service. Cloud storage allows you to store your files securely in online servers, accessible from any device with an internet connection. Here’s how you can transfer data using a cloud storage service:
- Select a cloud storage service: There are several popular cloud storage services available, such as Google Drive, Dropbox, OneDrive, and iCloud. Choose the one that best suits your needs and create an account if you don’t already have one.
- Upload your files: Once you have set up your cloud storage account, you can begin uploading your files from your old tablet. Open the cloud storage app on the old tablet and select the files you want to transfer. This could include photos, documents, videos, or any other important data you want to transfer to the new tablet. Use the app’s upload or share function to transfer the files to your cloud storage account.
- Access your files on the new tablet: On your new tablet, download and install the cloud storage app associated with the service you chose. Log in to your account using the same credentials you used on the old tablet. Once logged in, you will be able to access all the files you uploaded from the old tablet. You can download them directly to your new tablet or access them within the cloud storage app.
Transferring data using a cloud storage service offers the advantage of flexibility and accessibility. You can upload your files from the old tablet and access them on the new tablet without the need for physical cables or external storage devices. This method is particularly useful when you have a large amount of data that exceeds the storage capacity of your devices.
Furthermore, cloud storage services often provide additional features, such as automatic syncing and file versioning, ensuring that your data is always up to date and accessible across multiple devices. Keep in mind that some cloud storage services may have limitations or require a subscription for larger storage capacities, so it’s essential to familiarize yourself with the service’s terms and conditions.
By using a cloud storage service to transfer your data, you can enjoy the convenience of accessing your files on the go and seamlessly synchronizing your data across all your devices. Next, we will explore another method of transferring data between tablets using a USB cable. Keep reading to learn more!
Step 5: Transfer data using a USB cable
If you prefer a more direct and traditional method of transferring data between tablets, using a USB cable is a reliable option. This method allows you to establish a physical connection between the old and new tablets, enabling data transfer at a faster rate. Here’s how you can transfer data using a USB cable:
- Check compatibility: Before proceeding, ensure that both your old and new tablets support USB OTG (On-The-Go) functionality. This feature enables devices to act as hosts and allows them to connect to each other using a USB cable.
- Obtain a USB OTG cable: To facilitate the transfer, you will need a USB OTG cable. This cable has a micro-USB or USB-C connector on one end and a standard USB-A connector on the other end. Make sure to choose a cable that is compatible with the ports on both your tablets.
- Connect the tablets: Plug one end of the USB OTG cable into the old tablet’s charging port, and the other end into the charging port of the new tablet. Once connected, the tablets should recognize each other, and a file transfer interface may appear on the screens of both devices.
- Select files to transfer: On your old tablet, navigate to the files, photos, or other data you wish to transfer. Depending on the operating system of your tablet, you may need to use a dedicated file manager app or access the files directly from the device’s internal storage or SD card. Select the files you wish to transfer, either individually or by selecting multiple files at once.
- Initiate the transfer: Once you have selected the files, choose the option to copy or move them to the new tablet. The exact steps may vary depending on the file manager app or operating system. Follow the on-screen prompts to complete the transfer process. Be patient as larger files or a large number of files may take longer to transfer.
Transferring data using a USB cable offers a secure and reliable method of transferring files directly from one tablet to another. It eliminates the need for an internet connection or additional hardware, providing a simple and efficient way to transfer data.
It is important to note that some tablets may require you to enable USB debugging or change USB connection settings in the device’s settings menu before initiating the transfer. This will allow the tablets to communicate properly and ensure a successful data transfer.
By using a USB cable to transfer data between tablets, you can enjoy a direct and efficient method of transferring your files, photos, and other data without relying on cloud services or external devices. Next, we will explore an alternative method of transferring data using a microSD card or external storage device. So, let’s continue!
Step 6: Transfer data using a microSD card or external storage device
If your tablets have a microSD card slot or support external storage devices, another convenient method for transferring data is by using a microSD card or external storage device. This method allows you to physically transfer files between tablets without relying on an internet connection or online services. Here’s how you can transfer data using a microSD card or external storage device:
- Check compatibility: Ensure that both your old and new tablets support microSD cards or have the necessary ports to connect an external storage device. Some tablets may have a dedicated microSD card slot, while others may require an adapter or a USB OTG cable for connecting external storage.
- Prepare the microSD card or external storage device: If you plan to use a microSD card, insert it into the microSD card slot of your old tablet. If you opt for an external storage device such as a USB flash drive or external hard drive, connect it to the appropriate port using a compatible cable or adapter.
- Transfer files to the microSD card or external storage device: On your old tablet, navigate to the files, photos, or other data you want to transfer. Select the desired files and choose the option to copy or move them to the microSD card or external storage device. This can typically be done through the device’s file manager app or by accessing the files directly from internal storage or other media.
- Connect the microSD card or external storage device to the new tablet: In the new tablet, insert the microSD card into the appropriate slot or connect the external storage device using a compatible cable or adapter. Once connected, the new tablet should detect the storage device and allow you to access the transferred files.
- Transfer files to the new tablet: On your new tablet, navigate to the microSD card or external storage device and select the files you want to transfer. Choose the option to copy or move them to the new tablet’s internal storage or any desired location. Follow the on-screen instructions to complete the transfer process.
Transferring data using a microSD card or external storage device provides a convenient and flexible option, especially when dealing with larger files or a significant amount of data. It allows you to physically carry the storage device and transfer files directly between tablets without relying on internet connectivity.
Keep in mind that some tablets may require you to format the microSD card or external storage device to a specific file system format before it can be used. Formatting the storage device will erase all existing data, so make sure to back up any important files before proceeding.
By using a microSD card or external storage device to transfer data between tablets, you can enjoy a versatile and portable solution for transferring files, photos, videos, and other important data. This method offers a high level of control and ensures that your data remains securely within your possession.
With the completion of this step, you have explored various methods to transfer data between tablets. You can choose the method that suits your preferences, the available resources, and the type and size of data you wish to transfer. Congratulations on successfully transferring your data to your new tablet!
Conclusion
Congratulations! You have successfully learned different methods to transfer data from one tablet to another. Whether you chose to connect both tablets to the same Wi-Fi network, created a backup and restored it, used a cloud storage service, transferred data using a USB cable, or utilized a microSD card or external storage device, you now have the tools and knowledge to make your data transfer process a breeze.
Transferring data between tablets is an essential task, especially when upgrading to a new device or switching between devices. It ensures that you can continue accessing your valuable files, photos, apps, and other data seamlessly on your new tablet.
Remember to always follow the specific instructions provided for each method to ensure a smooth and successful transfer. It’s important to double-check that you have all the necessary requirements, such as a stable Wi-Fi connection, a compatible USB cable or OTG adapter, or a functional microSD card or external storage device.
Additionally, take the time to back up your data regularly, whether through cloud storage services, external storage devices, or any other suitable method. Doing so will provide an extra layer of protection and peace of mind, ensuring that your data is safe in case of any unforeseen events or issues that may arise during the data transfer process.
Each method has its strengths and may suit different scenarios. Consider factors such as available resources, the size and type of files you’re transferring, and personal preferences to choose the most suitable method for your specific needs.
Remember to explore the settings and features of your new tablet thoroughly to optimize its performance and take advantage of any additional features or services that may be available.
With the knowledge gained from this article, you are now well-equipped to transfer data from your old tablet to your new one efficiently and effectively. Embrace the possibilities offered by your new tablet and enjoy a seamless transition without losing any of your important data.
Happy exploring and enjoy your new tablet!