Introduction
Welcome to our guide on how to sync iMessage to your iPad. As an iPad user, you may find it convenient to access your iMessages across all your Apple devices, including your iPhone and iPad. Syncing your iMessage allows you to seamlessly send and receive messages from your iPad, making it a versatile tool for communication.
iMessage is a messaging platform developed by Apple that lets you send text messages, photos, videos, and more to other Apple users. By syncing iMessage to your iPad, you can stay connected with friends, family, and colleagues, even when you don’t have your iPhone with you.
In this article, we will walk you through the step-by-step process of syncing iMessage to your iPad. Whether you’re an experienced iPad user or new to the world of Apple devices, our easy-to-follow instructions will ensure that you can start enjoying the benefits of synced messaging in no time.
Before we dive into the steps, it’s important to note that syncing iMessage requires a few prerequisites. Firstly, make sure that your iPad is running on the latest iOS version. Secondly, ensure that you are signed in to your Apple ID on your iPad. Lastly, make sure that iMessage is enabled on both your iPhone and iPad.
With these preparations in mind, let’s get started on syncing iMessage to your iPad and revolutionize the way you communicate on your Apple devices.
Step 1: Update iOS on your iPad
Before you can sync iMessage to your iPad, it’s crucial to ensure that your device is running on the latest iOS version. Updating to the latest iOS version not only provides you with the latest features and security enhancements but also ensures compatibility with iMessage syncing.
To update iOS on your iPad, follow these steps:
- Connect your iPad to a stable Wi-Fi network to ensure a smooth and uninterrupted update process.
- Go to the “Settings” app on your iPad’s home screen.
- Scroll down and tap on “General.”
- Next, tap on “Software Update.”
- Your iPad will then check for available updates. If an update is available, tap on “Download and Install.”
- Enter your passcode if prompted, and agree to the terms and conditions.
- The update process will begin, and your iPad will restart once the update is complete.
It’s important to note that the update process may take some time, depending on the size of the update and the speed of your internet connection. Ensure that your iPad is sufficiently charged or connected to a power source to prevent any interruptions during the update process.
After your iPad has successfully updated to the latest iOS version, you can proceed to the next step of syncing iMessage to your iPad. It’s always a good practice to keep your iOS devices up to date to enjoy the latest features and security improvements that Apple provides.
Step 2: Sign in to your Apple ID on your iPad
To sync iMessage to your iPad, you need to ensure that you are signed in to your Apple ID on your device. Your Apple ID serves as your unique identifier and allows you to access various Apple services, including iMessage. Here’s how you can sign in to your Apple ID on your iPad:
- Open the “Settings” app on your iPad’s home screen.
- Scroll down and tap on “Sign In to your iPad” or “Sign in to your device” (depending on your iOS version).
- Next, enter your Apple ID email address and password in the provided fields. If you don’t have an Apple ID, you can create one by tapping on “Don’t have an Apple ID or forgot it?” and following the on-screen instructions.
- After entering your Apple ID credentials, tap on “Sign In” to proceed.
- If you have enabled two-factor authentication for your Apple ID, you may be prompted to enter the verification code sent to your trusted devices or phone number.
- Once you have successfully signed in to your Apple ID, you can proceed to the next step of enabling iMessage on your iPad.
By signing in to your Apple ID, you ensure that your iMessage conversations and settings are synced across your Apple devices. This means that you can pick up conversations where you left off, regardless of whether you’re using your iPhone or iPad.
In addition to syncing iMessage, signing in to your Apple ID also grants you access to other Apple services, such as iCloud, the App Store, and Apple Music. It’s a convenient way to manage your Apple devices and enjoy a seamless user experience across all your devices.
Once you have successfully signed in to your Apple ID on your iPad, we can move on to the next step of enabling iMessage on your device. Let’s continue our journey towards synced messaging on your iPad!
Step 3: Enable iMessage on your iPad
To start syncing iMessage on your iPad, you need to enable the iMessage feature. Enabling iMessage allows you to send and receive messages from other Apple users seamlessly. Here’s how you can enable iMessage on your iPad:
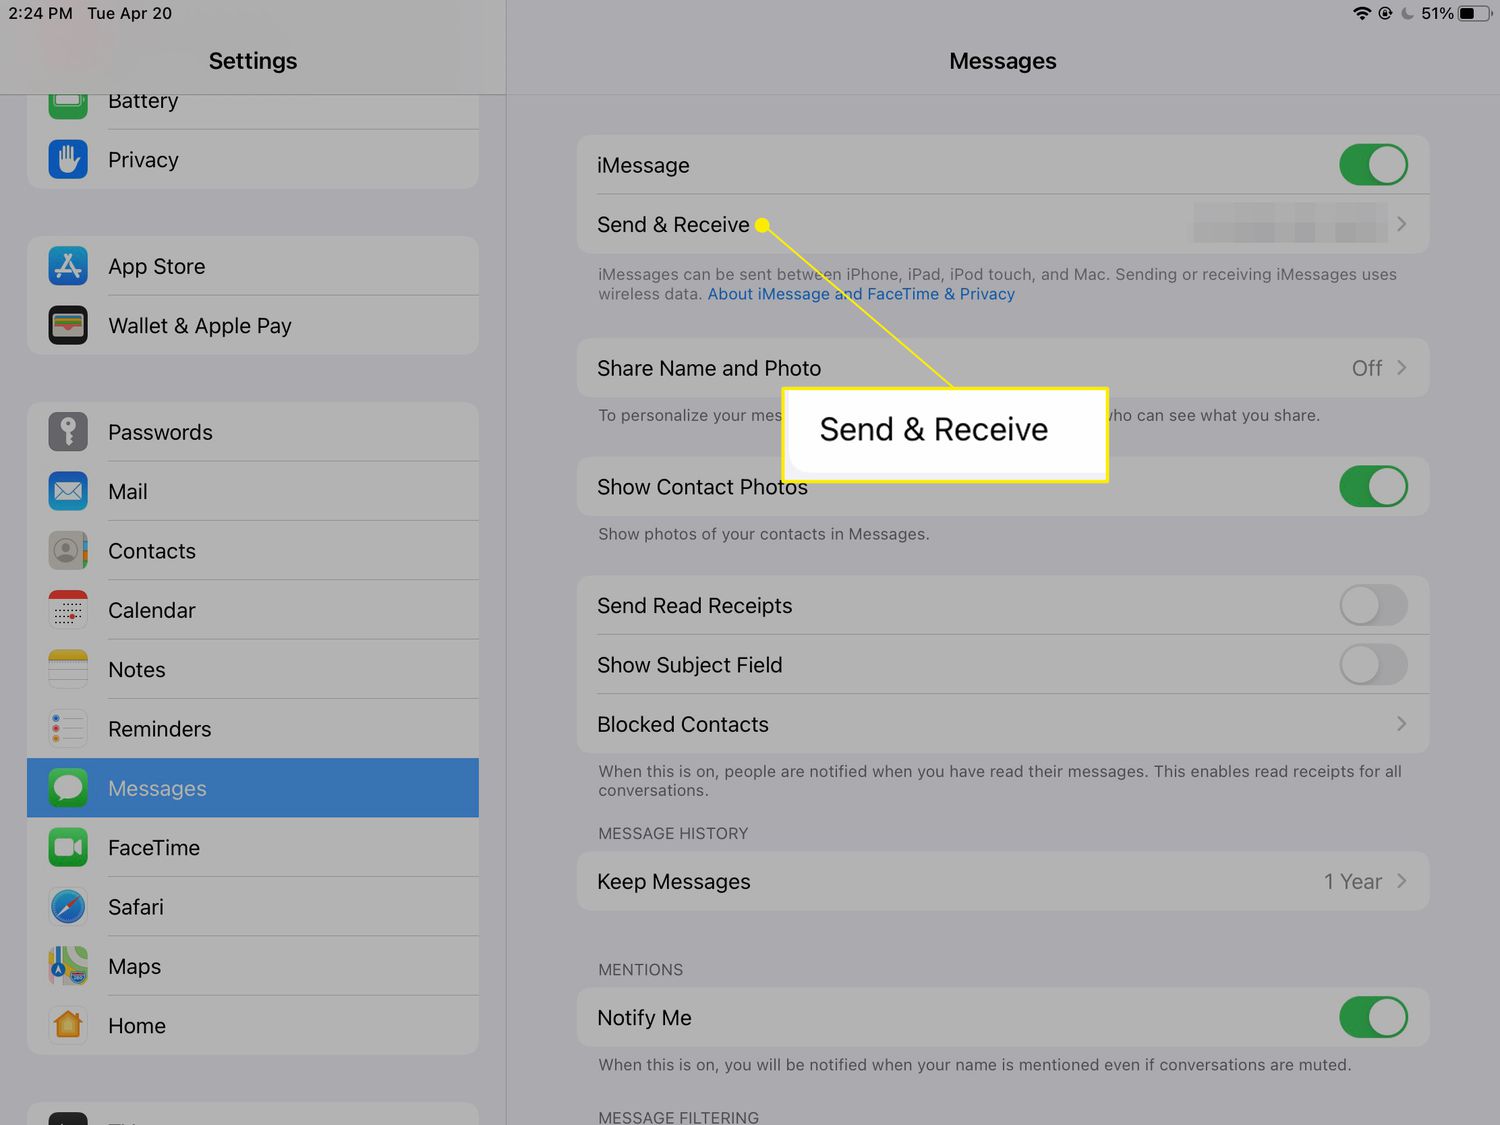
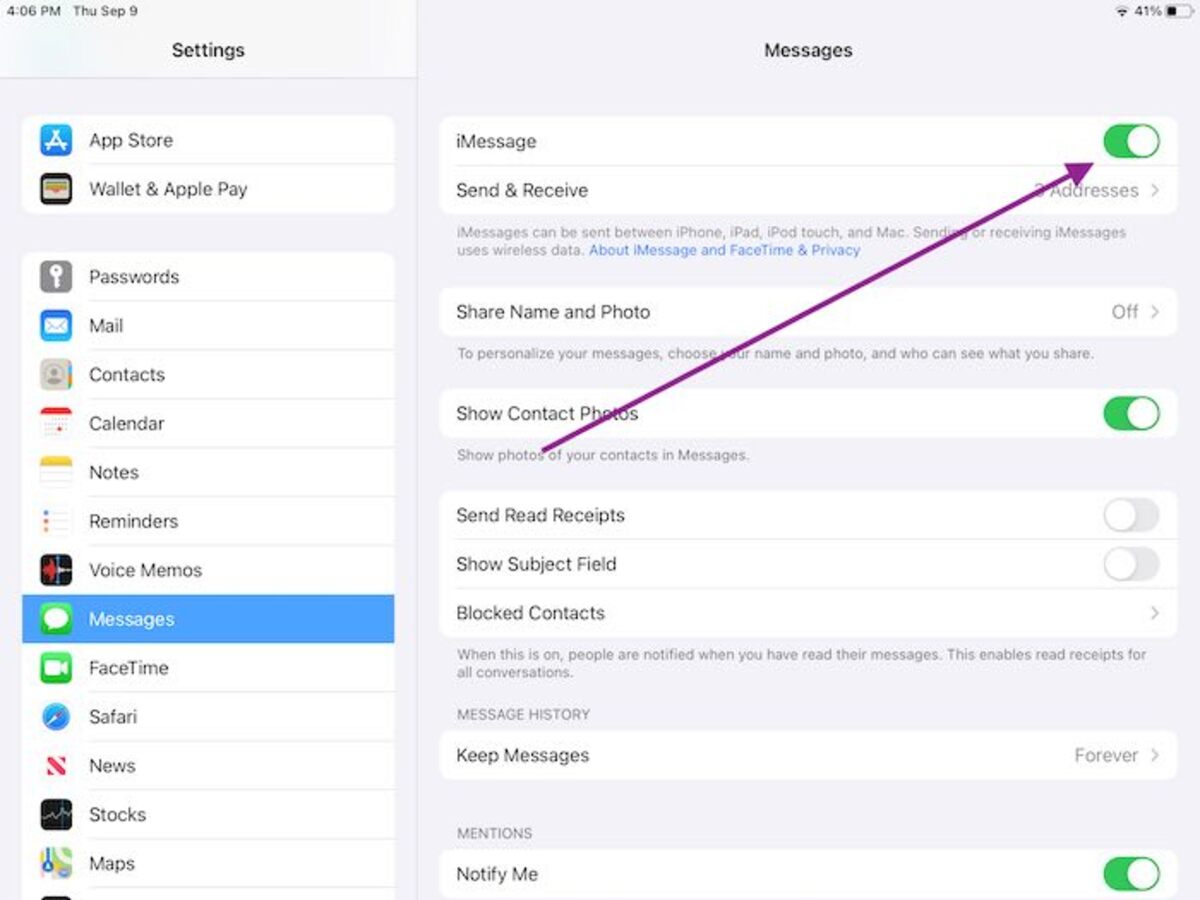
- Open the “Settings” app on your iPad’s home screen.
- Scroll down and tap on “Messages.”
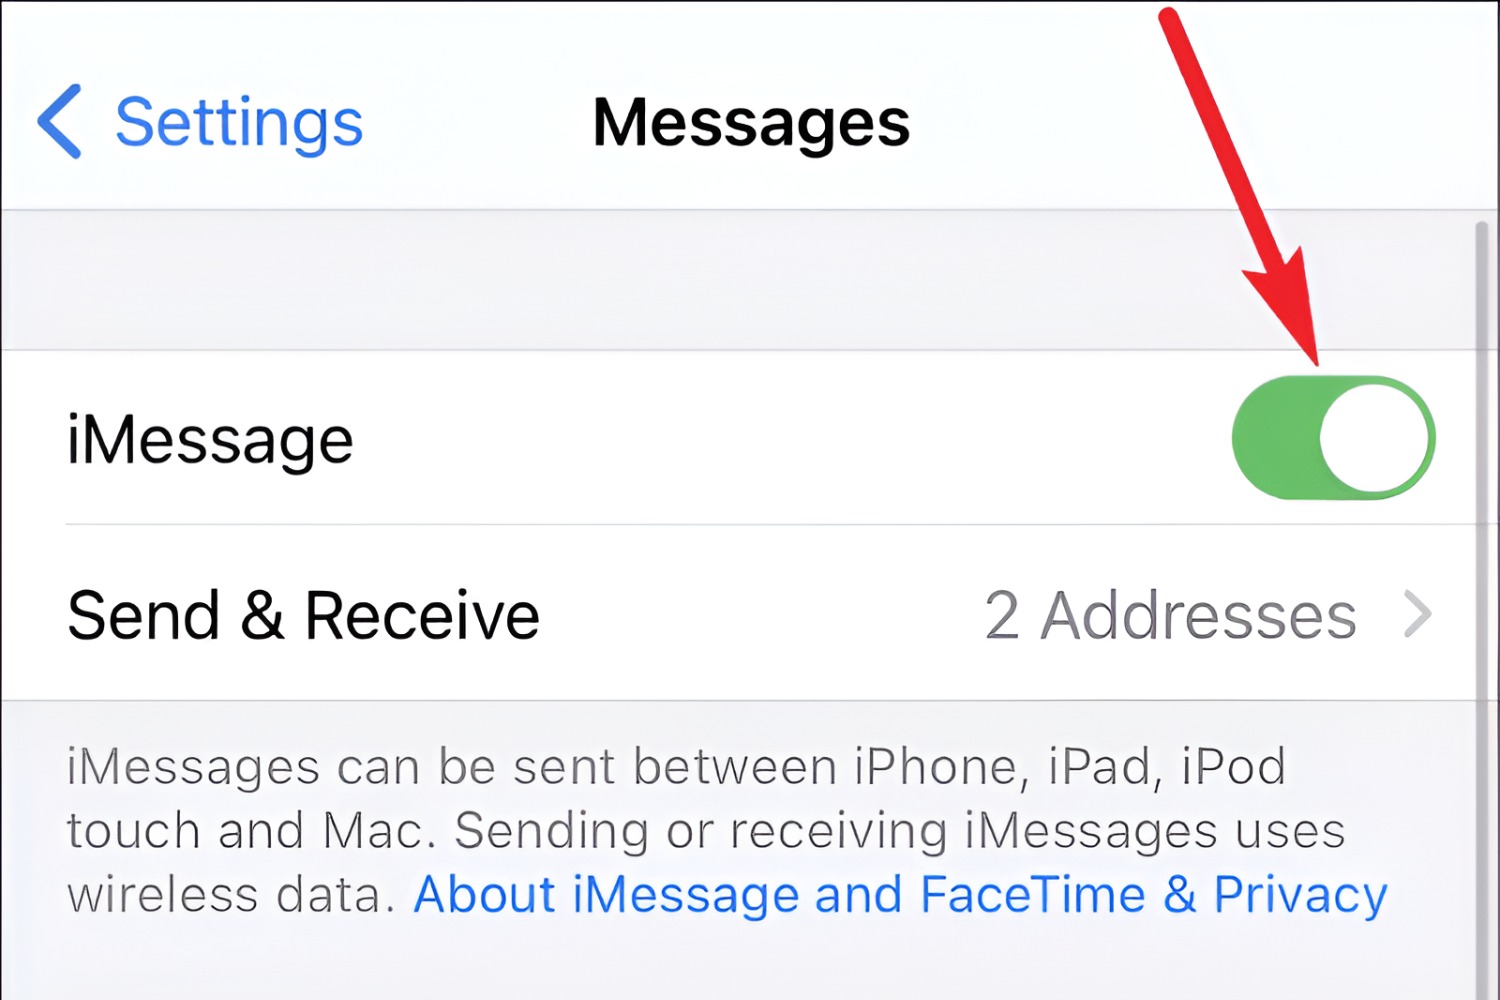
- In the Messages settings, locate the “iMessage” toggle switch and make sure it is turned on (the switch will appear green when enabled).
- You may need to wait a moment while your device verifies your iMessage activation status.
- Once iMessage is successfully activated on your iPad, you’ll see a notification indicating that “iMessage is waiting for activation.”
- Wait for a few seconds or minutes for the iMessage activation process to complete. If the activation fails, ensure that your iPad is connected to a stable Wi-Fi or cellular network, or try the “Try Again” option.
- Once the iMessage activation is complete, you can proceed to the next step of syncing iMessage with your iPhone.
Enabling iMessage on your iPad allows you to send text messages, photos, videos, and more to other Apple users, all from the convenience of your iPad. By syncing iMessage with your iPhone, you can seamlessly switch between devices without missing a beat in your conversations.
It’s important to note that iMessage utilizes an internet connection (either Wi-Fi or cellular data) to send messages, and may incur data charges depending on your network plan. Ensure that your iPad is connected to a stable network to enjoy uninterrupted messaging with iMessage.
Now that you have successfully enabled iMessage on your iPad, let’s move on to the next step of syncing iMessage with your iPhone to unify your messaging experience across both devices.
Step 4: Sync iMessage with your iPhone
Syncing iMessage with your iPhone allows you to seamlessly continue conversations across both devices. By syncing your iMessages, you can receive and send messages from your iPad using your existing iPhone phone number and Apple ID. Here’s how you can sync iMessage with your iPhone:
- Open the “Settings” app on your iPhone.
- Scroll down and tap on “Messages.”
- In the Messages settings, tap on “Text Message Forwarding.”
- You’ll see a list of devices associated with your Apple ID. Find your iPad and enable the toggle switch next to it.
- You may be prompted to enter the code displayed on your iPad to authorize text message forwarding.
- Once you authorize text message forwarding, your iPad will display a verification code.
- Enter the verification code on your iPhone to complete the syncing process.
- After successfully syncing iMessage with your iPhone, you can now receive and send messages on your iPad using your iPhone phone number and Apple ID.
Syncing iMessage with your iPhone ensures that all your messages are up to date and accessible across both devices. This means that you can seamlessly transition between your iPad and iPhone without missing any messages.
It’s important to note that syncing iMessage with your iPhone requires both devices to be connected to the internet. Ensure that your iPad and iPhone are connected to a stable Wi-Fi or cellular network to enjoy uninterrupted messaging synchronization.
Now that you have successfully synced iMessage with your iPhone, let’s move on to the final step of adjusting iMessage settings on your iPad to personalize your messaging experience even further.
Step 5: Adjust iMessage settings on your iPad
Now that you have successfully synced iMessage to your iPad and iPhone, it’s time to explore and customize the iMessage settings on your iPad. Adjusting these settings allows you to personalize your messaging experience and tailor it to your preferences. Here’s how you can adjust iMessage settings on your iPad:
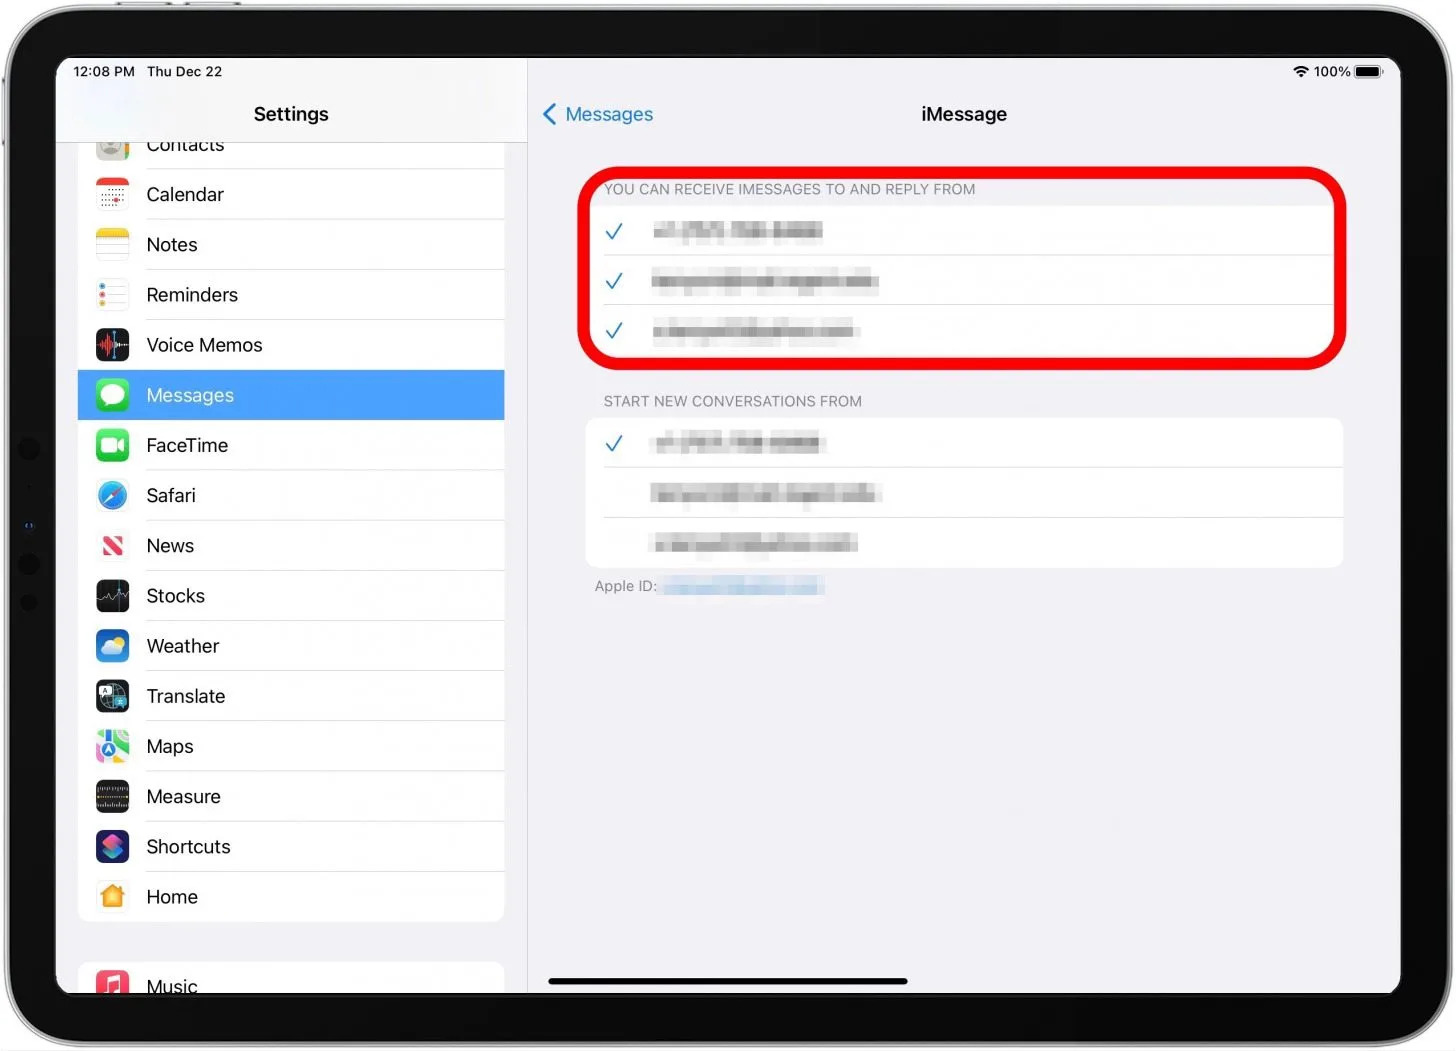
- Open the “Settings” app on your iPad.
- Scroll down and tap on “Messages.”
- In the Messages settings, you’ll find various options to customize your iMessage experience.
- Here are a few key settings you can adjust:
- iMessage Effects: Customize the way your messages appear with special effects, such as bubbles, confetti, and more. Tap on “iMessage Effects” to explore and select your preferred visual effects.
- Send Read Receipts: Decide whether or not you want to send read receipts to other iMessage users. When enabled, the sender can see when you have read their messages. Toggle the “Send Read Receipts” switch to enable or disable this feature.
- Filter Unknown Senders: Prevent messages from unknown senders from appearing in your main iMessage inbox. Enable the “Filter Unknown Senders” switch to keep your inbox tidy.
- Blocked: Manage the list of contacts that you have blocked from sending you iMessages. Tap on “Blocked” to view or add contacts to the blocked list.
- Explore other settings, such as notification preferences, message history, and more, to further tailor your iMessage experience.
- Once you have adjusted the desired settings, exit the Messages settings and start enjoying your personalized iMessage experience on your iPad.
By adjusting iMessage settings on your iPad, you can enhance your messaging experience and make it more tailored to your preferences. Whether you want to add some flair with iMessage effects or control the visibility of read receipts, customizing these settings allows you to communicate in a way that suits your needs.
Now that you have adjusted the iMessage settings on your iPad, you are all set to enjoy synced messaging across your Apple devices.
Conclusion
Congratulations! You have successfully synced iMessage to your iPad, allowing you to seamlessly send and receive messages across your Apple devices. By following the steps outlined in this guide, you have unlocked the power of synced messaging and can now enjoy a unified messaging experience.
Throughout this guide, we covered the essential steps to sync iMessage to your iPad, including updating iOS, signing in to your Apple ID, enabling iMessage, syncing with your iPhone, and adjusting iMessage settings. By completing these steps, you can have all your messages at your fingertips, whether you’re using your iPad or iPhone.
Syncing iMessage to your iPad offers a range of benefits. You can conveniently switch between devices without missing any messages, personalize your messaging experience with effects and settings, and enjoy a seamless integration with your existing Apple ID and phone number.
Remember to keep your iPad updated with the latest iOS version and ensure a stable internet connection to experience uninterrupted messaging with iMessage. Additionally, explore the iMessage settings to further customize your messaging experience to suit your preferences.
We hope this guide has been helpful in syncing iMessage to your iPad. Now you can stay connected with friends, family, and colleagues, regardless of whether you’re using your iPad or iPhone. Enjoy the convenience and versatility of synced messaging, making communication a breeze on your Apple devices.
Happy iMessaging!