Introduction
Welcome to the world of Windows 7, a powerful operating system that offers a wealth of features and functionalities. Whether you’re a seasoned user or a novice, there may come a time when you need to troubleshoot issues with your computer. One useful tool at your disposal is “Safe Mode,” a special diagnostic mode that allows you to start your computer with only the most essential system files and drivers.
Safe Mode is designed to help you troubleshoot problems that may be preventing your computer from starting up normally. By starting your computer in Safe Mode, you can isolate and identify any software conflicts, faulty drivers, or other issues that may be causing it to malfunction. This can be especially helpful when you’re troubleshooting system errors, removing problematic software, or performing malware scans.
Accessing Safe Mode on Windows 7 is relatively easy, and you have a couple of methods at your disposal. In the following sections, we’ll walk you through the steps to enter Safe Mode using the System Configuration utility and the F8 key during startup. We’ll also explore how to start in Safe Mode with networking or using the command prompt, as well as troubleshooting startup issues in Safe Mode.
So, whether you’re a Windows 7 power user or just getting started with this versatile operating system, read on to discover how to harness the power of Safe Mode and resolve those pesky computer issues.
What is Safe Mode?
Safe Mode is a diagnostic mode in Windows 7 that allows you to start your computer with minimal drivers and system files. When you boot your computer into Safe Mode, only the essential components necessary for the operating system to run are loaded, which means that any unnecessary or problematic software or drivers are temporarily disabled.
In Safe Mode, your computer will appear different from regular startup, with a lower screen resolution and a simplified user interface. This stripped-down mode helps to isolate issues by preventing third-party software and drivers from interfering with the smooth operation of your computer.
Safe Mode provides a stable environment for troubleshooting and resolving software and hardware problems. By starting your computer in Safe Mode, you can diagnose and fix issues such as overheating, software conflicts, virus infections, driver problems, and much more.
One of the key benefits of Safe Mode is that it allows you to remove or uninstall problematic software that may be causing your computer to freeze or crash. By eliminating these troublesome applications, you can restore normal functionality to your system and enhance its performance.
Furthermore, Safe Mode is an invaluable tool for combating malware and other security threats. By starting your computer in Safe Mode, you can more effectively scan for and remove malicious software, as it cannot run in this diagnostic mode. This can be especially useful in cases where malware is preventing your computer from functioning properly in regular mode.
Overall, Safe Mode provides a controlled environment that enables you to diagnose and troubleshoot software and hardware issues more effectively. It’s a powerful tool that can help you get your computer back up and running smoothly.
Why Use Safe Mode?
Safe Mode is an indispensable feature in Windows 7 that serves several important purposes. Here are some of the key reasons why you should consider using Safe Mode:
Troubleshoot Startup Issues: Safe Mode allows you to diagnose and troubleshoot issues that may prevent your computer from starting up normally. By starting your computer in Safe Mode, you can identify and resolve problems such as software conflicts, faulty drivers, or corrupted system files that may be causing startup errors.
Remove Problematic Software: If you suspect that a recently installed application is causing issues on your computer, Safe Mode provides an ideal environment for uninstalling or removing it. By booting into Safe Mode, you can bypass any potential conflicts or disruptions caused by the troublesome software, allowing you to safely remove it and restore your computer to normal operation.
Scan for Malware: If you suspect that your computer is infected with malware, Safe Mode is a highly effective way to combat it. By starting your computer in Safe Mode, you can limit the abilities of malicious software and perform thorough scans to detect and remove any harmful programs.
Perform System Maintenance: Safe Mode is also beneficial for performing routine system maintenance tasks. By starting your computer in this mode, you can run disk cleanup, check disk errors, defragment your hard drive, update drivers, and perform other essential maintenance activities without interference from unnecessary programs or background services.
Stability and Reliability: With only essential drivers and system files loaded, Safe Mode provides a stable and reliable environment for troubleshooting. It allows you to isolate issues and identify whether they are caused by software, hardware, or other factors. By eliminating unnecessary components, Safe Mode reduces the chances of conflicts and provides a clearer picture of the underlying problem.
Compatibility Testing: Additionally, Safe Mode is useful for testing software compatibility. If you experience issues with a particular program, running it in Safe Mode can help determine if the problem lies with the software itself or with other factors, such as conflicting background processes or incompatible drivers.
In summary, Safe Mode is a powerful tool that offers numerous advantages for diagnosing and resolving computer issues. Whether you need to troubleshoot startup problems, remove problematic software, scan for malware, perform system maintenance, ensure stability, or test software compatibility, Safe Mode is an essential feature to have in your troubleshooting toolbox.
Accessing Safe Mode in Windows 7
Accessing Safe Mode in Windows 7 is a straightforward process, and there are a couple of methods you can use. In this section, we will explore two main methods: using the System Configuration utility and using the F8 key during startup.
Method 1: Using System Configuration
One way to access Safe Mode in Windows 7 is through the System Configuration utility. Here’s how:
- Press the Windows key + R to open the Run dialog box.
- Type “msconfig” in the Run dialog box and hit Enter.
- In the System Configuration window, navigate to the “Boot” tab.
- Under the “Boot options” section, check the box next to “Safe boot“.
- Select the “Minimal” option for Safe boot.
- Click Apply and then OK.
- A prompt will appear asking if you want to restart your computer. Click Restart to enter Safe Mode.
Your computer will now start in Safe Mode, and you can troubleshoot any issues you’re experiencing.
Method 2: Using F8 during Startup
Another way to access Safe Mode is by using the F8 key during startup. Here’s how:
- Restart your computer.
- As soon as your computer starts to boot, repeatedly press the F8 key until the Advanced Boot Options menu appears.
- Using the arrow keys on your keyboard, select the “Safe Mode” option and press Enter.
Your computer will now start in Safe Mode, and you can begin troubleshooting or performing any necessary tasks.
It’s worth noting that if you have trouble accessing Safe Mode using the F8 key, you can try using the System Configuration method described above as an alternative.
Now that you know how to access Safe Mode in Windows 7, you can easily enter this diagnostic mode and resolve any issues that may be affecting your computer’s performance.
Method 1: Using System Configuration
One of the methods to access Safe Mode in Windows 7 is by using the System Configuration utility. This method allows you to configure your computer to boot into Safe Mode for troubleshooting purposes. Here’s how you can use System Configuration to access Safe Mode:
- Press the Windows key + R to open the Run dialog box.
- Type “msconfig” in the Run dialog box and hit Enter.
- In the System Configuration window, navigate to the “Boot” tab.
- Under the “Boot options” section, check the box next to “Safe boot“.
- Select the “Minimal” option for Safe boot.
- If you require network access in Safe Mode, check the box next to “Network“.
- Click Apply and then OK.
- A prompt will appear asking if you want to restart your computer. Click Restart to enter Safe Mode.
After following these steps, your computer will restart and boot directly into Safe Mode. Once in Safe Mode, you can proceed with troubleshooting any issues you’re experiencing, such as repairing startup errors, removing problematic software, or performing malware scans.
It’s important to note that when your computer is in Safe Mode, it will have a different appearance than when it is in normal mode. The screen resolution may be lower, and the desktop may appear more basic. This is normal and is done to ensure that only essential drivers and services are loaded.
To exit Safe Mode and return to normal mode, simply open the System Configuration utility again, navigate to the “Boot” tab, uncheck the “Safe boot” option, and click “Apply” and then “OK”. Restart your computer, and it will boot back into normal mode.
The System Configuration method is a convenient way to access Safe Mode in Windows 7 without relying on the F8 key during startup. It provides a simple and efficient way to troubleshoot issues and perform essential maintenance tasks, ensuring the smooth operation of your computer.
Method 2: Using F8 during Startup
Another method to access Safe Mode in Windows 7 is by using the F8 key during the startup process. This method allows you to access the Advanced Boot Options menu, where you can select Safe Mode. Here’s how you can use the F8 key to access Safe Mode:
- Restart your computer.
- As your computer starts to boot, begin pressing the F8 key repeatedly. It’s important to start pressing the key before the Windows logo appears.
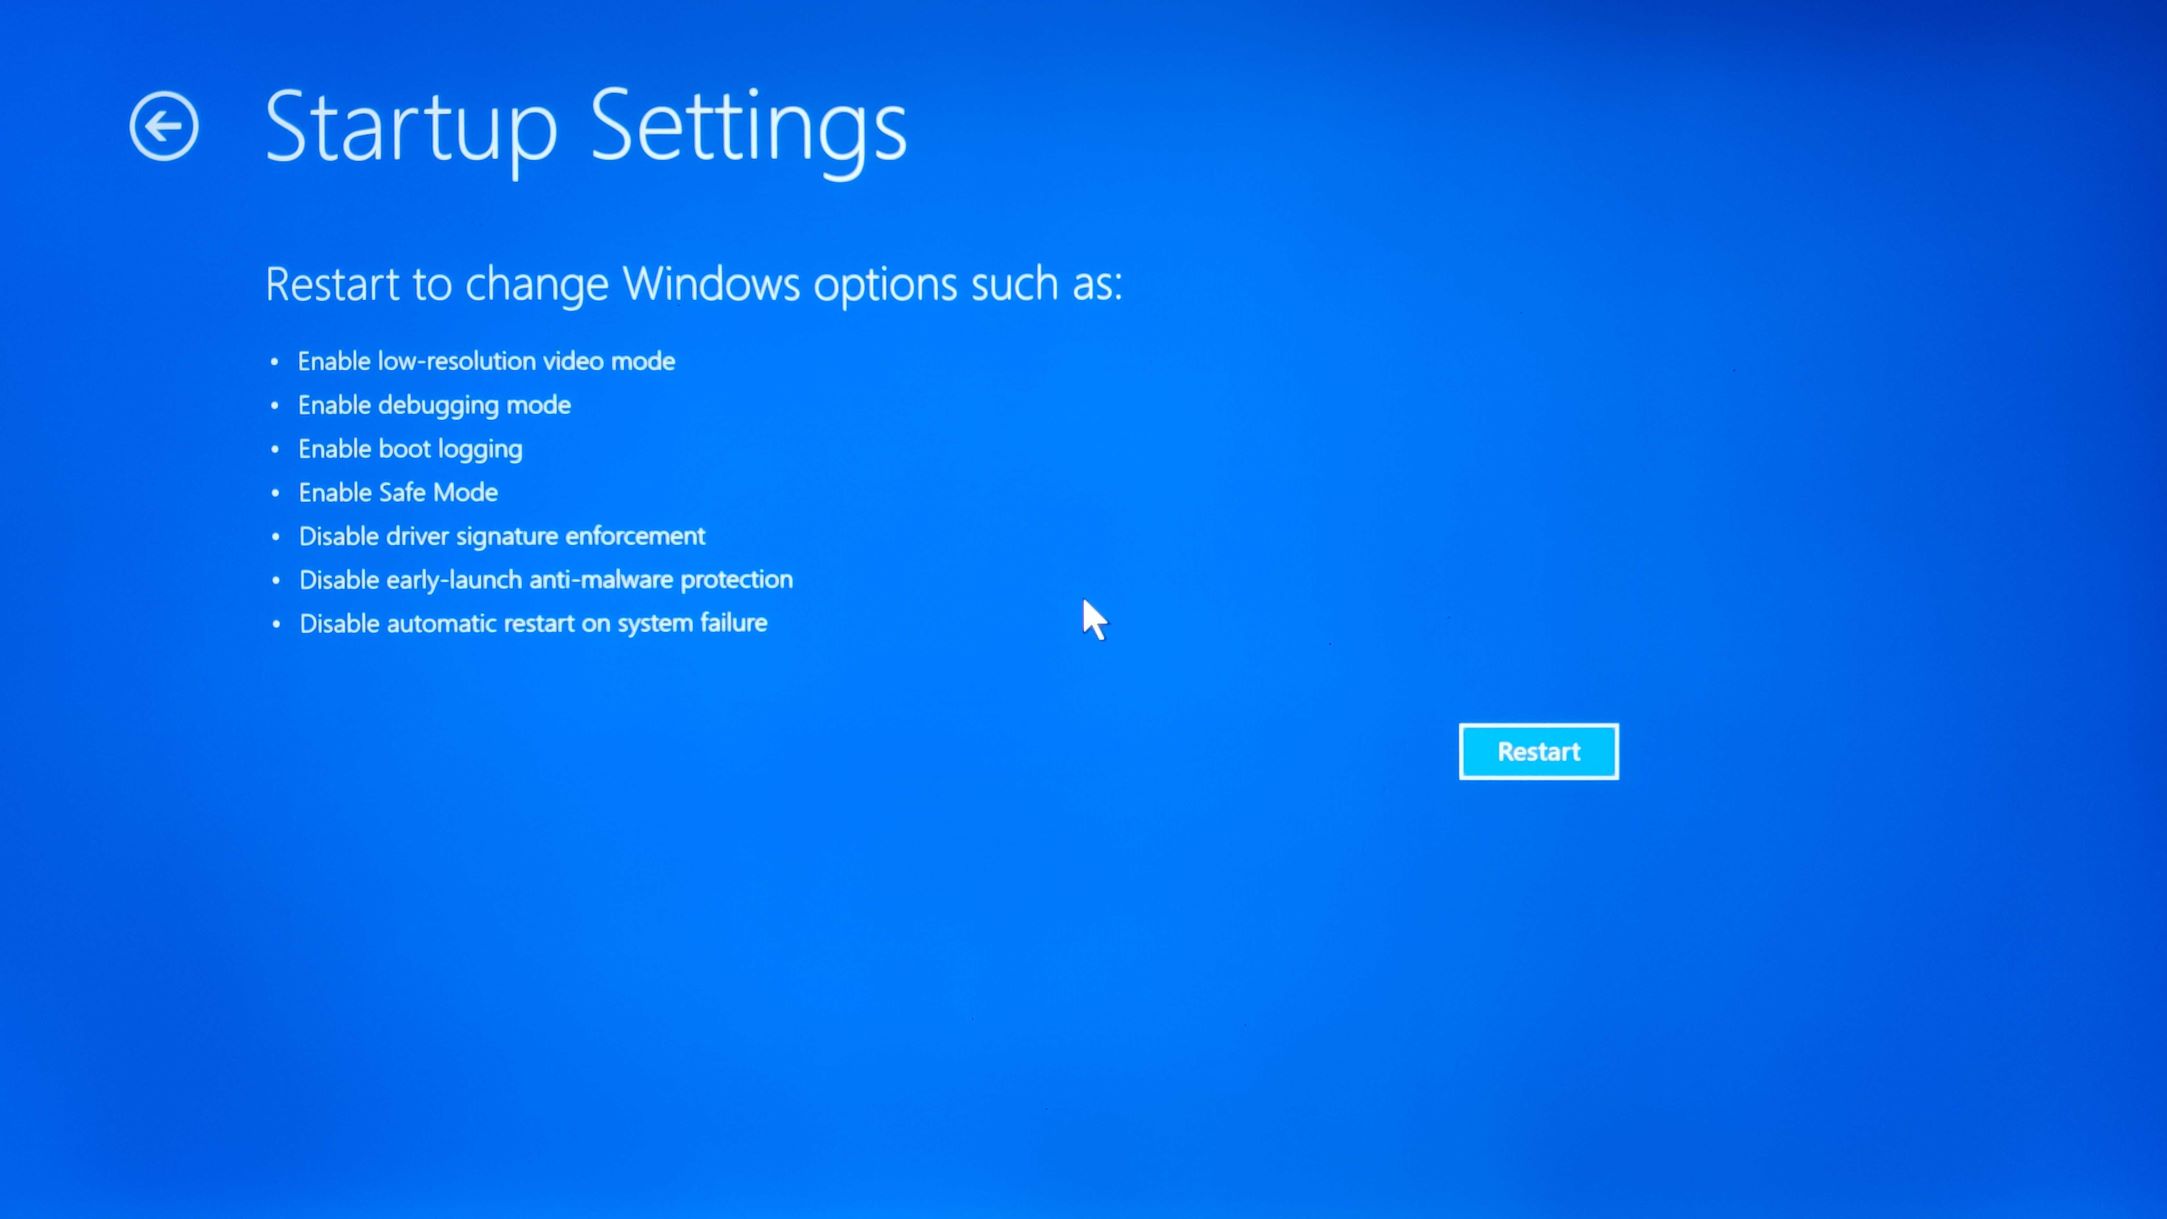
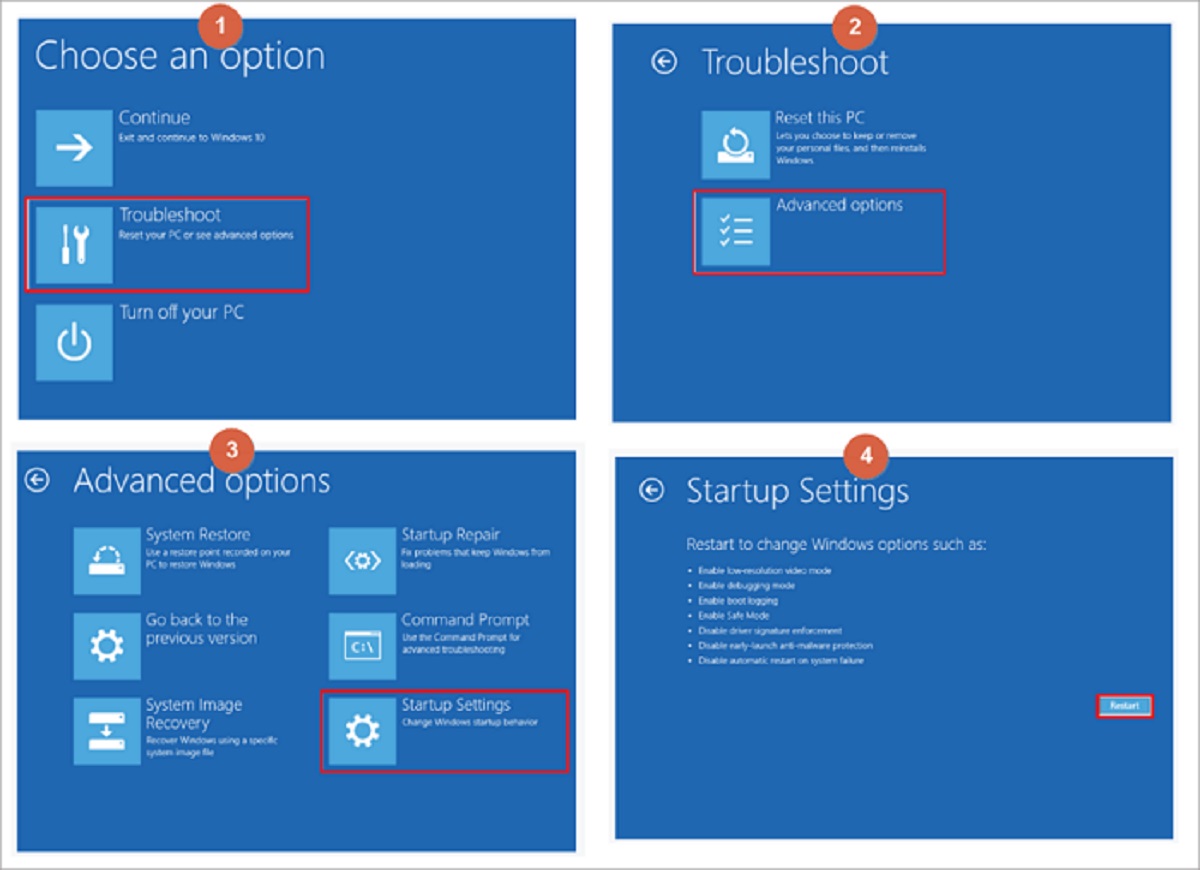
- The Advanced Boot Options menu will appear, presenting several startup options.
- Using the arrow keys on your keyboard, navigate to the “Safe Mode” option.
- Once the “Safe Mode” option is highlighted, press the Enter key to select it.
Your computer will now start in Safe Mode. The screen resolution may be lower, and the desktop may have a simplified appearance. This is normal, as Safe Mode loads only the most essential drivers and services.
Once in Safe Mode, you can begin troubleshooting any issues you’re experiencing, such as diagnosing startup errors, removing problematic software, or performing malware scans.
It’s worth mentioning that if your computer starts too quickly and you’re unable to press the F8 key in time, you can try the following method:
- Click on the Start menu and select “Control Panel“.
- In the Control Panel, click on “System and Security“.
- Under “System“, click on “Advanced system settings“.
- In the System Properties window, go to the “Advanced” tab.
- Click on the “Settings” button under the “Startup and Recovery” section.
- In the Startup and Recovery window, uncheck the box next to “Time to display list of operating systems“.
- Click OK to save the changes.
By disabling the display of the list of operating systems, you can ensure that your computer will automatically boot into the Advanced Boot Options menu on the next restart when you use the F8 key.
Using the F8 key during startup is a quick and reliable method to access Safe Mode in Windows 7. Whether you’re troubleshooting startup issues, removing problematic software, or conducting malware scans, Safe Mode provides a controlled environment for resolving computer problems effectively.
Starting in Safe Mode with Networking
Safe Mode with Networking is a variation of Safe Mode that allows you to access the internet and network-related services while still in the diagnostic mode. This can be especially useful if you need to download updates, access online troubleshooting resources, or perform network-related tasks while troubleshooting your computer. Here’s how you can start in Safe Mode with Networking in Windows 7:
- Access Safe Mode using either the System Configuration utility or the F8 key method as previously described.
- Once your computer has booted into Safe Mode, click on the Start menu and select “Control Panel“.
- In the Control Panel, click on “Network and Internet“.
- Under “Network and Sharing Center“, click on “Change adapter settings“.
- In the Network Connections window, right-click on the network connection you want to enable networking for, such as Ethernet or Wi-Fi.
- From the context menu, select “Enable“.
- Your network connection is now enabled in Safe Mode with Networking, allowing you to access the internet and network-related resources.
With networking enabled in Safe Mode, you can now perform tasks that require an internet connection. This includes updating drivers, downloading software updates, accessing online forums or support websites for troubleshooting guidance, and running online antivirus or malware scans.
It’s important to note that while Safe Mode with Networking allows internet connectivity, it still operates in a limited capacity with minimal drivers and services. Therefore, certain network-related features or applications may still be unavailable or not fully functional in this mode.
When you’re done troubleshooting and no longer need to be in Safe Mode, you can exit Safe Mode using the same methods described earlier. Simply restart your computer and let it boot into normal mode.
Starting in Safe Mode with Networking provides a valuable option for troubleshooting internet-related issues or performing network-related tasks. With this capability, you can effectively diagnose and resolve problems that require internet connectivity while still benefitting from the streamlined and controlled environment of Safe Mode.
Starting in Safe Mode with Command Prompt
In addition to Safe Mode and Safe Mode with Networking, Windows 7 also offers a mode called Safe Mode with Command Prompt. This mode starts your computer in Safe Mode, but instead of loading the regular graphical user interface (GUI), it opens a command prompt window. Safe Mode with Command Prompt can be useful for advanced troubleshooting tasks or performing specific command-line operations. Here’s how you can start in Safe Mode with Command Prompt:
- Access Safe Mode using either the System Configuration utility or the F8 key method as previously described.
- After your computer has booted into Safe Mode, you’ll be presented with the Safe Mode screen. From here, select “Safe Mode with Command Prompt” using the arrow keys on your keyboard.
- Press the Enter key to confirm your selection.
Your computer will now start in Safe Mode with Command Prompt. Instead of the regular graphical user interface, you’ll see a command prompt window where you can enter various commands.
In Safe Mode with Command Prompt, you can perform a range of tasks by executing commands directly in the command prompt window. Some common uses of this mode include repairing the Master Boot Record (MBR), running system file scans, fixing boot configuration errors, and using advanced troubleshooting tools.
It’s important to note that Safe Mode with Command Prompt is primarily intended for users with advanced technical knowledge. Executing the wrong commands or making incorrect changes through the command prompt can have serious consequences for your computer. Therefore, exercise caution and consult reliable sources or seek expert advice before executing any commands in this mode.
When you’re finished with your troubleshooting, you can exit Safe Mode with Command Prompt and return to normal mode by restarting your computer. Simply type “exit” in the command prompt and press Enter. Your computer will then restart and boot into normal mode.
Starting in Safe Mode with Command Prompt provides an alternative way to troubleshoot and perform advanced tasks using the command-line interface. It gives you access to various powerful commands and provides a controlled environment to resolve specific issues or perform advanced troubleshooting operations.
Troubleshooting Startup Issues in Safe Mode
Safe Mode is a valuable troubleshooting tool for diagnosing and resolving startup issues in Windows 7. When your computer encounters problems during the startup process, Safe Mode allows you to boot with a minimal set of drivers and services, making it easier to isolate and address the underlying problem. Here are some troubleshooting techniques you can employ while in Safe Mode:
- Uninstall Recently Installed Software: If you suspect that a recently installed program is causing the startup issue, use Safe Mode to uninstall it. Open the Control Panel, navigate to the “Programs” or “Programs and Features” section, and uninstall the problematic software.
- Update or Rollback Drivers: Faulty or incompatible drivers can also lead to startup problems. In Safe Mode, you can update or rollback drivers to their previous versions. Access the Device Manager, right-click on the problematic device, and select “Update Driver” or “Rollback Driver” as appropriate.
- Run System File Checker: Safe Mode with Command Prompt allows you to run the System File Checker (SFC) utility, which scans for and repairs corrupted system files. Open the command prompt and type “sfc /scannow“. Wait for the scan to complete and fix any detected issues.
- Disable Startup Programs: Access the System Configuration utility in Safe Mode and disable startup programs that may be causing conflicts during the startup process. Navigate to the “Startup” tab and uncheck any programs that you suspect may be problematic.
- Scan for Malware: As malware can interfere with the normal startup routine, use Safe Mode with Networking to perform a thorough malware scan using reliable antimalware software. Update the software and run a complete scan of your system to detect and remove any malicious programs.
By using these troubleshooting techniques in Safe Mode, you can identify and resolve common startup issues that may be preventing your computer from booting properly. If none of these methods prove successful, it may be necessary to seek assistance from a professional technician or contact the support channels provided by the hardware or software manufacturer.
Remember, the goal of troubleshooting in Safe Mode is to identify and address any issues that are specific to the startup process. Once the problems are resolved, your computer should be able to start up normally, allowing you to resume your regular activities.
Conclusion
Safe Mode is an essential feature in Windows 7 that provides a controlled and diagnostic environment for troubleshooting various computer issues. Whether you’re facing startup problems, software conflicts, driver issues, or malware infections, accessing Safe Mode can help isolate and resolve these issues effectively.
In this article, we’ve discussed what Safe Mode is and why it’s useful for troubleshooting. We’ve also explored two main methods of accessing Safe Mode: using the System Configuration utility and utilizing the F8 key during startup. Additionally, we’ve covered how to start in Safe Mode with networking and with the command prompt, providing versatility for different troubleshooting scenarios.
In Safe Mode, you have the flexibility to perform a range of troubleshooting tasks, such as uninstalling problematic software, updating drivers, running system scans, and performing network-related tasks. By following the steps outlined in this article, you can confidently navigate Safe Mode and resolve a variety of computer issues.
Remember to exercise caution and seek expert advice if you encounter complex issues or are unsure about specific troubleshooting actions. Technical forums, support websites, and professional technicians can provide further guidance and assistance.
Whether you’re a novice or an experienced user, understanding and utilizing Safe Mode is a valuable skill that can save you time, frustration, and potentially costly repairs. By harnessing the power of Safe Mode, you can take control of your Windows 7 computer and overcome a wide range of software and hardware challenges.