Introduction
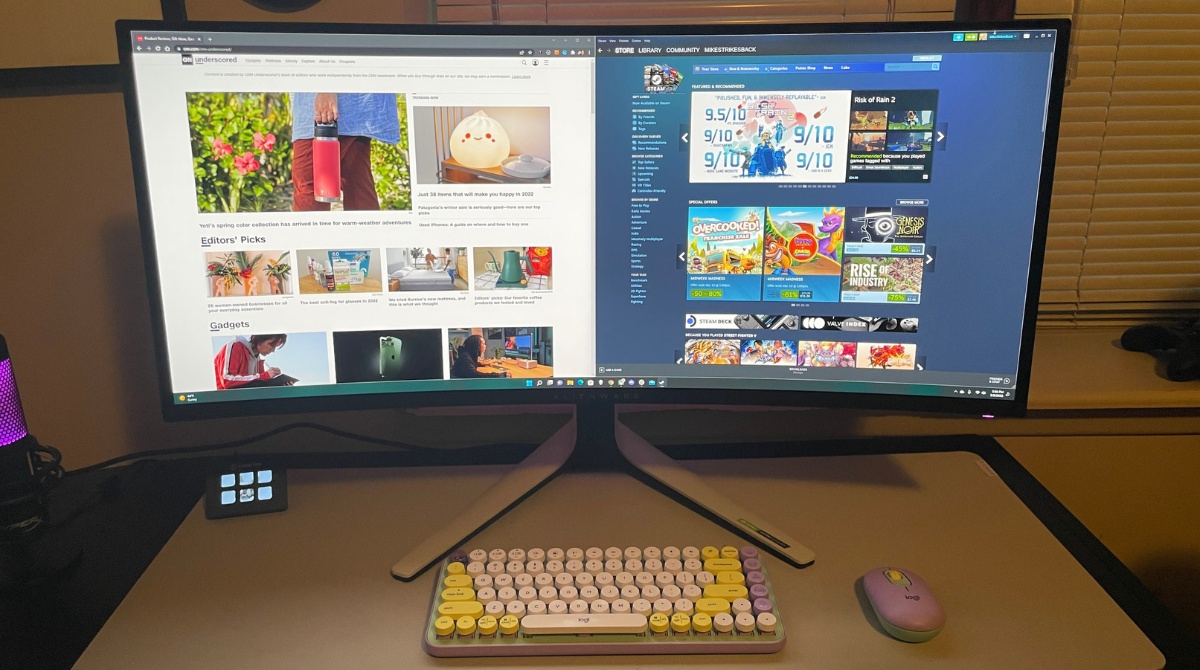
Split screen mode is a useful feature in Windows 10 that allows you to multitask and work more efficiently by displaying two or more applications side by side on your screen. Whether you need to reference information from one application while working on another, compare documents, or simply want to have multiple applications open and visible at the same time, splitting the screen can be a real time-saver.
This article will guide you through the steps of splitting the screen using the keyboard in Windows 10. By learning this keyboard shortcut method, you can quickly and easily divide your screen into multiple sections and manage your active applications with ease.
Whether you’re a student, professional, or casual computer user, mastering the art of splitting the screen using the keyboard will undoubtedly boost your productivity and facilitate seamless multitasking.
So, let’s dive in and explore the step-by-step instructions for splitting the screen in Windows 10 using keyboard shortcuts. By the end of this tutorial, you’ll be a pro at multitasking with split screen mode!
Step 1: Open the desired applications
The first step in splitting the screen using the keyboard in Windows 10 is to open the applications you want to display side by side. You may have multiple applications in mind that you want to use simultaneously, such as a web browser, a text editor, or a spreadsheet program.
To open an application, simply click on its shortcut on the desktop, taskbar, or Start menu. Alternatively, you can use the search bar in the taskbar to quickly find and launch the desired application.
It’s important to ensure that all the applications you want to use are already running on your computer before proceeding to the next step. If any of the applications are not yet open, take a moment to open them now.
Remember, the ability to split the screen using keyboard shortcuts is particularly handy when you want to quickly switch between applications and keep them in view at the same time, so make sure you have all the necessary applications open and ready.
Once you have opened all the desired applications, you are ready to move on to the next step: arranging the windows side by side.
Step 2: Arrange the windows side by side
After opening the desired applications, the next step is to arrange the windows side by side on your screen. This will prepare them for splitting in the later steps.
To arrange the windows side by side, you have a few options:
- Method 1: Drag and drop: Click and hold the title bar of an application window and drag it to either the left or right edge of your screen until you see a transparent outline appear. Release the mouse button to snap the window into place.
- Method 2: Use the docking option: Click and hold the title bar of an application window and drag it to the top edge of your screen until a docking overlay appears. Release the mouse button to maximize the window. Repeat the same process for the second application, but this time drag it to the opposite side of the screen.
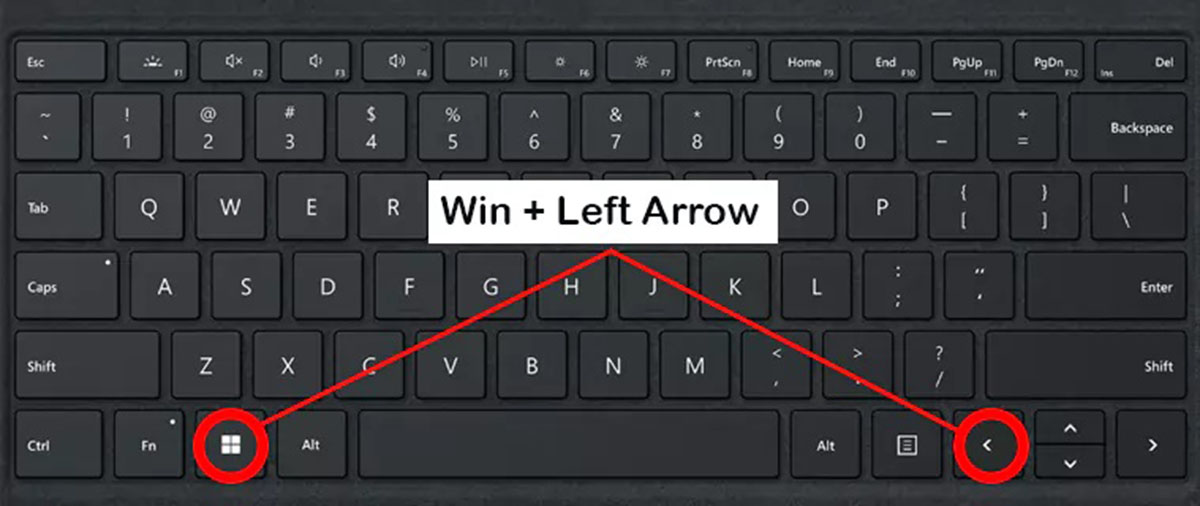
- Method 3: Keyboard shortcut: If you prefer to use keyboard shortcuts, you can press the Windows key + the left or right arrow key to snap the active window to the left or right side of the screen, respectively. Repeat the same shortcut for the second application but snap it to the opposite side.
Choose the method that works best for you and arrange the windows side by side on your screen. This will allow you to easily view and access the applications when you enter split screen mode.
Now that you have successfully arranged the windows side by side, you’re ready to move on to the next step: activating split screen mode using the keyboard.
Step 3: Activate Split Screen mode using the keyboard
Now that you have your applications arranged side by side, it’s time to activate the split screen mode using keyboard shortcuts. Windows 10 provides a convenient way to enter split screen mode and manage your multiple applications with ease.
To activate Split Screen mode using the keyboard, follow these steps:
- Make sure the application window you want to occupy the left side of the screen is active and in focus.
- Hold down the Windows key on your keyboard and press the right arrow key. This will move the active window to the right side of the screen, automatically resizing it to fit half of the screen width.
- Similarly, make sure the application window you want to occupy the right side of the screen is active and in focus.
- Hold down the Windows key on your keyboard and press the left arrow key. This will move the active window to the left side of the screen, also resizing it to fit half of the screen width.
Once you have executed the keyboard shortcuts, both application windows will be positioned side by side, taking up half of the screen each. This split screen view allows you to work in both applications simultaneously, making multitasking a breeze.
It’s important to note that the keyboard shortcuts mentioned above can be customized in the Windows settings. If you prefer a different combination of keys, you can modify them to suit your preference. Simply navigate to the Windows settings, select “System,” and then “Multitasking” to customize the snap windows keyboard shortcuts.
Now that you have successfully activated Split Screen mode using the keyboard, it’s time to move on to the next step: adjusting the size of the split screen.
Step 4: Adjust the size of the split screen
After activating Split Screen mode, you may find that the default size allocation of half the screen width for each application works perfectly for your needs. However, Windows 10 allows you to further customize and adjust the size of the split screen based on your preferences.
To adjust the size of the split screen, follow these steps:
- Hover your cursor over the vertical line that separates the two application windows.
- When the cursor changes to a double-headed arrow, click and drag the line to the left or right to increase or decrease the size of either window.
- Release the mouse button once you have achieved the desired size for each window.
By adjusting the size of the split screen, you can allocate more space to the application you need to focus on or create a balanced split between the two applications. This flexibility ensures a comfortable and personalized multitasking experience.
It’s important to note that the minimum width for each window in split screen mode is governed by your screen resolution and the resolution requirements of the applications you are using. If you encounter issues with resizing the windows, it may be due to these limitations.
Now that you’ve learned how to adjust the size of the split screen, you’re ready to move on to the next step: switching between applications in split screen mode.
Step 5: Switch between applications in split screen mode
When working in split screen mode, it’s essential to know how to switch between the applications seamlessly. Windows 10 provides various methods to navigate between the two application windows with ease.
Here are the different ways to switch between applications in split screen mode:
- Alt + Tab: Press and hold the Alt key on your keyboard, then tap the Tab key to cycle through the open applications. Release both keys when you reach the desired application window.
- Taskbar: If you prefer a visual method, you can also click on the application icon on the taskbar to switch directly to that application.
- Touchpad gestures: If you have a touchpad that supports multi-finger gestures, you can use swipe gestures to switch between applications. For example, you can swipe three fingers left or right to switch between open applications.
- Keyboard shortcuts: Windows 10 provides additional keyboard shortcuts to move focus between windows. For example, press Windows key + number key (1, 2, 3, etc.) to jump directly to the corresponding application on the taskbar.
Choose the method that suits your preference and workflow. Experiment with different methods to find the most comfortable and efficient way for you to switch between applications.
With the ability to seamlessly switch between applications, you can make the most of split screen mode and maximize your productivity.
Now that you know how to switch between applications in split screen mode, let’s move on to the final step: exiting split screen mode.
Step 6: Exit split screen mode
Exiting split screen mode in Windows 10 is as easy as entering it. When you no longer need the screen divided into multiple applications, you can quickly revert back to a single-window view.
To exit split screen mode, follow these steps:
- Click and hold the title bar of either application window.
- Drag the window towards the edge of the screen until the transparent outline disappears.
- Release the mouse button to restore the application window to its original size.
Alternatively, you can use the keyboard shortcut Windows key + Esc to exit split screen mode and return to a single-window view.
Once you have exited split screen mode, you have the freedom to rearrange and resize application windows as needed, allowing you to work on a single application or set up a new split screen configuration.
Remember that split screen mode is a great way to multitask and increase your productivity. However, it’s important to assess your needs and workflow to determine when it is appropriate to use split screen mode and when a single-window view may be more suitable.
Congratulations! You have successfully completed the steps to exit split screen mode.
Conclusion
Split screen mode in Windows 10 is a powerful feature that allows you to multitask and work more efficiently by displaying multiple applications side by side. By following the step-by-step instructions in this guide, you have learned how to split the screen using keyboard shortcuts, arrange windows, adjust the split screen size, switch between applications, and exit split screen mode.
With the ability to split the screen, you can have different applications visible simultaneously, which can significantly enhance your productivity. Whether you’re working on a research project and need to reference information from a web browser while typing in a document, or you simply want to keep an eye on important tasks while managing your email, splitting the screen can save you time and effort in switching between applications.
Remember to experiment with different methods and customize the keyboard shortcuts to fit your preferences. Windows 10 provides flexibility so that you can optimize your multitasking experience.
So, the next time you find yourself needing to work on multiple applications simultaneously, give split screen mode a try. By following the instructions in this guide, you’ll be able to seamlessly divide your screen, increase your efficiency, and take full advantage of the multitasking capabilities in Windows 10.
Happy multitasking!