Introduction
Are you ready to take your gaming experience to the next level on your PC? Look no further than the Logitech Controller. With its ergonomic design and intuitive controls, the Logitech Controller offers a seamless gaming experience for both casual gamers and hardcore enthusiasts alike. Whether you’re playing action-packed shooters, racing games, or exploring immersive open-world adventures, this controller will enhance your gameplay and provide you with the precision and comfort you need.
In this guide, we will walk you through the step-by-step process of setting up your Logitech Controller for use on your PC. You’ll learn how to download the necessary software, connect the controller to your PC, install the Logitech Controller software, configure the controller settings, and test it to ensure it is working correctly. By the end of this guide, you’ll be ready to dive into your favorite games with the Logitech Controller as your trusted companion.
But before we delve into the setup process, let’s take a quick look at the system requirements to ensure that your PC meets the necessary specifications to use the Logitech Controller. Failure to meet these requirements may result in compatibility issues or suboptimal performance.
System Requirements
Before setting up your Logitech Controller for use on your PC, it’s important to ensure that your system meets the necessary requirements for optimal performance. Here are the minimum and recommended system specifications:
- Operating System: Windows 7, 8, 8.1, or 10
- Processor: Intel Core i3 or AMD equivalent
- RAM: 4GB or higher
- Graphics Card: DirectX 11 compatible graphics card
- USB Port: 1 available USB 2.0 or 3.0 port
- Internet Connection: Required for software download and updates
While the Logitech Controller is compatible with a wide range of PC configurations, having a system that meets or exceeds these requirements will ensure optimal performance and responsiveness during gameplay.
It is worth noting that the Logitech Controller is designed specifically for use on PCs and may not be compatible with gaming consoles or other devices. Therefore, it is essential to have a PC that meets the recommended system specifications to ensure a smooth gaming experience.
Once you have verified that your PC meets these requirements, you’re ready to proceed with the setup process. Keep in mind that having the latest drivers and updates for your operating system and graphics card can also help improve compatibility and performance with the Logitech Controller.
Step 1: Download Logitech Controller Software
The first step in setting up your Logitech Controller for use on your PC is to download the Logitech Controller software. This software allows you to customize your controller settings and provides additional features to enhance your gaming experience. Here’s how to download the Logitech Controller software:
- Open your web browser and navigate to the Logitech official website.
- Go to the Support or Downloads section of the website.
- Search for the Logitech Controller software compatible with your specific controller model.
- Once you have found the software, click on the download link to start the download process.
- Save the downloaded file to a location on your computer where you can easily access it.
Once the Logitech Controller software has finished downloading, you’re ready to move on to the next step of the setup process. But before we do that, make sure you have the necessary cables and connectors to connect your Logitech Controller to your PC. Depending on your controller model, you may need a USB cable or a wireless receiver. Refer to your controller’s user manual or online documentation for specific instructions on how to connect it to your PC.
Now that you have the Logitech Controller software downloaded and you’ve checked the cables and connectors, it’s time to move on to the next step: connecting the controller to your PC.
Step 2: Connect the Controller to the PC
Now that you have downloaded the Logitech Controller software, it’s time to connect the controller to your PC. The method of connection may vary depending on your controller model, but here are the general steps to follow:
- If you have a wired Logitech Controller, simply connect one end of the USB cable to the controller and the other end to an available USB port on your PC.
- If you have a wireless Logitech Controller, you’ll need to use the wireless receiver that came with the controller. Insert the receiver into an available USB port on your PC.
- For controllers that support Bluetooth connectivity, make sure your PC has Bluetooth capability. Enable Bluetooth on your PC and put your controller into pairing mode by following the instructions in the controller’s user manual.
Once the controller is connected to your PC, the necessary drivers will be installed automatically. If prompted, follow the on-screen instructions to complete the driver installation process.
Now that your Logitech Controller is successfully connected to your PC, it’s time to install the Logitech Controller software. This software will allow you to customize your controller settings and make adjustments to suit your preferences.
In the next step, we’ll walk you through the installation process of the Logitech Controller software. Stay tuned!
Step 3: Install the Logitech Controller Software
Now that your Logitech Controller is connected to your PC, it’s time to install the Logitech Controller software. This software will allow you to customize your controller settings and unlock additional features. Follow the steps below to install the Logitech Controller software:
- Locate the downloaded Logitech Controller software file on your computer.
- Double-click on the file to start the installation process.
- Follow the on-screen instructions to proceed with the installation.
- Accept the End User License Agreement (EULA) when prompted.
- Choose the installation location for the software or leave it as the default location.
- Click on the “Install” or “Next” button to begin the installation.
- Wait for the installation process to complete. This may take a few minutes.
- Once the installation is finished, you may be prompted to restart your PC. If so, save any open files and click on the “Restart Now” button.
After your PC restarts, the Logitech Controller software will be successfully installed and ready to use. You can now proceed to the next step, where we will guide you through running the Logitech Controller software and configuring the settings according to your preferences.
Keep in mind that it’s always a good idea to periodically check for software updates from Logitech to ensure that you have the latest features and performance enhancements for your Logitech Controller. You can usually find these updates on the Logitech website or through the software’s built-in update functionality.
Now that you have the Logitech Controller software installed, let’s move on to the next step and start configuring the controller settings to suit your gaming needs.
Step 4: Run the Logitech Controller Software
With the Logitech Controller software successfully installed on your PC, it’s time to run the software and get ready to customize your controller settings. Follow the steps below to launch the Logitech Controller software:
- Locate the Logitech Controller software icon on your desktop or in your list of installed programs.
- Double-click on the icon to open the software.
- Once the Logitech Controller software launches, you will be presented with a user-friendly interface that displays various options for controller customization.
- Take a moment to familiarize yourself with the different tabs and options available in the software. These may include settings for button mapping, sensitivity adjustments, vibration control, and more.
- Explore the different customization options, and adjust the settings according to your personal preferences for each game or genre.
- Remember to save your changes after customizing the settings to ensure they are applied when you use the controller during gameplay.
The Logitech Controller software provides a convenient and intuitive interface that allows you to fine-tune your controller for optimal performance. You can experiment with different settings to find the perfect configuration that suits your gaming style and preferences.
Keep in mind that the Logitech Controller software may also offer additional features and functionality, such as firmware updates for the controller, the ability to create and save custom profiles for different games, and the option to share your settings with the Logitech community.
Now that you have accessed the Logitech Controller software and explored the customization options, it’s time to move on to the next step where we will guide you through testing the controller to ensure it is working correctly.
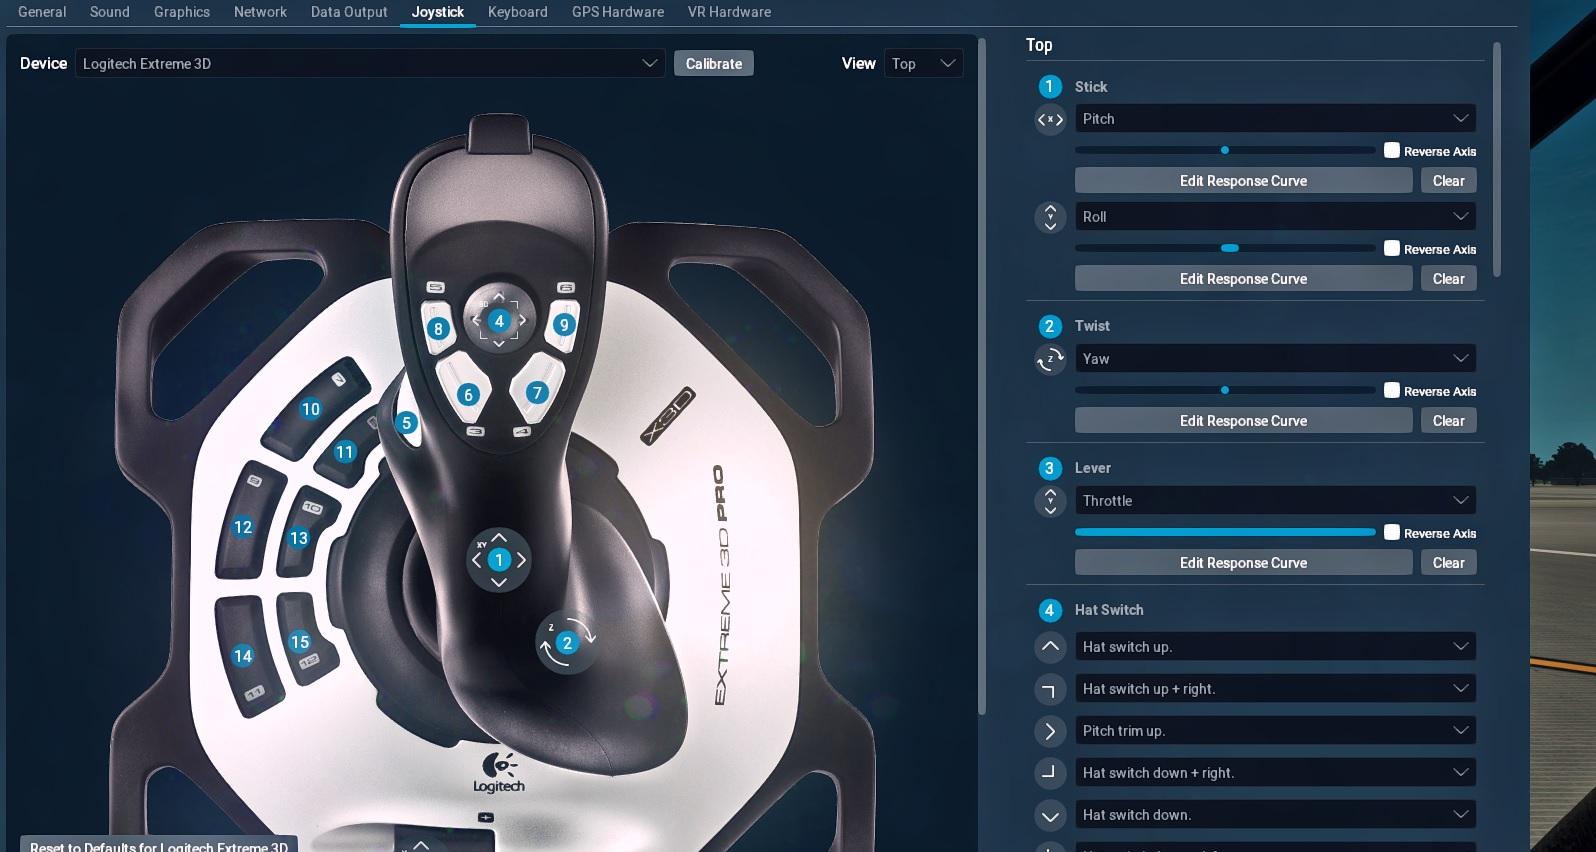
Step 5: Configure Controller Settings
Now that you have the Logitech Controller software running, it’s time to configure the controller settings according to your preferences. Follow the steps below to fine-tune your Logitech Controller:
- Open the Logitech Controller software on your PC.
- Navigate to the “Settings” or “Configuration” tab, which may be located within the software’s main menu.
- Here, you will find various options to customize your controller settings. These options may include button mapping, sensitivity adjustments, trigger configurations, and vibration control.
- Click on the specific setting you wish to modify, and a submenu or dialogue box will appear.
- Adjust the settings according to your preference by following the on-screen instructions or using the provided sliders, checkboxes, or drop-down menus.
- Take your time to experiment with different settings to find the optimal configuration for your gaming style.
- Remember to save your changes after configuring each setting to ensure they are applied during gameplay.
Configuring your controller settings is an essential step to enhance your gaming experience. By mapping buttons to your liking, adjusting the sensitivity, or fine-tuning other aspects of the controller, you can optimize your gameplay for increased precision, comfort, and responsiveness.
Don’t forget to explore additional features that the Logitech Controller software may offer, such as the ability to create custom profiles for different games or the option to download pre-configured profiles from the Logitech community.
Once you have finished configuring your controller settings, it’s time to move on to the final step of the setup process: testing the controller to ensure it is functioning correctly.
Step 6: Test the Controller
After configuring the controller settings to your preferences, it’s time to test the Logitech Controller to ensure that it is functioning correctly. Follow the steps below to perform the controller test:
- Make sure that the Logitech Controller software is still running on your PC.
- Launch a game or application that supports gamepad input.
- Once in the game or application, navigate to the settings or options menu.
- Look for a section related to controller settings or input devices.
- Select the option to calibrate or test the controller.
- Follow the on-screen instructions to perform the controller test.
- Test all the buttons, triggers, thumbsticks, and other controls to ensure they are registered correctly and respond as expected.
- Take note of any issues or inconsistencies you encounter during the test.
During the controller test, ensure that the buttons are responsive, the analog sticks provide accurate movement, and the triggers and other controls function as intended. If you encounter any issues or notice any inconsistencies, you may need to revisit the Logitech Controller software to reconfigure your settings or troubleshoot any potential hardware or software conflicts.
If the Logitech Controller passes the test and functions correctly in the game or application, congratulations! You have successfully set up and tested your Logitech Controller for use on your PC. You can now enjoy an enhanced gaming experience with the precision and comfort that Logitech controllers are known for.
Keep in mind that you may need to adjust the controller settings within individual games or applications to optimize the gaming experience further. Each game may provide its own customization options for controller input, allowing you to fine-tune the controls to your liking.
Now that you have tested and ensured the proper functioning of your Logitech Controller, you are ready to dive into your favorite games and embark on exciting gaming adventures!
Conclusion
Setting up and configuring your Logitech Controller for use on your PC can greatly enhance your gaming experience. From downloading the Logitech Controller software to connecting and testing the controller, each step plays a crucial role in ensuring optimal performance and customization.
By following the step-by-step instructions in this guide, you have learned how to download the Logitech Controller software, connect the controller to your PC, install the software, and configure the controller settings according to your preferences. The Logitech Controller software provides a user-friendly interface that allows you to map buttons, adjust sensitivity, and customize various aspects of the controller to suit your gaming style.
Remember to periodically check for software updates from Logitech to keep your controller software up to date and take advantage of the latest features and performance enhancements. Additionally, be sure to explore any additional functionalities offered by the Logitech Controller software, such as creating custom profiles or sharing your settings with the Logitech community.
Once you have successfully completed the setup process and tested the controller, you can enjoy a seamless and immersive gaming experience on your PC. The Logitech Controller’s ergonomic design, intuitive controls, and precise response will enhance your gameplay and provide you with the comfort and precision you need to excel in your favorite games.
Now it’s time to embark on gaming adventures and experience the thrill of playing your favorite games with the Logitech Controller as your trusted companion. So, grab your controller, power up your PC, and dive into the exciting world of gaming!