Introduction
Welcome to the digital age, where sharing memories with friends and family is just a click away. Sending pictures through email has become a common practice and a convenient way to share precious moments captured in photographs. Whether it’s a vacation snapshot, a family portrait, or a selfie with your loved ones, email allows you to easily send and receive images without the need for physical prints or complicated transfer methods.
In this article, we will guide you through the process of sending pictures through email, ensuring that your photos arrive safely and can be enjoyed by the recipients. We will provide step-by-step instructions on how to compress your photos, open your email provider, start a new email, attach the photos, add recipients and subject, write a personal message, and finally, send the email.
Sending pictures through email is not only a convenient way to share memories, but it also allows you to instantly connect and communicate with your loved ones, no matter where they are in the world. Whether it’s sharing snapshots of your travels, celebrating special occasions, or simply keeping in touch, sending pictures through email is a fantastic way to stay connected and spread the joy of visual storytelling.
So, let’s dive in and learn how to effortlessly send pictures through email, ensuring that your cherished memories are securely transmitted and can be enjoyed by those who are important to you.
Step 1: Compress Your Photos
Before sending your photos through email, it is crucial to compress them to reduce their file size. Compressing the photos not only makes it faster to upload and send them but also helps prevent any potential issues with email attachment size limits.
To compress your photos, you can use various software and online tools. Here’s a simple method using the popular image editing software Adobe Photoshop:
- Open Adobe Photoshop on your computer and navigate to the File menu.
- Select the Open option, and choose the photo you want to compress.
- Once the photo is opened in Photoshop, go to the File menu again and select Export > Save for Web (Legacy).
- A new window will appear, allowing you to adjust the settings for the compressed photo. The most important setting to focus on is the Quality option; reducing it will decrease the file size. Aim for a balance between file size and image quality.
- After you have made the necessary adjustments, click the Save button and choose a destination on your computer to save the compressed photo.
Remember, the goal of compressing your photos is to reduce their file size while maintaining decent quality. Be mindful not to compress them too much, as it may result in a significant loss of image detail and clarity.
In addition to Photoshop, there are also convenient online tools available, such as TinyPNG and JPEG-Optimizer, that can compress your photos quickly and efficiently. These tools allow you to upload your photos and automatically compress them without the need for any software installation.
By compressing your photos, you ensure that they are email-friendly and won’t cause issues with attachment size limits. So, take a moment to compress your photos before moving to the next step, ensuring that your email attachments are ready for a smooth and seamless transfer.
Step 2: Open Your Email Provider
Now that you have compressed your photos, it’s time to open your email provider to begin the process of sending the images. Whether you use Gmail, Yahoo Mail, Outlook, or any other email service, the steps will generally be similar.
First, open your preferred web browser on your computer or launch the email application on your mobile device. Navigate to the website of your email provider or open the app on your device.
If you have not already done so, sign in to your email account using your username and password. If you don’t have an email account, you can sign up for one by following the provider’s instructions.
Once you have signed in, you will be directed to your inbox, where you can see your received and sent emails. Take a moment to familiarize yourself with the email interface if you haven’t used it before.
It’s worth mentioning that some email providers offer additional features and storage space if you opt for a premium subscription. If you require more storage or want access to extra features, you may consider upgrading your account.
Make sure to check if your email provider has any specific file size limits for attachments. This information can typically be found in the help or support section of your email provider’s website. Knowing the attachment size limit will help you ensure that your compressed photos meet the requirements.
Now that you have opened your email provider and logged into your account, you are ready to start composing a new email. In the next step, we will guide you through the process of initiating a new email and attaching your compressed photos.
Step 3: Start a New Email
With your email provider open and your account logged in, it’s time to start a new email to begin the process of sending your photos. The steps may vary slightly depending on the email service you are using, but the overall process remains similar.
Look for a button or link that says “Compose,” “New Message,” or something similar. Click on it to open a new blank email window.
In the new email window, you will see various fields, including the “To” field, the “Subject” field, and the body of the email where you can write your message.
To ensure a successful delivery, it is important to provide accurate information in these fields:
- To: Enter the email address or addresses of the recipient(s) to whom you want to send the photos. If you are sending to multiple recipients, separate their addresses using commas.
- Subject: Write a brief and descriptive subject line for your email. This will help the recipient understand the purpose of the email before they open it.
- Body: This is where you can include a personal message to accompany the photos. It’s a nice touch to share a few words about the pictures or express your sentiments.
Take a moment to think about the recipients and what you want to say to them. Your message can be as brief or as detailed as you like, depending on the occasion and your relationship with the recipient(s).
Before moving forward, double-check the email addresses in the “To” field and make sure they are accurate. Ensuring that the recipients’ email addresses are correct will prevent any unnecessary delays or miscommunications.
Now that you have started a new email and filled in the necessary fields, you are ready to attach your compressed photos in the next step. Keep the email window open, as we will guide you through the process of attaching photos and completing your message before sending it off.
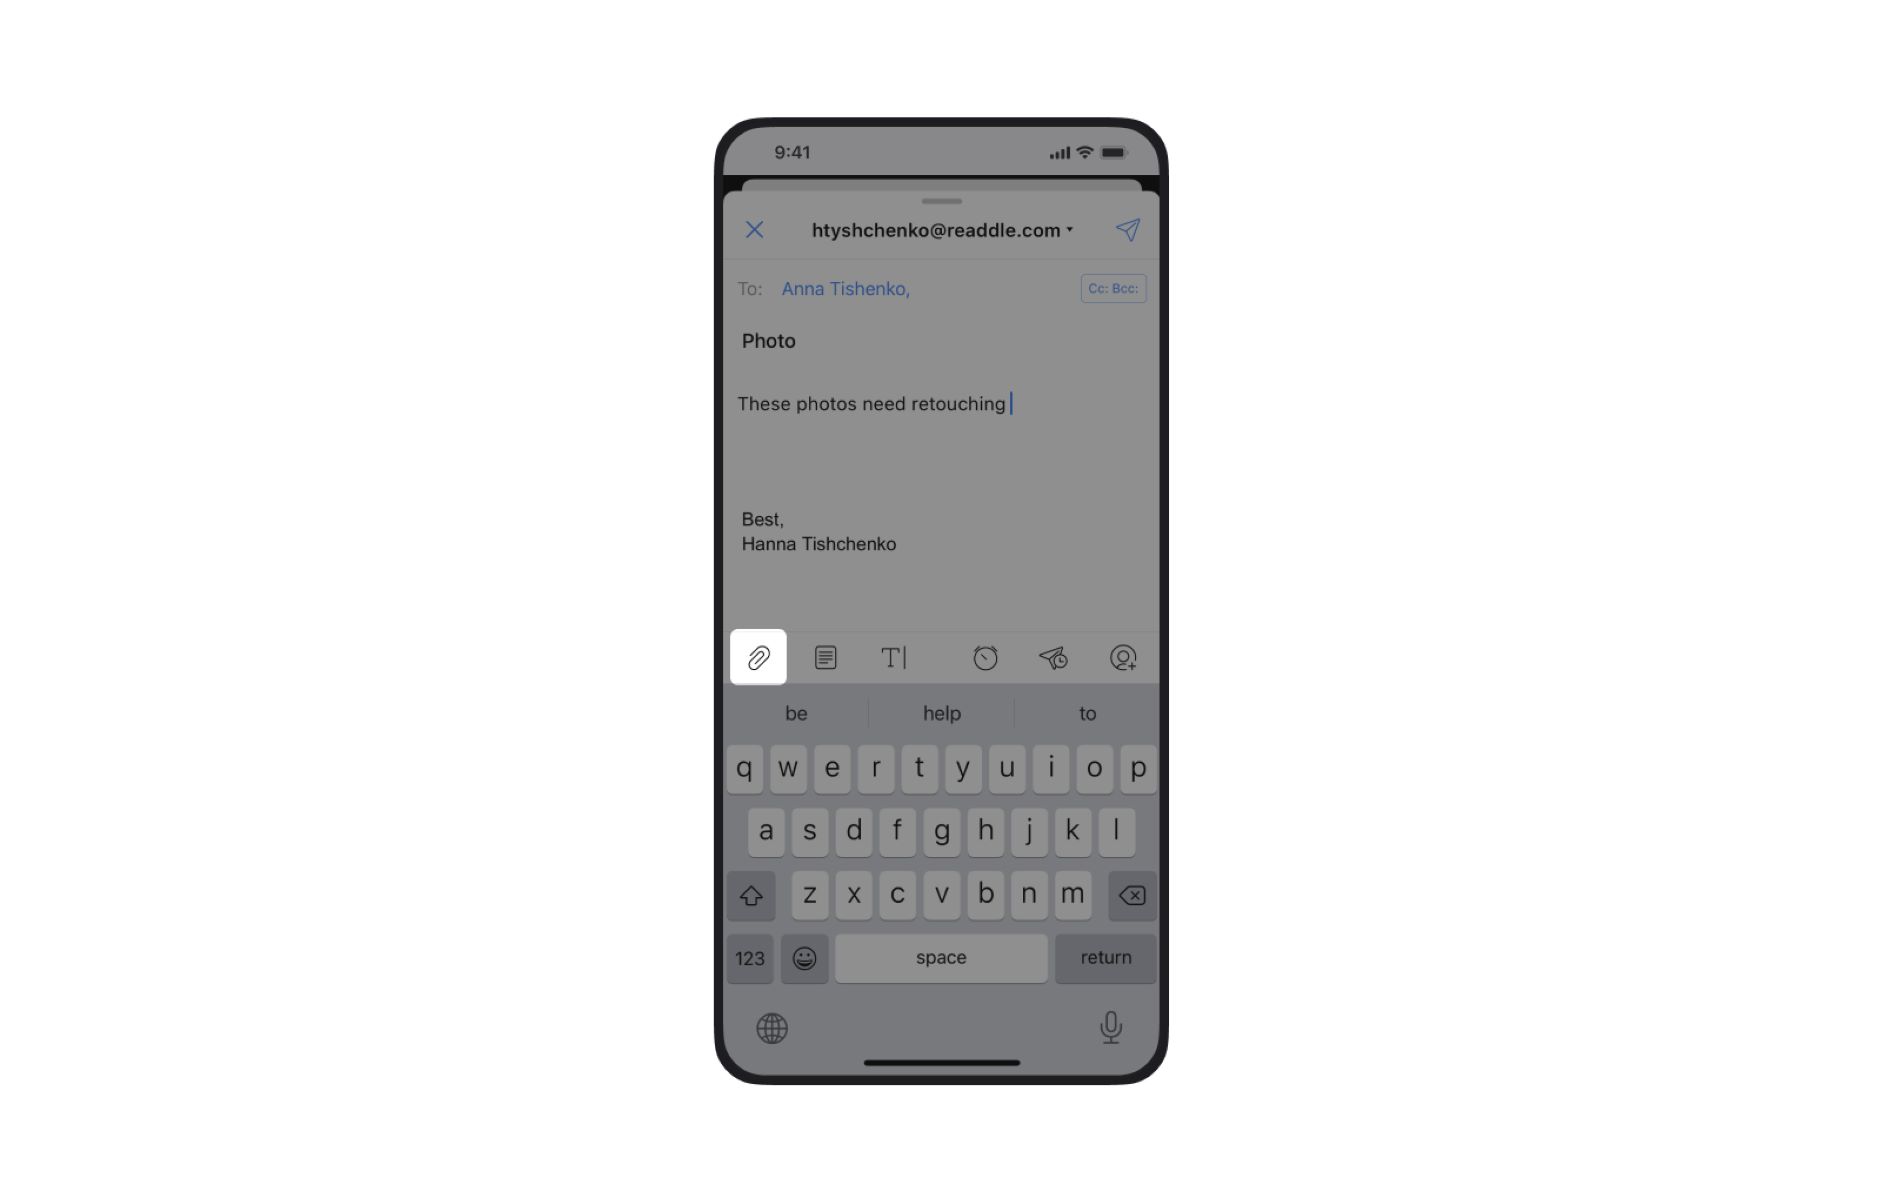
Step 4: Attach the Photos
With your new email open and the necessary fields filled in, it’s time to attach the compressed photos you want to send. Attaching photos to your email allows the recipients to easily view and download them.
To attach photos, locate the “Attach” or “Attach Files” button in the email compose window. Click on it, and a file explorer window will pop up.
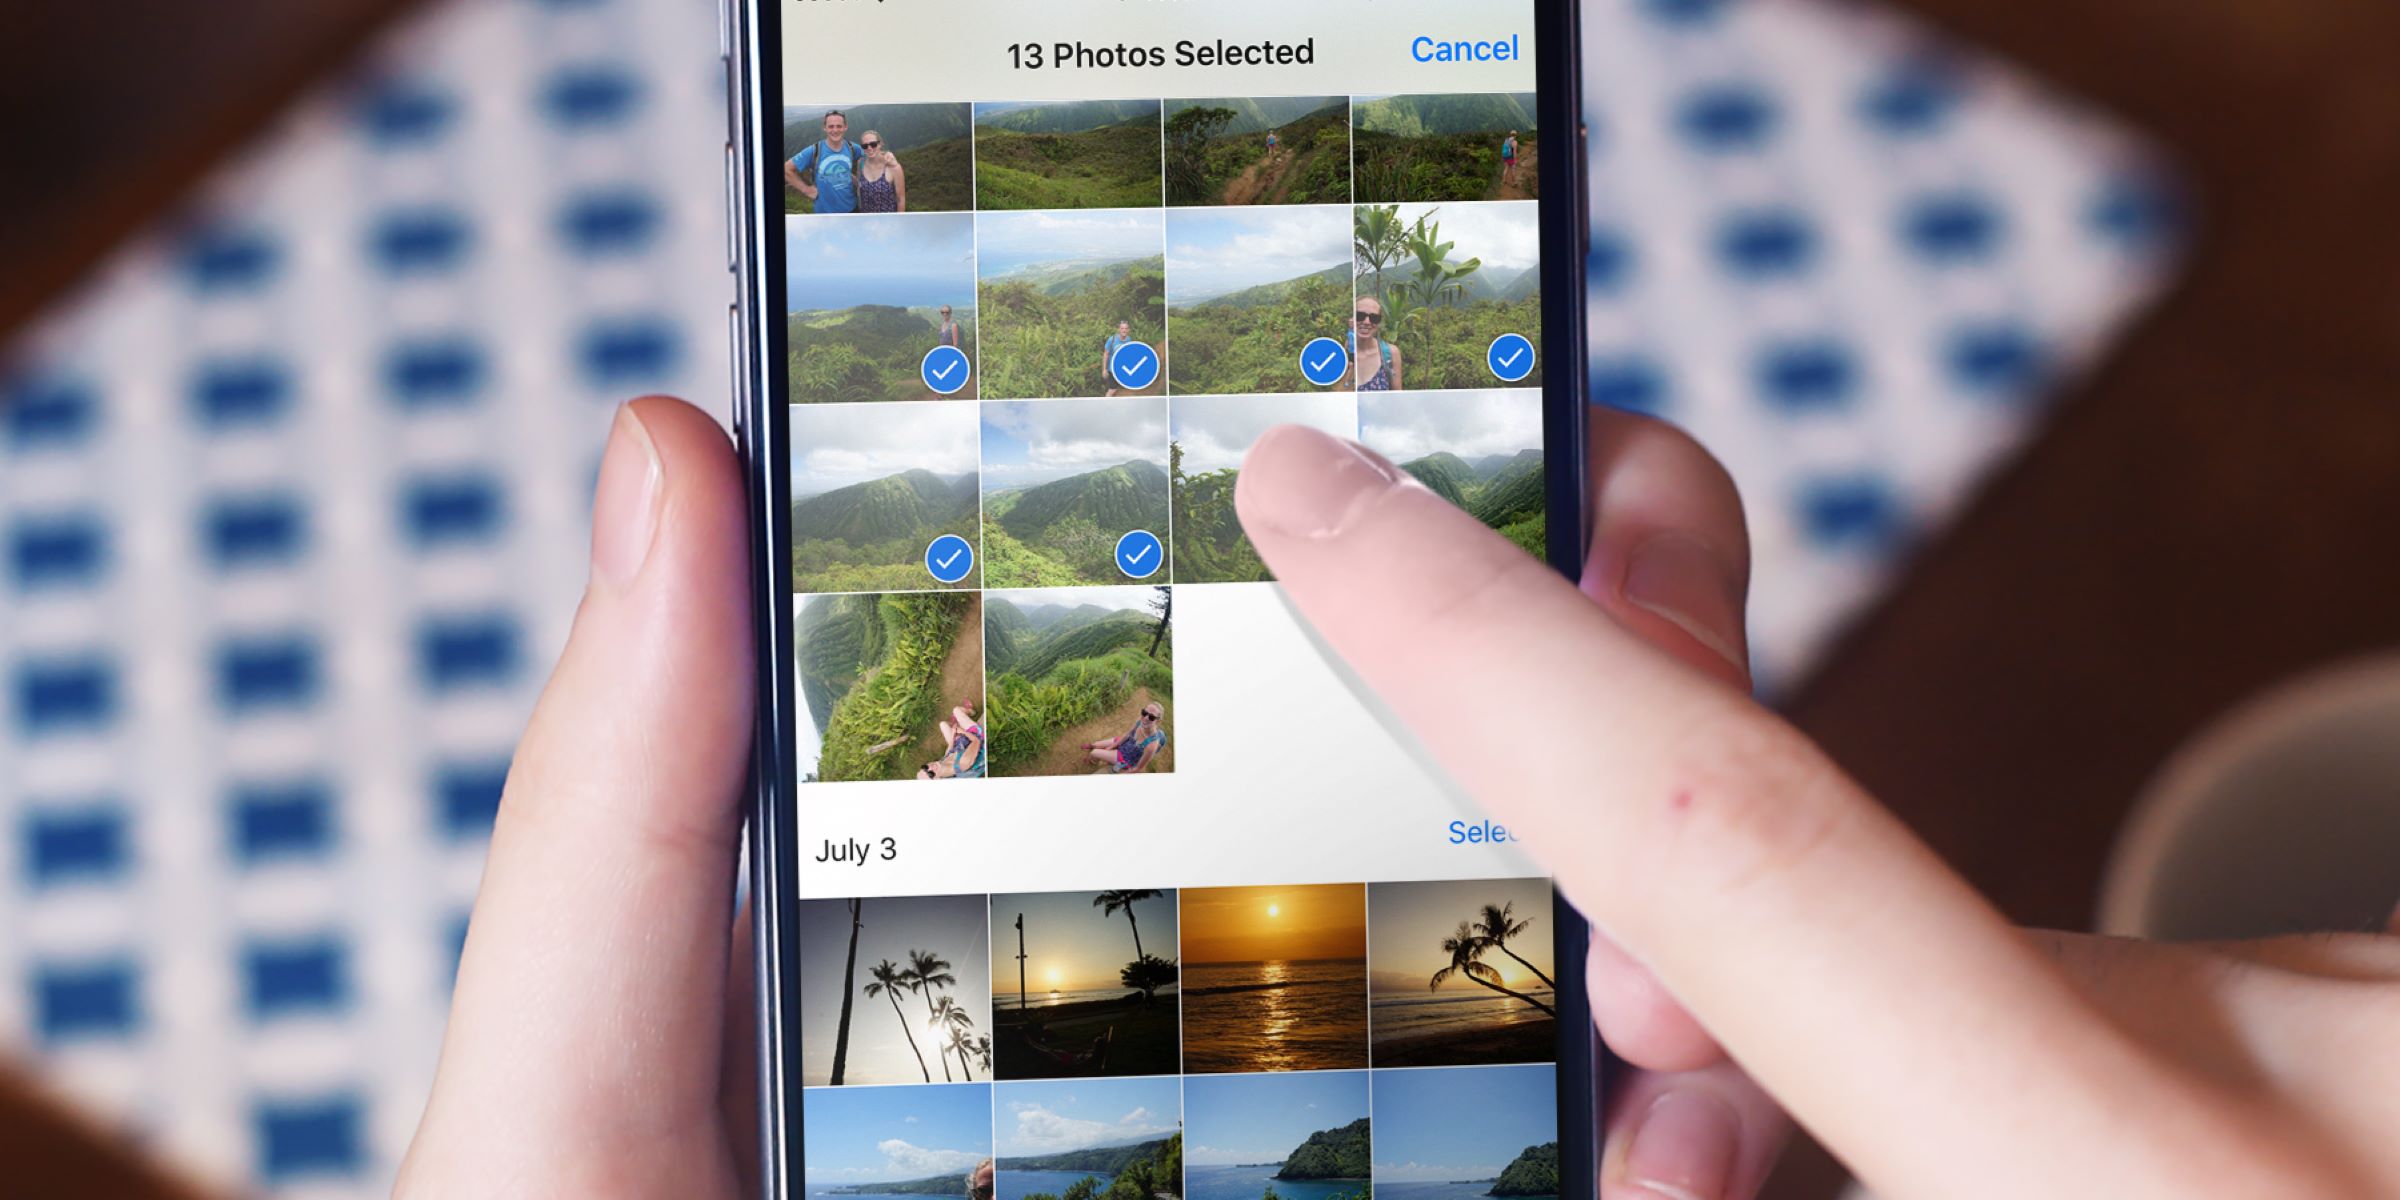
Navigate to the folder where you saved your compressed photos, select the photos you want to attach, and click “Open” or “Attach.” Depending on your email provider, you may be able to select multiple photos at once by holding down the Ctrl key (Command key for Mac users) while selecting the files.
Once you have attached the photos, you will typically see the file names or thumbnails of the attached photos listed at the bottom of the email window. This gives you a visual confirmation that the photos have been successfully attached.
It’s important to note that some email providers have restrictions on the total size of attachments that can be sent in one email. If the combined size of your attached photos exceeds this limit, you may need to send multiple emails or consider using cloud storage services, such as Google Drive or Dropbox, to share larger collections of photos.
Before moving on to the next step, take a moment to review the attached photos and ensure that you have included all the desired images. If needed, you can remove any mistakenly attached photos by clicking on the delete or remove button next to the respective file name.
With the photos properly attached to your email, you are now ready to proceed to the next step: adding the recipient(s) and subject line, and writing a heartfelt message to accompany the photos.
Step 5: Add Recipient and Subject
Now that you have attached the photos to your email, it’s time to add the recipient(s) and a subject line. This information is essential for ensuring that your email reaches the intended recipient and provides them with a clear understanding of the email’s content.
In the recipient field, you will see a box labeled “To” or “Recipient.” This is where you need to add the email address of the person or people you want to send the photos to. If you are sending the email to multiple recipients, separate their email addresses with commas.
It’s crucial to double-check the email addresses to ensure they are accurate. One small typo or missing character can result in an email being sent to the wrong person or, worse, undelivered.
Next, you will see a field labeled “Subject.” This is where you need to enter a brief and descriptive subject line for your email. The subject line gives the recipient an overview of your email’s content or purpose.
When crafting your subject line, try to be concise and specific. For example, if you are sending vacation photos, a subject line like “Memories from our tropical getaway!” can grab the recipient’s attention and provide them with a teaser of the email’s content. Make sure to avoid generic subject lines that may come across as spammy or uninteresting.
Using the recipient field and subject line effectively can increase the chances of your email being opened promptly and ensure that the recipient knows what to expect when they see your email in their inbox.
Once you have added the recipient(s) and a subject line, you’re ready to move on to the next step: composing a personal message to accompany the photos, adding the finishing touches to the email before sending it off.
Step 6: Write Your Message
With the recipient(s) and subject line in place, it’s time to write a heartfelt message to accompany the photos you’re sending. Adding a personal touch to your email can make the receiving experience more meaningful and memorable for the recipient(s).
In the body of the email, you have the opportunity to express your thoughts, share memories, or convey any specific messages associated with the photos you are sending. Here are a few tips to help you craft an engaging and thoughtful message:
- Be genuine: Write from the heart and let your true emotions shine through in your words. This will make the message more personal and heartfelt.
- Share the story behind the photos: If there’s a story or special occasion related to the photos, take a moment to share it with the recipient(s). This adds depth and context to the visual memories.
- Express gratitude or affection: If you’re sending the photos to express gratitude or affection, be sure to convey your feelings in words. Let the recipient(s) know how much they mean to you and why you appreciate them.
- Keep it concise: While it’s important to express yourself, try to keep your message concise. Long, rambling emails might deter some recipients from reading the entire message.
- Use a friendly and conversational tone: Write as if you were having a friendly conversation with the recipient(s). This makes the message feel warm and inviting.
Remember, your message is an opportunity to connect and make the experience more personal for the recipient(s). It’s a chance to share your thoughts, spread joy, and create a more meaningful interaction through the photos you’re sending.
Once you have written your message, take a moment to read it through and make any necessary edits or additions. Ensure that the tone, content, and overall message align with your intentions.
Now that you have crafted your personalized message, it’s time to move on to the final step: sending the email with your heartfelt message and attached photos.
Step 7: Send the Email
Congratulations, you’ve made it to the final step: sending the email with your carefully crafted message and attached photos. Before you hit that send button, take a moment to review everything and ensure that it’s exactly how you want it.
First, re-read your message to make sure it accurately conveys your thoughts and feelings. Check for any spelling or grammatical errors, as these can detract from the overall impression of the email.
Next, double-check that you have attached all the intended photos. Scroll through the list of attached files to verify that none are missing or duplicated. It’s always a good idea to have another look, just to be absolutely certain.
Before sending, it’s also helpful to consider the time and context in which you are sending the email. If it’s an email to wish someone a happy birthday, for example, make sure you send it on the appropriate day. Also, consider the time zone differences if you’re sending the email to someone in a different region.
When you’re satisfied with everything, it’s time to hit that send button. Depending on your email provider, the button may be labeled as “Send,” “Send Now,” or something similar. Give it a click, and off your email goes on its journey to the recipient(s)!
Once the email is sent, it may take a few moments or longer depending on the size of the attachments and your internet connection speed. During this time, the email will be transmitted through the internet and delivered to the recipient(s) in their inbox.
After sending, you can check your “Sent” or “Outbox” folder to confirm that the email has been successfully sent. If you encounter any issues, such as a failed delivery notification or error message, double-check the email addresses and try sending the email again.
Now that the email is on its way, you can eagerly anticipate the moment when the recipient(s) receives it and enjoys the photos and message you’ve shared.
Congratulations on successfully sending your email with attached photos! You’ve completed all the necessary steps to ensure your memories are shared, and your message is delivered. Now, sit back, relax, and wait for the recipient(s) to experience the joy and sentimentality you’ve captured in your email.
Conclusion
Sending pictures through email has become a seamless process, allowing us to share precious memories with our loved ones near and far. By following the steps outlined in this guide, you can confidently send your photos, knowing that they will be safely delivered and enjoyed by the recipients.
We started by compressing the photos to reduce their file size, ensuring they are email-friendly and won’t exceed attachment size limits. Then, we opened our email provider and created a new email, attaching the compressed photos to the message.
Adding the recipient(s) and a descriptive subject line helps ensure that the email reaches the intended recipients and provides them with an idea of its content. After that, we crafted a personal message to accompany the photos, expressing our thoughts and sharing the stories or sentiments behind the images.
Finally, we reviewed everything and hit the send button, eagerly awaiting the moment when the email arrives in the recipient(s)’ inbox. Sending pictures through email allows us to connect, share, and cherish memories with our loved ones, no matter the distance.
Remember, make sure to choose an appropriate time to send the email, considering time zone differences and the context of the occasion. And always double-check the accuracy of email addresses and the content of your message before pressing send.
Now that you have a complete understanding of how to send pictures through email, it’s time to start sharing those cherished moments. Whether it’s a simple snapshot or a series of photos capturing a special event, email makes it effortless to connect and share your memories with the people who matter most.
So go ahead, seize the opportunity to spread joy, preserve memories, and strengthen the bonds with your family and friends through the power of pictures and email. Happy sharing!