Introduction
Welcome to the world of SEO writing! In this article, we will explore the significance of running Chkdsk on an external hard drive. Whether you are a tech-savvy individual or a casual computer user, understanding how to perform this essential maintenance task can help ensure the health and longevity of your external storage device.
An external hard drive is a convenient and reliable way to store and backup your important files, photos, videos, and documents. However, like any technology, external hard drives are not immune to glitches and errors. Over time, these errors can accumulate and lead to data corruption, file system issues, and even hardware failures. Running Chkdsk (Check Disk) is a built-in Windows utility that can help detect and repair these errors, ensuring the optimal performance and functionality of your external hard drive.
In this article, we will walk you through the step-by-step process of running Chkdsk on an external hard drive. We will cover different methods, including using the Command Prompt and File Explorer, as well as provide some tips to troubleshoot common issues that may arise during the scanning process.
Before we delve into the technical details, it is crucial to acknowledge that Chkdsk should be approached with caution. It involves manipulating the file system of your external hard drive, which, if not done correctly, can lead to irreversible data loss. It is highly recommended to back up your data before running Chkdsk and consult with a professional if you are unsure about any aspect of the process.
Now, without further ado, let’s dive into the exciting world of Chkdsk and learn how to maintain the health of your external hard drive!
Why Run Chkdsk on an External Hard Drive?
Your external hard drive is a valuable asset, storing crucial data that you don’t want to lose. However, over time, various factors can cause errors and corruption in the file system of the drive. This is where Chkdsk comes to the rescue. Let’s explore why it’s essential to run Chkdsk on your external hard drive:
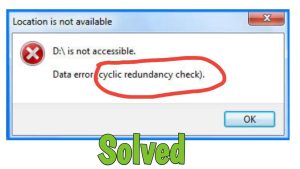
1. Detecting and Fixing File System Errors: Regular usage and improper handling of the external hard drive can lead to file system errors. These errors can manifest as inaccessible files, missing data, or even system crashes. Running Chkdsk helps to identify and repair these errors, ensuring that the file system is healthy and your data is safe.
2. Recovering Bad Sectors: Bad sectors on the disk can occur due to physical damage or excessive use. These sectors can prevent data from being written or read properly, leading to data loss or corrupted files. Chkdsk can mark these bad sectors and attempt to recover any data stored in them, improving the overall reliability of your external hard drive.
3. Improving Performance: Over time, as the file system becomes fragmented and errors accumulate, the performance of your external hard drive can be negatively impacted. Running Chkdsk optimizes the file allocation and reorganizes the data, resulting in improved access times and overall performance.
4. Preventing Data Loss: By running Chkdsk regularly, you can proactively identify and fix errors before they escalate into significant data loss situations. This preventative measure can save you from the stress and frustration of losing important files or having to invest in expensive data recovery services.
5. Maintaining Longevity: A healthy file system directly contributes to the longevity of your external hard drive. By running Chkdsk periodically, you can ensure that the drive remains in top condition, prolonging its lifespan and maximizing its utility.
Now that we have explored the importance of running Chkdsk on an external hard drive, it is time to move on to the next section: Preparing for Chkdsk.
Preparing for Chkdsk
Before initiating the Chkdsk scan on your external hard drive, it is crucial to make some preparations to ensure a smooth and successful process. Here are some steps to follow:
1. Backup Your Data: Running Chkdsk involves making changes to the file system, and while it is usually a safe procedure, there is still a small risk of data loss or corruption. To protect your valuable data, it is highly recommended to create a backup before running Chkdsk. This way, even if an unforeseen issue occurs, you can restore your files from the backup without any trouble.
2. Close Running Programs and Files: Before initiating Chkdsk, close any open files or programs that are accessing the external hard drive. This ensures that Chkdsk can perform a thorough scan without any interference. If any files are left open, Chkdsk may prompt you to schedule the scan for the next system startup.
3. Check for Hardware Issues: Before starting the Chkdsk scan, it’s a good idea to check for any hardware issues that might be affecting the external hard drive’s performance. Ensure that all cables are securely connected, and there are no signs of physical damage. This step is crucial as addressing any potential hardware problems beforehand can prevent further damage during the Chkdsk process.
4. Free Up Disk Space: Chkdsk needs some free space on the external hard drive to perform its tasks effectively. Make sure you have sufficient free disk space and delete any unnecessary files or old backups to create more room. This will allow Chkdsk to run smoothly and avoid any potential issues due to lack of space.
5. Check for Power Supply: Running Chkdsk on an external hard drive requires a steady power supply. Ensure that your device is plugged into a reliable power source or has a full battery charge if you are using a laptop. This will prevent any data corruption or system disruptions that may occur due to sudden power loss during the scan.
By following these preparation steps, you can ensure a safe and effective Chkdsk scan on your external hard drive. Now that you are ready, let’s move on to the next section: Running Chkdsk through Command Prompt.
Running Chkdsk through Command Prompt
Command Prompt is a powerful tool in Windows that allows you to execute various commands, including running Chkdsk on your external hard drive. Here’s how to do it:
Step 1: Open Command Prompt: Press the Windows key + R to open the Run dialog box. Type “cmd” and press Enter to open the Command Prompt.
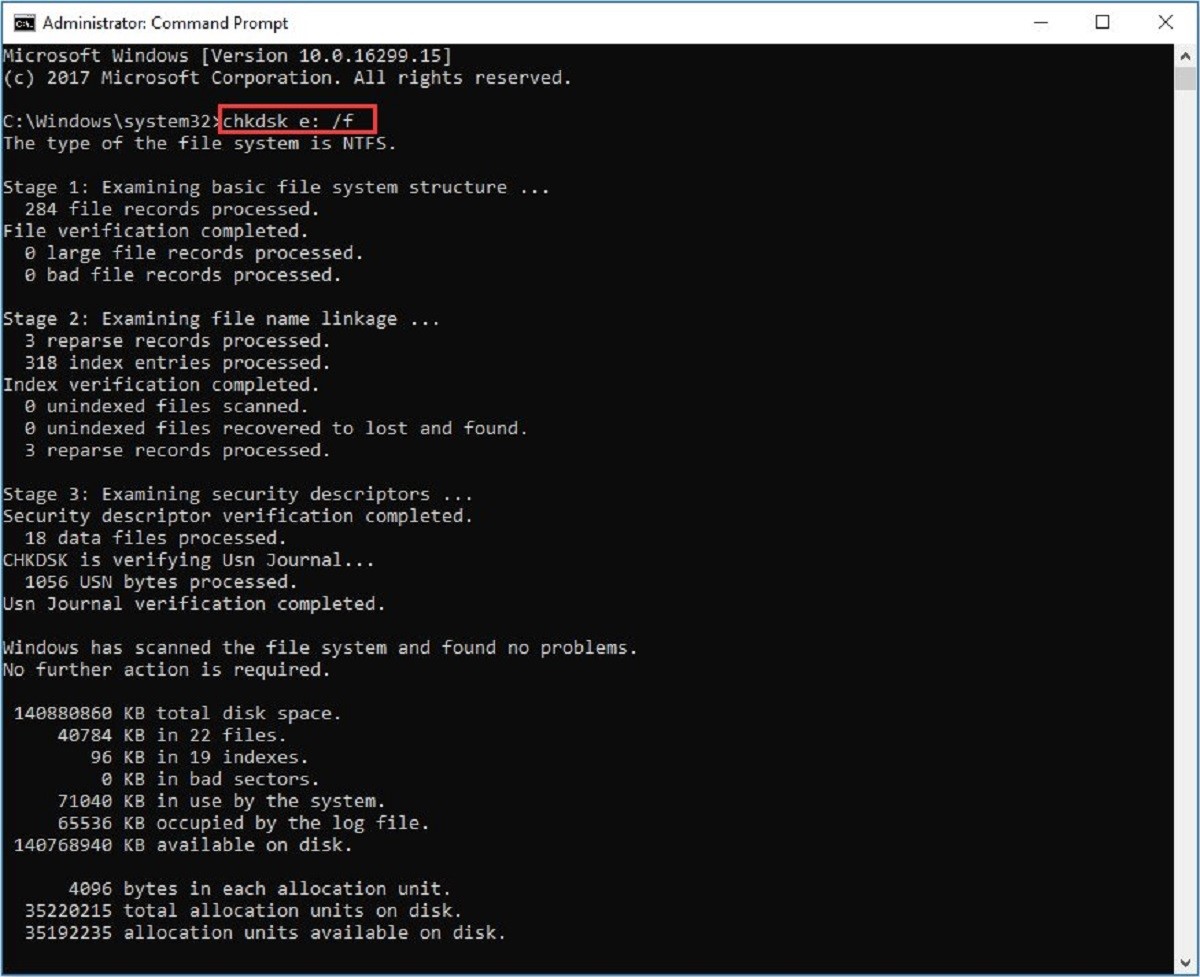
Step 2: Run Chkdsk: In the Command Prompt window, type the following command:
chkdsk [drive letter]: /f /r
Replace [drive letter] with the actual drive letter of your external hard drive. For example, if your drive is assigned the letter D, the command will be:
chkdsk D: /f /r
Step 3: Confirm and Schedule: Press Enter to confirm the command and proceed with the scan. If the external hard drive is in use, you will be prompted to schedule the scan for the next system restart. Type “Y” and press Enter to confirm.
Step 4: Restart Your System: To initiate the Chkdsk scan, you will need to restart your computer. Close any open programs and files, and then restart your system.
During the scan, Chkdsk will analyze the file system, detect errors, and attempt to repair them. This process may take some time, depending on the size and condition of your external hard drive. You can monitor the progress of the scan in the Command Prompt window.
Once the scan is complete, your computer will restart, and Windows will provide a summary of the Chkdsk results. If any issues were found and repaired, your external hard drive should now be in a healthier state.
Note that the Chkdsk command options used in the above steps are /f to fix errors and /r to locate bad sectors and attempt recovery of data. You can also use other command options depending on your specific needs.
Now that you know how to run Chkdsk through Command Prompt, let’s move on to the next section: Running Chkdsk through File Explorer.
Running Chkdsk through File Explorer
In addition to using Command Prompt, you can also run Chkdsk on your external hard drive through File Explorer. Here’s how:
Step 1: Open File Explorer: Press the Windows key + E to open File Explorer, or simply double-click on the File Explorer icon on your desktop.
Step 2: Select the External Hard Drive: In the File Explorer window, locate and click on “This PC” or “Computer” in the left-hand navigation panel. Then, find and select your external hard drive from the list of drives.
Step 3: Access Drive Tools: With your external hard drive selected, click on the “Manage” tab at the top of the File Explorer window. In the “Manage” tab, click on the “Optimize” option.
Step 4: Run Chkdsk: In the “Optimize Drives” window, you will see a list of drives. Locate your external hard drive in the list and click on the “Optimize” button next to it. This will initiate the Chkdsk scan on the selected drive.
Step 5: Monitor the Scan: As the Chkdsk scan proceeds, you can monitor the progress in the “Optimize Drives” window. Depending on the size and condition of your external hard drive, the scan may take some time to complete.
During the scan, Chkdsk will analyze the file system, detect errors, and attempt to fix them. It will also locate any bad sectors on the drive and try to recover data if possible. Once the scan is finished, you will see a summary of the Chkdsk results in the “Optimize Drives” window.
It is important to note that in this method, the default Chkdsk settings are applied. If you want to use specific command options, such as /f or /r, to perform a more thorough scan, it is recommended to use the Command Prompt method mentioned earlier.
Now that you know how to run Chkdsk through File Explorer, let’s move on to the next section: Tips to Ensure a Successful Chkdsk Scan.
Tips to Ensure a Successful Chkdsk Scan
Running Chkdsk on your external hard drive can help resolve errors and improve its overall health. To ensure a successful and effective Chkdsk scan, consider the following tips:
1. Be Patient: Chkdsk scans can take a significant amount of time, especially if you have a large external hard drive or if there are numerous errors to be fixed. It’s important to be patient and allow the scan to complete without interruption. Interrupting the scan can lead to incomplete repairs or data loss.
2. Avoid Interruptions: It’s crucial to avoid any interruptions during the Chkdsk scan. Ensure that your computer is plugged into a stable power source or has a fully charged battery if you are using a laptop. Also, avoid closing the Command Prompt or File Explorer window while the scan is in progress.
3. Do Not Use the Drive: While Chkdsk is running, it’s best to avoid using the external hard drive for any read or write operations. This includes opening files, copying data, or deleting files. Using the drive during the scan can interfere with the repair process and may lead to further errors.
4. Scan Regularly: To maintain the health of your external hard drive, it’s recommended to run Chkdsk regularly. Performing periodic scans helps to identify and fix errors before they escalate and become more significant issues. Regular maintenance can prolong the lifespan of your external hard drive and improve its overall performance.
5. Keep Backup Copies: Chkdsk is generally a safe procedure, but it’s always a good idea to have backups of your important data. In rare cases, issues can occur during the scan that may result in data loss or corrupted files. Having regular backups ensures that your data remains protected, even in the unlikely event of an unforeseen problem.
6. Seek Professional Help if Needed: If you encounter any issues during the Chkdsk process or if you are unsure about any aspect of the scan, it’s advisable to seek professional assistance. Data recovery experts or computer technicians can provide guidance and ensure that your external hard drive is properly diagnosed and repaired.
By following these tips, you can increase the chances of a successful Chkdsk scan and maintain the health of your external hard drive. Now that you are equipped with valuable information, let’s move on to the next section: Troubleshooting Common Issues.
Troubleshooting Common Issues
While running Chkdsk can help resolve errors on your external hard drive, there may be instances when you encounter common issues during the scanning process. Here are some troubleshooting tips for common Chkdsk issues:
1. “Access Denied” Error: If you receive an “Access Denied” error when running Chkdsk, make sure you have administrative privileges. Open Command Prompt or File Explorer as an administrator by right-clicking on the program icon and selecting the appropriate option. Additionally, ensure that no other applications or processes are accessing the external hard drive.
2. Stuck at a Certain Percentage: Sometimes, the Chkdsk scan may appear to be stuck at a certain percentage for a prolonged period. In such cases, it’s best to be patient and allow the scan to continue running. Chkdsk may be repairing complex errors or dealing with a large number of files, which can lengthen the scanning time. Avoid interrupting the scan unless there is no progress for an extended period (e.g., several hours).
3. Inconsistent Scan Results: Chkdsk scans can sometimes provide inconsistent results, showing errors that are not actually present or indicating no errors when issues exist. If you suspect this is the case, it may be beneficial to run additional scans or use third-party disk utility software for a more accurate assessment. Seeking professional advice can also help diagnose and address any underlying problems.
4. Unsuccessful Repairs: Occasionally, Chkdsk may encounter errors that it cannot repair. In such situations, it’s recommended to consult a data recovery service or a professional technician. They have specialized tools and expertise to recover data from faulty drives or assess the extent of the damage and explore further repair options.
5. System Freeze or Crash: Rarely, running Chkdsk may cause your system to freeze or crash. This can happen if the external hard drive has severe hardware issues. If this happens, restart your computer and attempt to run Chkdsk in safe mode or with a different computer to determine if the problem persists. If the issue continues, professional assistance may be necessary.
Remember, if you’re unsure about any aspect of running Chkdsk or encounter persistent issues, it’s always advisable to seek professional guidance. They can provide tailored solutions based on the specific problems you’re facing and help ensure a successful resolution.
Now that we’ve covered troubleshooting common issues, it’s time to wrap up this informative guide.
Conclusion
Running Chkdsk on your external hard drive is a vital maintenance task that can help detect and repair errors, improve performance, and prevent data loss. Whether you choose to use the Command Prompt or File Explorer method, it is important to follow the necessary preparations and best practices to ensure a successful and effective Chkdsk scan.
Remember to backup your data before initiating the scan and exercise patience during the process, as it may take some time, especially for larger drives or when addressing complex issues. Avoid interruptions, keep your system powered, and refrain from using the drive during the scan.
In cases where common issues arise, such as access denied errors or inconsistent scan results, troubleshoot with administrative rights, seek professional advice, or explore third-party disk utility options. If repairs are unsuccessful or your system freezes or crashes, consider engaging data recovery services or consulting a professional technician.
Regularly running Chkdsk on your external hard drive can help maintain its health, enhance performance, and extend its longevity. Be proactive in scheduling scans and keeping backups to ensure the safety and integrity of your important data.
We hope this guide has provided you with valuable insights and troubleshooting tips for running Chkdsk on an external hard drive. By following the outlined steps and taking necessary precautions, you can effectively maintain the health of your external storage device and enjoy hassle-free data storage and retrieval.
Thank you for reading, and best of luck in maintaining your external hard drive!