Introduction
Welcome to our guide on how to reset your Acer tablet. Whether you are experiencing software issues, want to erase all your personal data, or simply want to start fresh, performing a reset can be a helpful solution. Resetting your tablet involves various steps, including backing up your data and performing either a soft or hard reset, depending on your needs.
Before proceeding with the reset, it’s important to understand the difference between a soft reset and a hard reset. A soft reset, also known as a restart or reboot, temporarily turns off and then turns on your tablet. This can help resolve minor software issues without deleting your personal data. On the other hand, a hard reset, also known as a factory reset, restores your tablet to its original factory settings, erasing all data in the process.
In this guide, we will walk you through the necessary steps to reset your Acer tablet effectively. However, please note that performing a factory reset will delete all your data, including apps, files, and settings. Therefore, we strongly recommend backing up all your important data before proceeding with the reset process.
Part 1: Back up your data
Before you proceed with any form of reset on your Acer tablet, it is crucial to back up your data to ensure you do not lose any important files or information. Here are the steps to back up your data:
- Connect to Wi-Fi: Ensure that your tablet is connected to a stable Wi-Fi network to facilitate the backup process.
- Sync with Google account: Sign in to your Google account or create one if you don’t have an existing account. This will enable you to backup your contacts, calendar events, app data, and other important information to the cloud.
- Backup photos and videos: If you have important photos and videos stored on your tablet, it is recommended to transfer them to a computer or an external storage device to ensure they are safely backed up.
- Save documents and files: If you have any important documents, such as Word files or PDFs, save them to a cloud storage service like Google Drive or Dropbox. Alternatively, you can transfer them to a computer or external storage device.
- Export app data: Some apps allow you to export their data. Check if any of your installed apps have an option to export data, and make use of it if necessary.
- Review backup: Double-check that all your important data is successfully backed up by accessing your Google account and confirming that the data is visible in the cloud storage services.
By following these steps, you can ensure that your valuable data is securely backed up before proceeding with the reset process. This allows you to restore your data easily after the reset is complete, preventing the loss of any essential files or contacts.
Part 2: Perform a soft reset
If you’re experiencing minor software issues or your Acer tablet is unresponsive, performing a soft reset can help resolve these problems. Follow the steps below to perform a soft reset on your Acer tablet:
- Locate the power button: Look for the power button on your tablet. It is usually located on the top, bottom, or side of the device.
- Press and hold the power button: Press and hold the power button for about 10 to 15 seconds until your tablet turns off completely.
- Release the power button: Once your tablet is powered off, release the power button.
- Turn on your tablet: Press the power button again to turn on your tablet. Wait for it to boot up and check if the issues you were experiencing have been resolved.
A soft reset essentially restarts your tablet, allowing it to refresh its system and resolve any temporary glitches. This process does not delete any data from your tablet. It is a simple and effective solution for resolving minor software or performance issues.
If the soft reset doesn’t resolve the problem or your tablet is still unresponsive, you may need to proceed with a hard reset, which we will guide you through in the next section. Remember, performing a hard reset will erase all data on your tablet, so it’s essential to back up your data before continuing, as mentioned in the previous section.
Part 3: Perform a hard reset
If you’re experiencing significant software issues, want to erase all your personal data, or need to restore your Acer tablet to its original factory settings, a hard reset is the solution. Here’s how you can perform a hard reset on your Acer tablet:
- Power off your tablet: Make sure your tablet is powered off by pressing and holding the power button until the screen goes black.
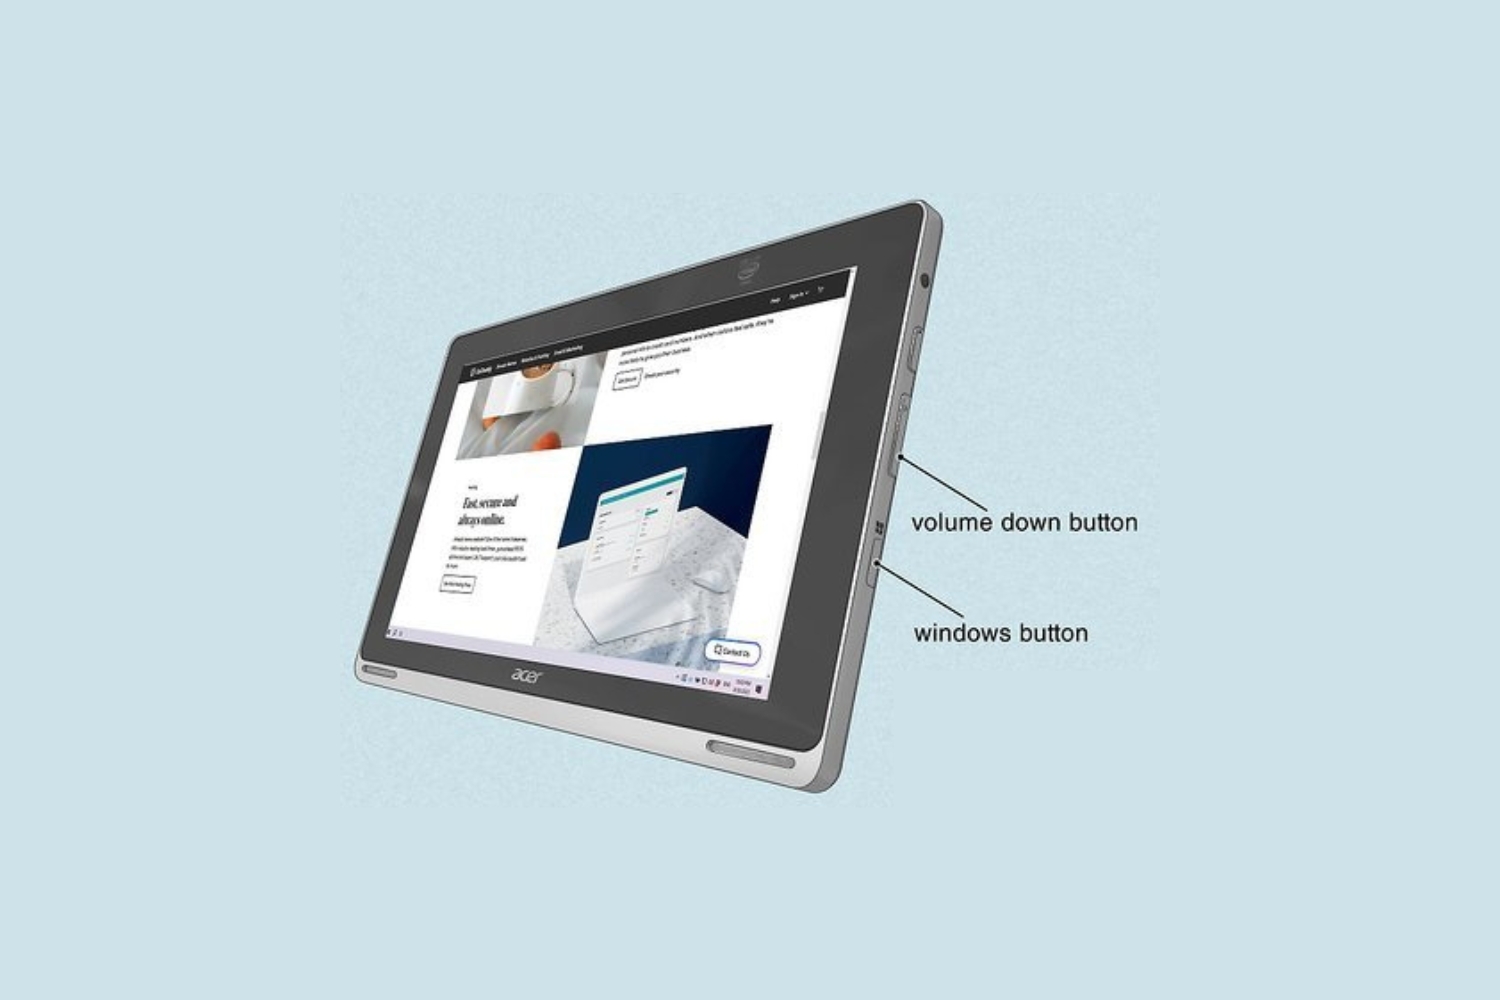
- Enter Recovery mode: Depending on the model of your Acer tablet, you may need to press a combination of buttons to access the Recovery mode. Common button combinations include the power button and volume up/down buttons, or the power button and the home button. Refer to your tablet’s user manual or search online for the specific button combination for your model.
- Navigate using volume buttons: Once you’ve entered Recovery mode, use the volume up or volume down buttons to navigate through the options presented on the screen.
- Select “Wipe data/factory reset”: Use the volume buttons to highlight the “Wipe data/factory reset” option, and then press the power button to select it.
- Confirm the reset: A confirmation prompt will appear on the screen. Use the volume buttons to highlight the “Yes” option, and then press the power button to confirm the reset process.
- Wait for the reset to complete: Your Acer tablet will now begin the reset process, which may take a few minutes. Once the process is complete, you will be taken back to the Recovery mode screen.
- Select “Reboot system now”: Use the volume buttons to navigate to the “Reboot system now” option, and then press the power button to restart your tablet.
After the hard reset, your Acer tablet will be restored to its original factory settings. All personal data, apps, and settings will be erased, so make sure you have backed up your data beforehand. Once your tablet restarts, you can set it up as new or restore your data using the backup you created earlier.
Part 4: Reinstalling the operating system
If you have performed a hard reset on your Acer tablet and want to reinstall the operating system to ensure a clean slate and optimal performance, follow these steps:
- Visit Acer’s website: Go to Acer’s official website and navigate to the support section.
- Find the appropriate drivers and downloads: Locate the support page for your specific Acer tablet model and search for the section that contains drivers and downloads.
- Download the operating system image: Look for the available operating system images or firmware updates for your tablet. Download the appropriate file, ensuring it is compatible with your device.
- Prepare a bootable USB or SD card: Depending on the instructions provided by Acer, you may need to create a bootable USB drive or SD card with the downloaded operating system image. Follow the instructions carefully to create the bootable media.
- Connect the bootable media: Connect the bootable USB drive or insert the bootable SD card into your Acer tablet.
- Access the boot menu: Power on your tablet and enter the boot menu by pressing the appropriate key combination. The key to access the boot menu may vary depending on your tablet model, so refer to the user manual or search online for the specific key combination.
- Select the bootable media: Once in the boot menu, use the arrow keys to highlight the bootable USB drive or SD card, and press Enter to select it as the boot device.
- Follow the on-screen instructions: The installation process will begin, and you will be guided through the steps to reinstall the operating system. Follow the on-screen instructions carefully and select the appropriate options when prompted.
- Complete the installation: Once the operating system installation is complete, your Acer tablet will reboot, and you will be directed to set up the device as new.
Reinstalling the operating system ensures that your Acer tablet starts fresh with all necessary drivers and software. It can resolve any persistent software issues and provide a more stable and optimized user experience. However, keep in mind that this process will erase all data on your tablet, so make sure you have backed up your important files and data beforehand.
Conclusion
Resetting your Acer tablet can be a useful solution for resolving software issues, improving performance, or starting fresh. In this guide, we presented four important steps to follow when resetting your Acer tablet:
- Back up your data: Before performing a reset, it’s crucial to back up all your important data, including contacts, photos, videos, documents, and app data.
- Perform a soft reset: A soft reset can help resolve minor software issues by restarting your tablet.
- Perform a hard reset: If you’re experiencing significant software problems or want to erase all your data, a hard reset will restore your Acer tablet to its original factory settings.
- Reinstall the operating system: If you performed a hard reset and want a clean slate, reinstalling the operating system can ensure optimal performance.
Remember to carefully follow the instructions for each step, as the process may vary slightly depending on your Acer tablet model. Additionally, backing up your data before any reset is crucial to prevent permanent loss of important files and information.
If you encounter any difficulties or have specific questions about your Acer tablet, it’s recommended to consult the official Acer support website or contact their customer support for personalized assistance.
By following the steps outlined in this guide, you can effectively reset your Acer tablet and resolve software issues or start fresh, ensuring optimal performance and a better user experience.