Introduction
Have you ever encountered issues with your Nextbook tablet, such as freezing, slow performance, or software glitches? If so, a factory reset could be the solution you’re looking for. Resetting your Nextbook tablet to its factory settings can help resolve various software-related problems and give your device a fresh start.
A factory reset, also known as a hard reset, erases all the data and customizations on your tablet, restoring it to its original state when you first bought it. This process removes any installed apps, personal files, and settings, so it’s important to back up your data before proceeding.
In this article, we will guide you through the process of performing a factory reset on your Nextbook tablet. We’ll explore different methods you can use, such as resetting through the settings menu, using the hardware buttons, and even utilizing advanced tools like ADB and Fastboot.
Before we delve into the step-by-step instructions, it’s important to note that a factory reset should be considered as a last resort. It is recommended to try other troubleshooting methods, such as clearing cache and app data, restarting your device, or updating the software, before resorting to a factory reset.
Now, let’s dive into the details and learn how to factory reset your Nextbook tablet to revive its performance and resolve any software issues.
Why Should You Factory Reset Your Nextbook Tablet?
There are several reasons why you might consider performing a factory reset on your Nextbook tablet. Let’s explore some of the common scenarios where a factory reset can be beneficial:
- Software Issues: Over time, your Nextbook tablet may experience software glitches, freezing, or slow performance. These issues can be frustrating, affecting your productivity and user experience. A factory reset can help resolve these problems by wiping out any corrupt files or conflicting settings that may be causing the issues.
- Unresponsive Apps: If certain apps on your Nextbook tablet become unresponsive or crash frequently, a factory reset can help address the issue. By clearing out all the installed apps and their associated data, you can start fresh and reinstall the problematic apps, ensuring they function properly.
- Excessive Storage Usage: If your tablet’s storage is cluttered with unnecessary files, this can lead to reduced performance and limited available space. A factory reset will remove all files and apps, giving you a clean slate and freeing up valuable storage capacity.
- Privacy and Security: Performing a factory reset is an effective way to ensure your personal data is completely wiped from the device. Whether you’re selling, donating, or simply recycling your Nextbook tablet, a factory reset will remove all your personal files, accounts, and passwords, safeguarding your privacy and preventing unauthorized access to your data.
- Device Optimization: Over time, your tablet’s performance may become sluggish due to a buildup of temporary files, cached data, and outdated system settings. A factory reset will restore your Nextbook tablet to its original settings, optimizing its performance and responsiveness.
While a factory reset can address many software-related issues, it’s important to remember that it will also erase all your personal data. Therefore, it’s crucial to back up any important files, contacts, and settings before proceeding with the reset. Additionally, keep in mind that a factory reset should be considered as a last resort if other troubleshooting methods have failed to resolve the issues with your Nextbook tablet.
Preparing for a Factory Reset
Before you proceed with a factory reset, it’s essential to take a few preparatory steps to ensure a smooth and successful reset process. Here are some key things to consider:
- Backup Your Data: A factory reset will erase all data on your Nextbook tablet, including apps, photos, videos, contacts, and settings. Therefore, it’s crucial to back up any important files or data that you don’t want to lose. You can use cloud storage services, such as Google Drive or Dropbox, to save your files, or transfer them to a computer or external storage device.
- Make Note of Important Settings: Take note of any important settings, such as Wi-Fi passwords, email accounts, or app preferences. These details will need to be reconfigured after the factory reset, so having them handy will save you time and effort.
- Charge Your Tablet: Ensure that your Nextbook tablet has sufficient battery power before initiating a factory reset. It’s recommended to have at least 50% battery charge to prevent any disruptions during the reset process. If necessary, plug your tablet into a power source during the reset to avoid any power related issues.
- Remove External Storage: If you have an external SD card or USB storage connected to your Nextbook tablet, it’s advisable to remove them before initiating the factory reset. This will prevent any accidental data loss or complications during the reset process.
- Account Removal: Before performing a factory reset, it’s essential to remove any accounts, such as Google or Microsoft accounts, associated with the device. This is particularly important if you are planning to sell or give away your tablet, as it will prevent unauthorized access to your personal information.
By taking these preparatory steps, you can ensure a smooth and hassle-free factory reset process for your Nextbook tablet. Once you have completed the necessary backups and made note of important settings, you are ready to proceed with the reset using one of the methods we will outline in the following sections.
Method 1: Factory Reset through Settings
One of the simplest ways to perform a factory reset on your Nextbook tablet is through the device’s settings menu. Follow these steps:
- Open the “Settings” app on your Nextbook tablet. You can usually find it in the app drawer or by swiping down from the top of the screen and tapping the gear icon.
- Scroll through the settings and look for the “Backup & reset” option. It may also be labeled as “System” or “System & updates,” depending on your device model and operating system version.
- Tap on “Backup & reset” to access the reset options.
- Look for the “Factory data reset” or “Reset” option. The exact wording may vary, but it should be clear that this is the option for performing a factory reset.
- Before proceeding, review the information presented on the screen. It will typically warn you that a factory reset will erase all data on your tablet and cannot be undone.
- If you’re ready to proceed, tap on “Factory data reset” or “Reset” and then confirm your decision by tapping “Reset” or “Erase everything.” Your tablet will now begin the reset process.
- Wait for the reset process to complete. Your Nextbook tablet will restart and boot up as if it were brand new.
It’s important to note that the exact steps and labels may vary depending on your tablet’s manufacturer and the version of the operating system. If you’re having trouble finding the reset option, refer to your device’s user manual or search online for specific instructions for your model.
Once the factory reset is complete, you can set up your Nextbook tablet again by following the on-screen instructions. This includes signing in with your Google or Microsoft accounts, connecting to Wi-Fi, and reconfiguring your settings and preferences.
Performing a factory reset through the settings menu is a relatively straightforward process, making it a convenient option for most Nextbook tablet users. However, if you’re unable to access your tablet’s settings or encountering issues with this method, don’t worry. We will explore alternative methods in the following sections.
Method 2: Factory Reset with Hardware Buttons
If you’re unable to access the settings menu on your Nextbook tablet or encountering software issues that prevent you from performing a reset through the normal process, you can use the hardware buttons to initiate a factory reset. Here’s how:
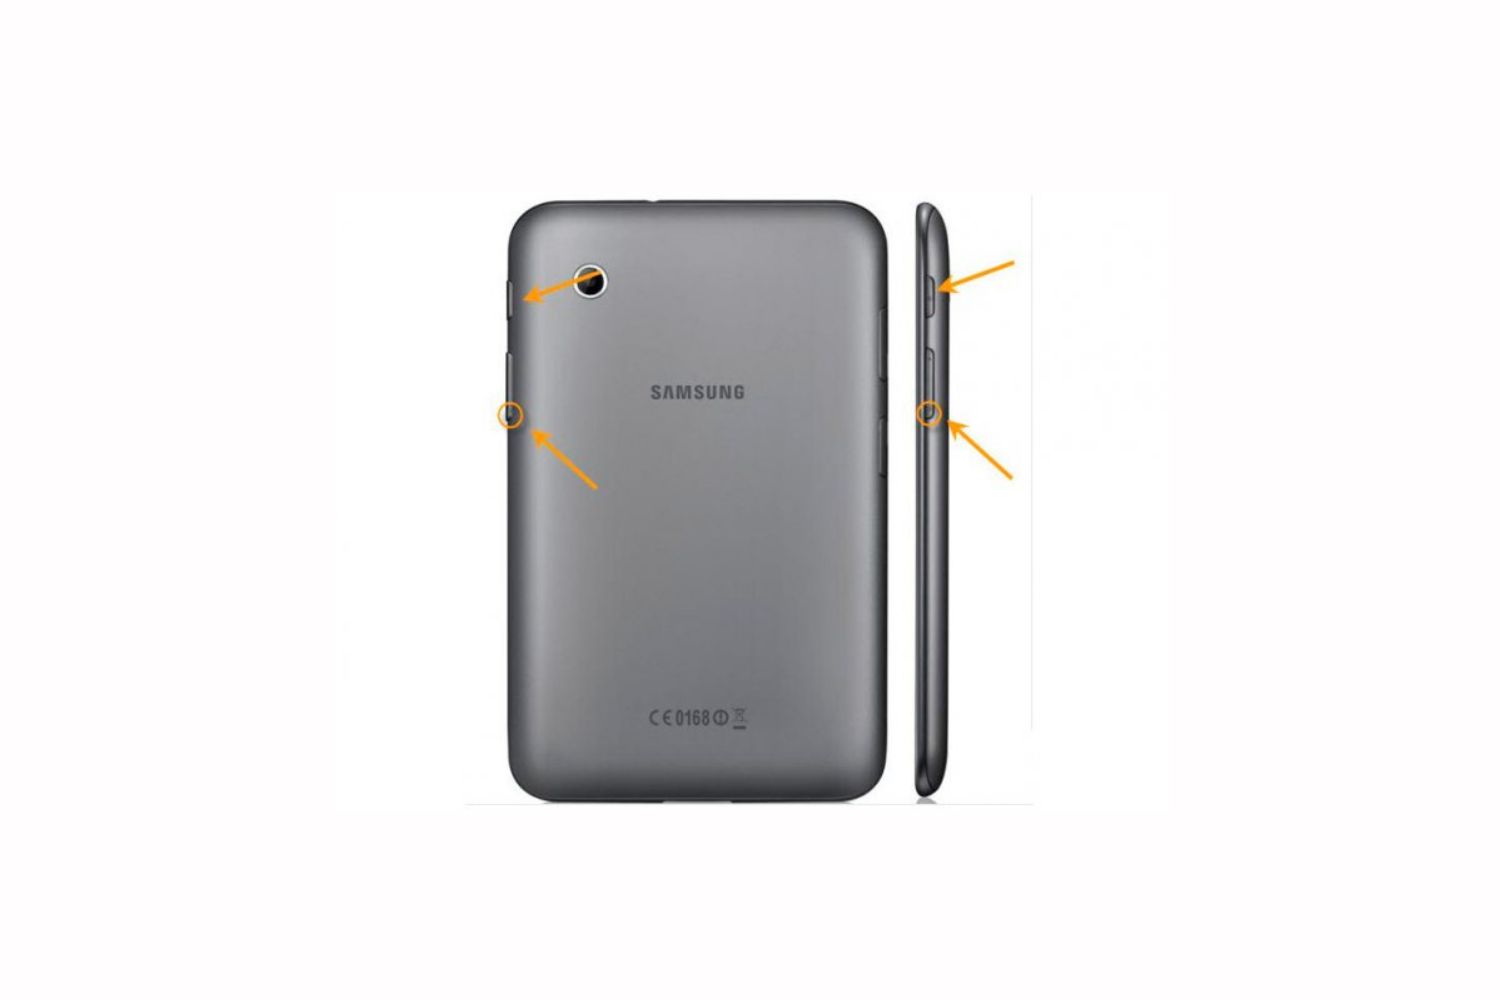
- Ensure that your Nextbook tablet is powered off. If it’s currently on, press and hold the power button until the shutdown options appear, and then select “Power off.”
- Press and hold the designated button combination to enter the recovery mode. The specific button combination may vary depending on your Nextbook model, but commonly used combinations include holding down the volume up button and the power button simultaneously, or the volume down button and the power button.
- Continue to hold down the buttons until you see the Nextbook logo or a recovery mode screen appear. Release the buttons once you see the screen.
- Using the volume up and volume down buttons, navigate through the recovery mode menu. Look for an option labeled “Wipe data/factory reset” or “Factory reset.”
- Select the option by pressing the power button. Confirm your selection if prompted.
- Wait for the factory reset process to complete. This may take a few minutes.
- Once the reset is finished, you’ll be taken back to the recovery mode menu. Use the volume buttons to navigate to the “Reboot system now” option and press the power button to confirm. Your Nextbook tablet will restart.
It’s important to note that entering the recovery mode and the specific button combination to initiate a factory reset may vary depending on your Nextbook tablet model. If you’re unsure about the correct button combination or are experiencing difficulties, consult your device’s user manual or search online for specific instructions for your particular model.
Using the hardware buttons to perform a factory reset can be useful when you can’t access the settings menu or encounter software issues. However, be cautious as this method can be more complex and potentially risky if not executed correctly. Ensure you follow the steps accurately and have a backup of your important data before proceeding.
If you’re still having trouble or prefer a more advanced approach, we’ll cover an alternative method using ADB and Fastboot in the next section.
Method 3: Factory Reset using ADB and Fastboot
If you’re comfortable with more advanced techniques or the previous methods haven’t resolved your Nextbook tablet’s issues, you can perform a factory reset using ADB (Android Debug Bridge) and Fastboot. This method requires a computer and some technical know-how. Here’s how you can do it:
- Ensure that you have ADB and Fastboot installed on your computer. If you don’t have them already, you can download the Android SDK Platform Tools, which includes ADB and Fastboot, from the official Android Developer website.
- Enable USB debugging on your Nextbook tablet by going to “Settings,” then “About tablet,” and tapping on the “Build number” multiple times until it says, “You are now a developer.” Then, go back to the main settings menu, and you’ll find a new option called “Developer options.” Open it and enable “USB debugging.”
- Connect your Nextbook tablet to your computer using a USB cable.
- Open a command prompt or terminal on your computer and navigate to the directory where you have ADB and Fastboot installed.
- Type the command “adb devices” to ensure that your tablet is recognized and listed as a connected device. If your device is not listed, make sure the USB drivers are installed correctly.
- Type the command “adb reboot bootloader” to boot your Nextbook tablet into Fastboot mode.
- Once in Fastboot mode, type the command “fastboot erase userdata” to initiate the factory reset process. This command will erase all data on your tablet.
- Wait for the process to complete. Once finished, type the command “fastboot reboot” to restart your Nextbook tablet.
Performing a factory reset using ADB and Fastboot provides a more technical and advanced approach. It is recommended for users who are familiar with ADB commands and comfortable working with the command-line interface. If you’re unsure or uncomfortable with these methods, it’s best to seek assistance from a knowledgeable individual or contact Nextbook support for guidance.
Remember, a factory reset using ADB and Fastboot will erase all data on your Nextbook tablet. Therefore, it’s crucial to back up any important files or data before proceeding with this method.
Now that we’ve explored various methods of performing a factory reset on your Nextbook tablet, it’s important to consider a few final factors before proceeding.
Things to Consider Before a Factory Reset
Before you proceed with a factory reset on your Nextbook tablet, there are a few important factors to consider:
- Data Backup: Performing a factory reset will erase all data on your tablet. Therefore, it’s crucial to back up any important files, photos, videos, contacts, and other data that you don’t want to lose. You can use cloud storage, an external hard drive, or a computer to backup your data.
- Account Disassociation: Before initiating a factory reset, make sure to remove any accounts associated with your Nextbook tablet. This includes Google accounts, Microsoft accounts, social media accounts, and any other accounts linked to the device. This step is essential to protect your privacy and prevent unauthorized access to your accounts.
- App and License Information: Take note of the apps you have installed on your tablet and the corresponding licenses or activation keys if applicable. After the factory reset, you will need to reinstall your apps and reactivate them, so having access to this information will be helpful.
- Device-Specific Considerations: Different Nextbook tablet models may have unique characteristics or requirements for a factory reset. It’s recommended to consult the user manual or online resources specific to your tablet model to ensure you are following the correct procedure.
- Alternative Troubleshooting: It’s worth attempting alternative troubleshooting methods before performing a factory reset. Restarting your tablet, clearing cache and app data, or updating the software may resolve the issues you’re experiencing without the need for a factory reset. Explore these options first and consider a factory reset as a last resort.
By considering these factors and making the necessary preparations, you can ensure a smoother and more successful factory reset process for your Nextbook tablet. Remember, a factory reset is a serious step that should be approached with caution as it will erase all data and settings on your device.
Now that you’re aware of these considerations, you can proceed with the factory reset method that best suits your situation and resolve any persistent issues with your Nextbook tablet.
Conclusion
Performing a factory reset on your Nextbook tablet can be a highly effective solution for resolving software issues, restoring performance, and giving your device a fresh start. Whether you choose to reset through the settings menu, use the hardware buttons, or employ more advanced techniques like ADB and Fastboot, it’s crucial to consider the implications and make the necessary preparations.
Before initiating a factory reset, it’s essential to backup any important data, remove associated accounts, and be aware of any device-specific considerations. Taking these steps will ensure that you can safeguard your data, easily recover your apps, and protect your privacy during and after the reset process.
While a factory reset can provide significant benefits, it’s important to remember that it should be considered as a last resort after trying other troubleshooting methods. Restarting your tablet, clearing cache and app data, or updating the software may resolve the issues without the need for a complete reset.
By carefully following the instructions outlined in this guide and understanding the factors to consider, you can confidently perform a factory reset on your Nextbook tablet and overcome software-related issues. Remember, a factory reset will erase all data, so ensure you make a backup and exercise caution throughout the process.
Now that you have the knowledge and tools to perform a factory reset, you can revive the performance of your Nextbook tablet and enjoy a more seamless and responsive user experience.