Introduction
Lenovo Thinkpad Ultrabooks are known for their exceptional performance and portability. These sleek devices are designed to make our lives easier, whether we’re working on the go or enjoying multimedia entertainment. One essential aspect of maintaining a smooth user experience with an Ultrabook is knowing how to remove and replace the battery.
Whether you need to replace a faulty battery or want to perform a routine maintenance check, removing the battery from your Lenovo Thinkpad Ultrabook can be a straightforward process if you follow the right steps. In this guide, we will walk you through the process of safely removing the battery from your Ultrabook.
Before we begin, it is crucial to note that different models may have slightly different procedures, so it’s always a good idea to consult your user manual if you’re unsure. Additionally, ensure that you have any necessary tools ready before starting the battery removal process.
Regularly removing and reinstalling the battery can also help calibrate the battery life readings, ensuring accurate battery level estimates. It can also be helpful if you’re having any power-related issues or if you want to reset certain settings on your Ultrabook.
Now, let’s dive into the step-by-step process of removing and replacing the battery on your Lenovo Thinkpad Ultrabook.
Step 1: Gather the necessary tools
Before you begin the process of removing the battery from your Lenovo Thinkpad Ultrabook, it’s important to gather the necessary tools. Having these tools readily available will make the process smoother and quicker. Here are the tools you will need:
- Small Phillips screwdriver
- Antistatic wristband (recommended)
- Clean, soft cloth
The small Phillips screwdriver is needed to remove any screws that may be securing the battery in place. The antistatic wristband is optional but highly recommended, as it helps protect the internal components of your Ultrabook from static electricity. The clean, soft cloth is useful for wiping away any dust or debris that may have accumulated on the battery or inside the device.
Make sure to have these tools prepared and within reach before you proceed to the next step.
Step 2: Power down the Ultrabook
Before you begin the battery removal process, it’s crucial to power down your Lenovo Thinkpad Ultrabook properly. This ensures that the device is completely turned off and reduces the risk of any electrical mishaps during the process. Follow these steps to power down your Ultrabook:
- Save and close any open files or applications you have running.
- Disconnect any external devices, such as USB drives or chargers, from your Ultrabook.
- Once you’ve ensured that all important data is saved and all external devices are disconnected, click on the Start button on your Ultrabook’s screen.
- Select the Power option from the menu that appears.
- In the power menu, click on the Shut Down option. Your Ultrabook will now begin the shutdown process.
Allow your Ultrabook to completely shut down before proceeding to the next step. This may take a few moments, depending on the speed of your device. You can confirm that your Ultrabook is powered down by ensuring that the screen is completely black and there are no lights or sounds indicating that it is still running.
Once you have successfully powered down your Lenovo Thinkpad Ultrabook, you are ready to move on to the next step of the battery removal process.
Step 3: Locate the battery release latch
Now that your Lenovo Thinkpad Ultrabook is powered down, it’s time to locate the battery release latch. The battery release latch is the mechanism that secures the battery in place and needs to be disengaged before you can remove the battery. Follow these steps to locate the battery release latch:
- Close the Ultrabook if it is open and turn it over so that the bottom side is facing up.
- Examine the bottom of the Ultrabook for a small, plastic latch or lever. This latch is usually located near the edge of the device, close to the battery compartment.
- Inspect the latch to determine its exact design. Some models might have a latch that requires sliding, while others may have a latch that needs to be pressed or released in a specific way.
- Once you have located the battery release latch, take a moment to familiarize yourself with its operation and ensure that you understand how it functions.
It’s essential to handle the battery release latch with care and avoid using excessive force when engaging or disengaging it. Applying too much pressure could potentially damage the latch or the battery compartment.
Once you have successfully located the battery release latch and feel confident in its operation, you are now ready to move on to the next step of the battery removal process.
Step 4: Slide the battery release latch
With the battery release latch located, it’s time to disengage it and prepare the battery for removal. Follow these steps to slide the battery release latch:
- Ensure that your Ultrabook is still turned over and the battery release latch is within reach.
- Using your fingers or a small tool, gently slide or push the battery release latch in the designated direction. This action will disengage the latch and release the battery.
- Be mindful of any additional locking mechanisms that might be present. Some Ultrabook models may have multiple locks or levers that need to be operated simultaneously for proper battery release.
- Once you have successfully disengaged the battery release latch, you should feel a slight click or movement, indicating that the latch is now released.
It’s crucial to exercise caution while sliding the battery release latch to prevent any damage to the latch or the battery compartment. Take your time and apply gentle pressure to ensure a smooth disengagement.
If you encounter any difficulties or resistance while sliding the battery release latch, double-check the user manual for your specific Lenovo Thinkpad Ultrabook model for any additional instructions or precautions.
Once you have successfully slid the battery release latch and disengaged it, you are ready to proceed to the next step of removing the battery from your Ultrabook.
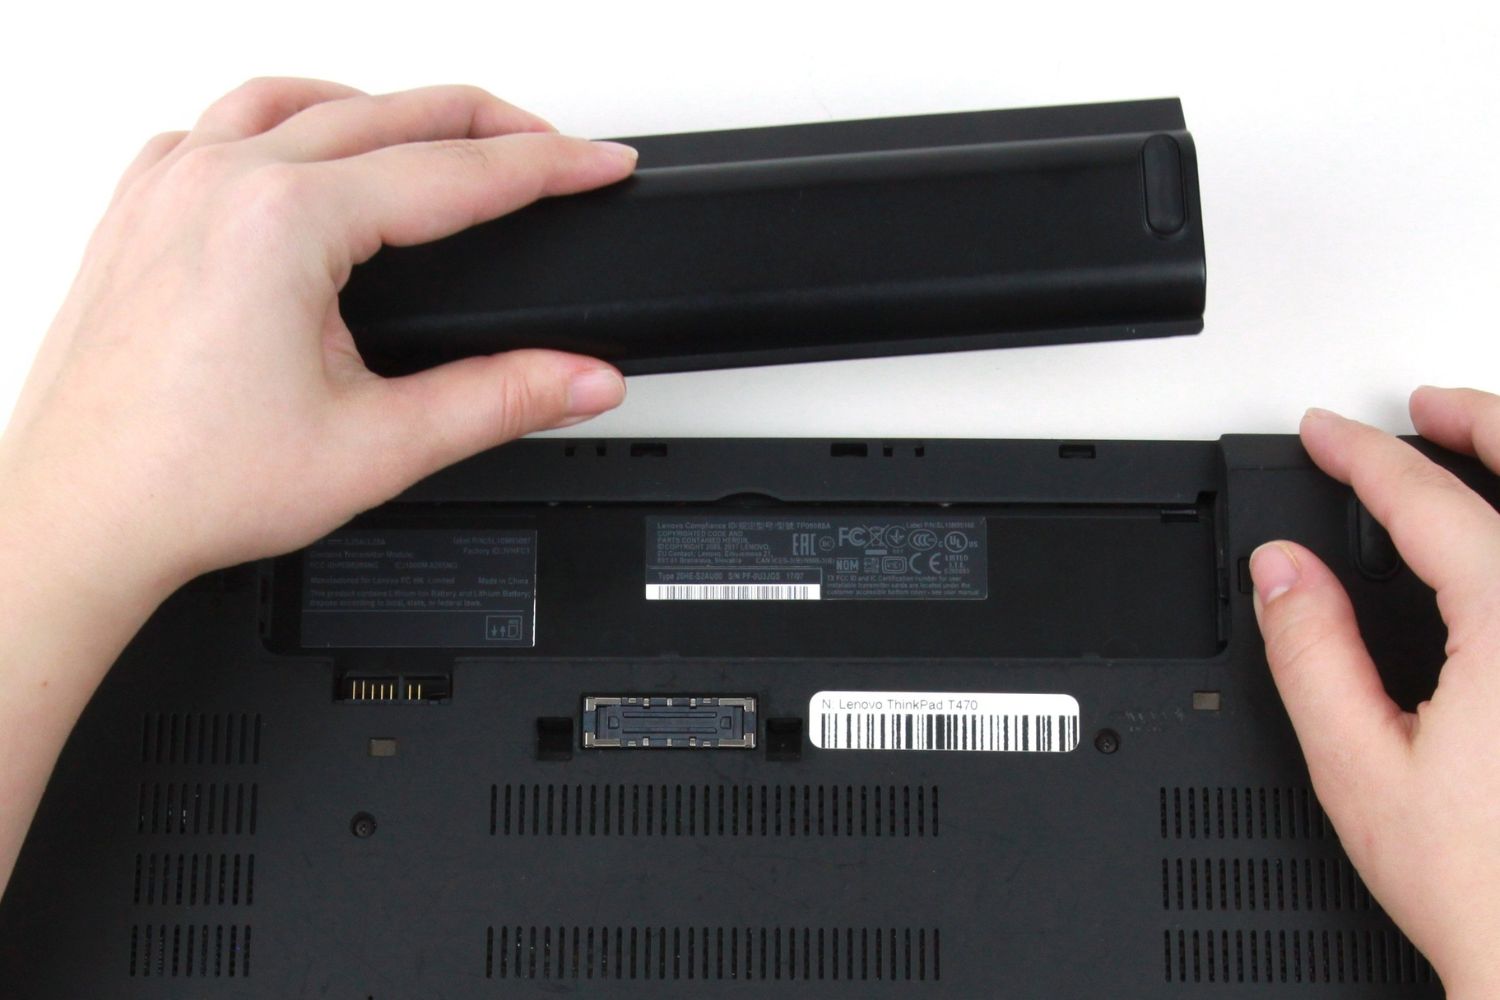
Step 5: Remove the battery from the Ultrabook
Now that you have disengaged the battery release latch, it’s time to remove the battery from your Lenovo Thinkpad Ultrabook. Follow these steps to safely remove the battery:
- Hold your Ultrabook with the bottom side facing up, ensuring that the battery release latch is facing away from you.
- Gently slide or lift the battery out of its compartment. The battery should easily come out with minimal effort.
- Be mindful of any cables or connectors attached to the battery. If there are any, gently disconnect them from the Ultrabook’s motherboard or power supply.
- Inspect the battery and its connectors for any signs of damage or corrosion. If you notice any, it’s advisable to consult an authorized service center for further assistance.
- Set the removed battery aside in a safe and dry location, away from any potential hazards.
It’s important to handle the battery with care and avoid any unnecessary force or impact that could cause damage. Additionally, make sure to place the removed battery in a safe area to avoid any accidental contact with liquids or other harmful substances.
If you plan to reinstall the battery immediately or at a later time, ensure that the battery is clean and free from any debris before proceeding to the next step.
With the battery successfully removed from your Lenovo Thinkpad Ultrabook, you have completed the crucial step of the battery removal process.
Step 6: Reinstall the battery (optional)
If you have completed the necessary maintenance or replacement tasks and want to reinstall the battery in your Lenovo Thinkpad Ultrabook, follow these steps:
- Ensure that the battery compartment is clean and free from any debris or dust.
- Align the battery with the compartment, making sure that the connectors on the battery align with the corresponding connectors in the Ultrabook.
- Gently slide the battery into the compartment, applying even pressure until you feel the battery firmly in place.
- If applicable, reattach and secure any cables or connectors that were detached earlier. Make sure they are connected securely.
- Once the battery is properly installed, carefully flip your Ultrabook back to its original position.
It’s important to take your time and ensure that the battery is aligned correctly before inserting it. Applying excessive force or installing the battery in an incorrect orientation could result in damage to the battery or the Ultrabook.
After reinstallation, you can proceed to power on your Lenovo Thinkpad Ultrabook to resume using it.
Keep in mind that reinstallation of the battery is optional. If you do not wish to reinstall the battery immediately, you can skip this step and store the battery in a safe place until you require it again.
With the battery either reinstalled or safely stored, you have completed the optional step of the battery removal process.
Step 7: Power on the Ultrabook
Now that you have completed the battery removal or reinstallation process on your Lenovo Thinkpad Ultrabook, it’s time to power on the device. Follow these steps to power on your Ultrabook:
- Ensure that the battery is either reinstalled properly or stored securely if you opted not to reinstall it.
- Flip your Ultrabook back to its original position, with the top side facing up.
- Connect your Ultrabook to a power source using the appropriate power cable.
- Press the power button located on the Ultrabook’s keyboard or side panel.
- Wait for the device to boot up and display the manufacturer’s logo or startup screen.
- Once the operating system loads, you should be able to use your Lenovo Thinkpad Ultrabook as usual.
It’s important to note that the battery removal process can sometimes reset certain settings or configurations on your Ultrabook. Therefore, you may need to adjust settings, such as date and time, display brightness, or power management options, to suit your preferences.
If you encounter any issues during the power-on process or notice any abnormal behavior, consult the user manual or contact Lenovo’s customer support for assistance.
By successfully powering on your Ultrabook, you have completed the final step of the battery removal process.
Conclusion
Removing and replacing the battery in your Lenovo Thinkpad Ultrabook is a simple and important process that can be done with relative ease. By following the step-by-step instructions outlined in this guide, you can ensure a safe and smooth battery removal experience.
Remember to gather the necessary tools, power down the Ultrabook properly, locate the battery release latch, slide the battery release latch, remove the battery from the Ultrabook (if necessary), reinstall the battery (if desired), and power on the Ultrabook. These steps will help you maintain your Ultrabook and ensure its optimal performance.
It’s worth noting that while the process in this guide provides general guidelines, specific Lenovo Thinkpad Ultrabook models may have slight variations in the battery removal process. Therefore, always consult your user manual for detailed instructions that are specific to your particular model.
Additionally, if you are unsure or uncomfortable with the battery removal process, it’s advisable to seek assistance from a professional or authorized service center to avoid any potential damage to your Ultrabook or yourself.
By following these steps, you can confidently remove and replace the battery in your Lenovo Thinkpad Ultrabook whenever necessary, ensuring that your device continues to meet your needs for work, entertainment, and productivity.