Introduction
Welcome to our guide on how to reformat your smartphone. Whether you are experiencing performance issues, want to sell your device, or simply want a fresh start, reformatting your smartphone can be a great solution. Reformatting, also known as a factory reset, restores your phone to its original settings, erasing all data and returning it to a clean state. However, before you proceed, please be aware that this process will delete all your personal files, apps, and settings, so make sure to back up any important data.
When reformatting your smartphone, it’s crucial to follow the correct steps to ensure a successful reset. In this guide, we will walk you through the process of reformatting various types of smartphones, including Android and iOS devices. We’ll cover how to back up your data, remove external storage, perform a factory reset, remove Google and Apple accounts, remove the SIM card and SD card, reboot your device, and restore your data from a backup.
Please note that the steps may vary slightly depending on the make and model of your smartphone, as well as the version of the operating system it runs on. However, the general principles outlined in this guide should apply to most smartphones. If you encounter any difficulties or have specific questions about your device, we recommend consulting the user manual or contacting the manufacturer’s support.
Without further ado, let’s dive into the process of reformatting your smartphone. Remember, a factory reset is a permanent action that cannot be undone, so ensure you have backed up all your important data before proceeding. Follow the remaining sections of this guide, and you’ll have your smartphone reformatted and ready for a fresh start.
Back up Your Data
Before you reformat your smartphone, it’s vital to back up all your important data. A factory reset will erase all your files, apps, contacts, and settings, so ensuring you have a backup will help you restore your data once the reformat is complete.
The easiest way to back up your data is by using your smartphone’s built-in backup and restore feature. Both Android and iOS devices offer options to back up your data to the cloud or external storage.
For Android devices, go to the Settings menu and look for the “Backup & Reset” or “System” section. From there, you can enable the backup feature and choose what data you want to back up, such as app data, Wi-Fi passwords, and device settings. You can also opt to automatically back up your data to your Google account or choose a third-party cloud storage service.
If you have an iPhone, you can back up your data using iCloud. Navigate to the Settings app and tap on your Apple ID at the top. Then, select “iCloud” and “iCloud Backup.” From there, you can enable iCloud Backup and choose what data you want to include in the backup, such as photos, contacts, and app data. Make sure you have enough storage space on your iCloud account to accommodate the backup.
In addition to the built-in backup options, you can also use third-party apps or software to create a backup of your data. There are numerous options available, both for Android and iOS devices, offering various features like selective data backup, scheduled backups, and cross-platform compatibility.
Remember to double-check that your backup is complete and up-to-date before proceeding with the reformat. Once you have a secure backup of your important data, you can proceed with the next steps to reformat your smartphone.
Remove External Storage
Before you proceed with the reformatting process, it’s crucial to remove any external storage devices, such as SD cards or USB flash drives, from your smartphone. External storage devices can hold additional data that may not be affected by the factory reset, so removing them ensures a clean reformat.
If your smartphone has an SD card slot, locate it and carefully eject the SD card by following the manufacturer’s instructions. This typically involves going to the Settings menu, selecting the “Storage” or “Memory” option, and choosing to eject or unmount the SD card. Once ejected, gently remove the SD card from the slot. Handle it with care and avoid touching the metal contacts to prevent any damage.
If you have a USB flash drive connected to your smartphone, simply disconnect it from the device by pulling it out gently. Some smartphones may require you to go to the Settings menu and eject the USB storage before physically removing it.
Removing external storage devices ensures that all files and data are erased along with the factory reset, maintaining the integrity of the reformatting process. If you forget to remove the SD card or USB drive, some data may remain on those devices even after the smartphone reset, potentially compromising your privacy or security.
Once you have removed any external storage devices, you can proceed to the next step of the reformatting process, which involves performing a factory reset on your smartphone. This step will erase all data on your device, so make sure you have completed the necessary backups discussed in the previous section.
Factory Reset
Performing a factory reset is a crucial step in reformatting your smartphone. This process will erase all data on your device, including apps, settings, and personal files, returning it to its original factory settings.
The exact steps to perform a factory reset may vary depending on the make and model of your smartphone. However, the general procedure involves accessing the Settings menu and navigating to the “Backup & Reset” or “System” section.
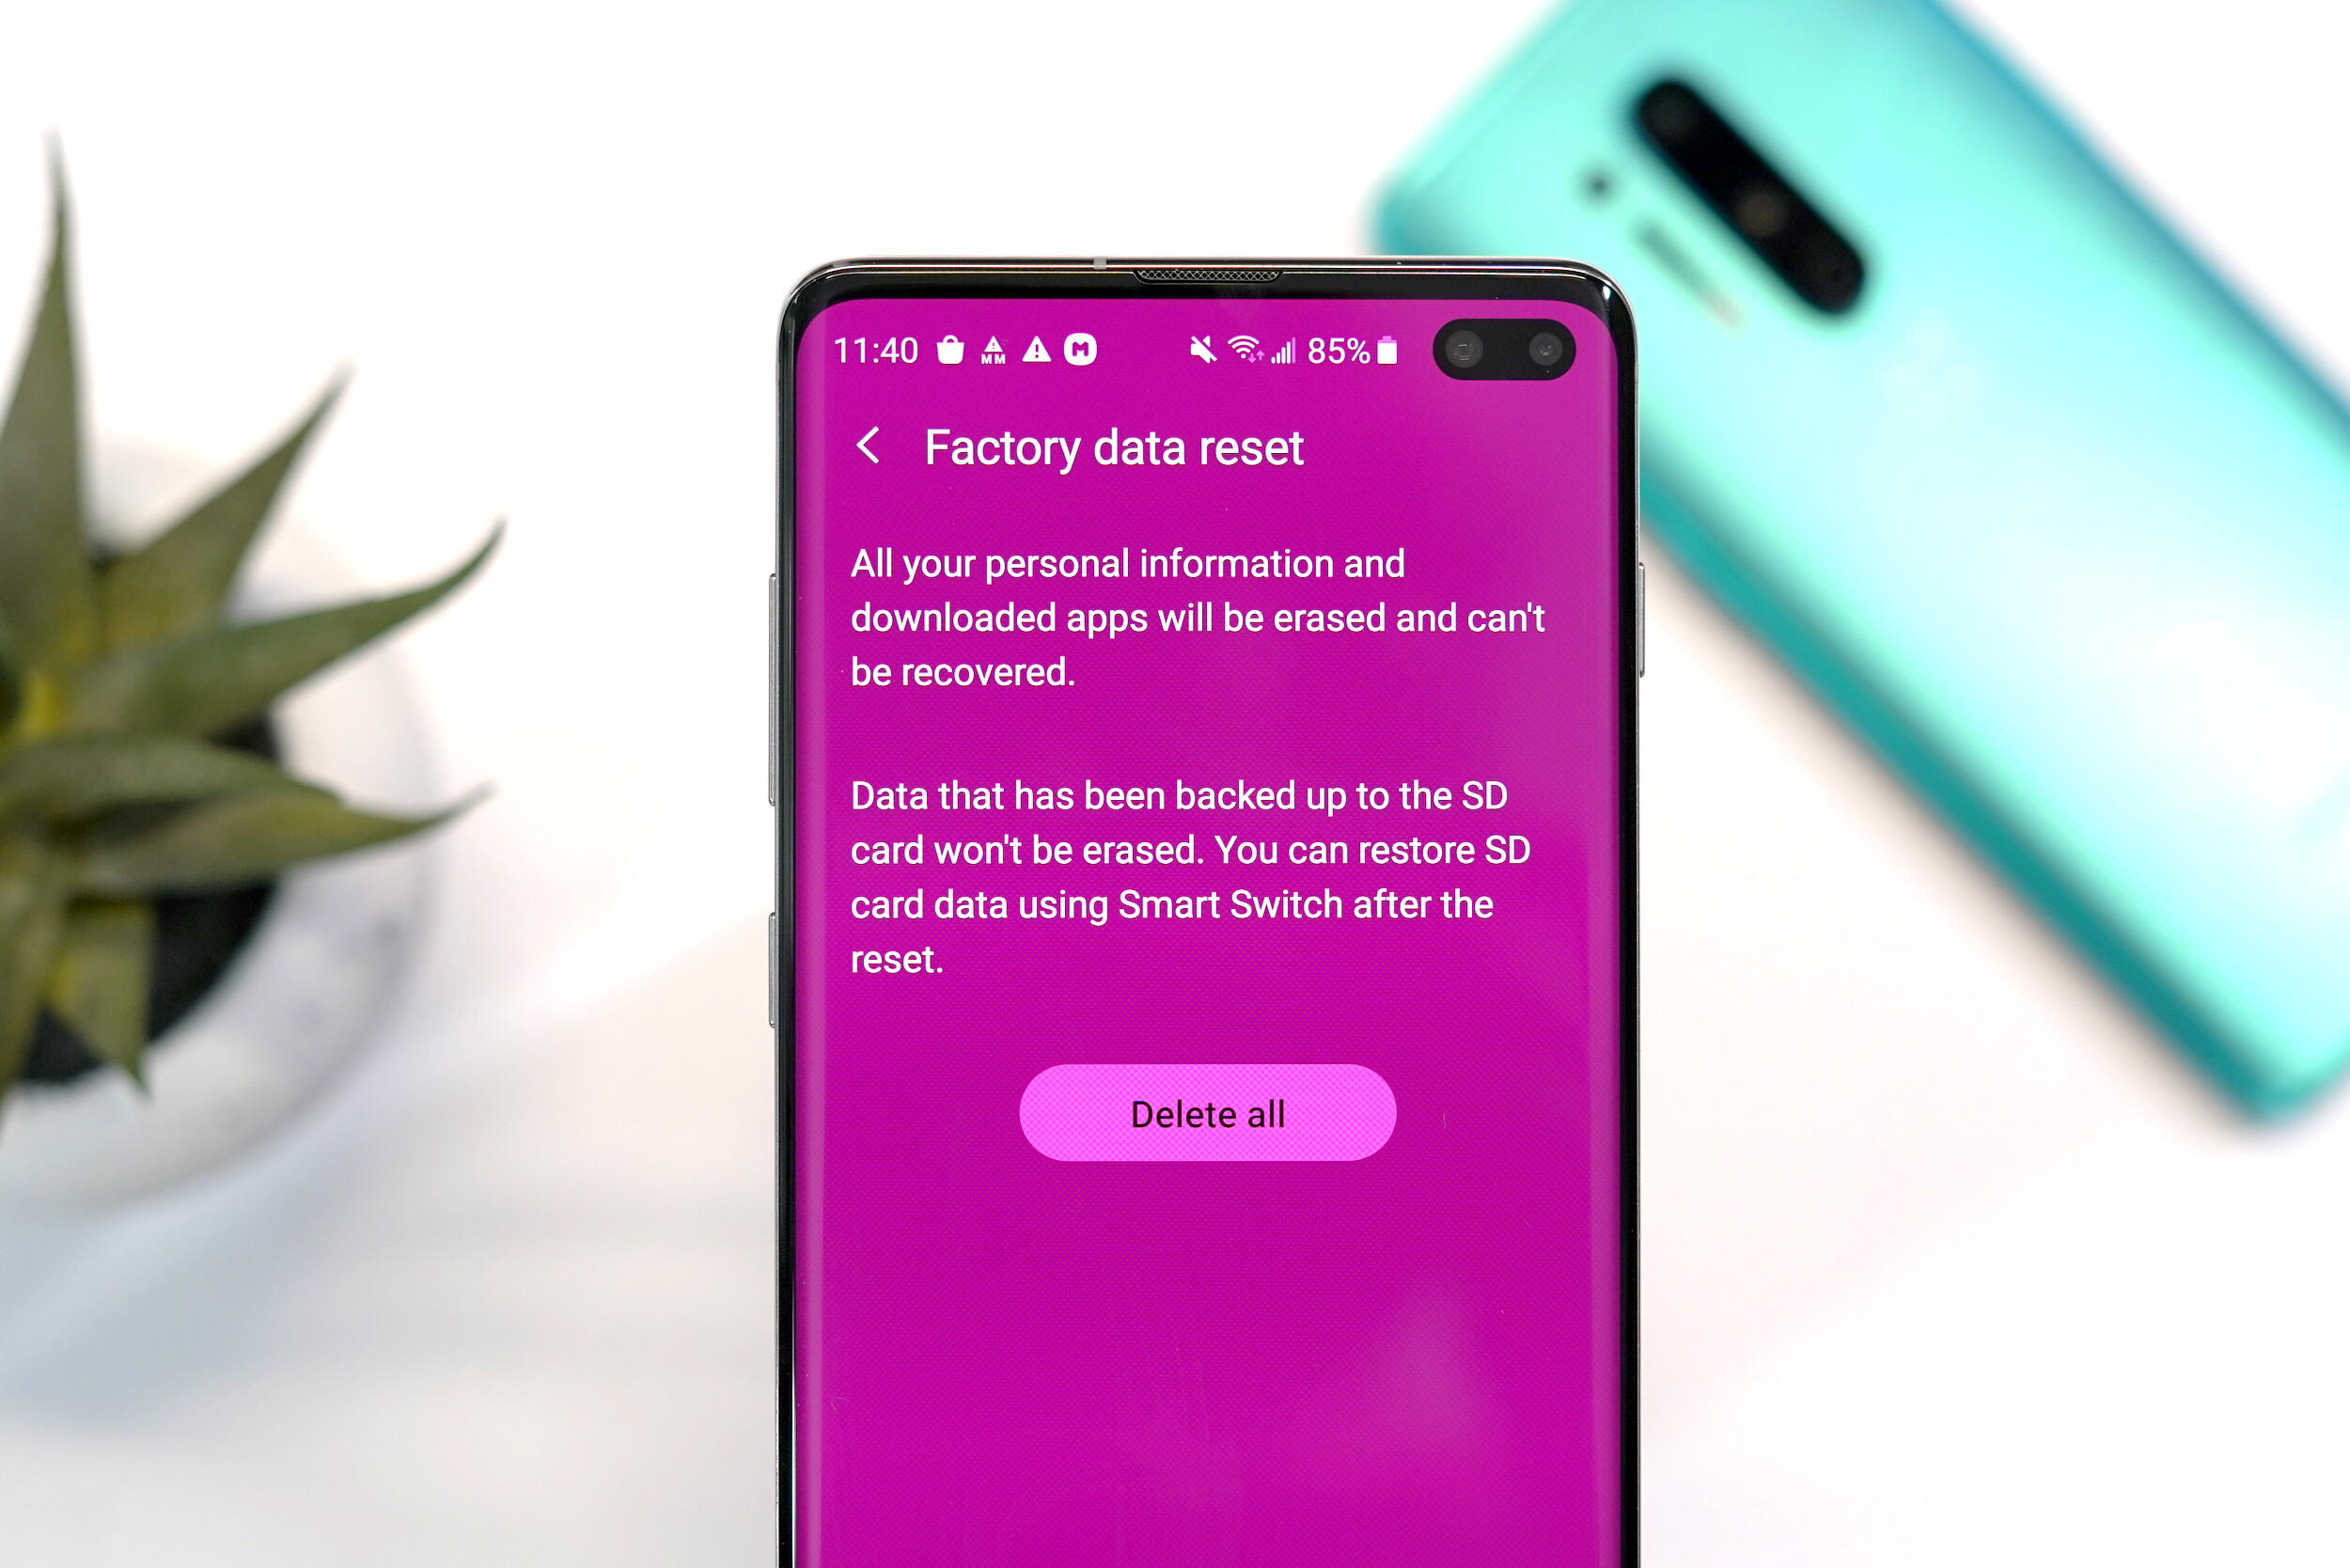
Within the “Backup & Reset” or “System” section, look for the option to “Factory Data Reset” or “Reset Phone.” Before proceeding, be aware that performing a factory reset will irreversibly delete all data on your device, so double-check that you have backed up any important information.
Once you are ready to proceed, select the “Factory Data Reset” or “Reset Phone” option. You may be prompted to enter your device password or PIN to confirm the reset.
After confirming the reset, your smartphone will begin the process of erasing all data and restoring it to its original factory settings. The time it takes for the factory reset to complete can vary, but it generally takes a few minutes.
It’s essential to allow the factory reset process to finish without interrupting it. Do not turn off or restart your device during this process, as it may cause instability or other issues with your smartphone.
Once the factory reset is complete, your smartphone will reboot, and you will be greeted with the initial setup screen, similar to when you first purchased the device. At this point, your smartphone has been reformatted and is ready for further setup.
In the next section, we will discuss the necessary steps to remove your Google or Apple accounts from the device before proceeding with the reformatting process.
Remove Google and Samsung Accounts
Before you continue with the reformatting process, it’s important to remove any Google and Samsung accounts associated with your smartphone. This is necessary to ensure that your personal information and account credentials are fully removed from the device.
To remove a Google account on an Android device, go to the Settings menu and look for the “Accounts” or “Users & Accounts” section. Then, select the Google account you want to remove and tap on it. From there, you can choose to remove the account by selecting the “Remove Account” option. Keep in mind that removing a Google account will also disable certain features, such as access to Google Play Store and synchronization of email and contacts.
If you have a Samsung device, navigate to the Settings menu and look for the “Accounts and Backup” or “Cloud and Accounts” section. Within this menu, you’ll find the option to manage your Samsung account. Select the Samsung account and choose the “Remove Account” or “Sign Out” option to remove it from your device. Removing your Samsung account may affect certain Samsung-specific features and services.
By removing these accounts, you are disconnecting them from your smartphone and ensuring that no further synchronization or data exchange will occur. This step is crucial to protect your privacy and prevent any potential access to your personal information after the reformat is complete.
It’s important to note that removing your Google or Samsung account will not delete the account itself. You will still be able to use the account on other devices or re-add it to your reformatted smartphone if needed.
Once you have successfully removed any Google and Samsung accounts from your device, you can proceed to the next step of the reformatting process, which involves removing the SIM card and SD card if present.
Remove SIM and SD Card
Before you proceed with the reformatting process, it’s important to remove the SIM card and SD card from your smartphone. Removing these cards ensures that no personal or sensitive data is left on the device, as the reformatting process does not affect external storage devices.
To remove the SIM card, locate the SIM card tray on your smartphone. The location of the tray may vary depending on the make and model of your device. Most modern smartphones have a SIM card tray on the side or at the top of the device. Some devices may require the use of a SIM card removal tool or a small paperclip to open the tray, while others have a slot that can be opened with your fingernail.
Gently insert the SIM card removal tool or paperclip into the small hole next to the SIM card tray and apply a small amount of pressure. The tray should pop out, allowing you to remove it completely. If your smartphone has a drawer-type SIM card tray, gently pull the tray out using your fingers. Once the tray is removed, carefully take out the SIM card and set it aside in a safe place.
If your smartphone has an SD card slot, you will also need to remove the SD card. Similar to the SIM card, the location of the SD card slot may vary depending on the device. Look for a small slot or tray that accommodates the SD card.
To remove the SD card, gently press down on the card until you feel a click or the card slightly springs out. Then, carefully slide the SD card out of the slot and store it in a secure place. Take care not to touch the metal contacts on the SD card to prevent any damage.
By removing the SIM card and SD card from your smartphone, you ensure that no personal or sensitive data is left on the device or the external storage. Once you have completed this step, you are ready to proceed to the next step, which involves rebooting your device.
Reboot
After you have completed the necessary steps of removing external storage, accounts, and cards, it’s time to reboot your smartphone. Rebooting your device will finalize the reformatting process and ensure that all previous settings and data have been cleared.
The process of rebooting may vary slightly depending on your device, but in most cases, it can be done by pressing and holding the power button until the power menu appears on the screen. From there, choose the “Restart” or “Reboot” option. Alternatively, you may need to press and hold the power button and the volume down button simultaneously for a few seconds to initiate a reboot.
During the reboot process, your smartphone will power down and then power back on. This can take a few seconds or up to a minute, depending on your device. Once your smartphone has fully rebooted, it will be in a clean state, just like when you first unboxed it.
After the reboot, you will need to go through the initial setup process, which typically includes selecting your desired language, connecting to a Wi-Fi network, and signing in with your Google or Apple ID. Follow the on-screen instructions to complete the setup and personalize your device according to your preferences.
It’s important to note that after rebooting, you will not have access to your previous apps or data. However, if you performed a backup as mentioned earlier, you can now restore your data from the backup you created. Consult the backup method you used, such as Google backup or iCloud, and follow the appropriate steps to restore your backed-up data onto your reformatted smartphone.
Once you have finished the setup process and restored your data, you can start using your reformatted smartphone with a fresh start, free from any previous settings or data.
Restore Data from Backup
After completing the reboot and setup process on your reformatted smartphone, it’s time to restore your data from the backup you created earlier. Restoring your data will bring back your apps, contacts, photos, and other files, allowing you to resume using your smartphone with all your previous information intact.
If you used the built-in backup and restore feature on your device, such as Google backup for Android or iCloud for iOS, the process is relatively straightforward.
For Android devices, during the setup process, you will be prompted to sign in with your Google account. Once signed in, your device will automatically sync with your Google account, and you may receive a prompt asking if you want to restore your apps and data from a previous backup. Select the “Restore” option, and your device will begin the process of restoring your data. Depending on the size of your backup and the speed of your internet connection, this process may take some time.
If you have an iPhone, during the setup process, you will also be prompted to sign in with your Apple ID. Once signed in, choose the option to restore your device from an iCloud backup. Select the most recent backup you created, and your iPhone will start restoring your apps, contacts, and other data from the backup. Again, the duration of the restoration process will depend on the size of your backup and your internet connection speed.
If you used a third-party backup solution or software, follow the instructions provided by the backup provider to restore your data onto your reformatted smartphone. Most backup solutions have an option to restore data, either through an app or a separate restoration tool.
During the restoration process, it’s important to keep your device connected to a stable Wi-Fi network and ensure that it has sufficient battery life or is plugged into a power source. Interrupting the restoration process may result in incomplete or incorrect data restoration.
Once the data restoration is complete, your smartphone will have all your previous settings, apps, contacts, and other data restored. Take some time to go through your apps and settings to ensure everything is as you want it to be. If any data is missing or not restored correctly, you can try restoring your data from an alternative backup or contacting the backup provider for assistance.
With your data successfully restored, you can now enjoy using your reformatted smartphone with all your important files and settings ready for use.
Conclusion
Congratulations! You have successfully reformatted your smartphone, erasing all data and returning it to its original factory settings. Through this guide, we have covered essential steps such as backing up your data, removing external storage, performing a factory reset, removing Google and Samsung accounts, removing SIM and SD cards, rebooting your device, and restoring data from backup.
Reformatting your smartphone can be a valuable solution to address performance issues, prepare for selling your device, or simply give your phone a fresh start. It’s important to remember that performing a factory reset will permanently delete all your personal files, contacts, apps, and settings. Therefore, always make sure to back up your data before proceeding.
By following the step-by-step instructions provided in this guide, you have taken the necessary precautions to remove external storage, accounts, and cards, ensuring a clean reformatting process. After rebooting your smartphone, you performed a data restoration from the backup you created to bring back all your apps, contacts, and files onto your reformatted device.
We hope that this guide has been helpful and that you now have a better understanding of how to reformat your smartphone. Remember, the specific steps may differ slightly depending on your device, so always refer to your device’s user manual or contact the manufacturer’s support for any specific queries.
Now, with a fresh and reformatted smartphone in hand, you can enjoy optimal performance and a clean slate for your digital experiences. Explore your device, install apps, and personalize your settings to suit your needs.
Thank you for following this guide, and we wish you a seamless smartphone experience!