Introduction
Welcome to the world of overclocking! If you’ve ever felt that your CPU is not performing at its full potential, overclocking might be the solution you’re looking for. By increasing the clock speed of your CPU, you can extract more power and achieve better overall performance.
Overclocking is a popular technique among computer enthusiasts and gamers who are always looking for ways to push their hardware to its limits. However, it’s important to note that overclocking can potentially void your warranty and can cause damage to your CPU if not done correctly. That being said, with proper knowledge and precautions, you can safely and effectively overclock your CPU to experience improved performance.
In this guide, we will take you through the process of overclocking your CPU step by step. We’ll cover everything from understanding what overclocking is and why you might want to do it, to the necessary preparations, setting up cooling solutions, adjusting CPU settings, stress testing, and monitoring temperatures. By the end of this guide, you’ll be equipped with the knowledge to safely and successfully overclock your CPU.
Before we dive into the details, it’s important to note that every CPU is unique and responds differently to overclocking. While we will provide general guidelines and best practices, it’s crucial to research and understand the specific overclocking capabilities and limitations of your CPU model. Additionally, be aware that overclocking can generate extra heat, so proper cooling is essential to prevent overheating.
Now that you have a basic understanding of what overclocking is and its potential benefits, let’s move on to the next section to delve deeper into this fascinating world of computer performance optimization.
Understanding Overclocking
Before we begin the overclocking process, it’s important to have a clear understanding of what overclocking actually entails. Simply put, overclocking refers to increasing the clock speed of your CPU beyond its default settings. The clock speed determines the number of operations a CPU can perform per second. By overclocking, you are essentially making your CPU work faster, which can result in improved performance.
One of the main reasons people choose to overclock their CPUs is to gain a performance boost in demanding tasks such as gaming, video editing, and 3D rendering. By increasing the clock speed, you can enhance the CPU’s processing power and allow it to handle more intensive tasks with greater efficiency.
It’s important to note that not all CPUs are created equal when it comes to overclocking. Some CPUs are designed with higher overclocking potentials, known as “unlocked” CPUs, while others have limited overclocking capabilities. Before you start overclocking, it’s essential to research and understand the specific limitations and recommendations for your specific CPU model.
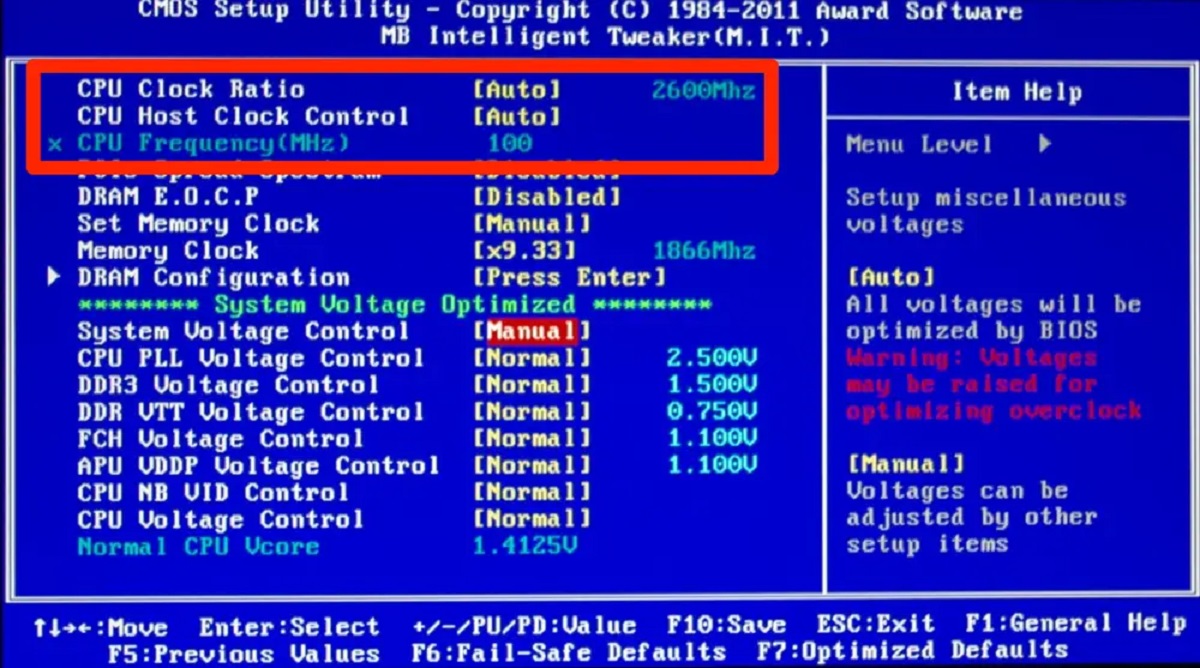
Overclocking involves adjusting several parameters in your BIOS, such as the CPU multiplier and base clock. The CPU multiplier determines the multiplier applied to the base clock speed to determine the overall clock speed. By increasing the CPU multiplier, you can achieve a higher clock speed. The base clock, on the other hand, is a reference frequency that is multiplied by the multiplier to determine the CPU clock. Adjusting both the CPU multiplier and base clock is crucial in achieving a stable and efficient overclock.
While overclocking can undoubtedly provide a performance boost, it’s important to be aware of the potential downsides. One of the main challenges of overclocking is heat generation. As you push your CPU to work at higher speeds, it generates more heat, which can lead to instability and even damage if not properly managed. That’s why it’s crucial to have a good cooling solution in place to keep temperatures within safe limits.
In the next section, we’ll discuss the necessary preparations you need to make before diving into the overclocking process. We’ll cover important factors such as compatibility, cooling solutions, and BIOS updates to ensure a successful and safe overclocking experience.
Preparing for Overclocking
Before you begin the overclocking process, it’s essential to make a few preparations to ensure a smooth and successful experience. Taking the time to properly prepare will help you avoid potential issues and maximize the chances of a stable and efficient overclock.
The first step in preparing for overclocking is to check the compatibility of your hardware. Ensure that your CPU, motherboard, and RAM are all capable of supporting overclocking. Not all CPUs and motherboards are designed with overclocking in mind, so it’s important to verify their compatibility to avoid any disappointments or compatibility issues.
Next, you need to set up proper cooling for your CPU. Overclocking generates additional heat, so it’s crucial to have a cooling solution in place to keep temperatures under control. An aftermarket CPU cooler, such as a high-quality air cooler or liquid cooling system, can help dissipate the extra heat generated by overclocking. Make sure your cooling solution is adequate for the level of overclocking you plan to undertake.
It’s also important to ensure that your BIOS is up to date before overclocking. BIOS updates often include improvements and bug fixes that can enhance the stability and performance of your system. Visit your motherboard manufacturer’s website and download the latest BIOS version for your specific motherboard model. Follow the manufacturer’s instructions to install the BIOS update properly.
Once you’ve checked compatibility, set up proper cooling, and updated your BIOS, it’s time to delve into the overclocking process. But before we do that, it’s essential to take some precautions:
- Backup your important data: Overclocking involves pushing your CPU beyond its default settings, which can increase the risk of system instability. To avoid potential data loss or corruption, it’s wise to back up your important files and data before overclocking.
- Start with conservative overclocking: It’s best to start with conservative overclocking settings and gradually increase them to find the sweet spot between performance and stability. Rushing into extreme overclocks can be risky and may lead to instability and system crashes.
- Monitor your temperatures: Throughout the overclocking process, it’s crucial to monitor your CPU temperatures using software tools like CPU-Z or HWMonitor. Keep an eye on the temperature readings and ensure they stay within safe limits. If temperatures become too high, you may need to adjust your cooling solution or lower your overclocking settings.
By following these preparations and precautions, you’ll be well-equipped to embark on your overclocking journey. In the next section, we’ll discuss how to adjust the CPU multiplier and base clock to achieve a stable and efficient overclock.
Checking Compatibility
Before diving into the world of overclocking, it’s crucial to ensure that your hardware is compatible and capable of handling the increased demands. Checking compatibility involves verifying if your CPU, motherboard, and RAM are suitable for overclocking and can handle the increased power and heat generated.
The first step in checking compatibility is to identify if your CPU is unlocked or capable of overclocking. Unlocked CPUs, commonly denoted by a “K” or “X” at the end of the model number (e.g., Intel Core i7-9700K), are specifically designed for overclocking. These CPUs have unlocked multipliers, which allow for easy adjustment of the clock speed. If you have one of these CPUs, you’re in luck, as they offer a great deal of flexibility for overclocking. On the other hand, if your CPU does not have an unlocked multiplier, overclocking might be more challenging or not possible at all.
Next, you need to ensure that your motherboard supports overclocking. Not all motherboards are created equal, and some might have limited or no overclocking capabilities. Review the specifications and features of your motherboard to determine its compatibility with overclocking. Look for features like robust power delivery systems and support for higher memory clocks. Additionally, your motherboard must also be compatible with your CPU model to ensure a successful overclock.
RAM compatibility is another crucial factor to consider. Overclocking puts additional strain on the RAM, so it’s important to ensure that your RAM modules are suitable for overclocking. Look for RAM modules with higher clock speeds and lower latency timings, as they tend to perform better under overclocked conditions. Also, check if your motherboard supports the higher clock speeds and voltages required for overclocked RAM.
It’s worth mentioning that when overclocking, you may also need to adjust other components, such as the graphics card and power supply. High-performance graphics cards and robust power supplies are recommended to handle the increased power demands that come with overclocking. However, these components are not directly related to CPU overclocking compatibility.
Overall, checking compatibility is crucial to ensure a successful and stable overclock. It’s recommended to consult the CPU and motherboard manuals, visit manufacturer websites, and seek advice from online forums or communities dedicated to overclocking. By doing the necessary research, you’ll be able to determine the compatibility of your hardware and make informed decisions regarding the overclocking process.
Now that you have ensured compatibility, the next step in the overclocking process is setting up proper cooling to keep your CPU temperatures in check. We’ll discuss cooling solutions in the next section.
Setting Up Proper Cooling
When it comes to overclocking, having proper cooling is essential to maintain stable and safe operating temperatures for your CPU. Overclocking increases power consumption and heat generation, and without adequate cooling, your CPU may become unstable or even suffer damage. Therefore, setting up proper cooling solutions is a crucial step in the overclocking process.
There are several cooling options available, and the choice depends on the level of overclocking you intend to achieve and your budget. The two main types of cooling solutions are air cooling and liquid cooling.
Air cooling is the most common and affordable option. It involves using a heatsink attached to the CPU, which is equipped with a fan to dissipate heat. High-quality air coolers, such as those designed for overclocking, feature larger heatsinks and multiple heat pipes for improved cooling efficiency. These coolers are effective in keeping CPU temperatures within safe limits, even under heavy overclocking loads. When choosing an air cooler, consider factors like cooler height, compatibility with your CPU socket, and its cooling capacity.
Liquid cooling, also known as water cooling, offers superior cooling performance, especially for extreme overclocking. It involves a sealed loop system where a pump circulates liquid coolant to a CPU block and a radiator equipped with fans. The liquid absorbs the heat from the CPU and carries it to the radiator where the heat is dissipated. Liquid cooling provides efficient heat transfer and can handle higher heat loads compared to air cooling. However, it is generally more expensive and requires more installation effort and maintenance.
Regardless of the cooling solution you choose, proper airflow within your PC case is essential for efficient cooling. Make sure you have adequate case fans to bring in cool air and exhaust hot air out of the case. This helps maintain a steady airflow and prevents heat buildup around essential components.
When installing your chosen cooling solution, ensure that it is properly mounted and securely attached to your CPU. Follow the manufacturer’s instructions and apply thermal paste between the CPU and the cooler to ensure effective heat transfer. It’s crucial to use a high-quality thermal paste to maximize thermal conductivity and prevent overheating.
After setting up your cooling solution, it is vital to monitor and track your CPU temperatures during overclocking. Use software tools such as CPU temperature monitoring programs to keep an eye on your CPU’s temperature readings. If temperatures approach unsafe levels, you may need to adjust fan speeds, reposition your case fans, or adjust your overclocking settings.
In the next section, we’ll discuss the important process of updating your BIOS before delving into the actual overclocking adjustments.
Updating BIOS
Before you start overclocking your CPU, it’s essential to ensure that your motherboard’s BIOS (Basic Input/Output System) is up to date. The BIOS is the firmware that runs when you power on your computer and initializes essential hardware components, including the CPU. Updating your BIOS can provide improvements in stability, compatibility, and performance, which are crucial for a successful overclocking experience.
The process of updating the BIOS varies depending on the motherboard manufacturer, so it’s important to consult your motherboard’s manual or visit the manufacturer’s website for detailed instructions specific to your model. Here’s a general overview of the updating process:
1. Determine your current BIOS version: Enter the BIOS setup by pressing a specific key (such as Del, F2, or F10) during the boot process. Look for the BIOS version information in the BIOS setup utility. Note down the current version for reference.
2. Visit the manufacturer’s website: Go to the official website of your motherboard manufacturer and locate the support or downloads section. Look for the BIOS updates available for your specific motherboard model. Be careful to select the correct BIOS version, as using an incorrect update can cause irreversible damage to your motherboard.
3. Download and prepare the BIOS update: Download the latest BIOS update file from the manufacturer’s website. Some updates may come as a ZIP file that needs to be extracted. Follow any instructions provided by the manufacturer to prepare the update file for installation.
4. Update the BIOS: There are different methods to update the BIOS, such as using a USB flash drive, a Windows-based utility, or a dedicated motherboard software. Again, refer to the specific instructions provided by your motherboard manufacturer. Follow the steps carefully to update the BIOS. During the update process, it’s important not to interrupt or power off the system as it can lead to a bricked motherboard.
5. Verify the update: After the update is complete, restart your computer and enter the BIOS setup again. Check the BIOS version to ensure that it has been successfully updated to the latest version. You can also explore the BIOS settings to familiarize yourself with any new options or features that may be available.
Updating the BIOS before overclocking ensures that you have the latest firmware with bug fixes, performance optimizations, and potentially improved overclocking capabilities. It helps to minimize any potential compatibility issues or instability during the overclocking process.
Now that you have a properly updated BIOS, you’re ready to adjust the CPU multiplier and base clock to overclock your CPU. We’ll cover this in detail in the next section.
Adjusting CPU Multiplier and Base Clock
Once you have prepared your system and updated the BIOS, it’s time to start the actual process of overclocking your CPU. This involves adjusting the CPU multiplier and base clock to achieve higher clock speeds and improved performance.
The CPU multiplier, also known as the “clock ratio” or “CPU ratio,” determines the multiplier applied to the base clock speed to calculate the CPU’s overall clock speed. By increasing the CPU multiplier, you can directly increase the clock speed of your CPU. The multiplier is a crucial factor in achieving stable overclocks, as it allows for precise control over the clock speed adjustment.
Keep in mind that not all CPUs have unlocked multipliers. If your CPU does not have an unlocked multiplier, you can still overclock by adjusting the base clock speed, but it requires more caution and finesse. The base clock is a reference frequency that, when multiplied by the CPU multiplier, determines the CPU’s final clock speed. Adjusting the base clock affects not only the CPU but also several other components, so be careful not to push it too far to avoid instability or system failures.
To adjust the CPU multiplier and base clock, start by entering the BIOS setup. Typically, you can access the BIOS by pressing a specific key (e.g., Del, F2, or F10) during system startup. Refer to your motherboard’s manual or manufacturer’s website for specific instructions on how to access the BIOS.
Once in the BIOS, navigate to the CPU settings or overclocking settings section. The exact location may vary depending on your motherboard model and BIOS version. Look for options related to the CPU multiplier and base clock adjustment. These options may be labeled differently, but they should be clearly identifiable as the settings that control the CPU’s clock speed.
When adjusting the CPU multiplier, increase it incrementally by small steps, such as 0.5 or 1.0, and test the stability of your system after each adjustment. Stress testing programs like Prime95 or AIDA64 can help you evaluate the stability of your overclocked CPU. If your system becomes unstable or crashes during stress testing, reduce the multiplier to a previously stable value or adjust other settings like voltages to find the right balance between performance and stability.
If overclocking with the base clock, keep in mind that even small adjustments can have significant effects on other components like the memory and PCIe devices. It’s essential to monitor the stability of your system and test each adjustment carefully. As with multiplier overclocking, stress testing programs can help you assess the stability of your overclocked system.
Throughout the entire process, monitor the temperatures of your CPU using software tools like CPU-Z or HWMonitor. Keeping an eye on the temperatures ensures that your CPU is within safe operating limits and that your cooling solution is adequate. If temperatures become too high, consider adjusting your cooling solution or lowering the overclocking settings.
Remember, overclocking is a trial-and-error process that requires patience and careful observation. Be methodical and take your time to find the optimal settings for your system. The next section will cover the importance of stress testing to ensure the stability and performance of your overclocked CPU.
Stress Testing
After adjusting the CPU multiplier and base clock to overclock your CPU, it’s crucial to subject your system to stress testing. Stress testing helps evaluate the stability and performance of your overclocked CPU and identifies any potential issues before they can lead to system crashes or instability during real-world usage.
There are several software tools available that can effectively stress test your CPU, such as Prime95, AIDA64, and IntelBurn Test. These programs push your CPU to its limits by putting heavy loads on all of its cores and threads, simulating demanding tasks that can cause high power consumption and heat generation.
Before running a stress test, ensure that your cooling solution is working optimally and that your CPU temperatures are within safe limits. Monitoring software like CPU-Z or HWMonitor can give you real-time temperature readings. If temperatures escalate too quickly or exceed the acceptable range, it’s important to revisit your cooling solution or consider lowering the overclocking settings.
When stress testing your CPU, it’s recommended to run the test for an extended period to ensure stability. Typically, running a stress test for at least an hour is a good starting point to evaluate the stability of your overclocked configuration. However, for a more accurate assessment, you may choose to run the test overnight or for several hours.
During the stress test, keep an eye out for any signs of instability, such as system crashes, blue screens, or excessive heat generation. If your system crashes or becomes unstable during the stress test, it’s an indication that your overclock is not stable. In such cases, you may need to reduce the overclock or adjust other settings such as voltages and memory timings to achieve stability.
It’s important to note that stress testing can significantly increase power consumption and heat output. Therefore, it’s crucial to have a robust and efficient power supply along with a reliable cooling solution to prevent any potential damage to your system.
Once you have successfully conducted a stress test and your overclocked CPU has proven stable, you can confidently use your system for everyday tasks and demanding applications, knowing that it can handle the increased clock speeds and improved performance.
In the next section, we’ll discuss the importance of monitoring your CPU temperatures to ensure the longevity and reliability of your overclocked CPU.
Monitoring Temperatures
When it comes to overclocking your CPU, monitoring temperatures is a critical aspect to ensure the longevity and reliability of your system. As you push your CPU to higher clock speeds, it generates more heat, which can lead to instability, decreased performance, and even permanent damage if not properly managed.
There are several software tools available that can help you monitor CPU temperatures in real-time. Programs like CPU-Z, HWMonitor, or Core Temp provide accurate temperature readings for your CPU and other components. These tools display temperatures for individual cores, allowing you to keep a close eye on any fluctuations or high temperatures.
Monitoring temperatures during overclocking helps determine the effectiveness of your cooling solution and enables you to make adjustments if necessary. Ideally, you want to keep your CPU temperatures within a safe operating range, even under heavy loads and extended periods of usage.
The safe operating temperature for CPUs can vary depending on the model and manufacturer. However, as a general guideline, most CPUs should stay below 85 to 90 degrees Celsius under full load. It’s important to consult the specifications and recommendations provided by your CPU manufacturer to identify the maximum safe temperature for your specific model.
If your temperatures exceed safe limits, it’s crucial to take action to avoid potential performance issues or damage. Here are a few steps you can take to address high temperatures:
- Ensure proper airflow: Make sure your case is properly ventilated with sufficient intake and exhaust fans. An optimized airflow helps remove hot air from the CPU and other components, keeping temperatures in check.
- Clean your system: Dust accumulation can reduce the efficiency of cooling systems, leading to higher temperatures. Regularly clean your PC case and components to remove dust and improve airflow.
- Upgrade cooling solutions: If your temperatures consistently exceed safe limits, it may be necessary to upgrade your cooling solution. Consider options like a more efficient CPU cooler or additional case fans to improve heat dissipation.
- Adjust overclocking settings: If all else fails, you may need to lower your overclocking settings to reduce heat generation. Lowering the CPU multiplier or base clock can decrease the workload on your CPU and help bring temperatures down.
Continuously monitoring your CPU temperatures after overclocking allows you to gauge the effectiveness of any adjustments you make to your cooling solution or overclocking settings. It’s a proactive approach to ensure that your system remains stable and reliable over time.
In the next section, we’ll discuss troubleshooting overclocking issues and how to address common problems that may arise during the overclocking process.
Troubleshooting Overclocking Issues
While overclocking your CPU can bring significant performance gains, it’s not uncommon to encounter issues along the way. Fortunately, most overclocking problems can be resolved by identifying the root cause and applying appropriate troubleshooting techniques. In this section, we’ll discuss common overclocking issues and provide guidance on how to resolve them.
1. System instability: If your system crashes, freezes, or experiences random reboots during overclocking, it’s a clear sign of instability. This can occur due to inadequate cooling, insufficient power supply, or improper overclocking settings. To fix this, make sure your cooling solution is sufficient, upgrade your power supply if necessary, and gradually reduce the overclocking settings until stability is achieved.
2. High temperatures: Overclocking can lead to higher temperatures, and if they reach unsafe levels, it can cause thermal throttling or system shutdowns. Ensure that your cooling solution is adequate, clean your system from dust, and consider adjusting your overclocking settings to lower temperatures.
3. Blue screen of death (BSOD): A BSOD typically occurs when a critical error is encountered. This can happen during overclocking due to unstable settings. Reduce the CPU multiplier or base clock, increase CPU voltage slightly, or adjust other settings like memory timings to resolve this issue.
4. Memory errors: Overclocking the CPU can also affect the stability of your system’s memory. If you encounter frequent memory-related errors or crashes, consider adjusting the memory timings or voltages. Alternatively, you may need to lower the CPU overclock to reduce the strain on the memory controller.
5. Failure to boot: If your system fails to boot after making overclocking adjustments, it’s likely due to settings that are too aggressive for your hardware. Reset the CMOS by removing the motherboard’s battery or using the clear CMOS jumper. This restores default BIOS settings and allows you to start fresh with more conservative overclocking parameters.
6. Insufficient power: Overclocking increases power consumption, which can strain your power supply. If you experience system instability or unexpected shutdowns, consider upgrading to a higher wattage power supply to ensure sufficient power delivery to all components.
7. Incompatibility issues: Not all CPUs, motherboards, or RAM modules are created equal, and some combinations may not work well together during overclocking. Check compatibility lists, forums, and user experiences to ensure that your hardware combination is suitable for overclocking. Incompatibility issues may also arise due to outdated or incompatible BIOS versions, so make sure to update your BIOS to the latest version supported by your hardware.
When troubleshooting overclocking issues, it’s crucial to be patient and methodical. Make incremental changes, test for stability after each adjustment, and keep an eye on temperatures and system behavior. Documentation and research are valuable resources to find specific solutions to the issues you encounter.
In the next section, we’ll wrap up this guide and provide a summary of the key takeaways you should remember when overclocking your CPU.
Conclusion
Congratulations! You have reached the end of this overclocking guide for your CPU. We have covered the essential steps and considerations to safely and effectively overclock your CPU, resulting in improved performance.
Throughout this guide, we discussed the fundamentals of overclocking, including understanding what overclocking is and why you might want to do it. We also covered important aspects such as preparing for overclocking, checking compatibility, setting up proper cooling, updating BIOS, adjusting the CPU multiplier and base clock, stress testing, monitoring temperatures, and troubleshooting common overclocking issues.
When overclocking your CPU, remember to take precautions and make preparations, such as backing up important data and starting with conservative overclocking settings. Pay close attention to temperatures and ensure that you have an adequate cooling solution in place to prevent overheating.
Stress testing is essential to ensure the stability and performance of your overclocked CPU. Run stress tests for an extended period to validate the stability of your overclock and make adjustments as needed to achieve optimal performance.
Monitoring temperatures is crucial to ensure the reliability and longevity of your system. Keep an eye on your CPU temperatures using monitoring software and take necessary steps if temperatures exceed safe limits, such as improving airflow or adjusting overclocking settings.
Finally, if you encounter any issues during the overclocking process, troubleshooting techniques can help identify and resolve them. Be patient and methodical, making incremental changes and testing for stability after each adjustment.
With proper knowledge and precautions, overclocking your CPU can yield significant performance gains, allowing you to tackle demanding tasks more efficiently, such as gaming, video editing, and 3D rendering.
Remember, every CPU is unique, and the overclocking capabilities and limitations may vary. It’s essential to thoroughly research and understand your specific CPU model before undertaking overclocking. Consult your CPU and motherboard manuals, visit manufacturer websites, and seek advice from the overclocking community to ensure a successful and safe overclocking experience.
Now that you’re armed with the knowledge gained from this guide, go ahead and unleash the full potential of your CPU through overclocking. Enjoy the enhanced performance and take your computing experience to new heights!


