Introduction
Tablets have become an essential part of our lives, serving as versatile tools for work, entertainment, and communication. And if you’re someone who frequently uses a tablet, you may have found yourself in need of a practical and stylish stand to hold it comfortably at the perfect viewing angle.
But why buy an expensive tablet stand when you can create your own unique one out of wood? Building a tablet stand not only allows you to customize it to your liking but also gives you the satisfaction of crafting something functional with your own hands.
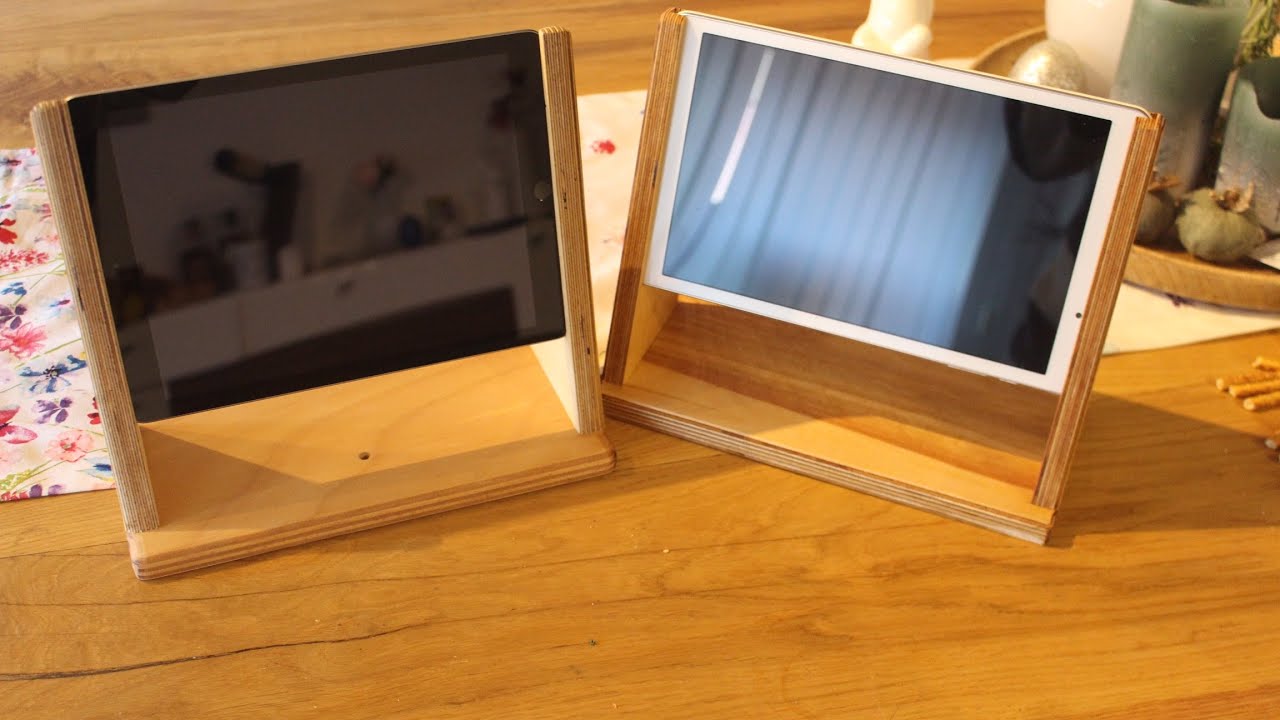
In this step-by-step guide, we will walk you through the process of making a tablet stand out of wood. It’s a relatively simple project that requires basic woodworking skills and a few readily available materials. So, let’s dive in and create a tablet stand that not only enhances the functionality of your device but also adds a touch of elegance to your workspace or home.
Materials Needed
Before you start building your tablet stand, make sure you have the following materials on hand:
- Wood: Choose a quality piece of wood that is sturdy and visually appealing. You can use hardwood, such as oak or maple, for durability and a natural aesthetic.
- Saw: A hand saw or a power saw will be necessary to cut the wood to the required dimensions.
- Sandpaper: Use sandpaper or a sanding block to smooth out rough edges and surfaces of the wood.
- Measuring Tape: You’ll need a measuring tape or a ruler to accurately measure the dimensions of the wooden pieces.
- Wood Glue: A strong wood glue will be necessary to join the different components of the tablet stand securely.
- Clamps: Clamps are essential for holding the pieces together while the wood glue dries.
- Paint or Stain: If you want to add color or protect the wood, you can use paint or stain of your choice. Consider using a finish that complements your decor.
- Paintbrushes: Brushes of various sizes will be needed to apply paint or stain to the wood.
- Optional: If desired, you can also add additional embellishments like decorative accents or varnish to enhance the appearance of the tablet stand.
Having these materials readily available will make the construction process smoother and more enjoyable. Once you have gathered all the necessary tools and materials, you’re ready to move on to the next step: measuring and cutting the wood.
Step 1: Gather the necessary materials
The first step in creating your own wooden tablet stand is to gather all the materials mentioned in the previous section. Make sure you have everything on hand before you begin the construction process. This will save you time and ensure a smooth workflow.
Start by selecting a piece of wood that is suitable for your tablet stand. Look for a sturdy hardwood, such as oak or maple, that will provide stability and durability. Consider the dimensions of your tablet and choose a piece of wood that is wide and long enough to accommodate it comfortably.
Next, collect your tools. Depending on the complexity of the design, you may need a hand saw or a power saw to cut the wood to the desired dimensions. Measure twice and cut once to ensure accuracy.
Don’t forget to have sandpaper or a sanding block on hand to smoothen the rough edges and surfaces of the wood. This will not only make the stand more visually appealing but also prevent any potential scratches on your tablet.
Once you have gathered all the necessary materials, set up a clean and well-lit workspace. Having a clutter-free environment will make it easier to measure, cut, and assemble the wooden pieces. It’s also important to ensure that you have adequate ventilation if you plan on using paint or stain.
By taking the time to gather all the materials upfront, you’ll be well-prepared to move on to the next step of measuring and cutting the wood, bringing you one step closer to completing your own handmade tablet stand.
Step 2: Measure and cut the wood
Now that you have gathered all the necessary materials, it’s time to move on to the next step: measuring and cutting the wood for your tablet stand. This step is crucial to ensure that the stand fits your tablet perfectly and provides optimal stability.
Start by measuring the length and width of your tablet. These measurements will serve as a reference point for determining the dimensions of the wooden pieces. Remember to add a little extra space for the thickness of the wood and a slight angle for your tablet to rest on comfortably.
Using a measuring tape or a ruler, mark the desired dimensions on the wood. To achieve straight and precise cuts, use a hand saw or a power saw. If you are new to woodworking, take your time and go slow to ensure accuracy.
It’s essential to double-check your measurements before making any cuts. Measure twice and cut once to avoid any mistakes that could jeopardize the stability and functionality of your tablet stand.
Once you have cut the base piece to the correct dimensions, measure and cut the supporting piece(s) as well. These pieces will be responsible for holding your tablet at the desired angle. The number and size of the supporting pieces will depend on your design preference.
Remember, precision is key in this step. Taking the time to measure accurately and make clean cuts will result in a well-crafted tablet stand that not only looks professional but also serves its purpose effectively.
Step 3: Sand the edges and surfaces
After cutting the wood to the desired dimensions, it’s time to move on to the next step: sanding the edges and surfaces of the wooden pieces. This step is crucial to ensure a smooth and polished finish, making your tablet stand both visually appealing and safe to use.
Start by using sandpaper or a sanding block to smooth out any rough edges on the wooden pieces. Gently rub the sandpaper along the edges, applying even pressure. Be careful not to over-sand, as this may lead to uneven surfaces or a loss of structural integrity.
Continue sanding the entire surface of the wooden pieces, paying special attention to any areas that may feel rough or have visible imperfections. Sanding will not only remove any splinters but also create a smooth and comfortable surface for your tablet to rest upon.
As you sand, periodically run your hands over the wood to feel for any roughness or inconsistencies. This tactile examination will help you identify areas that may require additional sanding to achieve a polished finish.
Once the edges and surfaces are smooth to your satisfaction, wipe away any sawdust or debris with a clean cloth or a brush. Removing any residue will ensure a clean canvas for the next steps of assembly and finishing.
Keep in mind that sanding can be a dusty process, so work in a well-ventilated area or consider wearing a dust mask to protect yourself from inhaling the particles.
By taking the time to sand the edges and surfaces of your wooden pieces, you’ll not only enhance the aesthetic appeal of your tablet stand but also create a safe and comfortable platform for your tablet to rest on.
Step 4: Assemble the pieces
With the wood cut to the desired dimensions and the edges and surfaces sanded, it’s time to assemble the pieces of your tablet stand. This step involves joining the different components together to create a sturdy and functional stand for your device.
Start by applying wood glue to the areas where the pieces will come into contact with each other. Use a brush or your finger to spread an even layer of glue, ensuring full coverage for a strong bond.
Once the wood glue is applied, carefully align the pieces according to your intended design. Use clamps to hold the pieces together firmly while the glue dries. This will help ensure a tight and secure fit. Remember to wipe away any excess glue that squeezes out during the clamping process.
Allow the wood glue to fully dry according to the manufacturer’s instructions. This may take several hours or overnight, so be patient and resist the temptation to rush the process.
After the glue has dried, remove the clamps and inspect the assembled tablet stand. Check for any loose joints or areas that may require additional reinforcement. If necessary, apply a bit of extra wood glue to strengthen these areas and clamp them again until the glue dries.
Once the glue is completely dry and the stand feels solid, you’re ready to move on to the next step of painting or staining to enhance the aesthetic appeal of your tablet stand.
By carefully assembling the pieces and allowing the wood glue to dry fully, you’ll create a tablet stand that not only looks professional but also provides a stable and reliable support for your device.
Step 5: Paint or stain the stand
Now that the pieces of your tablet stand are securely assembled, it’s time to add a touch of color or protection to the wood. In this step, you’ll have the option to paint or stain your tablet stand, depending on your desired aesthetic and functionality.
If you prefer a pop of color or want to match the stand with your existing decor, painting is a great choice. Start by applying a coat of primer to create a smooth and even surface for the paint. Once the primer is dry, use a paintbrush to apply thin and even coats of paint to the wooden surface. Allow each coat to dry before applying the next to prevent drips or uneven coverage.
Alternatively, if you prefer the natural look of wood, staining is the way to go. Stain enhances the natural beauty of the wood while providing protection against moisture and wear. Apply the stain with a brush or a cloth, following the manufacturer’s instructions, and allow it to penetrate the wood. Once the desired color is achieved, wipe off any excess stain and allow it to dry completely.
Consider applying multiple coats of paint or stain to achieve the desired depth of color or level of protection. Remember to sand lightly in between coats to ensure a smooth finish.
While painting or staining, pay attention to the details and ensure that the entire surface, including the edges and corners, is evenly covered. Take your time and apply the paint or stain with even strokes for a professional-looking finish.
After the paint or stain has dried, you can choose to add a protective topcoat, such as varnish or polyurethane, to further safeguard the wood and prolong the lifespan of your tablet stand. Applying a topcoat will also give your stand a subtle shine and make it easier to clean and maintain.
By painting or staining your tablet stand, you can personalize it to your taste and protect the wood from daily wear and tear. Whether you prefer a vibrant color or the natural warmth of wood, this step will add the final touch to your handmade creation.
Step 6: Add finishing touches
With your tablet stand assembled and painted or stained, it’s time to add the final touches to complete your creation. These finishing touches will not only enhance the aesthetics of the stand but also add functionality and personalization.
One option for adding a touch of elegance is to sand the painted or stained surface lightly with fine-grit sandpaper. This will create a smooth and velvety finish, further enhancing the visual appeal of the stand.
If you desire additional embellishments for your tablet stand, consider adding decorative accents such as metal corner brackets, leather accents, or engraved patterns. These details can add a unique touch and make your stand stand out even more.
Another finishing touch you might consider is adding a non-slip material to the area where your tablet rests. This could be a small piece of rubber or felt that provides extra stability and prevents your tablet from sliding or scratching the surface of the stand.
Don’t forget to inspect the overall construction of the stand and ensure that all edges and surfaces are smooth and free from any rough spots or imperfections. If necessary, use sandpaper or a file to carefully smooth out any small blemishes.
Lastly, take a moment to clean your tablet stand with a clean cloth or a mild cleaning solution to remove any dust or debris accumulated during the construction process. This will ensure that your tablet remains clean and scratch-free when placed on the stand.
Adding these finishing touches will elevate your tablet stand from a simple wooden structure to a stylish and functional accessory. These small details will not only showcase your craftsmanship but also enhance the user experience and make your tablet stand a standout piece in your workspace or home.
Conclusion
Congratulations! By following the step-by-step guide outlined above, you have successfully created a unique and functional tablet stand out of wood. This DIY project allows you to customize the stand to your liking, while also providing the satisfaction of crafting something practical with your own hands.
Throughout the process, you have learned how to gather the necessary materials, measure and cut the wood, sand the edges and surfaces, assemble the pieces, paint or stain the stand, and add the finishing touches. Each step contributes to the overall quality and functionality of your tablet stand.
Not only does this homemade tablet stand provide a convenient and stable platform for your device, but it also adds a touch of elegance to your workspace or home. Whether you chose to paint it in a vibrant color or left it with the natural beauty of stained wood, your tablet stand is now a personalized accessory that reflects your style.
Remember, this project can be further customized to suit your preferences. Feel free to experiment with different wood types, finishes, or even shapes to create a tablet stand that perfectly fits your needs.
Now, enjoy the benefits of your homemade tablet stand as you effortlessly browse through your favorite apps, watch movies, or work on your projects with hands-free convenience. Not only did you save money by creating your own stand, but you also have a one-of-a-kind piece that showcases your creativity and woodworking skills.
So, why settle for a generic tablet stand when you can showcase your craftsmanship and individuality with a beautifully crafted wooden stand? Get ready to enjoy the functional and aesthetic benefits of your DIY tablet stand for years to come!


