Introduction
Welcome to the exciting world of DIY electronics! In this guide, we will walk you step-by-step through the process of creating your very own Bluetooth speaker. With a few tools and components, you can build a high-quality speaker that will allow you to enjoy your favorite music wirelessly.
Bluetooth speakers have become incredibly popular in recent years due to their convenience and portability. Whether you’re hanging out with friends, having a picnic in the park, or simply relaxing at home, a Bluetooth speaker can enhance your listening experience.
This project is perfect for both beginners and experienced hobbyists. It’s a great way to explore the world of electronics and gain a better understanding of how speakers and amplifiers work. Plus, at the end of the project, you’ll have a custom-made speaker that you can proudly show off to your friends.
Throughout this guide, we’ll provide you with detailed instructions and helpful tips to ensure your success. We’ll cover everything from selecting the right components to wiring and testing your speaker. You don’t need to be an expert in electronics to follow along; we’ll explain everything in a beginner-friendly manner.
So, if you’re ready to embark on a fun and rewarding DIY project, let’s get started on building your very own Bluetooth speaker!
Overview of the Project
Before we dive into the nitty-gritty details, let’s start with an overview of the project. Building a Bluetooth speaker involves assembling various components, such as speakers, an amplifier board, and a Bluetooth module, and connecting them together to create a functional audio system.
The speaker enclosure serves as the housing for the components and is an essential part of the project. It helps to enhance the sound quality and provides protection for the delicate electronic components inside.
We’ll guide you through each step of the process, from gathering the necessary components to configuring and testing the Bluetooth connection. You’ll learn how to prepare the speaker enclosure, install and wire the speakers, connect the amplifier board, and integrate the Bluetooth module.
Additionally, we’ll cover the power supply and wiring aspects to ensure that your Bluetooth speaker functions properly. Understanding the power requirements and correctly connecting the components is crucial for a successful outcome.
Throughout the project, we’ll provide guidance on selecting the right components for your speaker. We’ll discuss the specifications to look for in speakers, amplifiers, and Bluetooth modules to ensure compatibility and optimal performance.
Once you’ve completed the assembly and wiring, we’ll show you how to configure the Bluetooth settings and test the speaker. You’ll be able to connect your smartphone or other Bluetooth-enabled devices and enjoy your favorite music wirelessly.
By the end of this project, you’ll have a fully functional Bluetooth speaker that you can use at home, take with you on outings, or even give as a unique handmade gift to someone special.
So, let’s roll up our sleeves and embark on this DIY journey to create an impressive Bluetooth speaker that will elevate your audio experience!
Tools and Materials Needed
Before you begin building your Bluetooth speaker, it’s important to gather all the necessary tools and materials. Here’s a list of what you’ll need:
- Screwdriver set: A set of screwdrivers with different sizes and types will be handy for opening and securing components.
- Soldering iron: You’ll need a soldering iron to connect wires and components together. Make sure to have soldering wire and a stand for the iron.
- Wire cutters and strippers: These tools will help you trim and strip the insulation from the wires.
- Multimeter: A multimeter is useful for testing connections, measuring voltage, and troubleshooting any issues.
- Hot glue gun: A glue gun will be used to secure components in place and provide extra stability.
- Heat shrink tubing: This tubing is used to protect and insulate soldered connections.
- Drill and drill bits: If you need to make holes in the speaker enclosure for mounting components, a drill and appropriate drill bits will be necessary.
In addition to the tools, you’ll need the following materials:
- Speaker enclosure: You can purchase a pre-made enclosure or build your own using suitable materials like wood or plastic.
- Speakers: Select speakers that fit your desired sound quality and power requirements.
- Amplifier board: Choose an amplifier board that is compatible with your speakers and provides the desired audio output power.
- Bluetooth module: Look for a Bluetooth module that supports the appropriate Bluetooth version and has the necessary audio input and output capabilities.
- Wires and connectors: Use wires of appropriate gauge to connect the components together. You’ll also need connectors to make secure and reliable connections.
- Power supply: Depending on the power requirements of your speakers and amplifier, you’ll need a suitable power supply, such as a 12V DC adapter.
Make sure to check the specifications and compatibility of the components before purchasing. It’s also a good idea to gather any additional materials, like screws or adhesive foam, that may be required during the assembly process.
Having all the necessary tools and materials on hand will ensure a smoother construction process and help you tackle any challenges that may arise along the way.
Step 1: Gather Necessary Components
Before you start building your Bluetooth speaker, it’s essential to gather all the necessary components. Here’s a list of the components you’ll need:
- Speaker enclosure: Select a suitable enclosure that fits your design preferences and desired sound quality. You can choose from various materials like wood, plastic, or metal.
- Speakers: Choose speakers that are compatible with your enclosure and meet your audio requirements. Consider factors such as size, power handling, and impedance.
- Amplifier board: Look for an amplifier board that matches the power requirements of your speakers. Make sure it has the necessary input and output connections.
- Bluetooth module: Select a Bluetooth module that supports the appropriate version, such as Bluetooth 4.0 or higher. Ensure it has audio input and output capabilities.
- Power supply: Determine the power requirements of your amplifier board and select a suitable power supply, such as a 12V DC adapter.
- Wires and connectors: Get wires of appropriate gauge to connect the speakers, amplifier board, and Bluetooth module. Use connectors like banana plugs or soldering for secure connections.
- Soldering materials: Ensure you have a soldering iron, soldering wire, and a stand. These will be needed to make the necessary electrical connections.
- Other tools: Gather tools like a screwdriver set, wire cutters, strippers, and a multimeter for testing and installing the components.
Before purchasing the components, it’s important to do some research and check the specifications and compatibility of each part. Ensure that the speakers, amplifier board, and Bluetooth module are compatible with one another and can deliver the desired audio output.
You can find these components at electronics stores, online retailers, or even salvage them from old speakers or electronic devices. Consider both cost and quality when making your selections.
Once you have gathered all the necessary components, you’re ready to move on to the next step: preparing the speaker enclosure.
Step 2: Prepare the Speaker Enclosure
Now that you have all the necessary components for your Bluetooth speaker, it’s time to prepare the speaker enclosure. Here’s what you need to do:
- Inspect the enclosure: Start by examining the speaker enclosure for any imperfections or defects. Check for cracks, rough edges, or any other issues that could affect the overall build quality.
- Clean the enclosure: Use a damp cloth or a gentle cleaning solution to wipe down the enclosure and remove any dust or dirt that may be present. This will ensure a clean surface for attaching components.
- Plan the layout: Consider the placement of the speakers, amplifier board, and Bluetooth module within the enclosure. Plan where the components will be positioned and how they will be mounted.
- Mark drill holes: If necessary, mark the positions where you need to drill holes for mounting the speakers, amplifier board, and Bluetooth module. Use a measuring tape or a template to ensure accurate placement.
- Drill the holes: Carefully drill the marked holes in the enclosure, following the appropriate drill bit size for the material. Take your time and use caution to prevent any damage to the enclosure.
- Smooth the edges: After drilling the holes, use sandpaper or a file to smooth out any rough edges around the holes. This helps in achieving a professional-looking finish.
- Test fit the components: Before permanently mounting the components, do a test fit to ensure they fit securely in the designated positions. Make any necessary adjustments if the components don’t fit properly.
- Apply finish (optional): If desired, you can apply a finish to the speaker enclosure to enhance its appearance or protect it from moisture or scratches. Choose an appropriate finish for the material of your enclosure.
Remember to follow the manufacturer’s instructions for drilling holes and applying any finishes to the enclosure. Take your time during this step to ensure the enclosure is properly prepared and ready for the next phase of the project.
Once you’ve prepared the speaker enclosure, you’re halfway there! The next step is to install and wire the speakers to create the audio output for your Bluetooth speaker.
Step 3: Install and Wire the Speakers
Now that the speaker enclosure is ready, it’s time to install and wire the speakers. Follow these steps to ensure a proper installation:
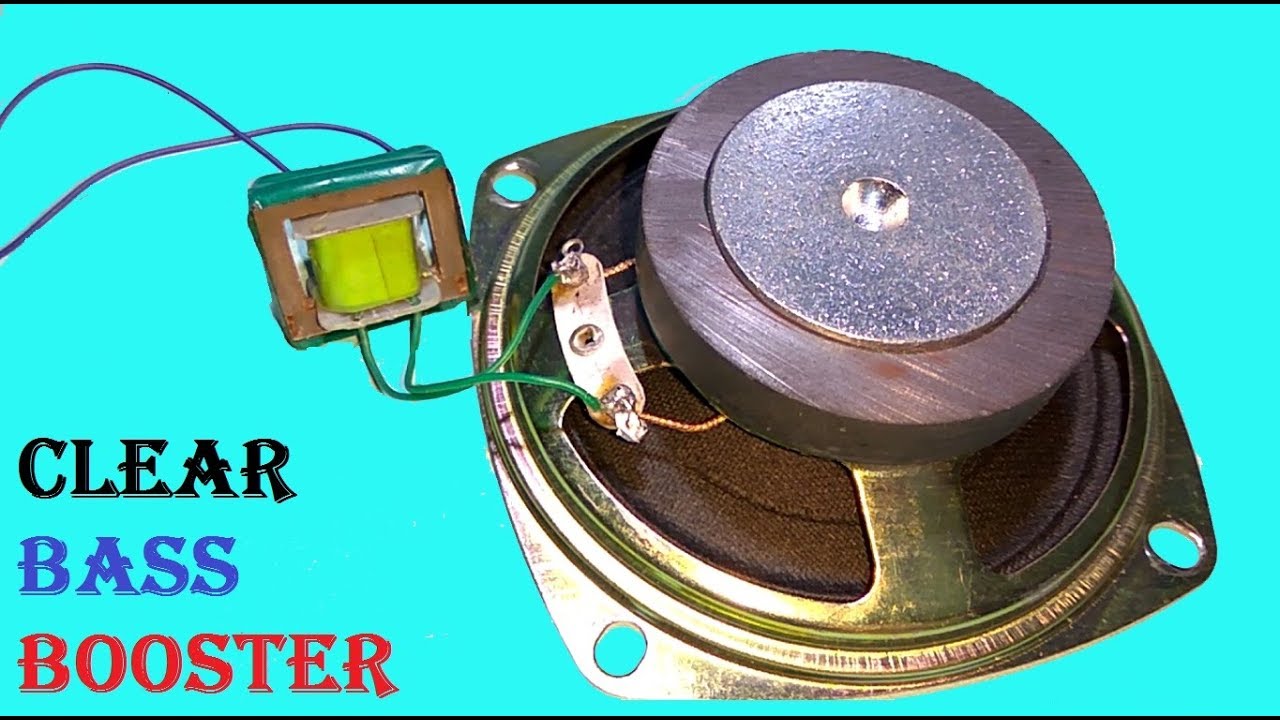
- Identify the positive and negative terminals: Check the back of each speaker and identify the positive (+) and negative (-) terminals. The positive terminal is usually marked with a “+” symbol or a red color, while the negative terminal is marked with a “-” symbol or a black color.
- Position the speakers: Place the speakers in the designated positions within the enclosure. Ensure that the speaker cones are facing towards the front or desired sound projection direction.
- Mark the mounting holes: Once the speakers are in position, use a pencil or marker to mark the locations of the screw holes on the enclosure. This will guide you during the mounting process.
- Secure the speakers: Using screws and a screwdriver, carefully align the marked holes on the enclosure with the mounting holes on the speakers. Gently tighten the screws to secure the speakers in place, ensuring they are centered and straight.
- Connect the wires: Strip a small portion of insulation from the speaker wires, exposing the metal conductor. Identify the positive and negative wires coming from the amplifier board and the corresponding terminals on the speakers.
- Solder the connections: Twist together the bare ends of the positive wires from the amplifier board and the speaker, and solder them together. Repeat this process for the negative wires. Use heat shrink tubing or electrical tape to insulate the soldered connections.
- Double-check the connections: Carefully inspect the connections to ensure there are no loose wires or exposed connections. Make sure the positive and negative terminals are correctly connected to avoid any phasing or polarity issues.
- Test the speakers: Before proceeding to the next step, it’s important to test the speakers. Connect the amplifier board to a power source and play some audio. Ensure that both speakers are producing sound and that the volume levels are balanced.
By following these steps, you have successfully installed and wired the speakers for your Bluetooth speaker. The speakers are a vital component in delivering high-quality audio, so make sure they are securely mounted and the connections are properly soldered. Now you’re ready to move on to the next step: connecting the amplifier board.
Step 4: Connect the Amplifier Board
With the speakers securely installed, it’s time to connect the amplifier board. Follow these steps to ensure a proper connection:
- Locate the input terminals: Identify the input terminals on the amplifier board. These terminals are usually labeled “L” and “R” for the left and right audio channels.
- Prepare the audio cables: Cut two lengths of audio cable, ensuring they are long enough to reach from the amplifier board to the Bluetooth module. Strip a small portion of insulation from the ends of each cable.
- Connect the cables: Connect one end of each audio cable to the corresponding input terminals on the amplifier board. Ensure the left channel cable is connected to the “L” terminal and the right channel cable is connected to the “R” terminal.
- Identify the output terminals: Locate the speaker output terminals on the amplifier board. These terminals are typically labeled “+” and “-” to indicate the positive and negative connections for each channel.
- Prepare speaker wires: Cut two lengths of speaker wire, ensuring they are long enough to reach from the amplifier board to the respective speakers. Strip a small portion of insulation from the ends of each wire.
- Connect the speaker wires: Connect one end of each wire to the corresponding output terminal on the amplifier board. Connect the positive wire to the “+” terminal and the negative wire to the “-” terminal for each channel.
- Secure the connections: Use a screwdriver or the provided connectors to secure the audio and speaker wire connections in place. Ensure that the wires are tightly connected to prevent any audio interference or loose connections.
- Double-check the connections: Carefully inspect the connections to ensure there are no loose wires or exposed connections. Make sure the positive and negative terminals on the amplifier board align correctly with the corresponding terminals on the speakers.
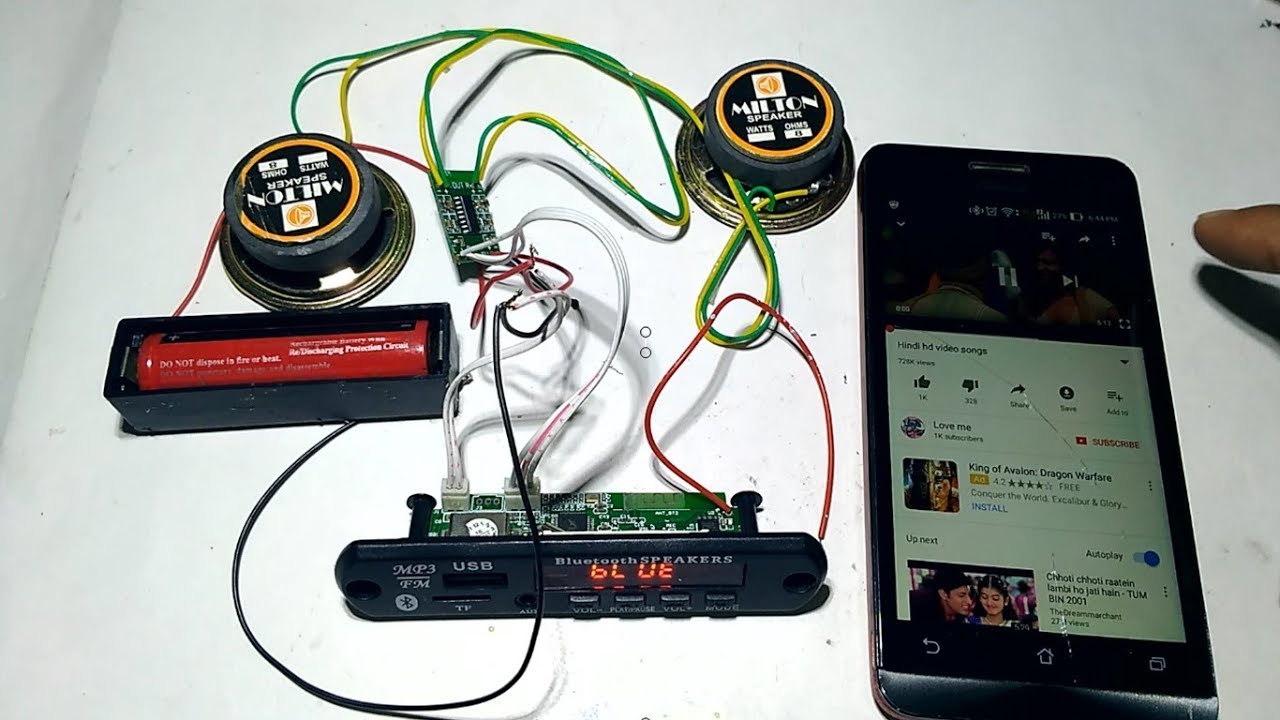
- Test the audio output: Before proceeding to the next step, it’s essential to test the audio output. Connect the power supply to the amplifier board and turn it on. Play some audio through the Bluetooth module and confirm that sound is being produced from both speakers.
By following these steps, you have successfully connected the amplifier board to the speakers and ensured proper audio output. It’s important to double-check the connections and test the system to ensure everything is functioning as expected. Now, you’re ready to move on to the next step: installing the Bluetooth module.
Step 5: Install the Bluetooth Module
With the amplifier board connected, it’s time to install the Bluetooth module. Follow these steps to ensure a proper installation:
- Locate the audio input and output terminals: Identify the audio input and output terminals on the Bluetooth module. These terminals are typically labeled “IN” and “OUT”.
- Prepare audio cables: Cut two lengths of audio cable, ensuring they are long enough to reach from the Bluetooth module to the corresponding input terminals on the amplifier board. Strip a small portion of insulation from the ends of each cable.
- Connect the audio cables: Connect one end of each audio cable to the corresponding input and output terminals on the Bluetooth module. Ensure the audio input cable is connected to the “IN” terminal and the output cable to the “OUT” terminal.
- Secure the connections: Use a screwdriver or the provided connectors to secure the audio cable connections in place. Ensure that the wires are tightly connected to prevent any audio interference or loose connections.
- Choose a suitable location: Determine the best location within the speaker enclosure to install the Bluetooth module. Consider factors such as accessibility, aesthetics, and signal reception.
- Mount the Bluetooth module: Use screws, adhesive tape, or hot glue to secure the Bluetooth module in place. Take care to position it in a way that the audio inputs and outputs are easily accessible.
- Connect the audio cables: Route the audio cables from the Bluetooth module to the respective input terminals on the amplifier board. Ensure that the left channel cable is connected to the left input terminal and the right channel cable to the right input terminal.
- Double-check the connections: Carefully inspect the audio connections to ensure there are no loose wires or exposed connections. Make sure the audio input and output terminals on the Bluetooth module align correctly with the corresponding terminals on the amplifier board.
- Test the Bluetooth connection: Power up the Bluetooth module and put it into pairing mode. Use a Bluetooth-enabled device to search for and connect to the module. Play some audio through the device, and confirm that the sound is being transmitted to the speakers via the Bluetooth connection.
By following these steps, you have installed and connected the Bluetooth module, enabling wireless audio streaming to your speakers. It’s important to double-check the connections and test the Bluetooth connection to ensure everything is functioning properly. Now, you’re ready to move on to the next step: wiring the power supply.
Step 6: Power Supply and Wiring
Now that the components are all connected, it’s time to address the power supply and wiring. Follow these steps to ensure proper power distribution and wiring:
- Determine power requirements: Check the power specifications of the amplifier board, speakers, and other connected components. Ensure that the power supply can meet the requirements, such as voltage and current.
- Select an appropriate power supply: Choose a power supply that matches the voltage and current requirements of the components. Consider using a 12V DC adapter or a battery pack with sufficient power output.
- Prepare the power cables: Cut a length of power cable appropriate for connecting the power supply to the amplifier board. Strip a small portion of insulation from the ends of the cable.
- Connect the power supply: Identify the positive and negative terminals on the power supply and the corresponding terminals on the amplifier board. Ensure that the positive (+) terminal is connected to the positive terminal on the amplifier board, and the negative (-) terminal is connected to the negative terminal.
- Secure the connection: Use a screwdriver or the provided connectors to secure the power cable connection in place. Ensure that the wires are tightly connected to provide a stable power supply.
- Additional wiring: If required, connect any additional wiring for features like power switches or LED indicators. Follow the manufacturer’s instructions or wiring diagrams provided with the components.
- Tidy up the wiring: Use zip ties or cable organizers to neatly bundle and secure the wiring inside the speaker enclosure. This helps to ensure a clean and organized appearance, as well as preventing any accidental damage to the wires.
- Double-check all connections: Carefully inspect all electrical connections to ensure they are secure and properly connected. Avoid loose wires or exposed connections that could cause issues or potential hazards.
- Test the power supply: Connect the power supply to an electrical outlet and power on the Bluetooth speaker. Verify that the amplifier board, speakers, and Bluetooth module are receiving power and functioning correctly.
By following these steps, you have successfully wired the power supply and ensured proper power distribution to your Bluetooth speaker. It’s important to double-check all connections, as well as test the power supply, to ensure everything is functioning as expected. Now, you’re ready to move on to the final step: configuring and testing the Bluetooth speaker.
Step 7: Configure and Test the Bluetooth Speaker
With all the components in place and properly connected, it’s time to configure and test your Bluetooth speaker. Follow these steps to ensure a smooth setup:
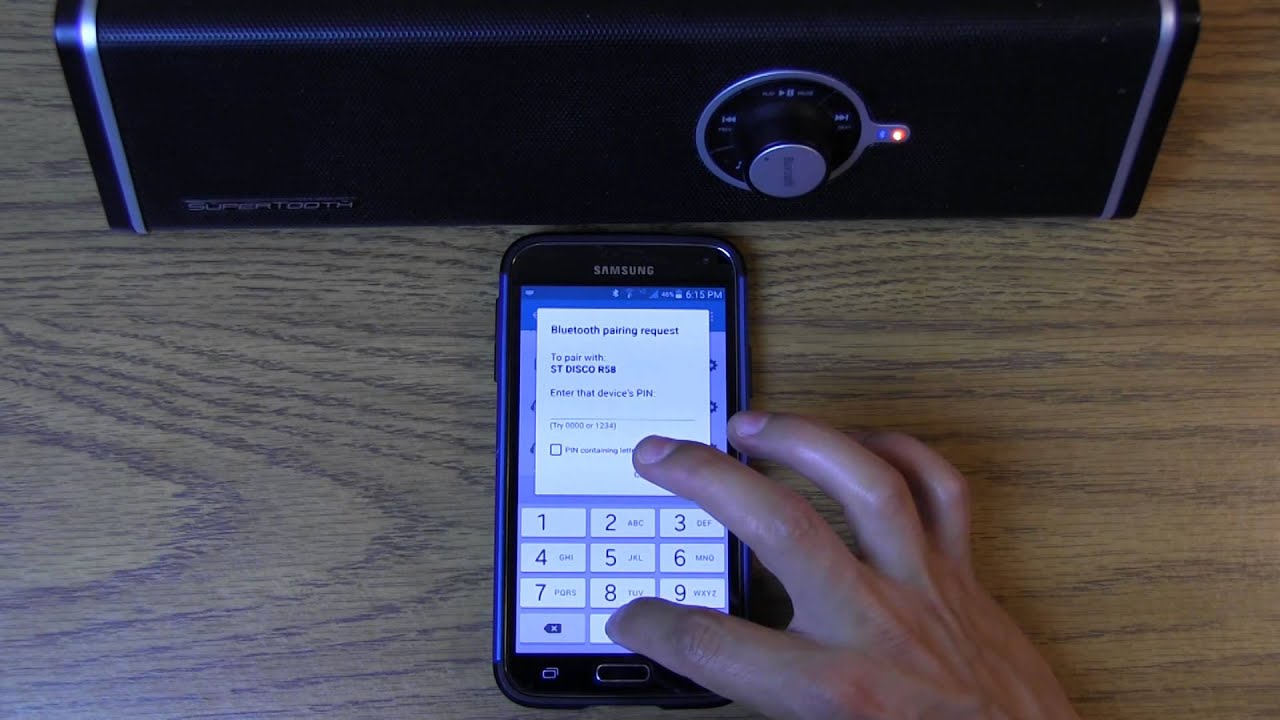
- Power on the Bluetooth module: Ensure that the power supply is connected and turned on. Power on the Bluetooth module and put it into pairing mode.
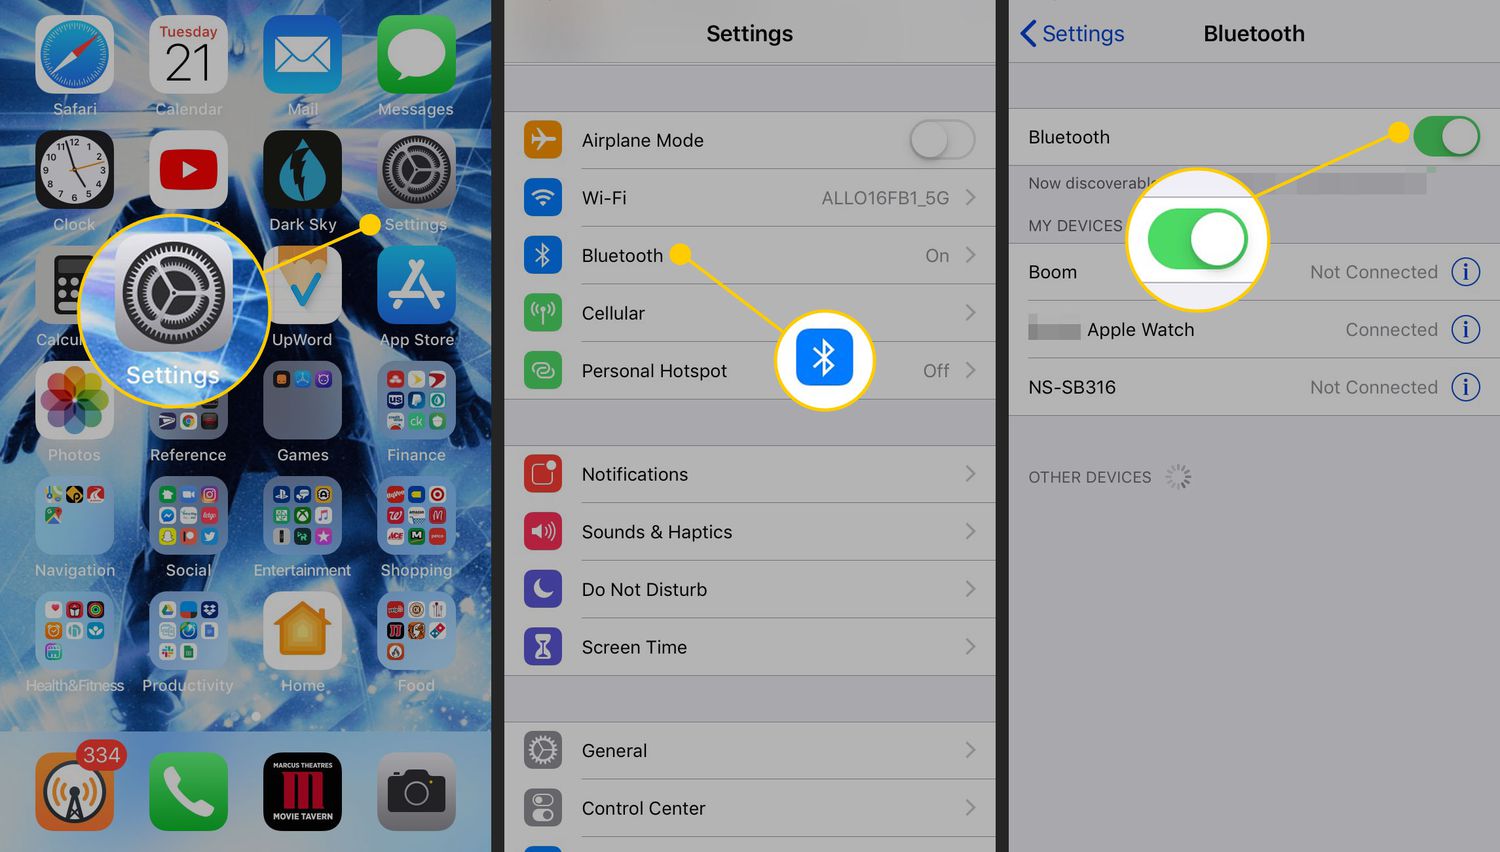
- Activate Bluetooth on your device: Enable Bluetooth on your smartphone, tablet, or any other Bluetooth-enabled device. Open the Bluetooth settings and scan for available devices.
- Select and pair with the Bluetooth module: Locate and select the Bluetooth module from the list of available devices. Follow any prompts to complete the pairing process. Once paired, your device should indicate a successful connection.
- Configure audio settings: In the Bluetooth settings of your device, ensure that the audio output is set to the Bluetooth speaker. Adjust the volume on both your device and the Bluetooth speaker to a comfortable level.
- Test the Bluetooth connection: Play some audio on your device and ensure that the sound is being transmitted to the Bluetooth speaker. Move around the room to test the range and stability of the Bluetooth connection.
- Adjust and fine-tune the sound: Use the volume controls on your device and the Bluetooth speaker to adjust the sound output. Test different audio tracks with varying frequencies and volume levels to ensure the speaker is performing as desired.
- Make any necessary adjustments: If you encounter any issues or notice any undesirable audio quality, double-check all the connections and ensure that the components are properly mounted. Adjust any settings on both the Bluetooth module and your device if necessary.
- Finalize and secure the setup: Once you are satisfied with the configuration and performance of your Bluetooth speaker, secure any loose wires or components inside the speaker enclosure. Ensure that the enclosure is properly closed and secure.
- Enjoy your Bluetooth speaker: Congratulations! You have successfully built and configured your own Bluetooth speaker. Sit back, relax, and enjoy your favorite music wirelessly.
By following these steps, you have completed the setup and testing of your Bluetooth speaker. Take the time to fine-tune the audio and make any necessary adjustments to ensure optimal performance. Now, sit back and enjoy the freedom of wireless audio.
Conclusion
Congratulations on successfully building your own Bluetooth speaker! You have embarked on a rewarding DIY journey, discovering the intricacies of speaker assembly, wiring, and Bluetooth connectivity. By following the steps outlined in this guide, you have created a custom-made speaker that allows you to enjoy your favorite music wirelessly.
Throughout the project, you have learned how to gather the necessary components, prepare the speaker enclosure, install speakers, connect the amplifier board, integrate the Bluetooth module, wire the power supply, and configure the Bluetooth settings. Each step was crucial in ensuring the proper functioning of your Bluetooth speaker.
Not only have you gained practical knowledge about electronics and audio systems, but you have also experienced the satisfaction of creating something with your own hands. Your Bluetooth speaker is not just a functional device; it’s a piece of your creativity and craftsmanship.
Remember, as you continue to use your Bluetooth speaker, you can always experiment with different speaker enclosures, components, and configurations to achieve various sound qualities and personal preferences. The possibilities for customization are endless.
Building a Bluetooth speaker is an excellent way to explore the world of DIY electronics, enhance your audio experience, and impress your friends and family. You now have a unique and portable sound system that can accompany you on various adventures or simply elevate your everyday moments.
So, turn up the volume, sit back, and enjoy the fantastic sound quality of your newly constructed Bluetooth speaker. Cheers to your accomplishment, and happy listening!