Introduction
Welcome to the world of 3D printing, where imagination becomes reality. With the advent of affordable 3D printers, the possibilities of creating custom objects are now within reach for enthusiasts and professionals alike. One crucial element in the 3D printing process is the filament, the material used to build the printed objects layer by layer.
Traditional filaments are commonly made from petroleum-based plastics, which can be expensive and harmful to the environment. However, there is a sustainable and cost-effective alternative – creating your own filament from plastic bottles. Not only does this method reduce plastic waste, but it also provides an affordable option for filament production.
In this guide, we will walk you through the process of transforming plastic bottles into 3D printer filament. You’ll learn how to collect the bottles, prepare them for processing, and convert the plastic into a usable filament for your 3D printer. So, let’s dive in and discover how you can go from trash to treasure with your own homemade filament!
Tools and Materials Needed
To embark on your journey of making 3D printer filament from plastic bottles, you will need the following tools and materials:
- Plastic Bottles: Collect a sufficient number of plastic bottles to ensure an ample supply of raw material. Look for bottles made from PET or HDPE plastic, as these are commonly used for filament production.
- Scissors or Box Cutter: These tools will be used to cut the plastic bottles into smaller pieces, making them easier to process.
- Heat Source: You will need a heat source to melt the plastic. This can be a hot plate, electric stove, or even a DIY heat source like a toaster oven.
- Extrusion Machine or DIY Extruder: An extrusion machine is used to melt and extrude the plastic into filament, but if you’re feeling adventurous, you can also build your own DIY extruder using readily available materials.
- Cooling System: To ensure that the filament solidifies properly, you will need a cooling system. This can be as simple as a fan blowing on the extruded filament or a dedicated cooling unit.
- Filament Spool: Finally, you will need a spool to wind the filament onto once it has cooled and solidified. This can be a commercially available spool or a DIY spool made from materials such as PVC pipe or wood.
With these tools and materials at hand, you are now ready to proceed to the next steps of the process. So, gather your supplies and let’s get started on making your own 3D printer filament from plastic bottles!
Step 1: Collecting Plastic Bottles
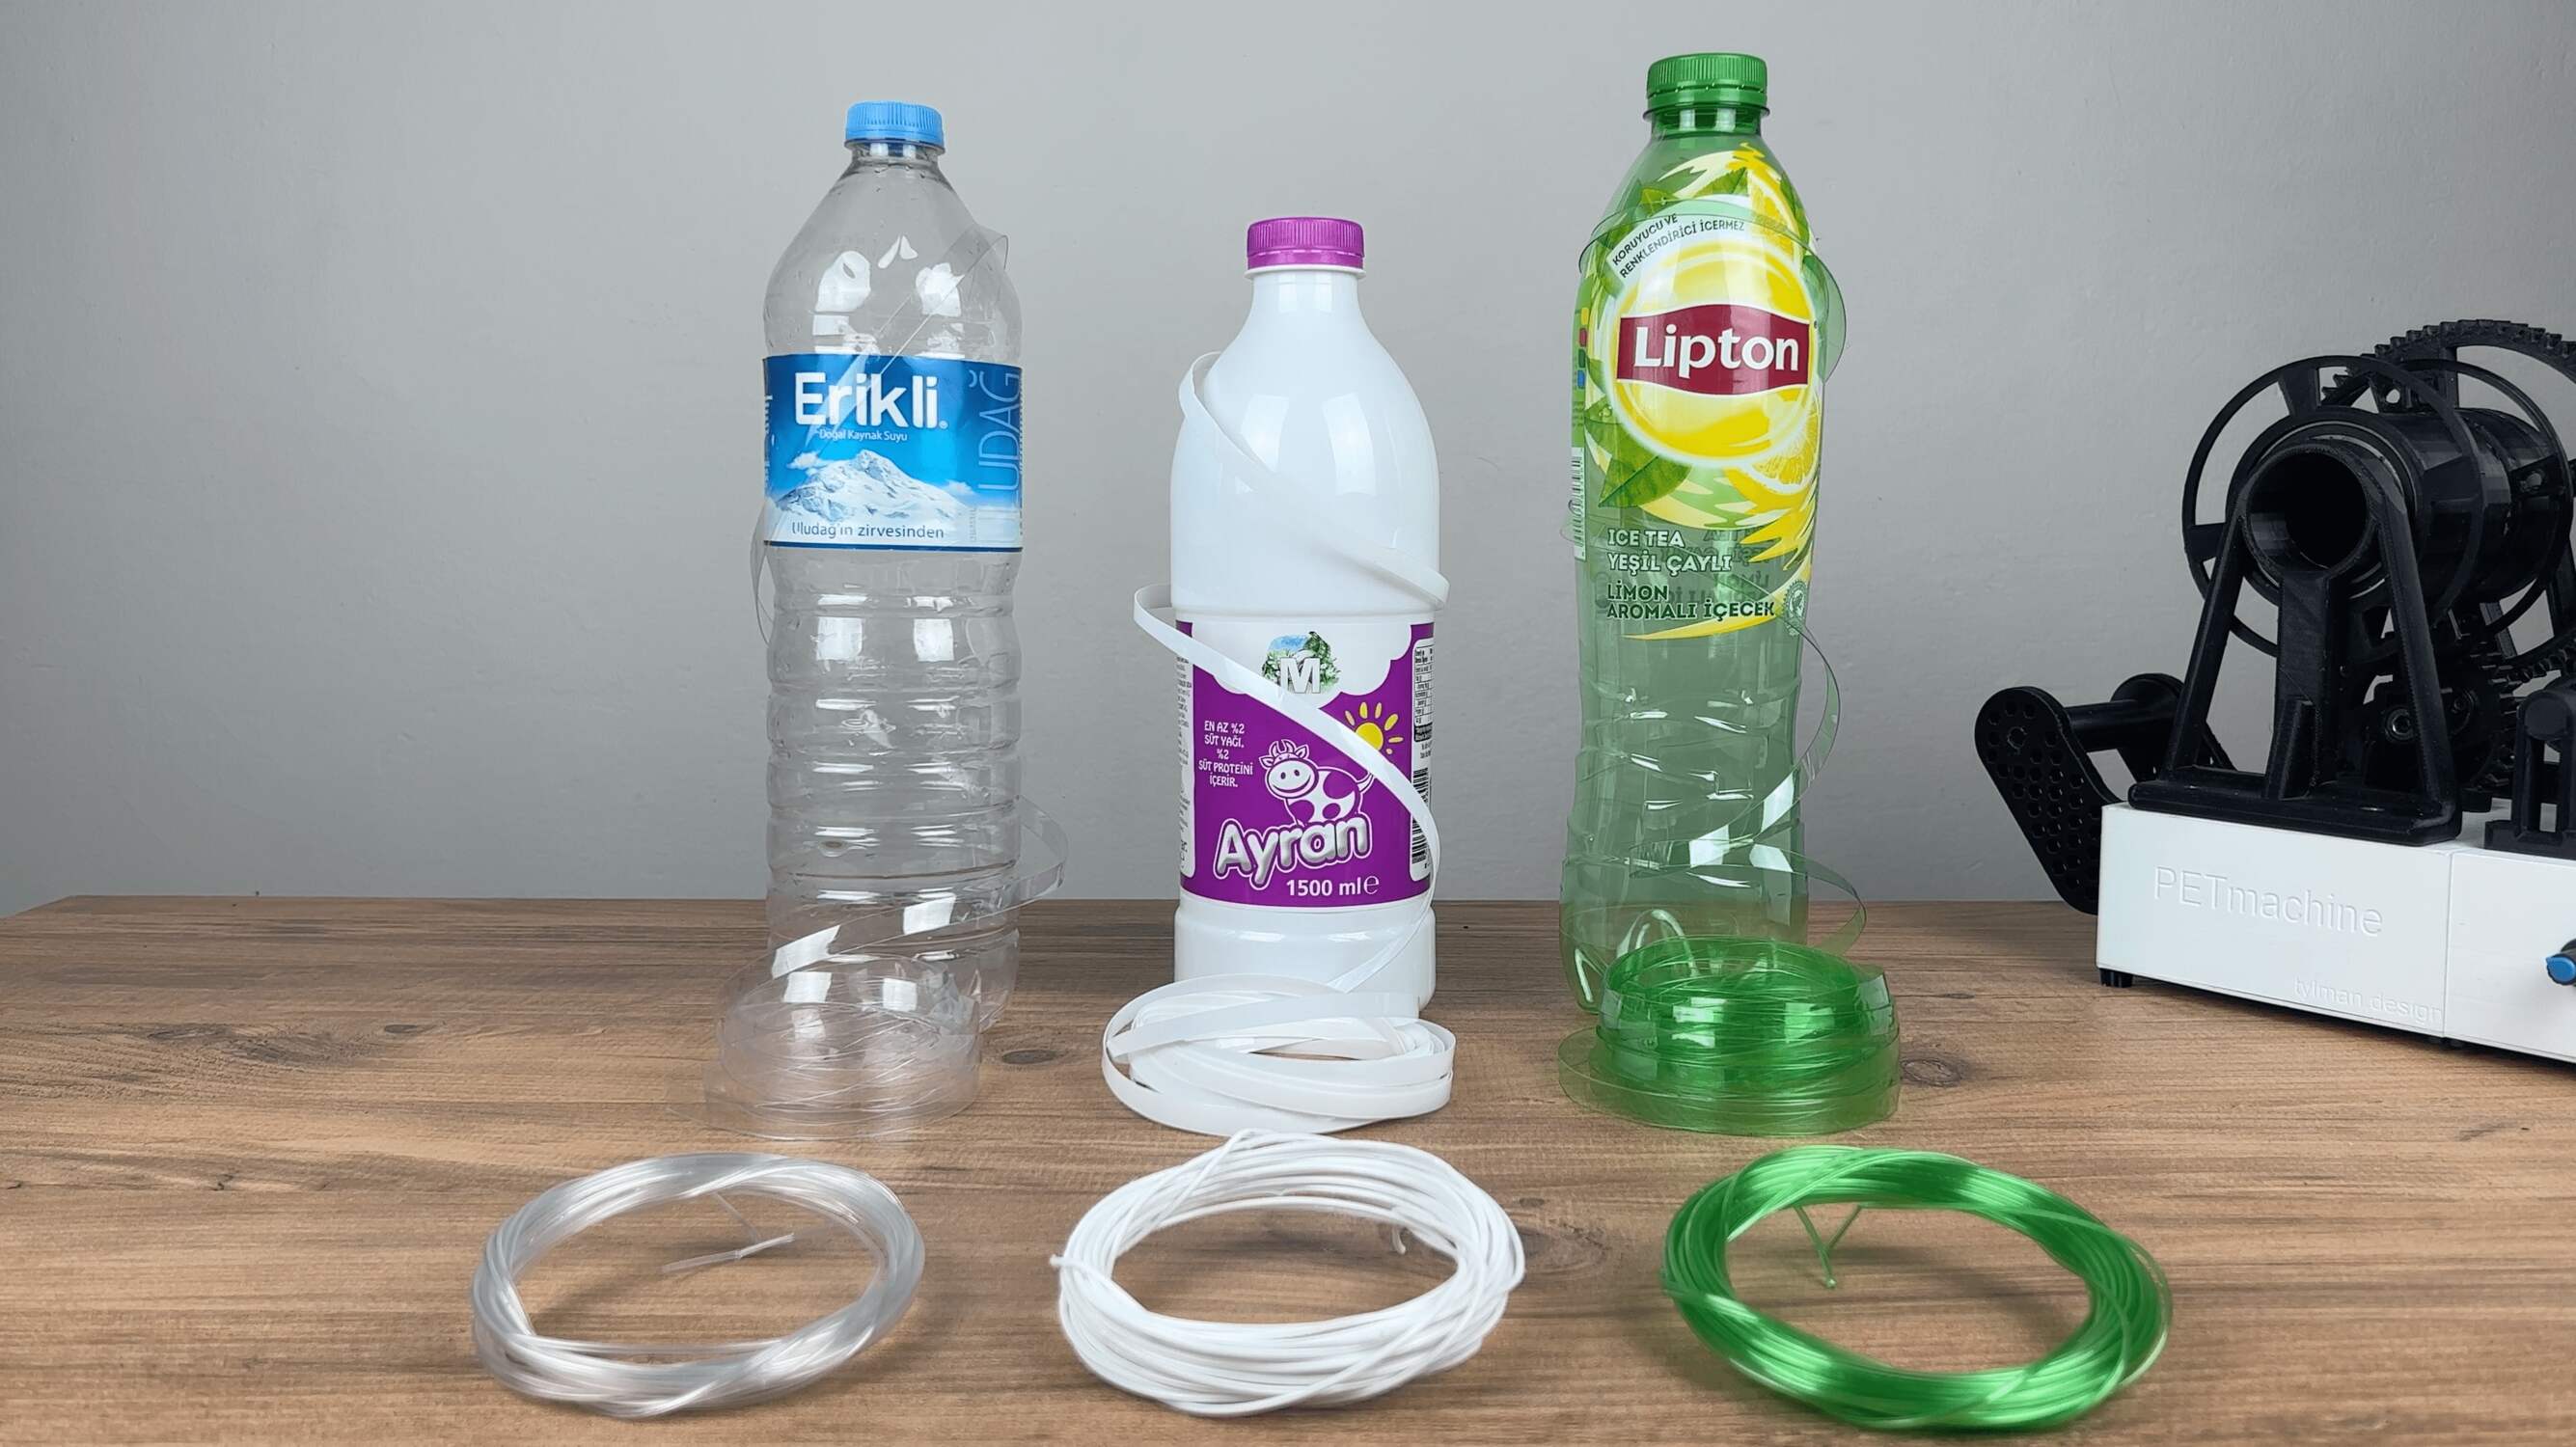
The first step in making 3D printer filament from plastic bottles is to collect an adequate supply of bottles. Look for plastic bottles made from PET (Polyethylene Terephthalate) or HDPE (High-Density Polyethylene), as these types of plastics are commonly used for filament production.
Start by collecting empty plastic bottles from your household waste or consider reaching out to friends and family to gather more bottles. You can also check local recycling centers or organize community clean-up events to acquire a larger quantity of bottles. Remember, the more bottles you collect, the more filament you can create!
When collecting plastic bottles, it’s crucial to ensure that they are clean and free from any contaminants. Rinse the bottles thoroughly with water and remove any labels or stickers. This will prevent any impurities from being introduced into the filament-making process, ensuring a high-quality end product.
If possible, try to sort the bottles by type of plastic (PET or HDPE) as different plastics have different melting points and properties. This separation will allow you to have more control over the filament’s characteristics when it comes to strength, flexibility, or color variation.
Remember, recycling is a great way to contribute to a cleaner environment and reduce plastic waste. By collecting and repurposing these plastic bottles, you are making a positive impact on the planet while creating a sustainable source of filament for your 3D printing projects.
Step 2: Sorting and Cleaning the Bottles
Once you have collected a sufficient number of plastic bottles for filament production, the next step is to sort and clean them to ensure the best quality filament. Sorting and cleaning will help eliminate any impurities that could affect the melting and extrusion process.
Start by sorting the bottles based on their plastic type. Look for the recycling symbols on the bottom of the bottles to identify whether they are made of PET (Polyethylene Terephthalate) or HDPE (High-Density Polyethylene). Separating the bottles by plastic type will allow for better control over the filament’s properties.
After sorting, it’s time to clean the bottles. Rinse them thoroughly with warm water to remove any residual contents or debris. Use a mild detergent or dish soap to scrub away any stubborn stains. Pay extra attention to the inside of the bottles, as they may have hidden residue or odor that needs to be removed.
If you come across bottles with labels or stickers that are difficult to remove, soak them in warm soapy water for a few minutes to loosen the adhesive. Scrub gently with a sponge or brush to remove any remaining residue.
Once the bottles are clean, it’s important to let them air dry completely before proceeding to the next steps. This will help ensure that no moisture is present when you start the melting process.
Sorting and cleaning the bottles may seem like an extra step, but it is crucial for producing high-quality filament. By taking the time to properly prepare the bottles, you will achieve better results and have a cleaner and more reliable source of plastic for your 3D printer filament.
Step 3: Cutting the Bottles into Small Pieces
Once you have sorted and cleaned the plastic bottles, it’s time to prepare them for the next stage of the filament-making process. This involves cutting the bottles into small pieces, making them easier to melt and extrude.
Start by removing the bottle caps and set them aside for recycling. Then, use a pair of scissors or a box cutter to cut off the bottom of each bottle. This will create an opening for the cutting process.
Now, carefully cut along the vertical length of the bottle, creating strips of plastic. Aim for strips that are approximately one inch wide. Repeat this process for all the bottles you have collected.
Next, take each strip of plastic and cut it into smaller pieces. The size of these pieces can vary, but ideally, they should be around half an inch to an inch long. The smaller the pieces, the easier and faster they will melt during the next step.
As you cut the plastic bottles, collect the small pieces in a clean, dry container. This will ensure that you have all the necessary raw material ready for the next step of the process.
It is worth noting that some individuals prefer to use shredders or specific cutting tools to ensure consistency in the size and shape of the plastic pieces. If you have access to such equipment, you can use it to streamline the cutting process.
By cutting the bottles into small pieces, you are preparing them for the melting step, where they will be transformed into filament. This step is essential for achieving a smooth and homogeneous melting process, ensuring the quality of the filament that will be created.
Step 4: Melting the Plastic Pieces
Now that you have prepared the plastic bottles by cutting them into small pieces, it’s time to melt the plastic in order to transform it into filament for your 3D printer. This step requires a heat source and careful control of temperature.
Firstly, ensure that you are working in a well-ventilated area. The melting process can release fumes, and it’s important to have good airflow to avoid inhaling any potentially harmful substances.
Next, set up your heat source. This can be a hot plate, electric stove, or a DIY heat source like a toaster oven modified for this purpose. Place a heat-resistant container, such as a metal or glass container, on the heat source.
Add the plastic pieces you previously cut into the container, making sure not to overfill it. The exact amount of plastic will depend on the size of your container and the desired quantity of filament. Experimentation and practice will help you determine the optimal amount for your specific setup.
Now, turn on the heat source and gradually increase the temperature. Different types of plastics have different melting points, so it’s important to know the specific melting point of the plastic bottles you are using. PET plastic typically melts around 250-260°C (482-500°F), while HDPE plastic melts at a lower temperature of around 160-170°C (320-338°F).
Monitor the temperature closely and ensure it stays within the appropriate range for the plastic being melted. A digital thermometer can be a helpful tool to accurately measure and control the temperature.
As the plastic pieces heat up, they will start to melt and form a molten mass. Stir the mixture gently with a heat-resistant utensil to help facilitate the melting process and ensure uniform heating. Take care not to create excessive air bubbles or introduce contaminants into the mixture.
Continue heating and stirring until all the plastic pieces have melted completely, resulting in a smooth and consistent molten plastic. At this point, you are ready to move on to the next step of the process, which is extruding the molten plastic into filament.
Step 5: Extruding the Melted Plastic
After successfully melting the plastic into a smooth and consistent molten state, the next step is to extrude the melted plastic into filament form. This process involves shaping the molten plastic into a thin and continuous thread that will be used as the 3D printer filament.
To extrude the plastic, you will need either an extrusion machine specifically designed for filament production or a DIY extruder that you have built. The extrusion machine or DIY extruder typically consists of a barrel, a screw conveyor, and a nozzle.
Start by feeding the molten plastic into the barrel of the extrusion machine or DIY extruder. Depending on the specific design, there may be a hopper or opening where you can introduce the plastic into the system. Gradually add the molten plastic while ensuring a steady and controlled feed rate.
Once the plastic is inside the barrel, the screw conveyor or other mechanism will help push the molten plastic forward. This forward movement aids in melting any remaining solid particles and achieving a smooth consistency.
As the plastic progresses through the extrusion machine, it will pass through a nozzle. The nozzle determines the diameter of the filament being produced. Most standard 3D printers use filament with a diameter of 1.75 mm or 2.85 mm, so make sure your nozzle matches the desired filament size.
The molten plastic will be forced through the nozzle, forming a continuous filament as it emerges. You can guide the newly formed filament onto a cooling rack or directly onto a spool for winding (which we’ll cover in the next step).
During the extrusion process, it’s essential to monitor the temperature and feeding rate to maintain a consistent flow and diameter of the filament. Adjustments may be necessary depending on the specific characteristics of the plastic being used and the desired properties of the filament.
Once the extrusion process is complete, you will have successfully transformed the melted plastic into filament form. Now it’s time to move on to the cooling and solidification stage to ensure that the filament maintains its shape and properties.
Step 6: Cooling and Solidifying the Filament
After extruding the molten plastic into filament form, the next crucial step is to cool and solidify the filament. This process is essential to ensure that the filament retains its shape and structural integrity for successful 3D printing.
As the newly extruded filament emerges from the nozzle, it will still be in a malleable, semi-soft state. It’s important to provide the necessary cooling to solidify the filament before winding it onto a spool.
There are a few methods you can employ for cooling the filament effectively:
- Fan Cooling: Position a fan or multiple fans near the extrusion nozzle to blow cool air directly onto the filament as it emerges. The airflow will facilitate rapid cooling and solidification.
- Water Cooling: Another option is to use a water cooling system. This involves placing the extruded filament in a water bath, which quickly lowers its temperature and solidifies it. Ensure that the water temperature is not too cold, as it may cause thermal shock or damage to the filament.
- Air Cooling Rack: If you have a cooling rack specifically designed for filament, you can guide the newly extruded filament onto the rack. The open design of the rack allows for natural air circulation, which aids in cooling and solidification.
Regardless of the cooling method you choose, it’s important to allow sufficient time for the filament to cool and solidify before handling. The exact cooling time will depend on factors such as filament diameter, ambient temperature, and cooling method used.
During the cooling process, keep an eye on the filament to ensure it maintains its shape and does not warp or deform. If you notice any irregularities, such as uneven cooling or excessive moisture, adjustments may be necessary to optimize the cooling conditions.
Once the filament has completely cooled and solidified, you are ready to move on to the final step – winding the filament onto a spool for storage and future use in your 3D printing projects.
Step 7: Winding the Filament onto a Spool
After successfully cooling and solidifying the filament, the final step in making 3D printer filament from plastic bottles is to wind the filament onto a spool for convenient storage and later use in your 3D printing projects.
Start by preparing an empty filament spool. This can be a commercially available spool or a DIY spool made from materials such as PVC pipe, wood, or even a 3D printed spool. Ensure that the spool has a central core with evenly spaced flanges to securely hold the filament.
Take the cooled and solidified filament and carefully guide it onto the spool, making sure it wraps evenly around the flanges. Ensure that there is no excessive tension or twisting, as this may lead to filament tangling or breakage during printing.
As you wind the filament onto the spool, it’s recommended to apply slight tension to keep the filament taut. This will help prevent loose loops or overlapping that could cause feeding issues in the 3D printer.
When nearing the end of the filament or the desired amount for the spool, leave a small section free to act as a leader or starter for the next printing session. This will make it easier to load the filament into the 3D printer when you are ready to start a new project.
Once the filament is securely wound onto the spool, you can use a zip tie, rubber band, or tape to secure the loose end and prevent unwinding during storage or transportation.
Label the spool with relevant information such as filament type, color, and diameter for easy identification. You may also want to note the date of production to keep track of the filament’s age.
Finally, store the spooled filament in a cool, dry place away from direct sunlight and moisture to maintain its optimal usability and prevent any damage or degradation.
With the filament now neatly spooled and ready for use in your 3D printer, you have successfully transformed plastic bottles into a sustainable and cost-effective source of filament. Now, it’s time to unleash your creativity and start bringing your 3D printing projects to life!
Conclusion
Congratulations! You have completed the process of making 3D printer filament from plastic bottles. By following the steps outlined in this guide, you have not only reduced plastic waste but also created a sustainable and cost-effective solution for obtaining filament for your 3D printing projects.
From collecting and cleaning plastic bottles to cutting them into small pieces, melting the plastic, extruding it into filament, and finally winding it onto a spool, each step plays a crucial role in the filament-making process. With careful attention to detail and proper execution, you have successfully transformed discarded plastic bottles into a valuable resource.
Remember to always work in a well-ventilated area and prioritize safety throughout the process. Be cautious of temperature control, ensure proper cooling and solidification, and handle the filament with care to prevent damage or tangling.
Now that you have your homemade filament ready, unleash your creativity and explore the endless possibilities of 3D printing. Whether you’re a hobbyist, an artist, or an engineer, the ability to create custom objects using your own filament opens up a whole new world of possibilities.
Continue to experiment, refine your techniques, and share your experiences with others. By sharing knowledge and encouraging responsible practices, we can all contribute to a more sustainable and eco-friendly approach to 3D printing.
So don’t hesitate – go ahead and start printing! Turn your ideas into reality and let your imagination soar, all while leaving a positive impact on the environment. Happy 3D printing!