Introduction
When it comes to securing your Windows computer, one of the simplest and most effective measures you can take is to lock your screen. Locking your computer ensures that no unauthorized access can be made while you’re away from your desk, protecting your personal information and preventing any potential misuse. Whether you’re stepping away for a quick break or leaving your workspace for an extended period, knowing how to lock Windows can give you peace of mind.
Locking your Windows computer is a straightforward process that can be done using various methods, including keyboard shortcuts, the start menu, and even the command prompt. Each method offers its own convenience and versatility, allowing you to choose the approach that best fits your workflow. In this article, we’ll guide you through different ways to lock your Windows computer, so you can easily secure your system whenever you need to step away.
By utilizing these locking methods, you can ensure that your computer remains inaccessible to others, protecting your sensitive files, personal data, and privacy. Whether you’re at home, in the office, or anywhere else, mastering the art of locking Windows is essential for maintaining a secure computing environment.
In the following sections, we’ll walk you through step-by-step instructions for each locking method, providing clear and easy-to-follow directions. Whether you’re a beginner or an experienced Windows user, you’ll find the information you need to keep your computer safe and secure. So, let’s dive in and explore the various ways to lock your Windows computer.
Step 1: Locking Windows using the Keyboard Shortcut
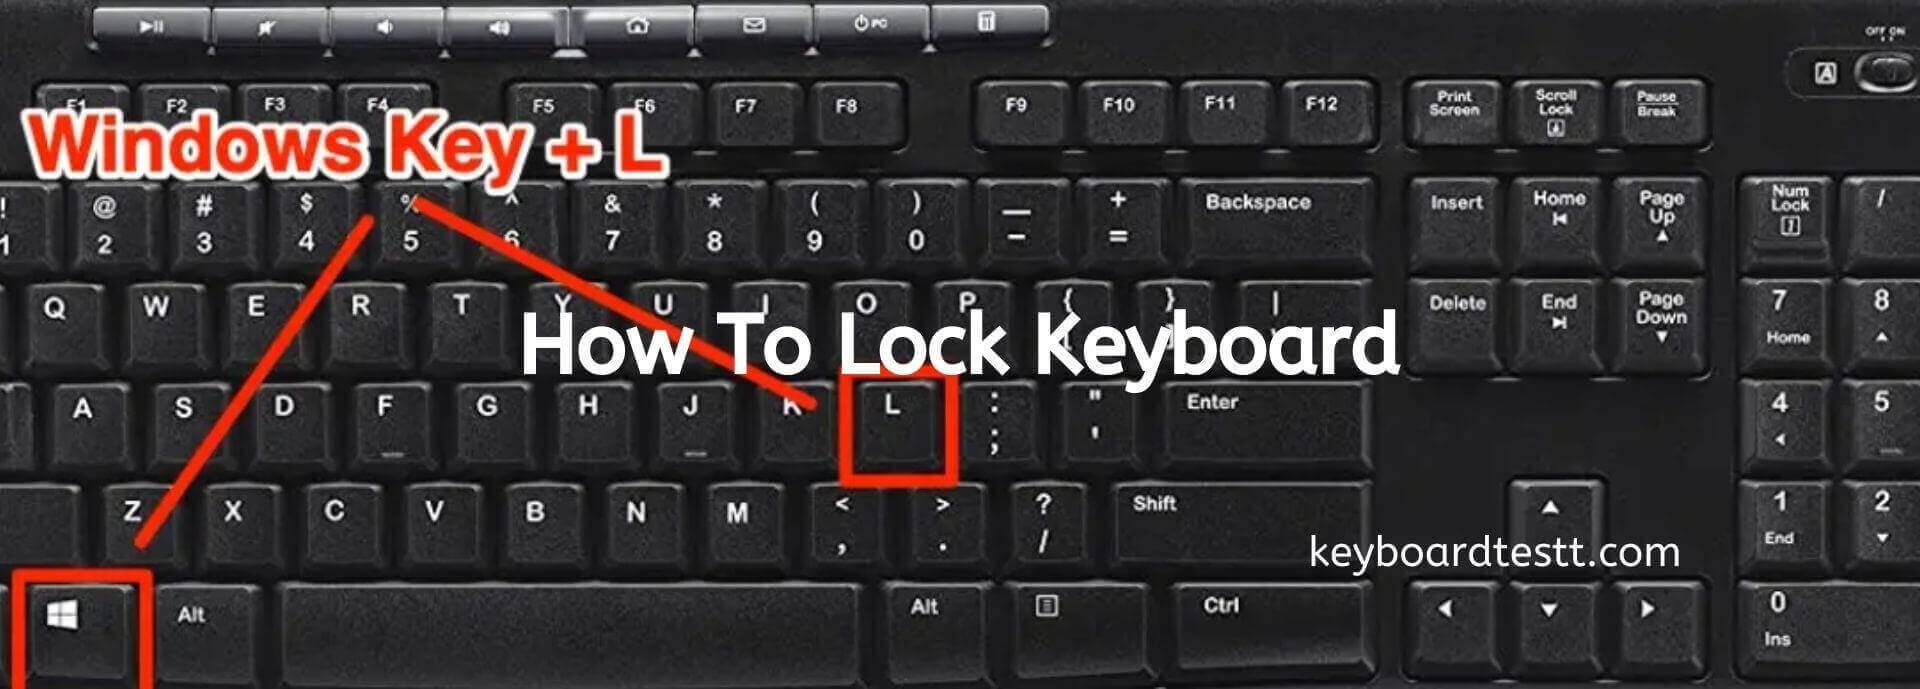
One of the quickest and easiest ways to lock your Windows computer is by using the keyboard shortcut. This method works on most versions of Windows, making it a convenient option for users. To lock your computer using the keyboard shortcut, simply press the Windows key and the L key simultaneously.
By pressing this key combination, your screen will instantly lock, requiring you to enter your password or PIN to regain access. This ensures that nobody can access your computer without the proper credentials while you’re away.
Using the keyboard shortcut offers several advantages. Firstly, it is a universal method that works regardless of which program or application you are currently using. This means that you can quickly lock your computer from any screen, whether you’re working on a document, browsing the internet, or watching a video.
Additionally, the keyboard shortcut is a time-efficient method. Instead of manually navigating through menus or clicking buttons, you can lock your screen with a simple key combination, saving you valuable time and effort.
It’s worth noting that using the keyboard shortcut to lock your computer is not only useful when stepping away temporarily. This method is also beneficial when you want to lock your computer before leaving it unattended for an extended period. By doing so, you can ensure that your system remains secure and protected from unauthorized access.
In summary, using the keyboard shortcut is a fast and efficient way to lock your Windows computer. With just a simple key combination, you can instantly secure your screen, safeguarding your personal information and ensuring the privacy of your data. So, next time you need to step away from your computer, remember to use the Windows key and the L key to lock your screen quickly and effectively.
Step 2: Locking Windows using the Start Menu
Another method to lock your Windows computer is through the Start menu. This method is accessible and straightforward, making it ideal for users who prefer using the mouse or touchpad. To lock your computer using the Start menu, follow these simple steps:
- Click on the Start menu button in the bottom-left corner of your screen.
- From the Start menu, click on your User profile picture or the user account name.
- Click on the Lock option from the dropdown menu.
Once you click on the Lock option, your Windows computer will instantly lock, requiring you to enter your password or PIN to regain access. This ensures that your screen and files remain secure from unauthorized access while you’re away.
Locking your computer through the Start menu offers convenience and accessibility. It provides an easy-to-find option for locking your screen, eliminating the need to remember complex keyboard shortcuts or navigate through multiple menus. With just a few clicks, you can quickly and effectively lock your Windows computer.
The Start menu method is particularly useful for touch-enabled devices, such as tablets or convertibles, where using the keyboard shortcut may not be as practical. By utilizing the intuitive user interface of the Start menu, you can easily lock your screen with a few taps or clicks, ensuring the safety of your data.
It’s important to note that the Lock option in the Start menu may vary slightly depending on the version of Windows you are using. However, the general principle remains the same – clicking on your user profile picture or user account name and selecting the Lock option will lock your computer.
To sum it up, using the Start menu to lock your Windows computer offers a user-friendly and accessible method. With a few simple clicks, you can secure your screen and protect your data from unauthorized access. Whether you’re using a mouse, touchpad, or touch-enabled device, the Start menu provides a convenient way to lock your Windows computer.
Step 3: Locking Windows using the Ctrl + Alt + Del Shortcut
Locking your Windows computer using the Ctrl + Alt + Del shortcut is another efficient method that provides an added layer of security. This shortcut has been a part of Windows for many years and is widely known among users. To lock your computer using the Ctrl + Alt + Del shortcut, follow these simple steps:
- Press the Ctrl, Alt, and Del keys simultaneously on your keyboard.
- A menu will appear on the screen. Click on the Lock option.
By pressing the Ctrl + Alt + Del keys, you invoke the secure attention sequence in Windows, ensuring that your computer responds only to legitimate inputs. This helps protect against certain types of attacks and adds an extra layer of security to the locking process.
Using the Ctrl + Alt + Del shortcut to lock your Windows computer offers several advantages. Firstly, it provides a dedicated keystroke combination that is less likely to be pressed accidentally, minimizing the risk of unintentional locking. Additionally, the Ctrl + Alt + Del shortcut works consistently across different versions of Windows, making it a reliable method irrespective of the operating system you’re using.
Another benefit of the Ctrl + Alt + Del shortcut is that it can be used as a safeguard in situations where your computer becomes unresponsive. It acts as a fail-safe method to regain control of your system if you encounter any issues or if an application freezes. By pressing the Ctrl + Alt + Del keys, you can access the lock option and secure your computer even in challenging scenarios.
In summary, the Ctrl + Alt + Del shortcut provides a secure and reliable way to lock your Windows computer. By using this well-known combination, you can quickly invoke the lock option and ensure the privacy and security of your device. Whether you use it as a precautionary measure or as a troubleshooting tool, the Ctrl + Alt + Del shortcut offers an efficient method to lock your Windows computer.
Step 4: Locking Windows using the Windows + L Shortcut
Locking your Windows computer using the Windows + L shortcut is a quick and convenient method that allows you to secure your screen with just a few keystrokes. This shortcut is specifically designed for Windows and is supported on all versions of the operating system. To lock your computer using the Windows + L shortcut, follow these simple steps:
- Press the Windows key and the L key simultaneously on your keyboard.
By pressing the Windows + L keys, you immediately lock your screen, preventing unauthorized access and ensuring the privacy of your data. This shortcut is particularly useful when you need to step away from your computer quickly or want to secure your Windows computer with minimal effort.
Locking your computer using the Windows + L shortcut offers several benefits. Firstly, it is easy to remember and requires only two keys to be pressed simultaneously, making it a convenient option for users. Additionally, the Windows + L shortcut works consistently across all versions of Windows, ensuring compatibility and effectiveness.
Another advantage of the Windows + L shortcut is that it instantly locks your screen without the need for any additional steps or menus. This means that you can quickly secure your computer within seconds, minimizing the chances of anyone accessing your files or accounts while you’re away from your desk.
It’s worth noting that the Windows + L shortcut is a preferred method for many users due to its efficiency and simplicity. Whether you’re in a hurry or want a reliable way to secure your computer, using this shortcut offers a convenient and effective solution.
In summary, the Windows + L shortcut is a powerful tool to lock your Windows computer. By pressing these two keys simultaneously, you can quickly and effortlessly secure your screen, protecting your personal information and ensuring the privacy of your data. Whether you’re at home, in the office, or on the go, the Windows + L shortcut provides a seamless method to lock your Windows computer with ease.
Step 5: Locking Windows using the Command Prompt
Locking your Windows computer using the Command Prompt is a lesser-known method but offers a powerful and efficient way to secure your screen. By using a simple command, you can lock your computer and prevent unauthorized access. To lock your computer using the Command Prompt, follow these steps:
- Open the Command Prompt by typing “cmd” in the Start menu search bar and selecting the Command Prompt app.
- In the Command Prompt window, type the command
tsdisconand press Enter.
By executing the tsdiscon command, your Windows computer will be locked, and you will be returned to the login screen. This ensures that only authorized users can access your computer by entering the required credentials.
Using the Command Prompt to lock your Windows computer provides several advantages. Firstly, it offers a versatile method that works consistently across various versions of Windows, making it an effective option for users. Additionally, using the Command Prompt allows you to lock your computer remotely if you’re connected to it through a remote desktop session.
Moreover, locking your computer using the Command Prompt can be useful in scenarios where other methods are not accessible or feasible. For example, if your screen is frozen or unresponsive, you can still use the Command Prompt to lock your computer and ensure its security.
It’s important to note that locking your computer using the Command Prompt requires administrative privileges. Make sure that you have the necessary permissions or run the Command Prompt as an administrator to execute the tsdiscon command successfully.
In summary, locking your Windows computer using the Command Prompt provides a powerful and versatile method to secure your screen. By executing a simple command, you can effectively lock your computer and prevent unauthorized access. Whether you need to lock your computer remotely or encounter a situation where other methods are not viable, using the Command Prompt offers a reliable and efficient solution.
Step 6: Locking Windows using the Taskbar Context Menu
Locking your Windows computer using the Taskbar context menu is a convenient and straightforward method that provides quick access to the lock option. This method allows you to lock your screen with just a few clicks, making it ideal for users who prefer using the mouse or touchpad. To lock your computer using the Taskbar context menu, follow these steps:
- Right-click on an empty area of the Taskbar (the bar at the bottom of your screen).
- In the context menu that appears, click on the Lock option.
By selecting the Lock option from the Taskbar context menu, your Windows computer will instantly lock, requiring you to enter your password or PIN to regain access. This ensures the security of your screen and prevents unauthorized access while you’re away from your desk.
Using the Taskbar context menu to lock your Windows computer has several advantages. Firstly, it offers a visually accessible option that is easy to find and locate on the Taskbar. This makes it a convenient method for users who prefer using the mouse or touchpad for navigation. Additionally, the Taskbar is readily available across all versions of Windows, ensuring compatibility and ease of use.
Another benefit of locking your computer using the Taskbar context menu is that it provides a quick and hassle-free approach. With just a couple of right-clicks, you can easily secure your screen, saving you time and effort compared to other methods that may involve multiple steps or keystrokes.
It’s worth noting that the Taskbar context menu may vary slightly depending on your Windows version or any customization you have made to your Taskbar settings. However, the Lock option is generally available in the context menu, making it easily accessible for locking your computer.
In summary, using the Taskbar context menu to lock your Windows computer offers a convenient and user-friendly method. With just a couple of right-clicks, you can quickly secure your screen and prevent unauthorized access. Whether you prefer using the mouse or touchpad, the Taskbar context menu provides an intuitive and accessible way to lock your Windows computer.
Step 7: Locking Windows using the Power User Menu
Locking your Windows computer using the Power User Menu is a simple and efficient method that provides a range of system management options, including the ability to lock your screen. This method is particularly useful for users who prefer using the keyboard over the mouse or touchpad. To lock your computer using the Power User Menu, follow these steps:
- Press the Windows key and the X key simultaneously on your keyboard.
- In the Power User Menu that appears, use the arrow keys to navigate to the Lock option.
- Press the Enter key to lock your Windows computer.
By selecting the Lock option from the Power User Menu, your screen will be locked, ensuring the privacy and security of your computer. To regain access, you will need to enter your password or PIN.
Using the Power User Menu to lock your Windows computer offers several advantages. Firstly, it is a quick and efficient method that can be accessed directly from your keyboard. This makes it ideal for users who are comfortable navigating through menus and options using their keyboard shortcuts.
Another advantage of the Power User Menu is that it provides a centralized location for various system management tasks, including locking your screen. This reduces the need to navigate through multiple menus or interfaces, as all the essential options are conveniently grouped in one menu.
It’s worth noting that the specific contents and layout of the Power User Menu may vary slightly depending on your Windows version. However, the Lock option is generally available and easily accessible with the arrow keys and the Enter key.
In summary, utilizing the Power User Menu to lock your Windows computer offers a quick and efficient method that can be accessed directly from your keyboard. By selecting the Lock option from the menu, you can easily secure your screen and protect your computer from unauthorized access. Whether you prefer navigating through menus using keyboard shortcuts or simply want a centralized location for system management tasks, the Power User Menu provides a convenient way to lock your Windows computer.
Step 8: Locking Windows using the Run Dialog Box
Locking your Windows computer using the Run dialog box is a lesser-known method that offers a quick and direct way to secure your screen. The Run dialog box allows you to execute various commands, and in this case, it provides a command to lock your computer. To lock your computer using the Run dialog box, follow these steps:
- Press the Windows key and the R key simultaneously on your keyboard. This will open the Run dialog box.
- In the Run dialog box, type
cmd.exe /c "rundll32.exe user32.dll,LockWorkStation"and press Enter.
By executing this command, your Windows computer will be locked, and you will be returned to the login screen. This ensures that only authorized users can access your computer by entering the required credentials.
Using the Run dialog box to lock your Windows computer offers several advantages. Firstly, it provides a direct and efficient method that can be accessed by pressing a few keys on your keyboard. This makes it a convenient option for users who are comfortable using the Run dialog box or prefer using keyboard shortcuts.
Another advantage of using the Run dialog box is that it allows you to execute various commands without navigating through multiple menus or interfaces. By typing the specific command to lock your computer, you can quickly secure your screen and protect your privacy.
It’s important to note that it may be necessary to run the Run dialog box as an administrator if you encounter any issues executing the lock command. This ensures that you have the necessary permissions to perform the operation successfully.
In summary, utilizing the Run dialog box to lock your Windows computer provides a direct and efficient method that can be accessed by keyboard shortcuts. By executing the specified command, you can quickly secure your screen and protect your computer from unauthorized access. Whether you prefer using the Run dialog box or want a quick way to execute commands, this method offers a convenient option to lock your Windows computer.
Conclusion
Locking your Windows computer is a crucial step in ensuring the security and privacy of your personal information. By utilizing various methods such as keyboard shortcuts, the Start menu, the Ctrl + Alt + Del shortcut, the Windows + L shortcut, the Command Prompt, the Taskbar context menu, the Power User Menu, and the Run dialog box, you can easily and effectively lock your screen to prevent unauthorized access.
Each method offers its own convenience and flexibility, allowing you to choose the approach that suits your preferences and workflow. Whether you prefer using keyboard shortcuts for quick access, navigating through menus, or executing commands, there is a locking method to cater to your needs.
Locking your computer not only protects your personal information but also ensures that your system remains secure and private, even when you’re away from your desk. It is a simple but essential security measure that should become a habit for all Windows users.
In this article, we have explored various methods to lock your Windows computer, providing step-by-step instructions for each method. Whether you use the keyboard shortcut, the Start menu, the Ctrl + Alt + Del shortcut, the Windows + L shortcut, the Command Prompt, the Taskbar context menu, the Power User Menu, or the Run dialog box, you now have the knowledge to easily secure your screen at any time.
Remember, locking your computer should be a regular practice, whether you’re stepping away for a brief moment or leaving your workspace for an extended period. By implementing these locking methods, you can protect your personal data, maintain privacy, and ensure the security of your Windows computer.
So, the next time you need to step away, take a moment to lock your Windows computer using the method that suits you best, and have peace of mind knowing that your valuable information is safe and secure.