Introduction
Welcome to this guide on how to link tasks in Asana. Asana is a powerful project management tool that helps individuals and teams stay organized and collaborate effectively. One of the key features of Asana is the ability to link tasks together, allowing you to create dependencies and streamline your workflow.
In today’s fast-paced work environment, managing multiple tasks and keeping track of their relationships can be a challenge. When it comes to complex projects, it’s crucial to establish connections between tasks, so you can prioritize and ensure everything progresses smoothly.
Linking tasks in Asana provides a visual representation of these relationships, making it easier for you to understand the dependencies and plan your work accordingly. By linking tasks, you can create a clear structure, define the order in which tasks should be completed, and ensure that project milestones are reached on time.
This guide will walk you through the process of linking tasks in Asana, helping you master this important feature and improve your project management skills. Whether you’re a seasoned Asana user or new to the platform, this guide will provide you with the knowledge and steps needed to link tasks effectively.
So, let’s dive in and discover how you can make the most out of Asana’s task linking feature!
What is Asana?
Asana is a popular web-based project management tool that helps individuals and teams manage their workflows, tasks, and projects with ease. It was founded in 2008 by Dustin Moskovitz and Justin Rosenstein, two former Facebook employees who wanted to create a better way for teams to collaborate and stay organized.
At its core, Asana is designed to streamline communication, eliminate guesswork, and provide a centralized platform for tracking progress and managing tasks. It offers a wide range of features and capabilities that empower teams to work more efficiently and effectively, regardless of their size or industry.
With Asana, you can create projects, assign tasks to team members, set due dates, attach files, add comments, and track progress in real-time. You can organize tasks into sections, create subtasks, and establish dependencies between tasks to ensure that everyone knows what needs to be done and when.
Asana offers a simple and intuitive user interface, making it easy for both individuals and teams to get started quickly. It provides various views, such as list view, board view, and calendar view, giving you the flexibility to choose the best way to visualize and manage your tasks.
Moreover, Asana integrates seamlessly with other popular tools and applications, allowing you to centralize your work and streamline your workflows. Whether you use Google Drive, Slack, Dropbox, or more, Asana offers integrations that enhance your productivity and collaboration.
Asana also provides robust reporting and analytics features, enabling you to track team performance, monitor project progress, and identify any bottlenecks or issues that need to be addressed. These insights help you make data-driven decisions and optimize your workflows for better results.
Overall, Asana is a versatile project management tool that empowers teams to stay organized, collaborate effectively, and achieve their goals. Whether you’re working on a simple personal project or managing a large-scale project with multiple stakeholders, Asana provides the tools and features you need to succeed.
Why should you link tasks in Asana?
Linking tasks in Asana offers several benefits that can greatly enhance your project management and productivity. Let’s explore why you should take advantage of this feature:
1. Establish task dependencies: Linking tasks allows you to establish dependencies between them, indicating that one task cannot be started or completed until another task is finished. This ensures that tasks are completed in the correct order, preventing any delays or bottlenecks in your project.
2. Visualize task relationships: When tasks are linked, Asana visually represents the connections, enabling you to see the relationships between tasks at a glance. This helps you understand the project’s overall structure and how different tasks are interconnected.
3. Prioritize your work: Linking tasks helps you prioritize your work effectively. By identifying the tasks that are dependent on others, you can focus on completing the tasks that need to be done first, ensuring a smooth workflow and efficient project progression.
4. Improve project planning: Task linking allows you to plan your projects more effectively. You can map out the tasks in sequential order, identifying any critical path or potential roadblocks. This enables you to allocate resources and manage timelines more efficiently.
5. Enhance team collaboration: When tasks are linked in Asana, it promotes better collaboration among team members. Everyone involved in the project can easily see the task dependencies and understand how their work fits into the broader context. This fosters better communication and coordination within the team.
6. Track progress and milestones: Linked tasks provide a clear roadmap for achieving project milestones. By tracking the completion of each task, you can monitor the overall progress and identify any delays or issues that need to be addressed promptly.
7. Streamline reporting and updates: When tasks are linked, it becomes easier to provide updates and reports on project status. Asana’s reporting features can showcase the progress of linked tasks, giving stakeholders a comprehensive overview of the project’s advancement.
By utilizing the task linking feature in Asana, you can create a more structured and efficient workflow, improve collaboration, and ensure project success. With these benefits in mind, let’s move on to the next section to explore how you can link tasks in Asana.
How to link tasks in Asana
Linking tasks in Asana is a straightforward process that can be done in just a few simple steps. Follow the steps below to start linking tasks in Asana:
Step 1: Open the task you want to link
To begin, open the task in Asana that you want to link to another task. You can do this by navigating to the project where the task is located and clicking on the task’s title.
Step 2: Click on the “Add Task” button
Once you’re inside the task, look for the toolbar located at the top of the task’s details. Click on the “Add Task” button in the toolbar. This will open up a search field where you can search for the task you want to link.
Step 3: Search for and select the task you want to link
In the search field, start typing the name of the task you want to link. Asana will provide suggestions as you type. Select the appropriate task from the suggestions to link it to your current task.
Step 4: Confirm the link
After selecting the task you want to link, Asana will display a preview of the link. Review the link to ensure it is correct. If everything looks good, click on the “Link” button to confirm the link between the tasks.
Step 5: View the linked tasks
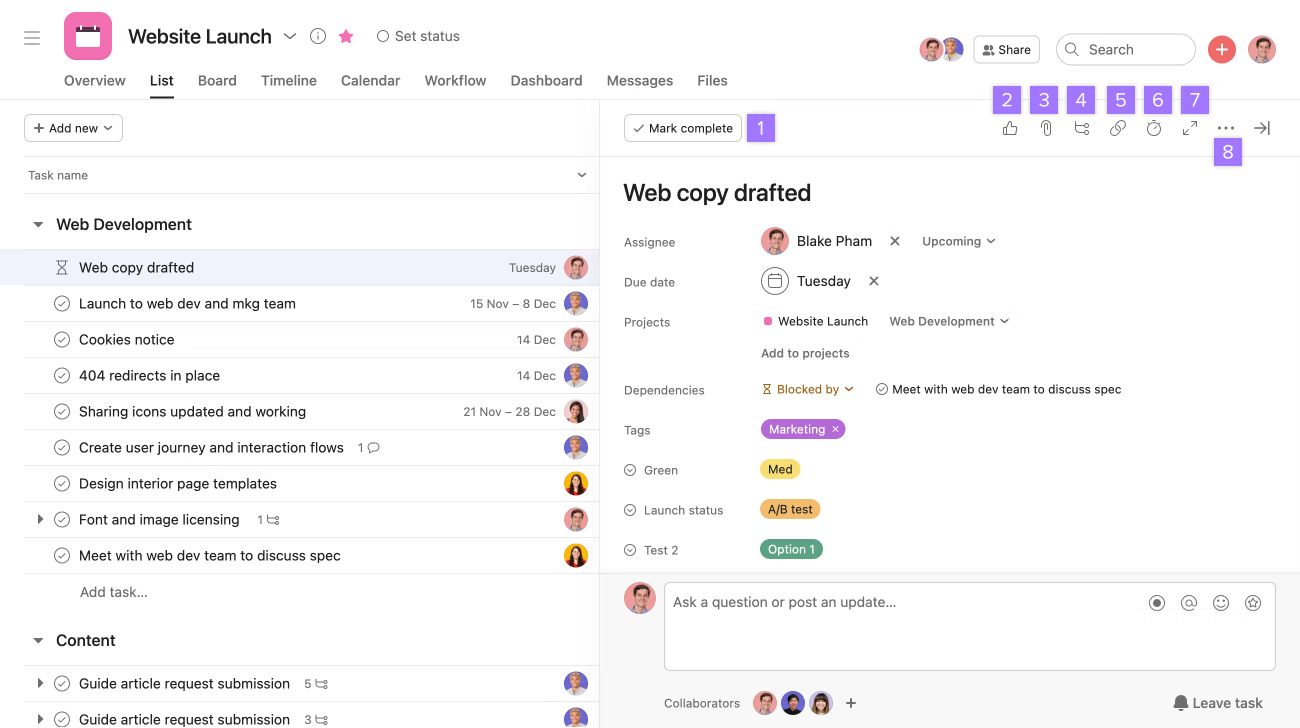
Once the tasks are linked, you will see the connection between them in the task’s details. You can view the linked tasks by scrolling down in the task’s details. Asana will display a list of linked tasks, allowing you to easily access and navigate between them.
Now that you know how to link tasks in Asana, you can start creating dependencies and improving your project management. Keep in mind that you can link multiple tasks to one task and vice versa, creating a network of connected tasks that represent your project’s workflow.
It’s worth noting that task linking is a dynamic feature, meaning that any updates made to the linked tasks will be reflected in real-time. If a linked task is marked as complete or its due date changes, Asana will automatically update the information in the linked task’s details.
By leveraging the task linking feature in Asana, you can keep your project on track, ensure tasks are completed in the correct order, and foster better collaboration within your team.
Step 1: Open the task you want to link
The first step in linking tasks in Asana is to open the task that you want to establish a connection with another task. Here’s how you can do it:
1. Launch Asana and navigate to the project that contains the task you want to link. You can do this by selecting the project from your project list or by using the search bar at the top of the Asana interface.
2. Once you are in the project, locate the specific task that you want to link. You can browse through the list of tasks or use the search function within the project to quickly find the task you need.
3. Click on the title of the task to open it. This will take you to the task’s details and allow you to make any necessary changes or additions.
Opening the task is essential before linking it as it ensures that you have access to all the relevant information and can view its details and progress. By clicking on the task’s title, you will be directed to a dedicated page where you can see its description, due date, assignee, and other relevant details.
Additionally, opening the task also gives you the opportunity to review any comments, attachments, or subtasks that are associated with it. This helps you make informed decisions when linking tasks and ensures that you have a clear understanding of the task’s context.
Remember, to link tasks effectively, it’s crucial to have a comprehensive understanding of the tasks involved and their relationships within the project. Opening the task provides you with the necessary information to establish accurate and meaningful connections.
Once you have followed this first step and opened the task you want to link, you’re ready to proceed to the next step in the process of linking tasks in Asana.
Step 2: Click on the “Add Task” button
In order to link tasks in Asana, the next step is to click on the “Add Task” button. Here’s a guide on how to do it:
1. Once you have opened the task you want to link, locate the toolbar at the top of the task’s details. This toolbar contains various options and buttons for task management.
2. Look for the “Add Task” button in the toolbar. It is usually represented by a plus sign or an icon that resembles a task or a list.
3. Click on the “Add Task” button. This action will open up a search field or a dropdown menu, depending on your Asana interface and settings.
Clicking on the “Add Task” button is a crucial step in the process of linking tasks as it allows you to search for and select the task that you want to establish a link with. It opens up options for connecting tasks and creating a relationship between them.
By clicking on the “Add Task” button, Asana provides you with a streamlined way to find and link tasks without the need to leave the current task’s details page or navigate to another part of the interface. It simplifies the process and keeps you focused on the task at hand.
The “Add Task” button is designed to enhance your productivity and make the task linking process more efficient. It saves you time and effort by offering a seamless way to search, select, and establish connections between tasks within the same project or across different projects.
It’s important to note that the location and appearance of the “Add Task” button may vary slightly based on your Asana interface configuration. However, Asana typically ensures that the button is easily accessible and visible so that you can quickly initiate the task linking process.
Now that you know how to click on the “Add Task” button, you’re ready to proceed to the next step, where you can search for and select the task you want to link in Asana.
Step 3: Search for and select the task you want to link
Once you have clicked on the “Add Task” button in Asana, the next step in linking tasks is to search for and select the task that you want to establish a link with. Follow these steps to search for and select the task:
1. After clicking on the “Add Task” button, a search field or a dropdown menu will appear, depending on your Asana interface. This is where you can search for the task you want to link.
2. Start typing the name or a keyword related to the task you want to link. As you type, Asana will provide suggestions based on the text you enter, narrowing down the search results to help you find the task more easily.
3. Scroll through the suggestions or continue typing to refine the search results until you locate the task you want to link. The search results will update in real-time to match your input.
4. Once you find the task you want to link, click on it to select it. Asana will display a preview of the link before confirming the link between the tasks.
Searching for and selecting the task you want to link is an important step in establishing the connection between tasks. It allows you to identify the specific task that needs to be linked and ensures accuracy in creating task dependencies or relationships within your project.
Asana’s search functionality is designed to help you find the task quickly and efficiently. By providing suggestions as you type, it saves you time and effort in locating the desired task from your project database.
Furthermore, Asana’s search capabilities are quite robust, allowing you to search not only by task name but also by relevant keywords. This ensures that you can find tasks even if you don’t remember the exact task name or are looking for specific criteria related to the task.
When selecting the task from the search results, Asana provides a preview of the link, giving you a final opportunity to ensure that you have chosen the correct task. This preview allows you to confirm that you are linking the intended tasks and helps prevent any unintended or incorrect task connections.
Once you have successfully searched for and selected the task you want to link, you’re ready to proceed to the next step, where you can confirm the link between the tasks in Asana.
Step 4: Confirm the link
After searching for and selecting the task you want to link in Asana, the next step is to confirm the link between the tasks. Here’s a guide on how to do it:
1. Once you have selected the task you want to link, Asana will display a preview of the link in the task’s details section. Take a moment to review the link and ensure that it is the correct task you want to establish a connection with.
2. Check that the task name and any other relevant details are accurately displayed in the link preview. Confirm that this is the task you want to link to your current task.
3. If everything looks correct, click on the “Link” or “Confirm” button to establish the link between the tasks. Asana will then create the connection and update the task’s details accordingly.
Confirming the link is a crucial step as it finalizes the connection between the two tasks. It ensures that tasks are properly linked and allows you to move forward with your project management activities, taking into account the established task relationships.
Asana provides a preview of the link in order to give you a final opportunity to double-check and validate the connection. This preview ensures that you are linking the intended tasks and helps prevent any mistakes or incorrect task associations.
Taking the time to review the link preview before confirming the link is important for maintaining accuracy and avoiding any potential errors in your project management. It ensures that you are establishing the desired connection and that the tasks are correctly linked according to your project requirements.
Once you have confirmed the link, Asana will create the connection and update the task’s details to reflect the established relationship. You will be able to see the linked tasks within the task’s details section, allowing for easy access and navigation between them.
Now that you have confirmed the link between the tasks, you’re ready to proceed to the final step, where you can view the linked tasks and take advantage of their connections within Asana.
Step 5: View the linked tasks
After confirming the link between tasks in Asana, the final step is to view the linked tasks. Here’s how you can do it:
1. Once the link between tasks is established, scroll down within the task’s details page. Asana will display a list of linked tasks, providing a visual representation of the connected tasks.
2. Take a moment to review the linked tasks and their relevant details. You can see the task names, due dates, assignees, and any other pertinent information associated with each linked task.
3. To access a linked task, simply click on its name or the relevant details. Asana will take you directly to the linked task, allowing you to view its details, make updates, or collaborate with team members as needed.
Viewing the linked tasks in Asana is essential for understanding the relationships between the tasks and effectively managing your projects. It allows you to have a comprehensive view of the project’s structure and track progress easily.
By scrolling down within the task’s details page, Asana provides a clear list of linked tasks. This visual representation helps you easily identify the tasks that are connected to your current task and see their order or sequence within the project.
Reviewing the linked tasks allows you to assess their individual status, due dates, and assignees, ensuring that everyone involved in the project is aware of their responsibilities and the dependencies between tasks.
Moreover, viewing the linked tasks enables you to navigate seamlessly between the connected tasks. By clicking on the task name or relevant details, you can access the linked task directly, making updates, adding comments, or collaborating with team members as needed.
Having easy access to the linked tasks within Asana streamlines communication, fosters collaboration, and helps ensure that everyone involved in the project is on the same page. It facilitates efficient task management and enables you to stay organized and focused on achieving project milestones.
Now that you know how to view the linked tasks, you can leverage this functionality in Asana to monitor progress, make updates, and effectively manage dependencies within your projects.
Additional tips for linking tasks in Asana
While the process of linking tasks in Asana is relatively simple, there are a few additional tips that can help optimize your task management and enhance your project workflows. Here are some useful tips to consider:
1. Use task dependencies wisely: Task dependencies are powerful, but it’s important to use them judiciously. Overloading tasks with unnecessary dependencies can lead to a rigid and inflexible project structure. Prioritize and link only the tasks that truly depend on each other.
2. Consider setting dependencies during project planning: It’s often beneficial to establish task dependencies during the project planning phase. By identifying interdependent tasks early on, you can ensure a smoother workflow and minimize the chances of delays or conflicts.
3. Use visual indicators for task dependencies: Asana provides visual indicators, such as arrows or lines, to represent task dependencies. Take advantage of these indicators to easily identify and understand the relationships between tasks at a glance.
4. Regularly review and update task dependencies: As your project progresses, it’s important to periodically review and update task dependencies. Make adjustments as needed to reflect changes in priority, resources, or project requirements.
5. Communicate task relationships with your team: Ensure that your team members are aware of the task dependencies and how they impact the workflow. Communicate and clarify any questions or concerns to maintain transparency and coordination in the project.
6. Use Asana’s search and filtering capabilities: Asana offers robust search and filtering features that can help you quickly find linked tasks or tasks with dependencies. Utilize these features to efficiently navigate and manage your linked tasks.
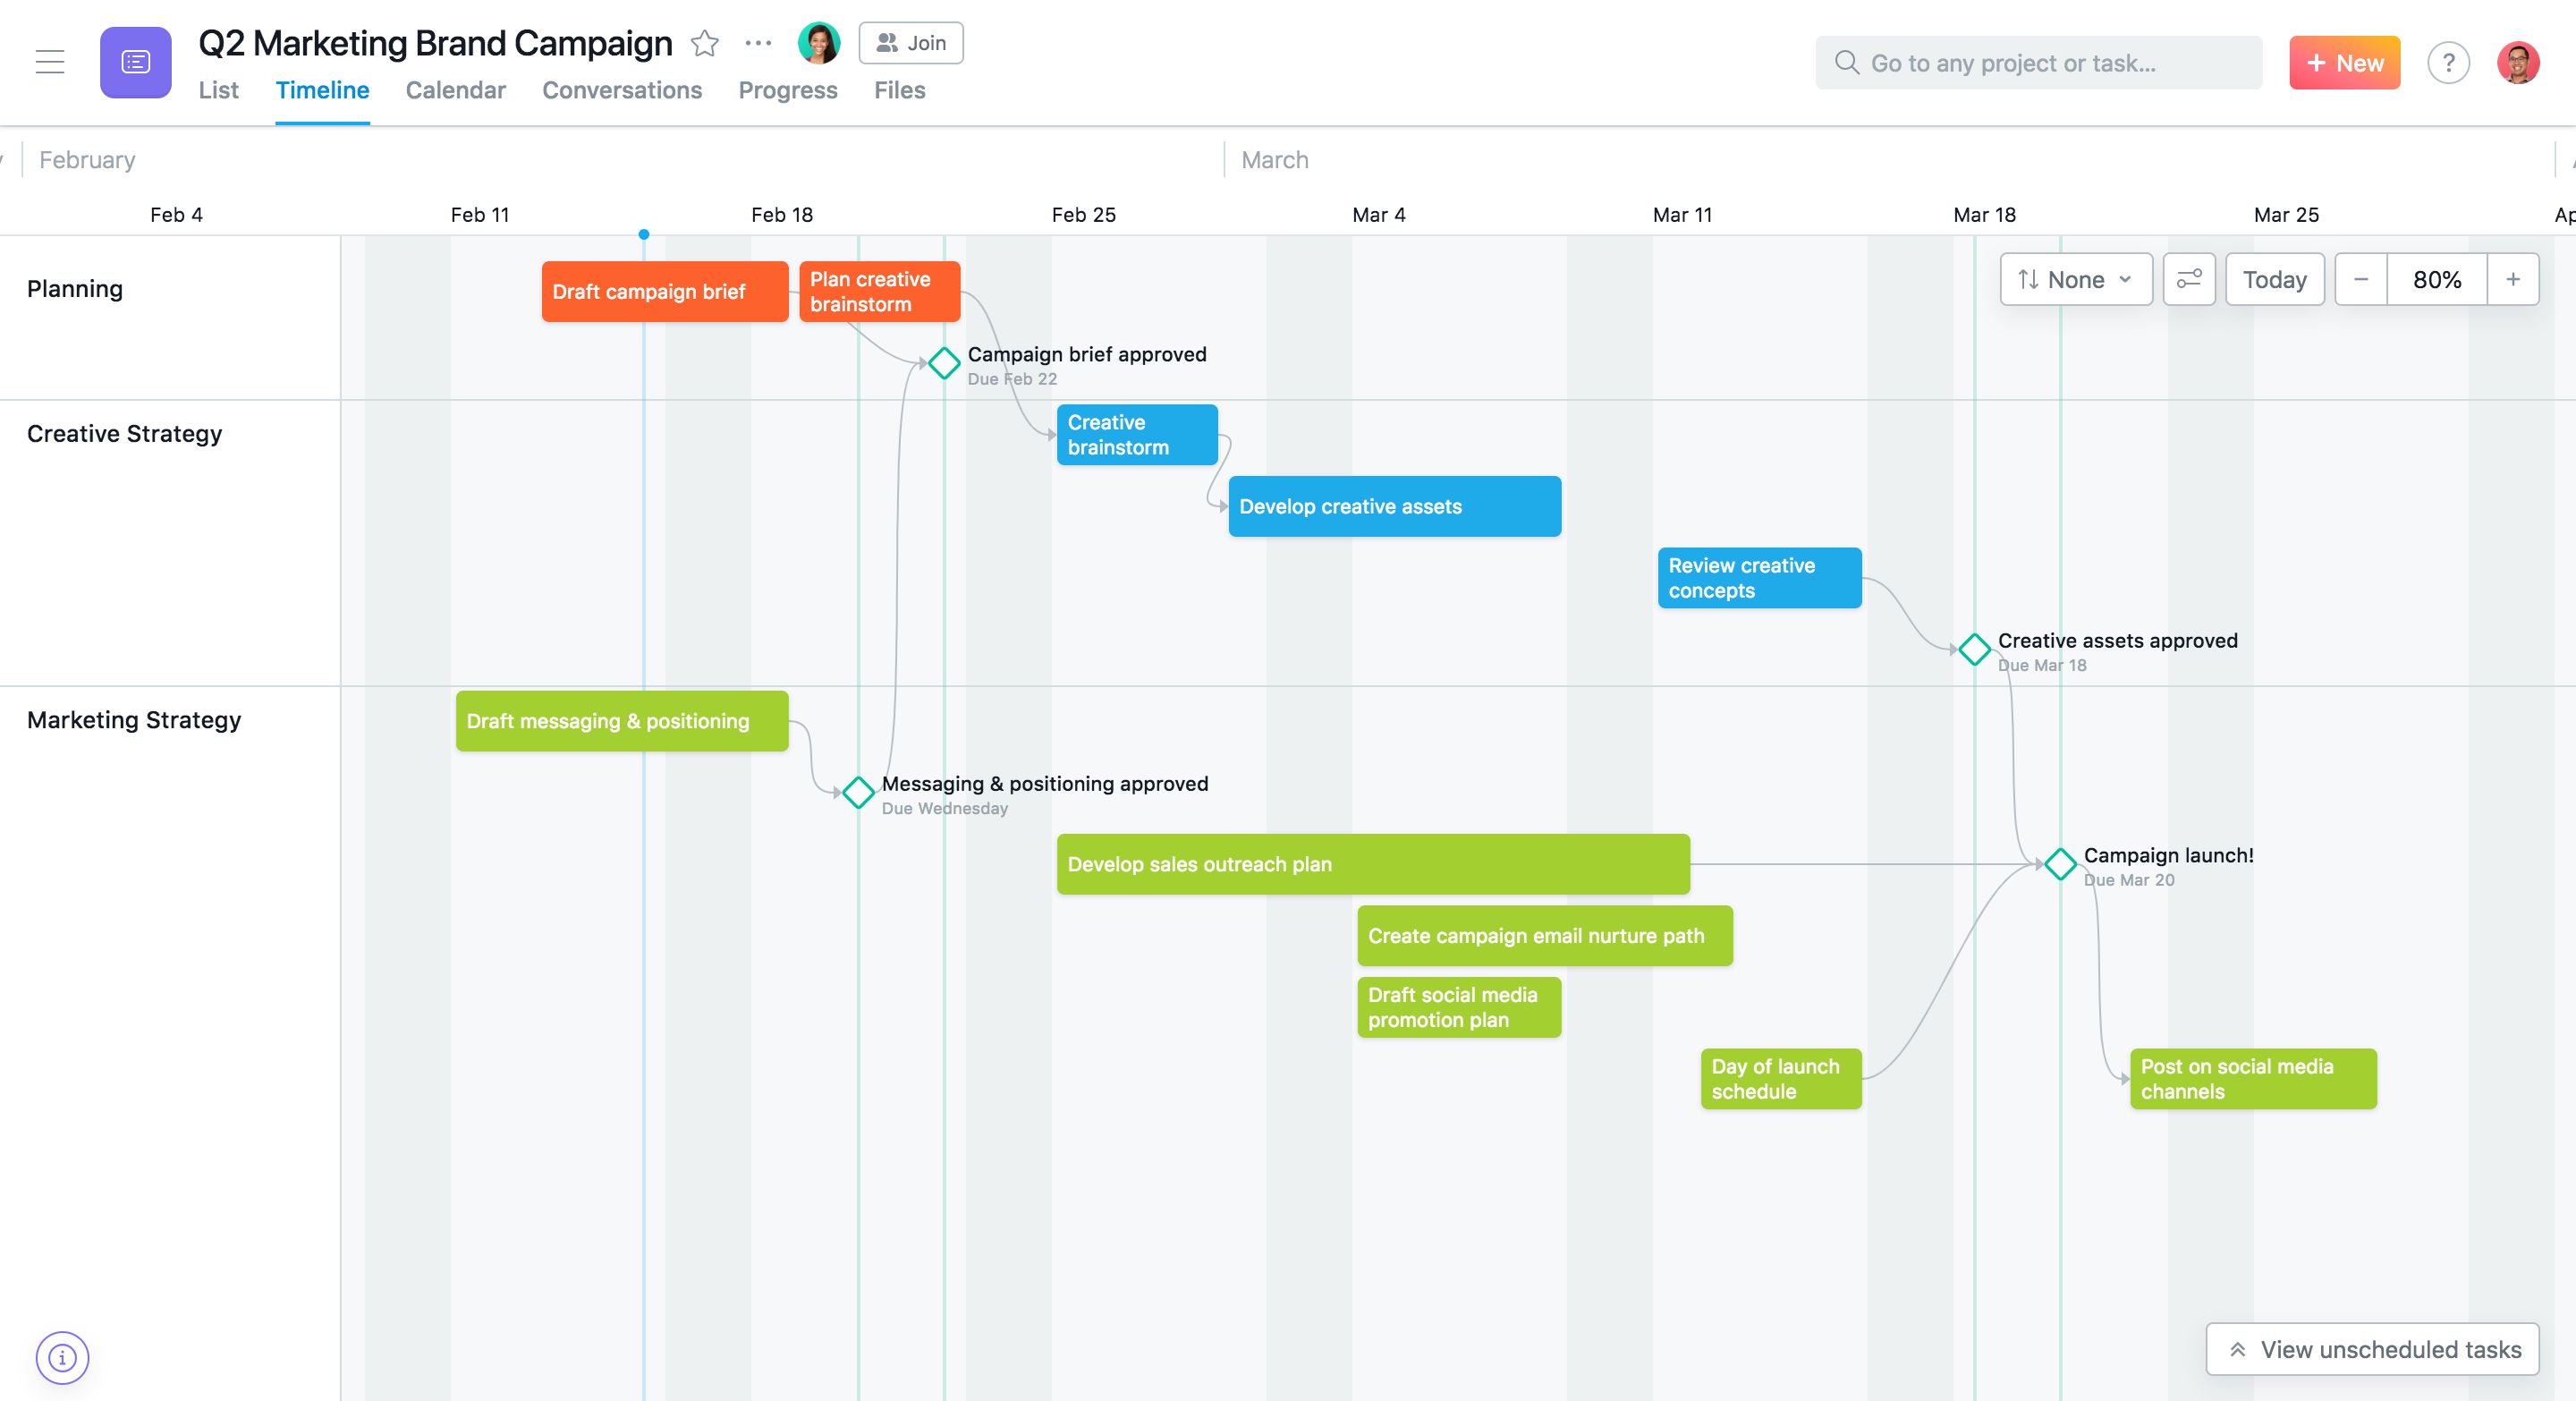
7. Leverage Asana’s timeline view: Asana’s timeline view provides a visual representation of tasks and their dependencies over time. Use the timeline view to get a comprehensive overview of your project’s progress and adjust task timelines if necessary.
8. Collaborate through task comments and updates: When working with linked tasks, collaborate effectively by using task comments to discuss dependencies, updates, or changes. Keep team members informed and ensure everyone is aligned on task priorities.
9. Customize task fields to capture dependencies: Customize your task fields in Asana to include custom fields that capture and display task dependencies. This can help provide additional context and information about the linked tasks.
By implementing these tips, you can use Asana’s task linking feature to its full potential. This will help you streamline your workflows, improve project management, and ultimately achieve greater success in your projects.
Conclusion
Linking tasks in Asana is a powerful feature that empowers you to establish dependencies, visualize task relationships, prioritize work, and streamline project management. By following the steps outlined in this guide, you can easily link tasks in Asana and take full advantage of this functionality.
Asana’s task linking capability allows you to create a structured and organized workflow, ensuring that tasks are completed in the right order and project milestones are achieved on time. It enhances collaboration, communication, and coordination within your team, enabling everyone to stay aligned and focused on the project’s goals.
Remember to open the task you want to link, click on the “Add Task” button, search for and select the task you want to link, confirm the link, and view the linked tasks. By navigating through these steps, you can establish meaningful connections between tasks and have a clear view of their dependencies.
Additionally, keep in mind the tips provided in this guide to maximize the effectiveness of task linking in Asana. Use task dependencies wisely, regularly review and update them, communicate with your team, and leverage Asana’s powerful search and filtering capabilities to efficiently manage linked tasks.
By utilizing Asana’s task linking feature, you can enhance your project management skills, improve workflow efficiency, and boost collaboration. Whether you’re working on personal projects, team assignments, or complex initiatives, task linking in Asana equips you with the tools to stay organized, prioritize effectively, and bring your projects to successful completion.
Start linking tasks in Asana today and unlock a new level of productivity and success in your projects. Happy task linking!