Introduction
Welcome to this step-by-step guide on how to install the leg for your Samsung Series 5 LED TV. Whether you’ve just purchased your new TV or are upgrading the existing setup, installing the leg is a crucial part of setting up your television. A sturdy and reliable leg ensures the stability of your TV, providing you with an optimal viewing experience.
Before we dive into the installation process, it’s important to have all the necessary tools and materials ready. This will save you time and make the installation process smoother. So, let’s take a look at what you’ll need:
- Screwdriver
- TV Leg
- TV Leg screws (usually provided with the TV)
- TV Manual
Now that we have all the required tools and materials, let’s get started with the installation process. Please ensure that you carefully follow each step to ensure a successful installation.
Tools and Materials Needed
Before you begin the installation process, it’s essential to gather all the necessary tools and materials. Having everything prepared beforehand will make the process smoother and more efficient. Here are the tools and materials you’ll need:
- Screwdriver: You’ll need a screwdriver to tighten the screws securely.
- TV Leg: Ensure you have the appropriate TV leg for your Samsung Series 5 LED TV model.
- TV Leg Screws: These screws are usually provided with the TV leg. Make sure you have the correct ones for your specific model.
- TV Manual: The TV manual contains detailed instructions and diagrams specific to your model. Keep it handy for reference during the installation process.
Make sure you have these tools and materials readily available before proceeding further. Having everything at hand will save you time and prevent any interruptions during the installation.
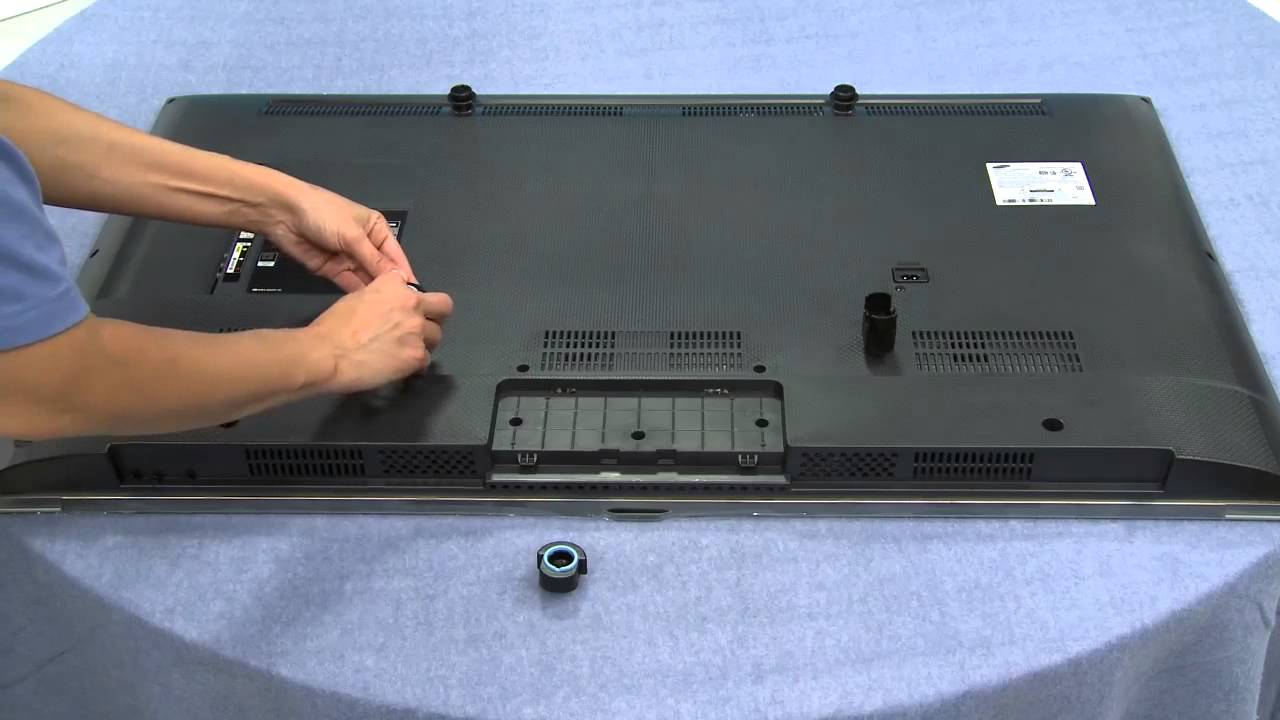
Step 1: Unboxing the TV and Checking the Contents
The first step in installing the leg for your Samsung Series 5 LED TV is to unbox the TV and check the contents. Follow these simple steps:
- Place the TV box on a flat and stable surface, ensuring it is easy to access from all sides.
- Remove any tape or packing material securing the box.
- Open the box carefully, taking care not to damage the TV or its components.
- Once the box is open, locate the TV and carefully lift it out of the packaging.
- Place the TV on a clean and stable surface, ensuring it is free from any obstructions or hazards.
- Check the contents of the TV box to ensure you have received all the necessary components, including the TV leg.
- Refer to the TV manual for a detailed diagram of the components and their placement.
It is crucial to check the contents of the TV box to ensure you have received all the necessary components. Missing any parts can hinder the installation process and may require contacting customer support for assistance.
Once you have verified that all the components are present, it’s time to move on to the next step: preparing the leg for installation.
Step 2: Preparing the Leg for Installation
With the TV unboxed and the contents checked, it’s time to prepare the leg for installation. Follow these steps to ensure a smooth and successful installation:
- Take out the TV leg from its packaging and carefully inspect it for any damage or defects.
- Refer to the TV manual to identify the correct orientation of the leg and its corresponding position on the TV. Different TV models may have varying leg designs, so it’s important to follow the manual’s instructions for your specific model.
- Find the screw holes on the TV leg. These are usually located on the bottom or back of the leg, depending on the design.
- Prepare the TV leg screws by ensuring they are the correct size and type for your TV model. Refer to the manual for specifications if you are unsure.
- Place the TV leg in the designated position on the TV, aligning the screw holes with the corresponding holes on the TV.
- Insert the screws into the holes and use a screwdriver to tighten them securely. Be careful not to over-tighten, as this can damage the TV or the leg.
By following these steps, you will effectively prepare the TV leg for installation. Now that the leg is securely attached to the TV, we can proceed to the next step: attaching the leg to the TV.
Step 3: Attaching the Leg to the TV
Now that you have prepared the TV leg, it’s time to attach it to your Samsung Series 5 LED TV. Follow these steps to ensure a proper and secure attachment:
- Position the TV leg near the designated leg attachment area on the TV.
- Align the screw holes on the TV leg with the corresponding holes on the TV. Make sure they are perfectly aligned before proceeding.
- Insert the screws into the holes and use a screwdriver to tighten them securely. Start with one screw and gradually tighten it until it is snug, then proceed to the remaining screws.
- Double-check to ensure that all screws are tightened securely but avoid over-tightening them, as it could damage the TV or the leg.
By following these steps, you will successfully attach the leg to your Samsung Series 5 LED TV. It’s important to take your time and ensure that the leg is firmly secured to avoid any instability or wobbling when the TV is placed on a surface.
With the leg in place, we can move on to the next step: adjusting the position of the leg for optimal stability and placement of the TV.
Step 4: Adjusting the Position of the Leg
After attaching the TV leg to your Samsung Series 5 LED TV, it’s time to adjust its position for optimal stability and placement. Follow these steps to ensure the leg is properly aligned:
- Carefully lift the TV and place it on a flat and stable surface where you intend to position it.
- Check the alignment of the TV leg by observing the levelness of the TV. If the TV appears slanted or unstable, the leg may need to be adjusted.
- Using your hands, carefully tilt and adjust the leg until the TV is level and stable on the surface.
- Once you have adjusted the leg, check the TV from various angles to ensure it is perfectly balanced. Make any necessary adjustments until you are satisfied with the positioning.
It’s important to take your time and ensure that the TV is level and stable. Proper alignment of the leg will not only enhance the viewing experience but also prevent any accidental tipping or instability. If you have a level tool, you can use it to double-check the levelness of the TV from different angles.
Now that you have adjusted the leg, we can move on to securing it in place for added stability.
Step 5: Securing the Leg in Place
After adjusting the position of the TV leg for optimal stability, it’s important to secure it in place. This will ensure that the leg remains firmly attached to the TV during use. Follow these steps to secure the leg:
- Verify that the TV is positioned on a stable surface and is level.
- Check the underside of the TV leg to identify any additional attachment points or mechanisms for securing the leg.
- If there are any additional attachment points, follow the instructions in the TV manual to secure them properly.
- If the leg does not have any additional attachment points, ensure that the screws securing the leg to the TV are tightened securely. Tighten them using a screwdriver while being careful not to over-tighten.
- Double-check the stability of the leg by gently shaking the TV to ensure there is no wobbling or loosening of the leg.
By securing the leg in place, you are taking an extra measure to ensure the stability and safety of your Samsung Series 5 LED TV. This step is crucial, as it provides added reassurance that the leg will not detach or become unstable during use.
Once you’ve secured the leg, it’s time to repeat the process for the installation of the second leg, if applicable. This will ensure the balanced support and stability of your TV.
Step 6: Repeating the Process for the Second Leg
If your Samsung Series 5 LED TV requires two legs for stability, it’s time to repeat the installation process for the second leg. By following these steps, you’ll ensure a balanced and secure support for your TV:
- Position the second TV leg near its designated attachment area on the TV.
- Align the screw holes on the leg with the corresponding holes on the TV, ensuring they are perfectly aligned before proceeding.
- Insert the screws into the holes and use a screwdriver to tighten them securely, just as you did with the first leg.
- Double-check that all screws are tightened but avoid over-tightening.
Repeat the process for the second leg, ensuring that it is securely attached and aligned with the first leg. This will provide balanced support and stability for your Samsung Series 5 LED TV.
After attaching the second leg, it’s important to check the stability of the TV by gently shaking it. Ensure there is no wobbling or loosening of either leg. If you notice any instability, recheck the attachment and tightening of the legs.
Now that you’ve installed both legs, it’s time to move on to the final step: checking the stability of the TV.
Step 7: Checking the Stability of the TV
With both legs securely attached to your Samsung Series 5 LED TV, it’s important to check the stability of the TV before completing the installation process. Follow these steps to ensure that your TV is stable:
- Ensure that the TV is positioned on a flat and stable surface.
- Stand back and observe the TV from different angles, checking for any signs of tipping or unsteadiness.
- Gently shake the TV to test its stability. If the TV wobbles or feels loose, recheck the attachment and tightening of the legs.
- If the TV remains stable during the test, pat yourself on the back – you have successfully installed and secured the legs for your Samsung Series 5 LED TV!
Checking the stability of your TV is crucial for your safety as well as the protection of your TV. A stable TV ensures a more enjoyable viewing experience without any unexpected mishaps.
If you find any issues with the stability of your TV, it is recommended to consult the TV manual or contact customer support for assistance. They can provide further guidance on troubleshooting and resolving any stability-related concerns.
Now that you have checked the stability of your TV and confirmed its safety, you can confidently enjoy your Samsung Series 5 LED TV.
Conclusion
Congratulations on successfully installing the leg for your Samsung Series 5 LED TV! By following the steps outlined in this guide, you have ensured the stability and optimal placement of your TV. Now you can sit back, relax, and enjoy your favorite shows and movies with confidence.
Remember, it’s essential to gather all the necessary tools and materials before starting the installation process. Take your time during each step to ensure that the leg is securely attached and properly aligned with the TV. Checking the stability of the TV is crucial to prevent any unexpected accidents.
If you encounter any difficulties during the installation or have questions about your specific TV model, don’t hesitate to consult the TV manual or reach out to customer support for assistance. They will be able to provide additional guidance and troubleshooting tips.
Proper installation of the TV leg not only enhances the viewing experience but also ensures the safety and longevity of your TV. With a stable and well-supported TV, you can enjoy immersive entertainment in any room of your home.
We hope this guide has been helpful in assisting you with the installation process. Thank you for choosing Samsung and happy viewing!