Introduction
Welcome to our comprehensive guide on how to install a graphics card on a laptop. Upgrading your laptop’s graphics card can significantly boost its performance, allowing you to enjoy smooth and high-quality graphics while gaming, editing videos, or performing other graphics-intensive tasks. While most laptops do not possess easily upgradable graphics cards like desktop computers, in some cases, you can install a new graphics card to replace the existing one.
Before diving into the process, it’s crucial to note that not all laptops are compatible with graphics card upgrades. Many laptops feature integrated graphics processors that are not detachable, meaning you cannot replace them. However, if your laptop has a dedicated graphics card and the manufacturer allows for upgrades, our guide will take you through the necessary steps to successfully install a new graphics card.
In this detailed tutorial, we will provide you with clear instructions and precautions to ensure a smooth installation process. We will guide you through the necessary preparations, opening your laptop casing, locating the graphics card port, removing the old graphics card (if applicable), inserting the new graphics card, securing it properly, closing the laptop casing, and finally, installing the required drivers and updates.
Please note that installing a graphics card on a laptop requires a certain level of technical expertise. If you are not comfortable working with computer hardware or are unsure about any step of the process, it is highly recommended to seek professional assistance. Additionally, remember to back up your important data and create a system restore point before making any hardware changes to your laptop.
Now that we’ve covered the basics, let’s move on to the first step: checking the compatibility of your laptop for graphics card upgrades.
Step 1: Check Compatibility
Before you begin the graphics card installation process, it is crucial to determine whether your laptop is compatible with a graphics card upgrade. Not all laptops support this feature, as some have integrated graphics processors that cannot be replaced or upgraded. To ensure a successful installation, follow the steps below:
- Check your laptop’s specifications: Start by reviewing your laptop’s documentation or visiting the manufacturer’s website. Look for information about graphics card compatibility and the possibility of upgrading or replacing the existing graphics card. If you can’t find this information, try searching online forums or contacting the manufacturer’s support for clarification.
- Know your laptop’s form factor: Laptops come in various form factors, such as Ultrabooks, 2-in-1s, or gaming laptops. Different form factors may have different limitations when it comes to upgrading components like the graphics card. Consider consulting your laptop’s manual or researching online to understand the limitations of your specific laptop model.
- Understand power requirements: Upgrading to a more powerful graphics card may require additional power. Check whether your laptop’s power supply can handle the increased power demands or if you need to upgrade it along with the graphics card. In some cases, external power adapters may be required, so make sure to research compatibility before purchasing a new graphics card.
- Measure available space: Determine if your laptop has sufficient physical space inside to accommodate a new graphics card. Check the internal dimensions and layout to ensure that the graphics card will fit without any clearance issues. Additionally, consider the cooling requirements, as a more powerful graphics card may generate more heat and require additional cooling solutions.
By thoroughly checking your laptop’s compatibility with a graphics card upgrade, you can avoid purchasing incompatible hardware and minimize the risk of encountering issues during the installation process. Once you have confirmed that your laptop supports graphics card upgrades, you can proceed to gather the necessary tools for the installation, which we will cover in the next step.
Step 2: Gather the Necessary Tools
Before you begin the graphics card installation process on your laptop, it is essential to gather the necessary tools to ensure a smooth and successful installation. Having the right tools readily available will help you work efficiently and minimize the risk of damaging any components. Here is a list of the tools you will need:
- Screwdrivers: Depending on your laptop’s design, you may need a small Phillips or flat-head screwdriver to open the laptop’s casing. Check the screws on the bottom or back of your laptop and determine the type and size of screwdriver required.
- Antistatic wrist strap: To protect delicate electronic components from static electricity damage, it is advisable to wear an antistatic wrist strap. This accessory ensures that any static charge on your body is discharged safely before you handle the internal components of your laptop.
- Cloth or towel: Keep a soft cloth or towel nearby to place your laptop on while you work. This will prevent any scratches or damage to the laptop’s surface.
- Rubbing alcohol: In some cases, you may need to clean the connections or thermal paste residue on your existing graphics card or new graphics card. Use rubbing alcohol and a microfiber cloth to gently clean the surfaces.
- Thermal paste: If you need to remove the existing graphics card or replace it with a new one, you will likely need thermal paste. This paste helps in conducting heat away from the graphics card to the cooling system. Ensure that you have a high-quality thermal paste recommended for use with laptops.
- Tweezers or small pliers: These tools can be helpful for maneuvering small components or cables during the installation process. Use them with caution to avoid damaging any delicate parts.
- Container for screws: To keep track of the screws you remove from the laptop, have a container or small magnetic tray on hand. This will prevent any screws from getting lost and make reassembling the laptop easier.
By gathering these essential tools before you start the graphics card installation process, you will be well-prepared and equipped to complete the task smoothly. With the necessary tools at hand, you can now move on to the next step, which involves preparing the laptop for the installation process.
Step 3: Prepare the Laptop
Before you can begin the actual graphics card installation process, it’s crucial to properly prepare your laptop. This step involves taking a few precautions to ensure your safety and the safety of your laptop’s components. Follow these steps to prepare your laptop:
- Power off your laptop: Make sure to shut down your laptop properly before starting any hardware modifications. This will prevent any accidental damage to the components and ensure a safe working environment.
- Disconnect all peripheral devices: Detach any external devices connected to your laptop, such as USB drives, external monitors, or printers. This will provide easier access to the laptop’s internals and minimize the risk of accidentally damaging any connected devices.
- Unplug the power cord: Remove the power cord from your laptop to eliminate the risk of electrical shock. This step is crucial to your safety while working with the internal components.
- Remove the battery (if removable): If your laptop has a removable battery, take it out to prevent any electrical power from remaining in the system. This ensures that there is no residual power that may pose a risk during the installation process.
- Work on a clean and static-free surface: Find a clean and static-free surface to work on, such as a wooden table or an anti-static mat. This will help prevent any electrostatic discharge from damaging your laptop’s internal components.
- Refer to your laptop’s manual: If available, consult your laptop’s manual for any specific instructions or precautions related to opening the casing or accessing the internal components. Different laptop models may have varying instructions, so it’s essential to follow the manufacturer’s guidelines.
By properly preparing your laptop, you ensure a safe working environment and minimize the risk of damaging any internal components. Once your laptop is prepared, you can move on to the next step, which involves opening the laptop casing.
Step 4: Open the Laptop Casing
Now that you have prepared your laptop, it’s time to open the casing to gain access to the internal components. Opening the laptop casing can vary depending on the laptop model, so it’s crucial to refer to your laptop’s manual or follow these general steps:
- Locate the screws: Flip your laptop over and carefully inspect the bottom cover for screws. These screws secure the casing and need to be removed to access the internal components. Note the number and location of the screws as they may differ from model to model.
- Remove the screws: Using the appropriate screwdriver, carefully unscrew and remove the screws that secure the bottom cover. Remember to keep the screws in a safe place or use a container to prevent them from getting lost.
- Open the casing: Once the screws are removed, gently pry open the laptop casing. Take your time and apply even pressure to avoid causing any damage to the plastic tabs or connectors. If you encounter resistance, double-check for any missed screws or hidden latches.
- Set aside the casing: After successfully opening the laptop casing, set it aside in a safe location. Be cautious not to place it on a surface that can generate static electricity or cause scratches.
Opening the laptop casing requires delicacy and precision. Avoid using excessive force or applying pressure to sensitive areas. If you encounter any difficulties or are unsure about the process, consult your laptop’s manual or seek professional assistance to avoid causing any damage.
With the laptop casing open, you’re now ready to move on to the next step. In the following section, we will guide you on how to locate the graphics card port in your laptop.
Step 5: Locate the Graphics Card Port
Now that you have successfully opened the laptop casing, the next step is to locate the graphics card port. Finding the graphics card port will allow you to identify where the current graphics card is installed and where the new one will be inserted. The location of the graphics card port can vary depending on the laptop model, so follow these general steps:
- Refer to your laptop’s manual: If available, consult your laptop’s manual for the specific location of the graphics card port. The manual will provide detailed instructions or illustrations that will help you easily identify the port.
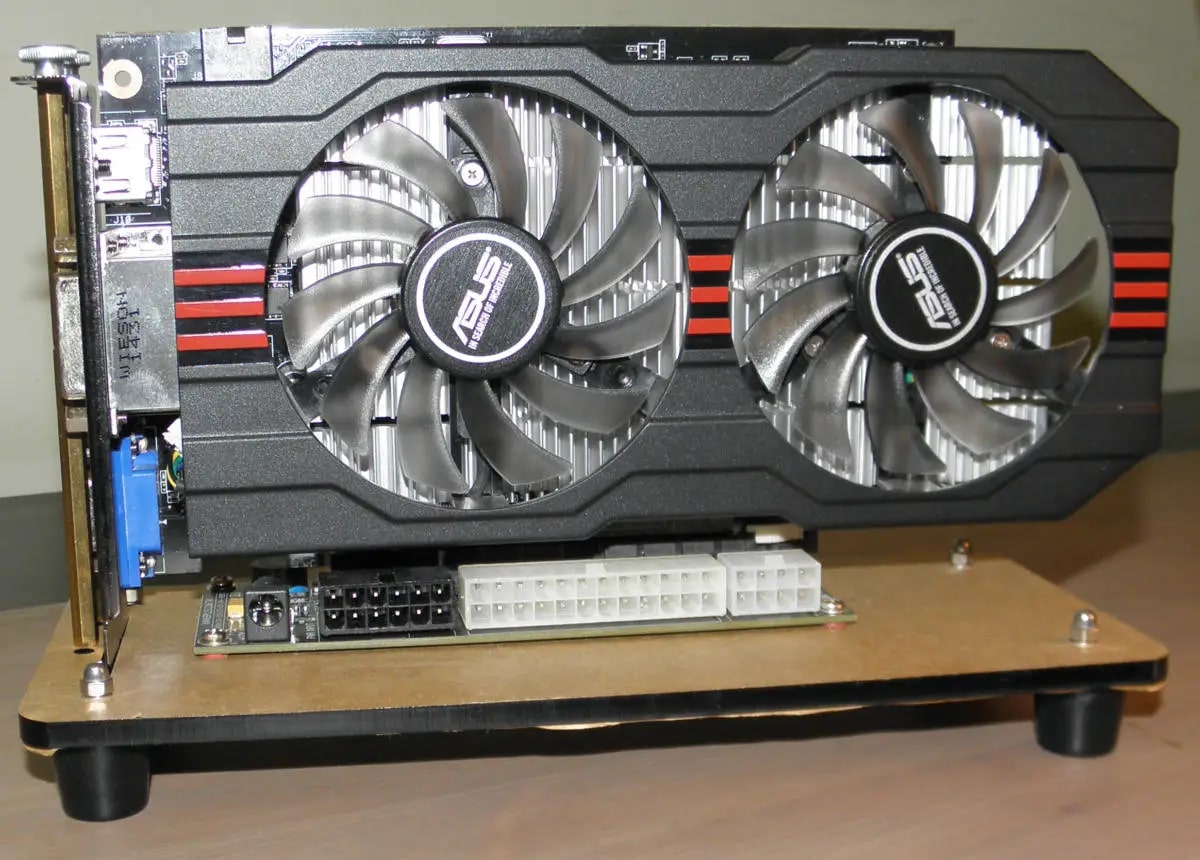
- Check near the CPU and motherboard: In most laptops, the graphics card port is located near the CPU and the motherboard. Look for a slot that is slightly larger than a RAM slot but smaller than a PCI-E slot. It is usually positioned at an angle and may be secured with a latch or screw.
- Inspect the existing graphics card: If your laptop already has a dedicated graphics card, it is typically installed in the graphics card port. Take note of how the existing graphics card is positioned and connected within the port. This will give you an idea of how to properly insert the new graphics card.
- Look for any labels or markings: Sometimes, the graphics card port may have labels or markings indicating its purpose or compatibility. Check for any visual cues that can help you identify the port.
- Take precautions: While inspecting the graphics card port, avoid touching any exposed circuitry or components. Handle the laptop and its internal parts with caution to prevent static discharge or accidental damage.
Locating the graphics card port is essential as it ensures that you correctly identify where the existing graphics card is connected and where the new graphics card will be inserted. Once you have located the port, you can proceed to remove the old graphics card (if applicable) in the following step.
Step 6: Remove the Old Graphics Card (if applicable)
If your laptop already has a dedicated graphics card installed, the next step in the process is to remove the old graphics card. Removing the old graphics card is necessary to make way for the installation of the new one. Please note that this step may not apply if your laptop doesn’t have a dedicated graphics card or if you’re planning to install the new graphics card in an unused slot. Follow these steps to remove the old graphics card:
- Disconnect any cables: Carefully detach any cables or connectors that are connected to the old graphics card. These cables may include power cables, display cables, or any other connectors specific to your laptop model. Take note of their positions and connectors for easy reassembly later.
- Release any securing mechanisms: Some laptops have securing mechanisms, such as latches or screws, that hold the graphics card in place. Look for any such mechanisms and carefully release them to free the old graphics card. Refer to your laptop’s manual for specific instructions if needed.
- Gently remove the old graphics card: Once any securing mechanisms are released, gently pull the old graphics card out of the graphics card port. Take care not to apply excessive force or bend any components as you remove it. If the card seems stuck, double-check for any additional cable connections or securing mechanisms that you may have missed.
- Set aside the old graphics card: Place the removed graphics card in a safe and static-free location. You may want to keep it as a backup or dispose of it appropriately if it is no longer in working condition or needed.
Removing the old graphics card is a crucial step before installing the new one. Take your time and handle the components with care to avoid any damage. With the old graphics card removed, you are now ready to move on to the exciting step of inserting the new graphics card in the next section.
Step 7: Insert the New Graphics Card
With the old graphics card removed, it’s time to insert the new graphics card into your laptop. This step is crucial for upgrading to a more powerful graphics card or replacing a faulty one. Follow these steps to correctly insert the new graphics card:
- Align the new graphics card: Before inserting the new graphics card, make sure it is properly aligned with the graphics card port. Check the connectors on the graphics card and match them with the corresponding slots in the port. Ensure that any notches or keyways on the graphics card match up with the port to avoid forcing the card in the wrong direction.
- Gently insert the new graphics card: Hold the new graphics card by its edges and carefully insert it into the graphics card port. Apply gentle and even pressure to insert the card fully. Do not force it or use excessive pressure, as this can cause damage to both the card and the port.
- Secure the new graphics card: Once the new graphics card is inserted, secure it using any latches, screws, or mechanisms provided by your laptop’s design. This ensures that the card stays in place during usage and prevents any accidental disconnections or damage.
- Reconnect any cables: Reattach any cables or connectors that were previously connected to the old graphics card. These may include power cables, display cables, or any other specific connectors required by your laptop model. Refer to your laptop’s manual for guidance if needed.
When inserting the new graphics card, it’s important to be gentle and precise to avoid any damage to the card or the laptop’s internal components. Ensure that the graphics card is securely inserted and all the necessary cables are properly connected. With the new graphics card in place, you are now ready to move on to the next step, which involves securing the graphics card.
Step 8: Secure the Graphics Card
After inserting the new graphics card into your laptop, it’s essential to secure it properly to ensure it remains in place during usage. Securing the graphics card helps prevent any accidental disconnections or movements that can lead to performance issues or damage. Here’s how to securely fasten the graphics card:
- Check for securing mechanisms: Inspect your laptop’s design for any latches, screws, or mechanisms specifically intended to secure the graphics card. These securing mechanisms may vary depending on your laptop model, so refer to the manufacturer’s instructions or the laptop’s manual for guidance.
- Align the graphics card: Once again, ensure that the new graphics card is properly aligned within the graphics card port. Verify that it fits snugly and the connectors are properly inserted into their respective slots.
- Engage the securing mechanisms: If your laptop employs any latches or mechanisms, gently push them into place to secure the graphics card. If there are screws, insert them carefully and tighten them just enough to hold the graphics card firmly in position. Avoid over-tightening, as it can cause damage to the card or the port.
- Double-check the connections: Confirm that all cables and connectors attached to the graphics card are secure and properly seated. Ensure there is no play or looseness in any of the connections.
Securing the graphics card ensures its stability and optimal performance. It helps prevent any movements or disconnections that could lead to glitches or interruptions while using your laptop. Take your time to properly engage the securing mechanisms and double-check all connections before proceeding to the next step.
Now that the graphics card is securely fastened in your laptop, you can proceed to the penultimate step, which involves closing the laptop casing.
Step 9: Close the Laptop Casing
With the new graphics card properly installed and secured, it’s time to close the laptop casing to protect the internal components and ensure everything is in place. Closing the laptop casing involves carefully putting the cover back on and reassembling the laptop. Follow these steps to close the laptop casing:
- Align the casing: Take the laptop casing and align it carefully with the base of the laptop. Ensure that all the edges and corners are properly aligned before proceeding.
- Apply even pressure: Starting from one corner, gently press the casing onto the base of the laptop. Apply even pressure along the edges to ensure a secure fit. Be cautious not to use excessive force that could damage any internal components.
- Secure the screws: Using the appropriate screwdriver, reinsert and securely tighten the screws that were previously removed to secure the laptop casing. Start with a corner and work your way around the laptop, tightening each screw gradually. Ensure that all screws are tight but not overtightened.
- Inspect the casing: After securing the screws, inspect the laptop casing to ensure that it is flush with the base and there are no visible gaps or misalignments. This ensures that the casing is properly closed and provides a clean appearance.
By following these steps, you can securely close the laptop casing and safeguard the internal components, including the newly installed graphics card. Take your time to align the casing properly and tighten the screws evenly to avoid any issues. Once the casing is closed, you are ready for the final step: installing the necessary drivers and updates for the new graphics card.
Step 10: Install Drivers and Update
After successfully installing the new graphics card and closing the laptop casing, the final step is to install the necessary drivers and update your system to ensure optimal performance. Drivers serve as the software interface between the graphics card and your operating system, enabling them to communicate effectively. Follow these steps to install the drivers and update your system:
- Visit the manufacturer’s website: Go to the website of the graphics card manufacturer, such as NVIDIA or AMD, and navigate to the driver downloads section.
- Select the appropriate drivers: Identify your specific graphics card model and select the appropriate drivers for your operating system. Download the latest version of the drivers to ensure compatibility and access to the latest features and optimizations.
- Run the driver installation program: Locate the downloaded driver file and run the installation program. Follow the on-screen prompts to install the drivers on your system. It is generally recommended to choose the default installation settings.
- Restart your laptop: After the driver installation completes, restart your laptop to ensure that the changes take effect and the new graphics card is recognized by the system.
- Check for updates: Once your laptop restarts, open the device manager or the graphics card control panel to verify that the new graphics card is recognized and functioning correctly. Additionally, check for any available updates for the graphics card drivers and install them if necessary.
Installing the necessary drivers and updating your system ensures that the new graphics card is fully utilized and optimized for performance. It also helps resolve any compatibility issues and ensures a smooth experience while using graphics-intensive applications or gaming.
Congratulations! You have successfully installed a new graphics card on your laptop and completed all the necessary steps. Enjoy the enhanced graphics capabilities and improved performance that your new graphics card brings!
Conclusion
Upgrading or replacing the graphics card in your laptop can greatly enhance its performance and allow you to enjoy smooth, high-quality graphics while gaming, editing videos, or performing graphics-intensive tasks. Although laptops are generally not as easily upgradable as desktop computers, with the right knowledge and preparation, you can successfully install a new graphics card in your laptop.
In this comprehensive guide, we covered the step-by-step process of installing a graphics card on a laptop. We began by checking the compatibility of the laptop for graphics card upgrades and gathering the necessary tools. We then prepared the laptop, opened the casing, located the graphics card port, and removed the old graphics card (if applicable). The next steps involved inserting the new graphics card, securing it properly, closing the laptop casing, and finally, installing the required drivers and updates.
It is important to note that installing a graphics card on a laptop requires careful attention to detail and patience. If you are not confident in performing these steps on your own, it is advisable to seek professional assistance to avoid any potential damages or complications.
By following this guide, you have successfully equipped your laptop with a new graphics card, allowing you to enjoy improved performance and enhanced visual experiences. Remember to regularly update your graphics card drivers to ensure optimal functionality. Enjoy your newfound graphics capabilities and take your laptop usage to new heights!