Introduction
Welcome to the world of Windows 10 on your HP Ultrabook! Whether you”re upgrading from an older version of Windows or starting fresh, this article will guide you through the process of getting Windows 10 up and running on your device. With its sleek design and powerful capabilities, the HP Ultrabook is the perfect companion for the latest version of Microsoft’s operating system.
Windows 10 brings a multitude of exciting features and improvements, including a user-friendly interface, enhanced security, and seamless integration with the Microsoft ecosystem. By upgrading to Windows 10, you”ll be able to take advantage of these advancements and enjoy a more efficient and productive computing experience.
Before we dive into the installation process, it’s important to ensure that your HP Ultrabook meets the necessary system requirements. Additionally, backing up your data is crucial to safeguarding your important files and settings during the upgrade. By following the steps outlined in this article, you”ll be well on your way to experiencing the power and versatility of Windows 10 on your HP Ultrabook.
System Requirements
Before getting started with the Windows 10 installation process, it’s important to ensure that your HP Ultrabook meets the minimum system requirements. Here are the specifications your device should have:
- Processor: Intel Core i3 or higher
- RAM: 4GB or higher
- Storage: 64GB or more free disk space
- Display: 13.3-inch or larger with a resolution of 1366 x 768 pixels or higher
- Graphics: Intel HD Graphics or compatible
- Network: Wi-Fi or Ethernet adapter
It’s important to note that these are the minimum requirements for a smooth Windows 10 experience. If your HP Ultrabook exceeds these specifications, it will further enhance your computing performance.
Please ensure that your device is running a genuine copy of Windows 7 or Windows 8.1, as Windows 10 can only be upgraded from these versions. Additionally, make sure that all your device drivers are up to date to prevent any compatibility issues during the installation process.
Now that you have verified that your HP Ultrabook meets the necessary system requirements, it’s time to proceed with the installation. Remember to back up your data to avoid any accidental loss during the upgrade process. Let’s move on to the next step: backing up your data.
Step 1: Check for Compatibility
Before diving into the Windows 10 installation process on your HP Ultrabook, it’s crucial to ensure compatibility with your device. This step will help you determine if your Ultrabook meets the requirements for a smooth and successful upgrade.
The first thing you need to verify is if your HP Ultrabook is running a genuine copy of either Windows 7 or Windows 8.1. This is essential because Windows 10 can only be upgraded from these versions. If you are not sure about the authenticity of your operating system, you can check it by going to “Control Panel” and selecting “System and Security”. Under the “System” section, you will find the information about your operating system version.
Next, make sure your Ultrabook meets the minimum hardware requirements mentioned in the previous section. This includes having an Intel Core i3 or higher processor, 4GB or more RAM, 64GB or more free disk space, a display with a resolution of 1366 x 768 pixels or higher, Intel HD Graphics, and a Wi-Fi or Ethernet adapter for network connectivity.
If your device meets these requirements, you’re ready to proceed with the Windows 10 installation. However, it’s always a good idea to go the extra mile and ensure that all your device drivers are up to date. This can be done by visiting the manufacturer’s website or using a reliable driver update tool. Having updated drivers will minimize the risk of any compatibility issues during the upgrade process.
Checking for compatibility may seem like a minor step, but it plays a vital role in ensuring a smooth transition to Windows 10 on your HP Ultrabook. Once you have confirmed that your device is compatible and running a genuine copy of Windows 7 or Windows 8.1, you can move on to the next step: backing up your data.
Step 2: Backup your Data
Before proceeding with the installation of Windows 10 on your HP Ultrabook, it’s crucial to back up your data to prevent any accidental loss or corruption during the upgrade process. By taking this precautionary step, you can ensure that your important files, documents, and settings are safely stored and easily recoverable if needed.
There are several options available to back up your data, depending on your preferences and requirements:
- External Hard Drive: Connect an external hard drive to your HP Ultrabook and manually copy your important files, folders, and documents to the drive. This method gives you full control over what files to backup and allows for quick and easy access to your data.
- Cloud Storage Services: Utilize cloud storage services such as Google Drive, Dropbox, or Microsoft OneDrive to securely store your important files. These services provide a convenient and reliable way to backup your data, as it can be accessed from any device with an internet connection.
- Windows Backup and Restore: Windows 10 also offers a built-in backup and restore feature. You can use this option to create a system image or backup specific files and folders. This method allows for easy restoration in case the need arises.
Choose the backup method that suits your needs and preferences. It is recommended to create multiple backups and store them in different locations for added security. Additionally, make sure to include any custom settings, bookmarks, and preferences from your applications or browsers.
Take your time to ensure that all your important data is properly backed up before proceeding with the installation. Once you have completed the backup process and verified the integrity of your backup, you can confidently move on to the next step: downloading Windows 10.
Step 3: Download Windows 10
With your data safely backed up, it’s time to download the Windows 10 installation files for your HP Ultrabook. Follow these steps to get started:
- Visit the Microsoft website: Open a web browser on your HP Ultrabook and go to the official Microsoft website.
- Navigate to the Windows 10 download page: Locate the “Downloads” section on the Microsoft website and find the Windows 10 download page.
- Select the appropriate edition: Choose the edition of Windows 10 that matches your current version of Windows. If you are unsure about which edition to select, you can usually opt for the “Windows 10 Home” edition, which is suitable for most users.
- Choose the language: Select the preferred language for your Windows 10 installation. Microsoft offers a wide range of language options to cater to users worldwide.
- Click on “Download Now”: Once you have made your selections, click on the “Download Now” button to start the download process. The size of the installation file will vary based on your selected edition and language.
- Wait for the download to complete: Depending on your internet speed, the download process may take some time. Make sure you have a stable internet connection and do not interrupt the download.
Once the download is complete, you will have the Windows 10 installation files ready to be used for the upgrade. It’s important to note that these files will be in the form of an ISO image, which can be used to create a bootable USB drive for the installation process.
Now that you have successfully downloaded the Windows 10 installation files, you are ready to proceed to the next step: creating a bootable USB drive.
Step 4: Create a Bootable USB Drive
Creating a bootable USB drive is an essential step in the process of installing Windows 10 on your HP Ultrabook. This will allow you to start the installation directly from the USB drive, ensuring a smooth and hassle-free upgrade. Follow these steps to create a bootable USB drive:
- Connect a USB drive: Connect a USB drive to your HP Ultrabook. Ensure that the USB drive has a minimum capacity of 8GB to accommodate the installation files.
- Formatting the USB drive: Format the USB drive to ensure it is clean and ready for use. Right-click on the USB drive in File Explorer, choose “Format,” and select the file system as “FAT32.”
- Download and install Rufus: Rufus is a popular tool for creating bootable USB drives. Download the latest version of Rufus from the official website and install it on your HP Ultrabook.
- Launch Rufus: Open Rufus and select the connected USB drive as the “Device” to create a bootable disk.
- Select the Windows 10 ISO: In Rufus, click on the “Select” button and navigate to the location where you saved the Windows 10 ISO file from the previous step.
- Configure the settings: Leave the default settings as they are unless you have specific requirements. Ensure that the partition scheme is set to “MBR” and the target system is set to “BIOS or UEFI.”
- Create the bootable USB drive: Click on the “Start” button in Rufus, and it will begin creating the bootable USB drive using the Windows 10 ISO file.
- Wait for the process to complete: The creation of the bootable USB drive may take some time. Allow Rufus to complete the process without interruptions.
- Eject the USB drive: Once Rufus has finished creating the bootable USB drive, safely eject the USB drive from your HP Ultrabook.
With the bootable USB drive in hand, you are now prepared to move on to the next step: installing Windows 10 on your HP Ultrabook.
Step 5: Install Windows 10
With the bootable USB drive ready, it’s time to install Windows 10 on your HP Ultrabook. Follow these steps to proceed with the installation:
- Restart your HP Ultrabook: Restart your device and press the appropriate key (usually F12 or Esc) to access the boot menu. Select the USB drive as the boot device to start the installation.
- Choose your language and region: Select your preferred language, time, and currency format, as well as your keyboard layout. Click on “Next” to continue.
- Click on “Install Now”: On the installation screen, click on the “Install Now” button to begin the installation process.
- Enter the product key: If prompted, enter the product key that came with your Windows 10 copy. Alternatively, click on “I don’t have a product key” if you don’t have one at the moment.
- Accept the license terms: Read and accept the license terms by checking the box. Click on “Next” to proceed.
- Choose the installation type: Select the installation type that suits your needs. You can opt for a clean installation or upgrade your existing Windows installation. Select the appropriate option and click on “Next”.
- Select the disk partition: Choose the disk partition where you want to install Windows 10. If you want a fresh installation, select the partition and click on “Delete” to remove any existing data. Then, click on “Next” to continue.
- Wait for the installation: Windows 10 will now start installing on your HP Ultrabook. The installation process may take some time, so be patient and avoid interrupting it.
- Set up your preferences: After the installation is complete, you’ll be prompted to set up your preferences, including your region, language, and privacy settings. Follow the on-screen instructions to customize these settings accordingly.
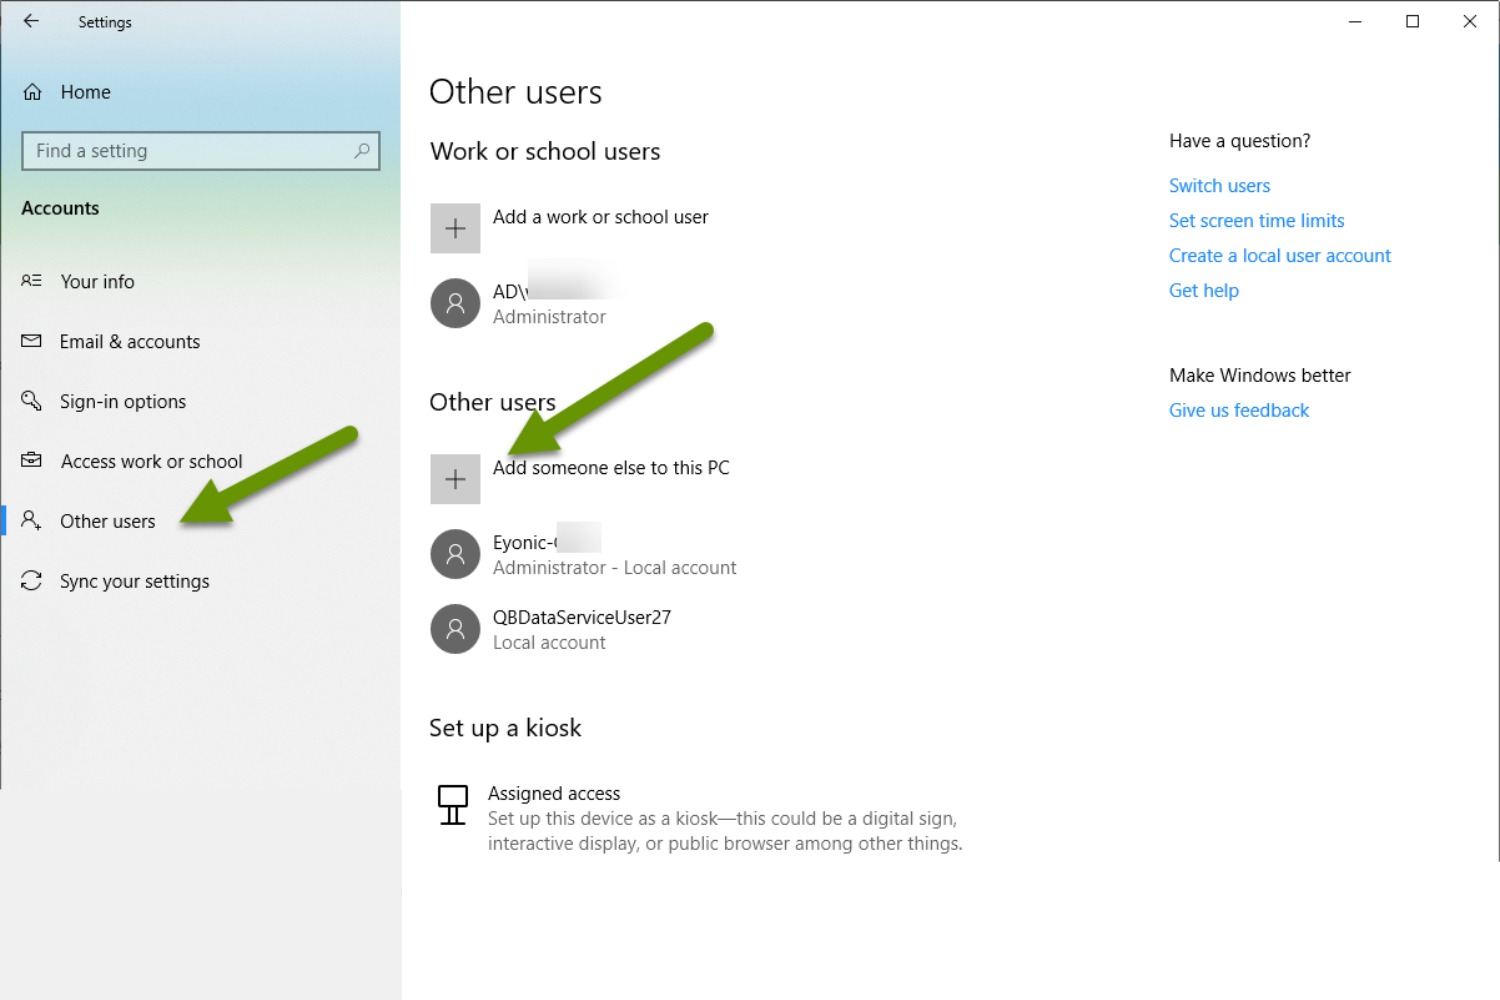
- Create a user account: Lastly, create a user account and password for your Windows 10 login. You can also choose to use a Microsoft account for added convenience.
Once you have completed these steps, Windows 10 will be installed on your HP Ultrabook. Congratulations! You are now ready to explore and enjoy the features and benefits of the latest Microsoft operating system.
Step 6: Activate Windows 10
After successfully installing Windows 10 on your HP Ultrabook, the next step is to activate your operating system. Activation is necessary to validate your copy of Windows and ensure that you have access to all its features and functionalities. Follow these steps to activate Windows 10:
- Open the Settings app: Click on the “Start” button, then select the gear icon to open the Settings app.
- Go to the “Update & Security” section: In the Settings app, navigate to the “Update & Security” section.
- Select “Activation”: In the left menu of the “Update & Security” section, click on “Activation”.
- Click on “Activate”: On the Activation page, click on the “Activate” button to start the activation process.
- Enter your product key: If you have a product key, enter it and click on “Next” to proceed with the activation. The product key should have been provided to you when you purchased your copy of Windows 10.
- Activate with a digital license: If you don’t have a product key, you can select the option to activate with a digital license. This option is available if you had previously activated Windows 10 on your HP Ultrabook using a Microsoft account.
- Wait for the activation: Windows 10 will connect to the activation servers and verify your product key or digital license. It may take a few moments for the activation process to complete.
- Confirmation: Once the activation is successful, you will see a confirmation message indicating that Windows 10 is now activated on your HP Ultrabook.
After completing the activation process, you can enjoy all the features and benefits of Windows 10 without any restrictions. It is important to keep your Windows installation activated to receive updates and security patches from Microsoft.
Congratulations! You have successfully activated Windows 10 on your HP Ultrabook. You are now ready to make the most of your upgraded operating system.
Conclusion
Congratulations on successfully installing and activating Windows 10 on your HP Ultrabook! You have taken the necessary steps to ensure compatibility, backup your important data, download the installation files, create a bootable USB drive, and complete the installation process. Now, you can enjoy the powerful features and enhanced performance that Windows 10 has to offer.
Windows 10 brings a seamless and user-friendly experience to your HP Ultrabook, with improvements in speed, security, and productivity. Its sleek design and integration with the Microsoft ecosystem make it a perfect fit for your daily computing needs. From the intuitive Start menu to the Cortana virtual assistant, you will find an array of features designed to enhance your workflow and enable you to stay connected.
Remember to explore all the customization options available in Windows 10 to tailor the operating system to your preferences. Personalize your desktop, choose your preferred apps and settings, and take advantage of the Microsoft Store to download additional software and utilities.
Keep in mind that staying up to date with the latest updates and security patches is essential for smooth and secure operation. Windows 10 offers automatic updates to ensure that you always have access to the latest features and bug fixes. It’s recommended to enable automatic updates or regularly check for updates manually to keep your system protected.
We hope this guide has been helpful in assisting you through the process of getting Windows 10 on your HP Ultrabook. If you have any further questions or encounter any issues, refer to the official Microsoft documentation or seek assistance from their support channels.
Enjoy the exciting features and improved performance that Windows 10 brings to your HP Ultrabook. Embrace the possibilities and make the most of this powerful operating system!