Introduction
Formatting a hard drive is a crucial step when it comes to managing your computer’s storage and optimizing its performance. Whether you’re planning to upgrade your operating system, securely erase sensitive data, or resolve disk errors, knowing how to format a hard drive in Windows 10 is essential.
In this article, we will guide you through the process of formatting a hard drive in Windows 10, providing step-by-step instructions and tips to ensure a successful outcome. We’ll cover different methods of formatting, including using the Disk Management tool and Command Prompt. Additionally, we’ll discuss the importance of backing up your data before formatting and provide recommendations for reinstalling Windows 10 after the process is complete.
Before we dive into the details, it’s important to note that formatting a hard drive will erase all the data stored on it. Therefore, it is crucial to back up any important files and ensure you have a backup plan in place before proceeding. Let’s explore the reasons why you might want to format a hard drive and how to prepare for the process.
Why Format a Hard Drive?
Formatting a hard drive serves several purposes and can be beneficial in a variety of scenarios. Here are some of the main reasons why you might want to consider formatting your hard drive:
- Upgrading the Operating System: When upgrading to a new operating system, it is often recommended to format your hard drive first. This ensures a clean installation and minimizes the potential for compatibility issues or lingering software conflicts from previous installations.
- Resolving Disk Errors: Over time, hard drives can develop errors that impact their performance and reliability. Formatting the hard drive can help to fix these errors and restore the drive to its optimal state.
- Securely Erasing Data: If you’re planning to sell or donate your computer, formatting the hard drive is essential to ensure that your personal data is completely wiped out. Formatting not only removes the files but also clears any traces of sensitive information, providing peace of mind that your data won’t fall into the wrong hands.
- Removing Malware or Viruses: In some cases, severe malware or virus infections may require formatting the hard drive as a last resort. By formatting, you can ensure that all traces of the malicious software are eliminated, providing a fresh start for your system.
- Resolving Performance Issues: If your computer has become slow or sluggish, formatting the hard drive can help to improve its performance. By removing unnecessary files and software, you can create a clean slate and potentially resolve any performance-related issues.
Formatting a hard drive can be a powerful solution to various computer-related problems. However, it’s important to note that the process will result in a loss of data. Therefore, it is crucial to back up your important files before proceeding with the formatting process. In the next section, we’ll discuss how to prepare for formatting and the importance of backing up your data.
Preparing to Format
Before you proceed with formatting your hard drive, it’s important to take a few steps to ensure a seamless and successful process. Here are some key considerations to keep in mind:
- Back Up Your Data: As mentioned earlier, formatting a hard drive will erase all the data stored on it. Therefore, it is crucial to back up your important files to an external storage device or cloud storage before proceeding. This will prevent any irrecoverable data loss and allow you to restore your files once the formatting process is complete.
- Organize and Clean Up Your Files: Take this opportunity to declutter your hard drive by organizing your files and deleting any unnecessary files or programs. This will not only free up valuable disk space but also make the formatting process faster and more efficient. Use tools like disk cleanup to identify and remove unnecessary files.
- Check for System Requirements: Ensure that your computer meets the minimum system requirements for the Windows 10 operating system or any other OS you plan to install after formatting. This includes checking the processor, RAM, and storage requirements to ensure compatibility and optimal performance.
- Gather Installation Media: If you plan on reinstalling Windows 10 after formatting, make sure you have the necessary installation media, such as a bootable USB drive or DVD. You can download the Windows 10 ISO from the official Microsoft website and create a bootable drive using tools like Rufus or the Windows 10 Media Creation Tool.
- Ensure Power and Connectivity: Make sure your computer is connected to a stable power source throughout the formatting process to avoid any interruptions. Additionally, ensure that all necessary cables, including power and data cables, are securely connected to the hard drive.
By taking these preparatory steps, you’ll minimize the risk of data loss and ensure a smooth formatting process. In the next sections, we’ll explore different methods to format a hard drive in Windows 10, including using the Disk Management tool and Command Prompt.
Backing up Data
Before formatting your hard drive, it is crucial to back up your important data to prevent any data loss. Formatting erases all the data on the drive, so it’s crucial to ensure you have a copy of your files before proceeding. Here are some steps to follow when backing up your data:
- Identify Important Files: Take some time to identify the files and folders that hold important data. These may include documents, photos, videos, music, and any other files that you don’t want to lose.
- Choose a Backup Location: Determine where you want to back up your data. You have a few options, such as an external hard drive, USB flash drive, network storage, or cloud storage platforms like Google Drive or Dropbox.
- Select the Backup Method: Depending on your preference and the amount of data you have, you can choose to manually copy and paste the files to the backup location, use a backup software or tool, or synchronize your files with a cloud storage service.
- Perform the Backup: Start the backup process by following the chosen method. If you’re manually copying files, make sure to preserve the folder structure to easily restore your files later. If you’re using a backup tool, configure the settings and initiate the backup process.
- Verify the Backup: Once the backup is complete, take the time to verify that all your important files are successfully copied to the backup location. Open and check a few files to ensure they are accessible and intact.
Backing up your data is a crucial step that ensures you can restore your files after formatting the hard drive. It provides peace of mind knowing that your important documents, photos, and other files are safely stored in a separate location.
In addition to backing up your personal files, it’s also important to ensure you have a backup of any software installation files or licenses that you may need after reinstalling your operating system. Keep track of any product keys or license codes to avoid any issues during the reinstallation process.
Once you have successfully backed up your data and are confident that you have copies of all the important files, you can proceed with formatting your hard drive. The following sections will explain different methods to format a hard drive in Windows 10.
Checking for System Requirements
Before formatting your hard drive and reinstalling the operating system, it’s important to ensure that your computer meets the minimum system requirements for the version of Windows or other operating system you plan to install. Checking system requirements helps ensure compatibility and optimal performance. Here’s what you need to consider:
- Processor (CPU): Verify that your CPU meets or exceeds the minimum requirements for the operating system. This includes checking the specific model, speed, and number of cores. You can find this information by right-clicking on the “This PC” or “My Computer” icon, selecting “Properties,” and navigating to the “Processor” section.
- Memory (RAM): Check the amount of RAM installed on your computer. Make sure it meets the minimum requirements for the operating system. Insufficient RAM can lead to performance issues and system slowdowns. To check your RAM, go to “Control Panel,” then “System and Security,” and click on “System.”
- Storage Space: Ensure that you have enough free space on your hard drive to accommodate the operating system and any additional software or files you plan to install. Check the storage capacity and available space by opening “File Explorer” and right-clicking on the hard drive. Select “Properties” to view the details.
- Graphics Card: Check if your computer has a dedicated graphics card (GPU) or relies on integrated graphics. Verify that the graphics card meets the minimum requirements for the operating system. This information can be found by right-clicking on the desktop and selecting “Display settings.”
- Other Hardware: Pay attention to other hardware components, such as network adapters, sound cards, and peripherals, to ensure they are compatible with the operating system. Check the manufacturer’s website for driver compatibility and updates.
It’s crucial to ensure that your computer meets the system requirements to guarantee a smooth installation and optimal performance. If your computer falls short in any area, consider upgrading the hardware components before formatting the hard drive.
By checking and confirming the system requirements, you can proceed with confidence, knowing that your computer is ready for the installation and formatting process. The next sections will cover different methods to format a hard drive in Windows 10.
Formatting Options
When it comes to formatting a hard drive in Windows 10, you have several options to choose from. The method you select will depend on your specific needs and preferences. Here are two common formatting options:
- Using the Disk Management Tool: The Disk Management tool is a built-in Windows utility that allows you to manage disk drives and partitions. To access it, right-click on the “Start” button and select “Disk Management” from the context menu. Within Disk Management, you can locate the hard drive you want to format, right-click on it, and choose the “Format” option. Follow the on-screen instructions to complete the formatting process.
- Formatting a Hard Drive from the Command Prompt: Another option is to format the hard drive using the Command Prompt. This method provides more control and flexibility. To format a hard drive from the Command Prompt, open the Start menu, search for “Command Prompt,” and run it as an administrator. Once you have the Command Prompt open, use the appropriate diskpart commands to select the disk and perform the format operation. Be cautious, as formatting using Command Prompt permanently erases all data on the selected drive.
Both methods are effective for formatting a hard drive in Windows 10. The Disk Management tool is suitable for users who prefer a graphical interface and a simpler process. On the other hand, using the Command Prompt provides more advanced options and control for experienced users.
Before formatting, ensure that you have selected the correct hard drive and double-check that you have backed up any important files from the drive. Additionally, be aware that formatting will delete all data on the selected drive, so exercise caution and confirm your actions before proceeding.
In the next sections, we will provide step-by-step instructions on how to format a hard drive using both the Disk Management tool and the Command Prompt.
Using the Disk Management Tool
The Disk Management tool is a convenient and user-friendly way to format a hard drive in Windows 10. This built-in utility allows you to manage disk drives and partitions, including the option to format a hard drive. Here’s a step-by-step guide on how to use the Disk Management tool to format your hard drive:
- Press the Windows key + X on your keyboard to open the Power User Menu. From the menu, select “Disk Management” to launch the Disk Management tool.
- In the Disk Management window, locate the hard drive you want to format. It will be listed along with its partition information.
- Right-click on the target hard drive and select “Format” from the context menu.
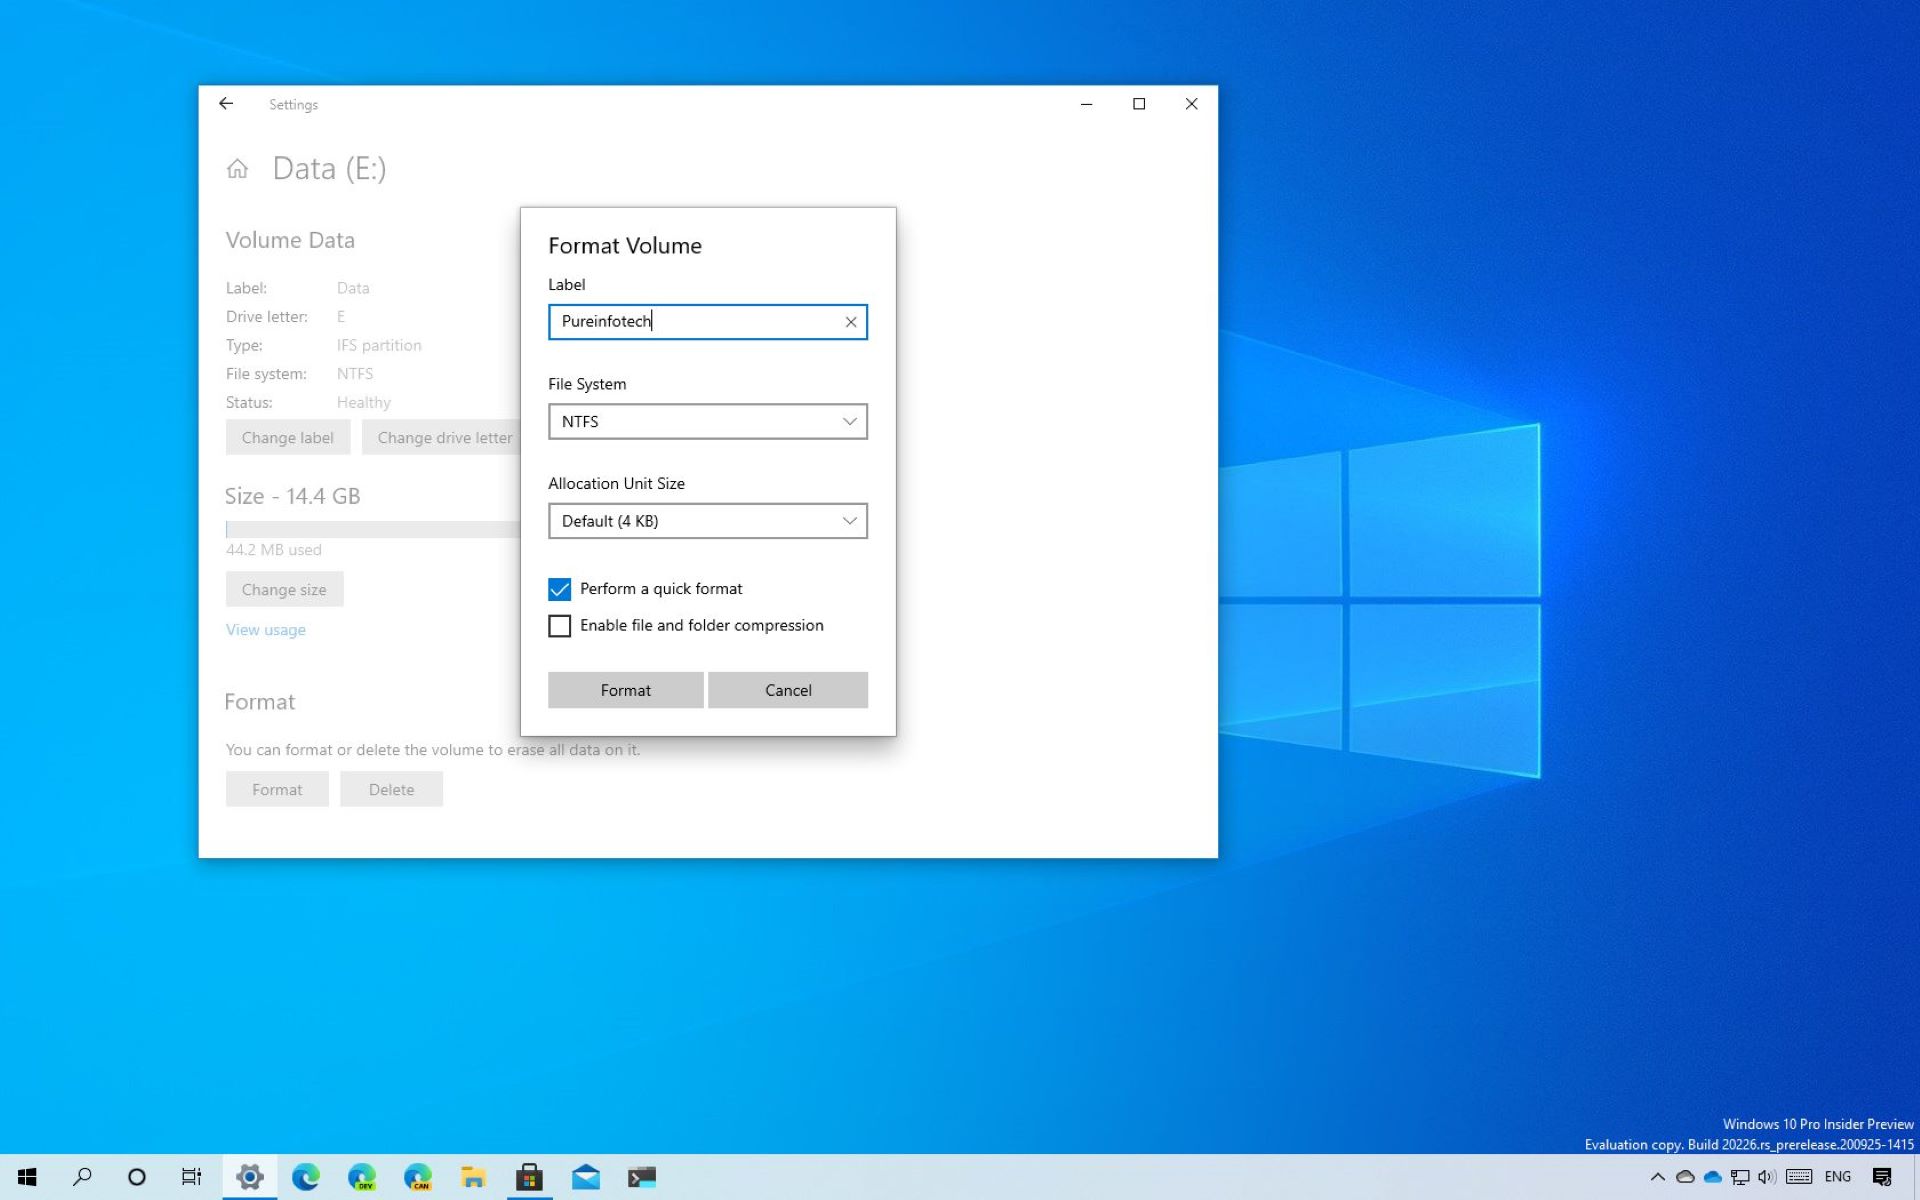
- A new Format window will open, allowing you to configure various options for the format. Choose the file system you prefer (such as NTFS, exFAT, or FAT32), set the allocation unit size, and provide a volume label if desired.
- Ensure that the “Perform a quick format” option is selected if you want a faster format. If you uncheck this option, the format process will take longer but will perform a more thorough check of the disk for errors.
- Double-check all your settings and click “OK” to start the formatting process.
- You will see a warning that formatting will erase all existing data on the selected disk. Confirm your decision and click “OK” to proceed.
- Wait for the formatting process to complete. The time required will depend on the size of the hard drive and the options chosen.
- Once the formatting process finishes, you can close the Disk Management tool.
It is important to note that formatting a hard drive will permanently delete all data on it. Therefore, it is crucial to double-check that you have backed up any important files before proceeding.
The Disk Management tool provides a simple and straightforward method for formatting a hard drive in Windows 10. However, if you prefer more control and flexibility, you may consider formatting the hard drive using the Command Prompt, which we will cover in the next section.
Formatting a Hard Drive from Command Prompt
Formatting a hard drive from the Command Prompt provides advanced control and flexibility. This method allows you to use diskpart commands to select the disk and perform the format operation. Here’s a step-by-step guide on how to format a hard drive using Command Prompt:
- Open the Start menu and search for “Command Prompt.” Right-click on it and select “Run as administrator” to open an elevated Command Prompt.
- In the Command Prompt window, type “diskpart” and press Enter to launch the diskpart utility.
- Type “list disk” and press Enter to view a list of all available disks on your computer.
- Identify the disk number of the hard drive you want to format. Take note of the disk number to ensure you select the correct disk.
- Type “select disk X” (replace “X” with the disk number of your hard drive) and press Enter to select the desired disk.
- Once the disk is selected, type “clean” and press Enter. This command will remove any existing partitions and data on the selected disk.
- Next, type “create partition primary” and press Enter to create a new primary partition on the disk.
- Type “format fs=NTFS quick” and press Enter to perform a quick format with the NTFS file system. If you prefer a different file system, replace “NTFS” with the desired file system (e.g., “FAT32” or “exFAT”).
- Wait for the format process to complete. The duration will depend on the size of the hard drive.
- After the format process finishes, type “assign letter=X” (replace “X” with the desired drive letter) to assign a drive letter to the newly formatted partition.
- Finally, type “exit” and press Enter to exit the diskpart utility.
It is crucial to exercise caution when using the Command Prompt for formatting a hard drive. Ensure that you have selected the correct disk, as formatting will erase all data on the selected disk.
Using the Command Prompt provides more control and advanced options for formatting a hard drive. However, if you prefer a simpler approach, you may opt for the Disk Management tool, as discussed in the previous section.
Now that you know how to format a hard drive using the Disk Management tool and the Command Prompt, you can choose the method that aligns with your preferences and needs. After formatting, you may need to reinstall your operating system, which we will cover in the next section.
Reinstalling Windows 10
After formatting your hard drive, you will need to reinstall the Windows 10 operating system to start afresh. Here’s a step-by-step guide on how to reinstall Windows 10:
- Ensure that you have the necessary installation media, such as a bootable USB drive or DVD, with the Windows 10 installation files. You can create a bootable USB drive using the Windows 10 Media Creation Tool.
- Insert the bootable USB drive or DVD into your computer and restart it.
- During the boot process, enter the BIOS or UEFI settings of your computer. The key to enter the BIOS or UEFI settings may vary depending on your computer’s manufacturer. Common keys include F2, F10, or Del.
- In the BIOS or UEFI settings, set the boot priority to the device that contains the Windows 10 installation files. This ensures that your computer boots from the USB drive or DVD.
- Save the changes and exit the BIOS or UEFI settings. Your computer will restart and start booting from the selected device.
- Follow the on-screen instructions to start the Windows 10 installation process. Select your language preferences, accept the license terms, and choose the type of installation (typically “Custom” or “Clean Install”).
- When you reach the disk selection screen, choose the newly formatted hard drive where you want to install Windows 10. If necessary, you can create new partitions or format existing ones during this step.
- Proceed with the installation by following the remaining on-screen instructions. Windows 10 will be installed on the selected hard drive.
- After the installation is complete, your computer will restart. Remove the installation media (USB drive or DVD) to prevent the computer from booting from it again.
- Follow the remaining instructions to personalize your settings, including creating a user account and choosing privacy settings.
- Once you’ve completed the setup process, Windows 10 will be ready to use on your freshly formatted hard drive.
Remember to reinstall any additional software, drivers, and updates that were installed on your previous Windows 10 system. It is also a good idea to restore your backed-up files and data to the appropriate locations on the newly installed operating system.
By following these steps, you can reinstall Windows 10 after formatting your hard drive and enjoy a clean, optimized operating system.
Final Thoughts and Recommendations
Formatting a hard drive in Windows 10 is a powerful tool for managing your computer’s storage and optimizing its performance. Before formatting, it’s crucial to back up your important data to prevent any loss. Additionally, ensure that your computer meets the system requirements for the operating system you plan to reinstall after formatting.
When it comes to formatting options, you can choose between the user-friendly Disk Management tool or the more advanced Command Prompt method. Both methods will allow you to format the hard drive successfully, so select the one that suits your needs and comfort level.
After formatting, reinstalling Windows 10 becomes a necessary step. Ensure that you have the installation media ready and follow the step-by-step instructions to complete the process. Remember to reinstall any additional software, drivers, and updates and restore your backed-up files to their appropriate locations.
Here are some final recommendations to keep in mind:
- Regularly back up your data: Make it a habit to back up your important files and data regularly to ensure their safety in case of any unforeseen circumstances or future formatting needs.
- Keep your system updated: After reinstalling Windows 10, regularly update your operating system, drivers, and software to ensure optimal performance and security.
- Practice safe computing: Install and maintain a reliable antivirus program, be cautious when downloading files or visiting unfamiliar websites, and regularly scan your system for malware.
- Organize and declutter your files: Take advantage of the formatting process to clean up your hard drive, delete unnecessary files, and organize your data in a logical manner for easier future access.
- Consider disk partitioning: If you have multiple drives or a large hard drive, consider partitioning it into separate sections for better data organization and management.
By following these recommendations, you can maintain a well-organized and optimized computer system, ensuring a smoother computing experience.
Remember, formatting a hard drive is a substantial process that should be approached with caution. Double-check your backups, system requirements, and formatting choices to ensure a successful outcome. If you’re unsure or unfamiliar with the process, it’s always a good idea to seek guidance or consult a professional.