Introduction
Welcome to our guide on how to fix a digital camera lens that is stuck! We understand how frustrating it can be when you’re ready to capture that perfect shot, but your camera lens refuses to cooperate. Don’t worry, though – this common issue can often have a simple solution that you can tackle on your own.
A stuck camera lens can happen for various reasons, such as mechanical failures, debris or dirt buildup, or even software glitches. Fortunately, there are several methods you can try to fix the problem and get your camera back in working order. In this guide, we’ll walk you through step-by-step instructions on how to troubleshoot and resolve a stuck camera lens.
Before we dive into the specific methods, it’s important to note that not all techniques will work for every situation. The severity of the issue and the camera model can affect the outcome. It’s always a good idea to start with the least invasive methods and progress to more advanced solutions if necessary.
So, if you’re ready to revive your camera and start capturing those special moments again, let’s get started with our troubleshooting guide on fixing a stuck camera lens.
Common Reasons for a Stuck Camera Lens
A stuck camera lens can be caused by various factors. Understanding the common reasons behind this issue can help you troubleshoot and potentially avoid future problems. Here are some of the typical culprits:
- Mechanical Failure: Over time, the mechanical components of a camera lens can wear out or become misaligned. This can prevent the lens from extending or retracting properly, resulting in a stuck position.
- Debris or Dirt Buildup: Dust, sand, or other small particles can find their way into the lens mechanism, impeding its movement. This can occur in various environments, particularly in outdoor settings where cameras are exposed to elements like wind or sandy beaches.
- Accidental Impact: Dropping or bumping your camera can cause internal damage to the lens mechanism, resulting in it getting stuck. Even a minor impact can disrupt the delicate alignment of the lens components.
- Software Glitches: Sometimes, a stuck camera lens can be caused by a software malfunction. This can occur when the camera’s firmware encounters an error or becomes unresponsive, preventing the lens from functioning correctly.
- Moisture or Liquid Damage: Exposure to moisture, water splashes, or other liquids can cause corrosion or short circuits in the camera lens mechanism. This can lead to the lens getting stuck or experiencing other functionality issues.
It’s important to note that identifying the precise cause of a stuck lens can be challenging without professional inspection. However, these common reasons give you a starting point for troubleshooting and potentially resolving the issue on your own. In the next section, we will provide you with step-by-step methods to fix a stuck camera lens.
Step-by-Step Guide to Fix a Stuck Camera Lens
If you find yourself dealing with a stuck camera lens, don’t panic. With a systematic approach and a little patience, you can often resolve the issue on your own. Follow these step-by-step instructions to troubleshoot and fix a stuck camera lens:
- Power Off: Start by turning off your camera. This will prevent any further damage and allow you to safely handle the camera without accidentally triggering any functions.
- Remove the Battery: Removing the battery from the camera can help to reset its internal settings. Leave the battery out of the camera for at least a minute before reinserting it.
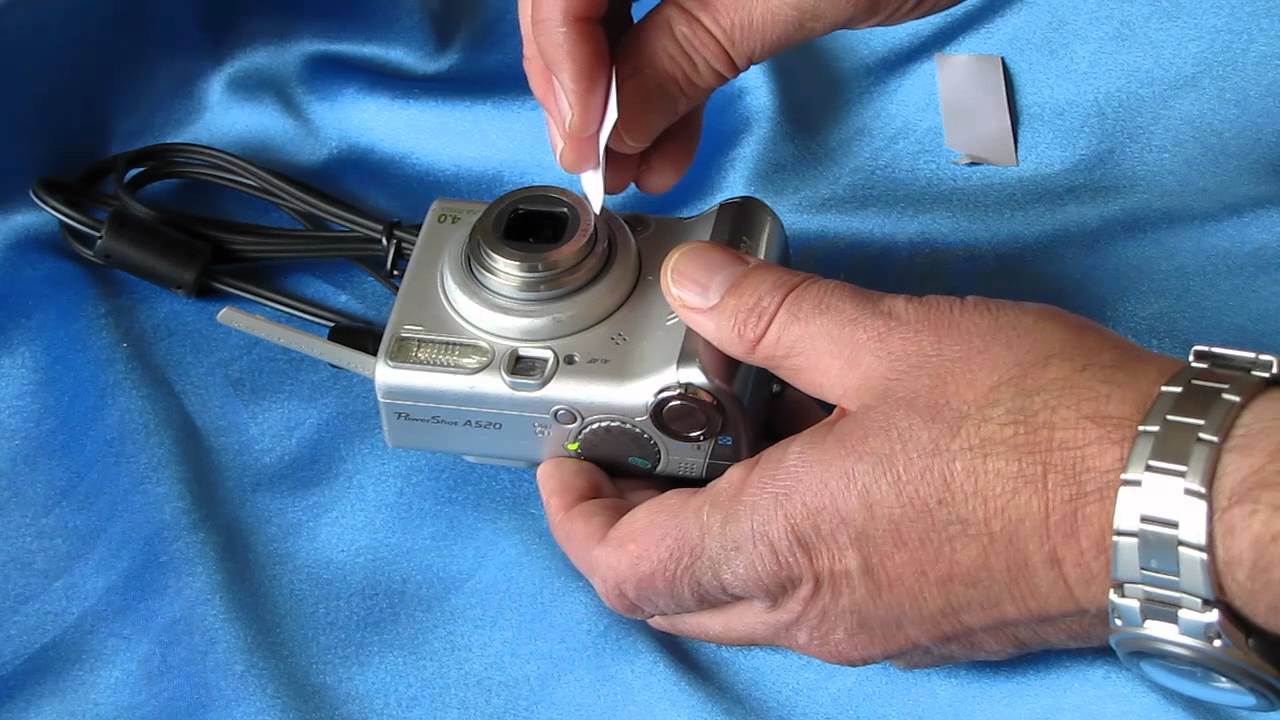
- Clean the Lens: Inspect the lens for any visible debris or dirt. Gently wipe the lens surface with a soft microfiber cloth or lens cleaning solution to remove any particles that may be causing the obstruction.
- Restart Your Camera: Once you’ve cleaned the lens, power on the camera and check if the lens extends and retracts as intended. Sometimes, a simple restart can resolve minor issues and get the lens unstuck.
- Removing Obstructions: If the lens is still stuck, look for any visible obstructions around the lens barrel or inside the camera housing. Use a soft brush or compressed air to carefully remove any debris that may be causing the problem.
- Using Compressed Air: If there are no visible obstructions, gently blow compressed air around the lens barrel to dislodge any hidden debris. Be cautious not to hold the nozzle too close to the lens, as excessive air pressure can potentially damage delicate components.
- Tapping or Shaking the Camera: In some cases, a stuck lens can be freed by giving the camera a gentle tap or shake. Hold the camera firmly and tap the sides or bottom with your hand to try and dislodge any internal mechanism that may be causing the obstruction.
- Applying Gentle Pressure: If none of the previous methods worked, you can apply gentle pressure to the lens barrel. Hold the camera securely and gently push or pull the lens in the direction opposite to where it’s stuck. Be careful not to exert excessive force or twist the lens.
- Resetting Your Camera: If all else fails, refer to your camera’s user manual to perform a factory reset. This will restore the camera’s settings to the original defaults and may help resolve any software-related issues causing the lens to be stuck.
- Seek Professional Help: If after trying these methods the lens remains stuck, it may require professional repair. Contact the camera manufacturer’s customer support or take your camera to a certified technician for further assistance.
Remember, not every method will work for every situation, and it’s important to exercise caution and patience when attempting to fix a stuck camera lens. Hopefully, one of these steps will help you get your camera back in working order.
Method 1: Restart Your Camera
One of the simplest and often effective methods to fix a stuck camera lens is to restart your camera. This method can help resolve minor software glitches that may be causing the lens to get stuck. Follow these steps to restart your camera:
- Power Off: Start by turning off your camera. This will ensure that no functions are inadvertently triggered during the restart process.
- Remove the Battery: Open the battery compartment and remove the battery from your camera. This will help in resetting the internal settings. Leave the battery out of the camera for at least a minute to ensure a complete reset.
- Reinsert the Battery: After a minute has passed, reinsert the battery into the camera. Ensure it is firmly in place and close the battery compartment securely.
- Power On: Press the power button to turn on your camera. Allow it a few moments to initialize and check if the lens extends and retracts properly. In many cases, a simple restart can resolve the issue and get the camera lens unstuck.
- Test the Lens: Once the camera has powered on, test the lens by zooming in and out (if applicable) and checking if it moves smoothly. Take a few test shots to ensure that the lens is functioning correctly.
If the lens still remains stuck after restarting the camera, you may need to move on to other methods to resolve the issue. However, it’s worth trying this method first, as it requires minimal effort and can often successfully fix the problem, especially if it’s caused by a temporary software glitch.
Note that some cameras have a dedicated reset button or a menu option to perform a soft reset. Consult your camera’s user manual to determine if there are any additional steps specific to your camera model.
Method 2: Removing Obstructions
If your camera lens is stuck, there might be obstructions present that are preventing its smooth movement. Dust, dirt, or small particles can find their way into the lens mechanism, hindering its extension or retraction. Follow these steps to remove any visible obstructions:
- Power Off: Before attempting to remove obstructions, make sure your camera is turned off. This will prevent any accidental damage and ensure your safety while handling the camera.
- Inspect the Lens: Carefully examine the lens barrel and surrounding area for any visible signs of obstruction. Check for dirt, debris, or any foreign objects that may be lodged in the crevices.
- Clean the Area: If you spot any obstructions, use a soft, lint-free cloth or a brush designed for camera cleaning to gently remove the debris. Be cautious not to apply too much pressure or use abrasive materials that could scratch or damage the lens surface.
- Blow Compressed Air: If there are stubborn particles that cannot be easily wiped away, you can try using compressed air. Hold the camera with the lens facing downwards and use short, controlled bursts of compressed air to dislodge the debris. Ensure that you hold the nozzle a safe distance away from the lens to prevent any damage from excessive air pressure.
- Recheck and Test: After removing the visible obstructions, inspect the lens again to make sure it is clean. Power on the camera and check if the lens is now able to extend or retract smoothly. Take a few test shots to ensure that the issue has been resolved.
Removing obstructions can often resolve a stuck camera lens, especially if the obstruction was causing the mechanism to become jammed. However, if the lens remains stuck after attempting this method, continue to the next steps in our troubleshooting guide.
Keep in mind that if you are unsure about performing this procedure on your own, it is recommended to seek professional assistance to avoid causing further damage to your camera.
Method 3: Using Compressed Air
If your camera lens is stuck and there are no visible obstructions, using compressed air can be an effective method to dislodge any hidden debris that may be causing the problem. Here’s how you can use compressed air to potentially fix a stuck camera lens:
- Power Off: Before using compressed air, ensure that your camera is powered off. This will prevent any accidental damage and ensure your safety during the process.
- Hold the Camera Properly: Grab your camera securely, making sure you have a firm grip. Position your camera with the lens facing downwards to allow any dislodged debris to fall away from the lens mechanism.
- Use a Can of Compressed Air: Hold the can of compressed air at a safe distance from the lens and use short, controlled bursts of air to blow around the lens barrel. Make sure to follow the instructions on the can and avoid tilting or shaking it vigorously.
- Cover Openings: While using compressed air, it’s a good practice to cover any openings on your camera, such as the battery compartment or memory card slot. This will prevent any particles from being blown deeper into the camera.
- Repeat if Necessary: If the first attempt doesn’t resolve the issue, you can try using compressed air again. Sometimes, stubborn debris may require a few attempts to dislodge completely.
- Power On and Test: After using compressed air, power on your camera and check if the lens now extends and retracts smoothly. Take a few test shots to ensure that the lens is functioning properly.
Using compressed air can be a helpful method to clear any hidden debris that may be obstructing the movement of your camera lens. However, it’s important to use caution and avoid holding the can too close to the lens or using excessive air pressure, as this may cause damage to delicate components.
If the lens remains stuck after attempting this method, proceed to the next steps in our troubleshooting guide to find a solution for your camera.
Method 4: Tapping or Shaking the Camera
If your camera lens is stuck and other methods haven’t resolved the issue, you can try gently tapping or shaking the camera to dislodge any internal components that may be causing the obstruction. Here’s how you can use this method:
- Power Off: Before attempting to tap or shake the camera, ensure that it is powered off. This will prevent any accidental damage and ensure your safety during the process.
- Hold the Camera Firmly: Grasp the camera securely, making sure you have a firm grip. Hold the camera with one hand while using the other hand to perform the tapping or shaking action.
- Gentle Tapping: With your camera held parallel to the ground, give it a few gentle taps on the sides or bottom. The aim is to dislodge any internal mechanism that may be causing the lens to stick. Avoid hitting the camera too hard as it may cause further damage.
- Gentle Shaking: If tapping alone doesn’t work, you can try gently shaking the camera. Hold the camera securely and sway it from side to side or up and down in a controlled manner. The motion may help to reposition any internal components that are causing the obstruction.
- Power On and Test: After tapping or shaking the camera, power it on and check if the lens now extends and retracts smoothly. Take a few test shots to ensure that the lens is functioning correctly.
It’s important to exercise caution while using this method. Ensure that you hold the camera firmly and use only slight tapping or shaking motions. Avoid excessive force or rough handling, as this may cause additional damage to your camera.
If the lens remains stuck after attempting this method, continue to the next steps in our troubleshooting guide to find a solution for your camera.
Method 5: Applying Gentle Pressure
If your camera lens is stuck and other methods haven’t been successful, applying gentle pressure to the lens barrel can sometimes help free it from its stuck position. Here’s how you can try this method:
- Power Off: Before applying any pressure, ensure that your camera is powered off. This will prevent accidental damage and ensure your safety during the process.
- Hold the Camera Securely: Grasp the camera firmly, ensuring you have a secure grip. Position your fingers around the lens barrel for better control during the application of pressure.
- Apply Gentle Pressure: While holding the camera securely, gently push or pull the lens barrel in the opposite direction of where it is stuck. Use subtle and gradual pressure, avoiding any sudden or forceful movements that may cause damage.
- Attempt Different Directions: If applying pressure in one direction doesn’t yield any results, try applying gentle pressure in different directions to see if it helps to dislodge the lens. Be patient and try small adjustments until you find a movement that seems to make a difference.
- Power On and Test: After applying pressure, power on your camera and check if the lens extends and retracts smoothly. Take a few test shots to ensure that the lens is functioning properly.
It’s important to note that this method requires careful handling to avoid exerting excessive force or causing further damage to your camera. If you’re uncomfortable or unsure about applying pressure on your own, it’s recommended to seek professional assistance.
If the lens remains stuck after attempting this method, proceed to the next steps in our troubleshooting guide to find a solution for your camera.
Method 6: Resetting Your Camera
If your camera lens is stuck and none of the previous methods have worked, resetting your camera to its factory settings may help resolve the issue. Here’s how you can reset your camera:
- Check the User Manual: Consult your camera’s user manual or manufacturer’s website to locate the specific instructions for performing a factory reset. Different camera models may have different procedures, so it’s important to follow the correct steps.
- Backup Your Data: Before resetting your camera, ensure that you have backed up any important images or data as the factory reset will erase all personalized settings and data on your camera.
- Access the Reset Option: Depending on your camera, the reset option may be located in the camera’s menu settings or accessible through external buttons. Refer to the user manual to find the exact location of the reset option.
- Initiate the Reset: Once you have located the reset option, follow the instructions to initiate the reset process. This may involve pressing specific buttons, navigating through the menu settings, or a combination of both.
- Confirm the Reset: During the reset process, you will likely be prompted to confirm your decision. Ensure that you read the on-screen instructions carefully and confirm the reset if you wish to proceed.
- Wait for the Reset: After confirming the reset, your camera will undergo the reset process. This may take a few moments as the camera’s settings are restored to their original factory defaults.
- Power On and Test: Once the reset is complete, power on your camera and check if the lens responds normally. Test the lens by zooming in and out (if applicable) and taking a few test shots to ensure that the issue has been resolved.
Performing a factory reset will revert your camera to its original settings, which can help resolve any software-related issues that may be causing the lens to be stuck. However, remember to backup your data and be aware that all personalized settings will be lost.
If the lens remains stuck after resetting your camera, it may be necessary to seek professional assistance or explore alternative solutions.
Method 7: Seek Professional Help
If you have tried all the previous methods and your camera lens is still stuck, it may be time to seek professional help. Getting assistance from a camera technician or contacting the manufacturer’s customer support can provide you with expert advice and possible solutions. Here’s what you can do:
- Contact Customer Support: Reach out to the camera manufacturer’s customer support department. Explain the issue you are experiencing with your camera lens and ask for their guidance. They may provide you with detailed instructions or recommend a certified service center in your area.
- Visit a Professional Technician: If the camera is under warranty or you prefer to have a professional handle the repair, consider taking it to a certified camera technician. These experts have the knowledge and tools to diagnose and fix complex issues with camera lenses.
- Explain the Problem: Provide the technician with a detailed explanation of the problem you are facing. Mention the steps you have already taken to troubleshoot the issue. This information will assist them in identifying the cause and determining the best course of action.
- Consider Repair Costs: Depending on the severity of the problem and the camera’s age, you’ll need to weigh the cost of repair against the value of the camera. The technician or manufacturer’s support team can provide you with an estimate of the repair costs, which will help you make an informed decision.
Professional help can be beneficial if the issue with your camera lens is more complicated or if you’re not comfortable trying to fix it yourself. It ensures that the repair is handled by experts who have the necessary knowledge and equipment to effectively resolve the problem.
Remember to research and choose a reputable camera repair service or consult the camera manufacturer directly for the best assistance with your stuck lens issue.
Conclusion
A stuck camera lens can be a frustrating problem, but with the right troubleshooting steps, it can often be resolved. In this guide, we’ve explored several methods to help fix a stuck camera lens.
Starting with simple solutions like restarting the camera or removing visible obstructions can sometimes do the trick. If those methods don’t work, you can try using compressed air, tapping or shaking the camera gently, or applying gentle pressure to the lens barrel. These methods can help dislodge any hidden debris or align internal components.
If all else fails, it’s wise to consider resetting your camera to its factory settings or seeking professional help. Resetting the camera can resolve software-related issues, while professional assistance ensures that the problem is addressed by experienced technicians.
Remember to exercise caution when attempting any DIY methods and consult your camera’s user manual for specific instructions tailored to your device. If you’re unsure or uncomfortable, it’s always best to seek professional assistance to avoid further damage.
While these methods can often fix a stuck camera lens, it’s important to acknowledge that there may be instances where the lens cannot be repaired and requires replacement. In such cases, consulting a camera technician or the manufacturer is advisable.
We hope this guide has been helpful in resolving your stuck camera lens issue. Remember to take proper care of your camera to avoid similar problems in the future, such as keeping it clean and protected from potential hazards. Happy shooting!