Introduction
So, you want to learn how to deregister your Amazon Fire Tablet? Whether you’re looking to sell or give away your device, or maybe you simply want to start fresh with a new Amazon account, the process of deregistering your tablet is quick and easy. This guide will walk you through the steps to ensure a smooth and successful deregistration.
Amazon Fire Tablets are known for their user-friendly interface, versatile features, and access to a wide range of apps, games, and entertainment options. However, there may come a time when you need to remove your device from your Amazon account, whether it’s to free up space, switch to a different account, or pass it on to someone else.
Deregistering your Amazon Fire Tablet not only removes it from your account but also resets it to its factory settings, erasing all personal data and customizations. This ensures that the new owner will have a clean slate to work with and provides an added layer of privacy and security for you.
In the following sections, we’ll walk you through the step-by-step process of deregistering your Amazon Fire Tablet. Whether you’re a tech-savvy individual or a beginner, these instructions are designed to be easy to follow and applicable to all Fire Tablet models.
Step 1: Go to Settings
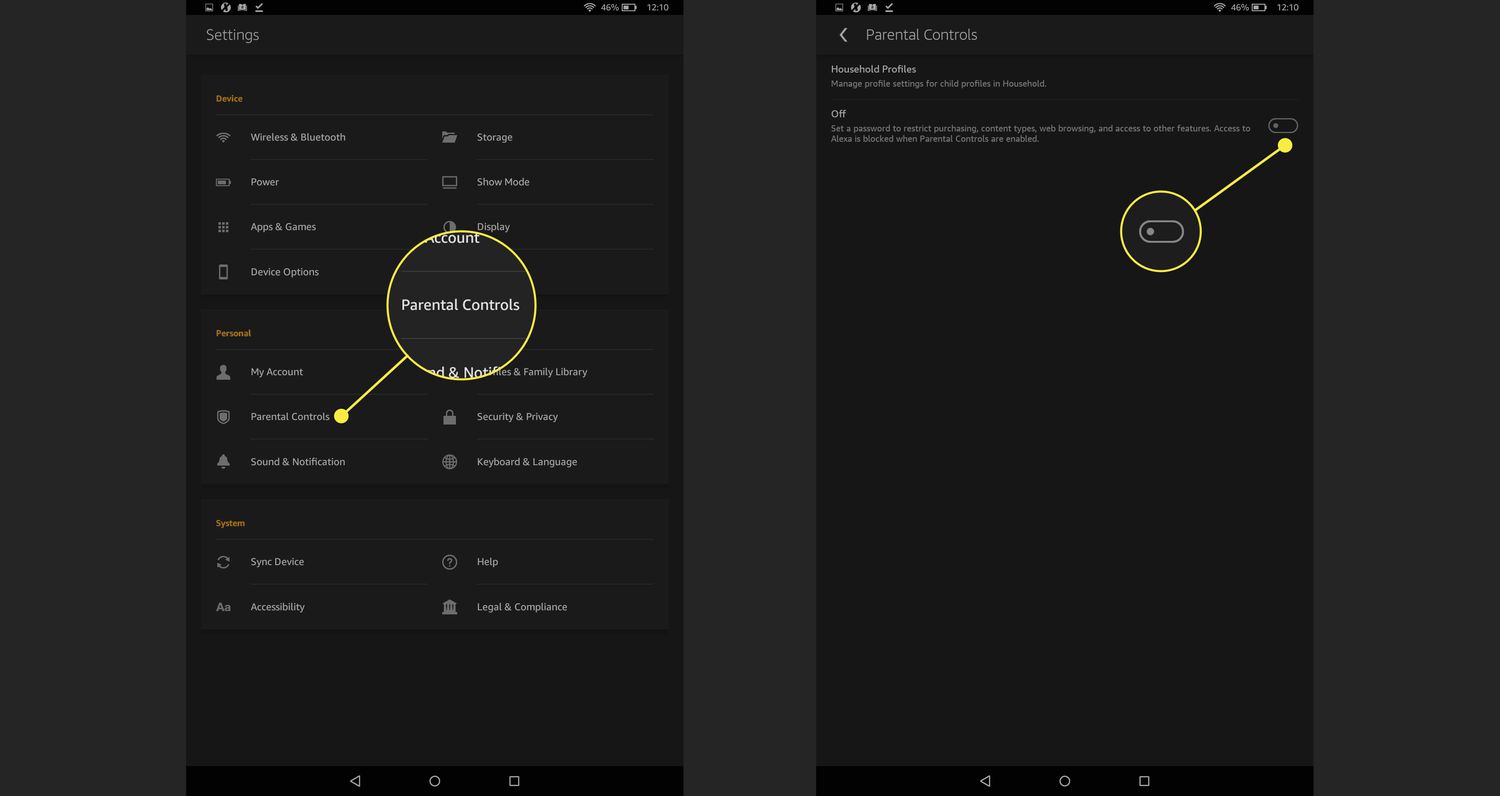
The first step to deregistering your Amazon Fire Tablet is to navigate to the Settings menu. The settings menu houses all the necessary options for managing your device’s configuration and preferences.
To access the Settings menu, you can follow these simple steps:
- Unlock your Amazon Fire Tablet by entering your PIN or using your biometric authentication.
- Swipe down from the top of the screen to reveal the notification panel.
- Tap on the “Settings” icon, which resembles a gear or a cogwheel. This will open the Settings menu.
Alternatively, you can access the Settings menu by tapping on the “Apps” tab on the home screen and then selecting the “Settings” app from the list.
Once you are in the Settings menu, you will see various options for configuring your Amazon Fire Tablet. This includes options for managing your account, personalization settings, connectivity settings, and more. It is essential to access the correct settings to proceed with the deregistration process.
Now that you have successfully accessed the Settings menu, let’s move on to the next step to deregister your Amazon Fire Tablet.
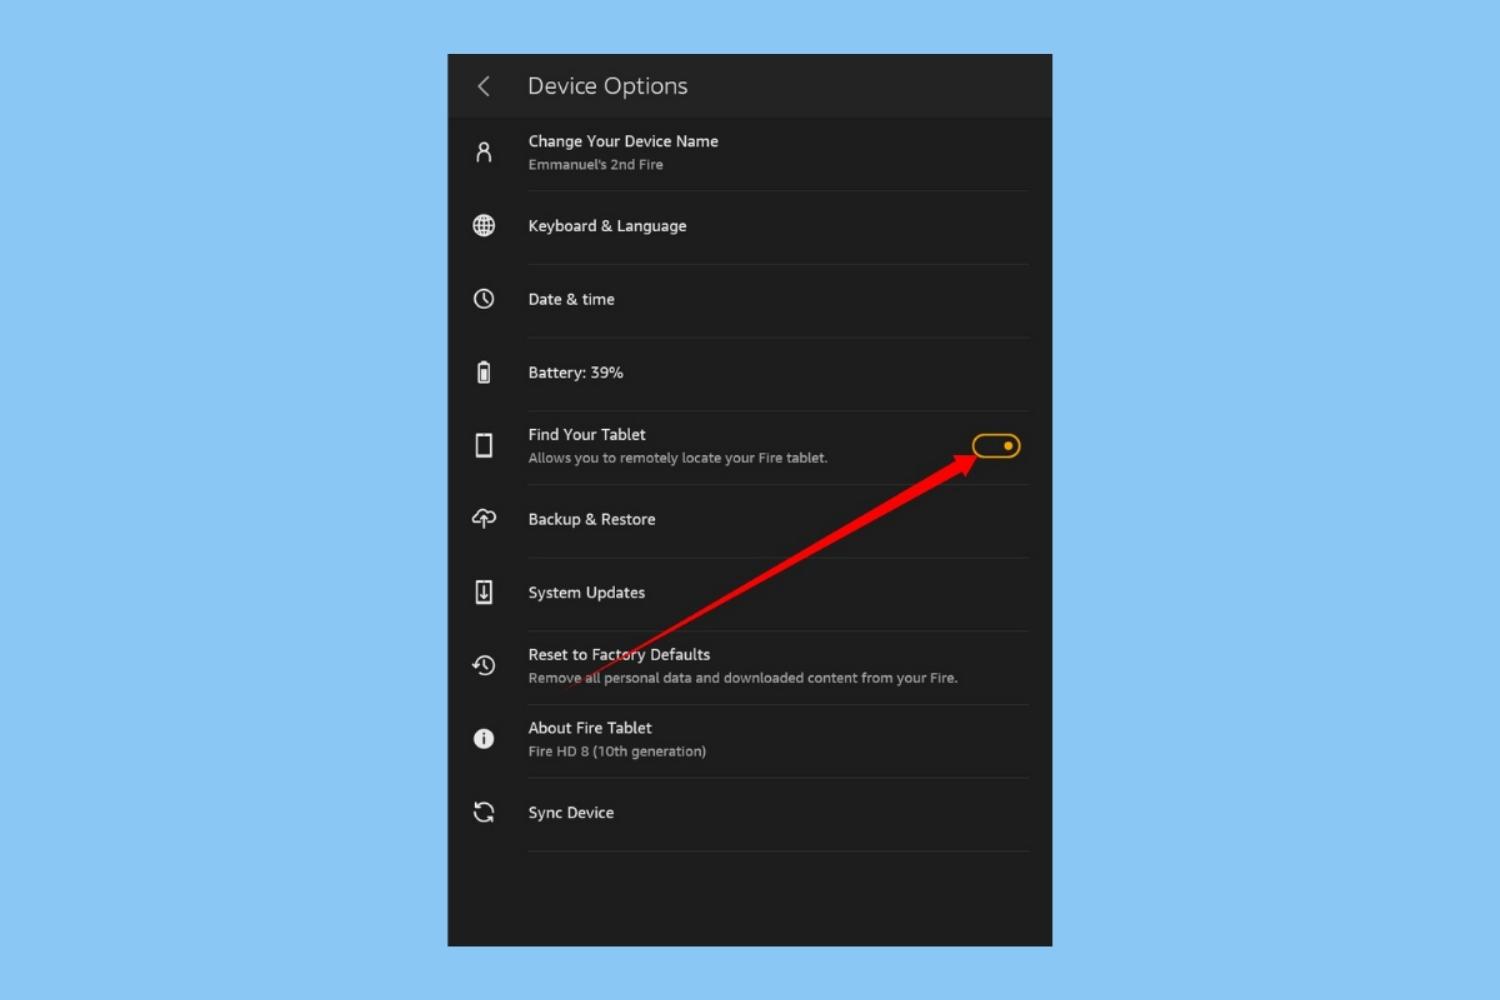
Step 2: Select Device Options
After accessing the Settings menu on your Amazon Fire Tablet, the next step in the deregistration process is to select the “Device Options” menu. This menu contains specific settings and options related to your device.
To navigate to the Device Options menu, follow the steps below:
- From the Settings menu, scroll down until you find the “Device Options” or “Device” category. The name may vary slightly depending on your Fire Tablet model.
- Tap on the “Device Options” or “Device” category to access the submenu.
Once you have entered the Device Options menu, you will see a list of settings and options that are specific to your Amazon Fire Tablet. These options allow you to customize various aspects of your device, including display settings, storage management, security settings, and more. However, for the purpose of deregistration, we will be focusing on a specific option within this menu.
Note: If your Fire Tablet does not have a separate “Device Options” category, you may find the deregistration option directly in the “Settings” menu. Look for options such as “My Account,” “Amazon Account,” or “Registration” to proceed with the deregistration process.
Now that you have reached the Device Options menu, let’s continue to the next step to learn how to proceed with deregistering your Amazon Fire Tablet.
Step 3: Tap on Reset to Factory Defaults
Now that you have accessed the Device Options menu on your Amazon Fire Tablet, it’s time to take the next step in the deregistration process. In this step, you will tap on the option to reset your device to its factory default settings. This will erase all personal data and settings, returning your tablet to its original state.
Here’s how you can proceed:
- From the Device Options menu, scroll down until you find the “Reset to Factory Defaults” or “Reset” option.
- Tap on the “Reset to Factory Defaults” or “Reset” option to proceed.
After tapping on the reset option, you may be prompted to enter your device’s passcode or confirm your action. This additional step helps ensure that the deregistration process is intentional and prevents any accidental data loss.
Keep in mind that resetting your tablet to its factory default settings will erase all data, including apps, media, personalized settings, and accounts. Therefore, it’s essential to create a backup of any important data or files before proceeding with this step.
Once you have confirmed the reset to factory defaults, your Amazon Fire Tablet will begin the process of erasing data and restoring it to its original settings. This process may take a few minutes, so be patient and refrain from interrupting the process.
Now that you have successfully initiated the reset to factory defaults, let’s move on to the next step, where you will confirm the deregistration of your Amazon Fire Tablet.
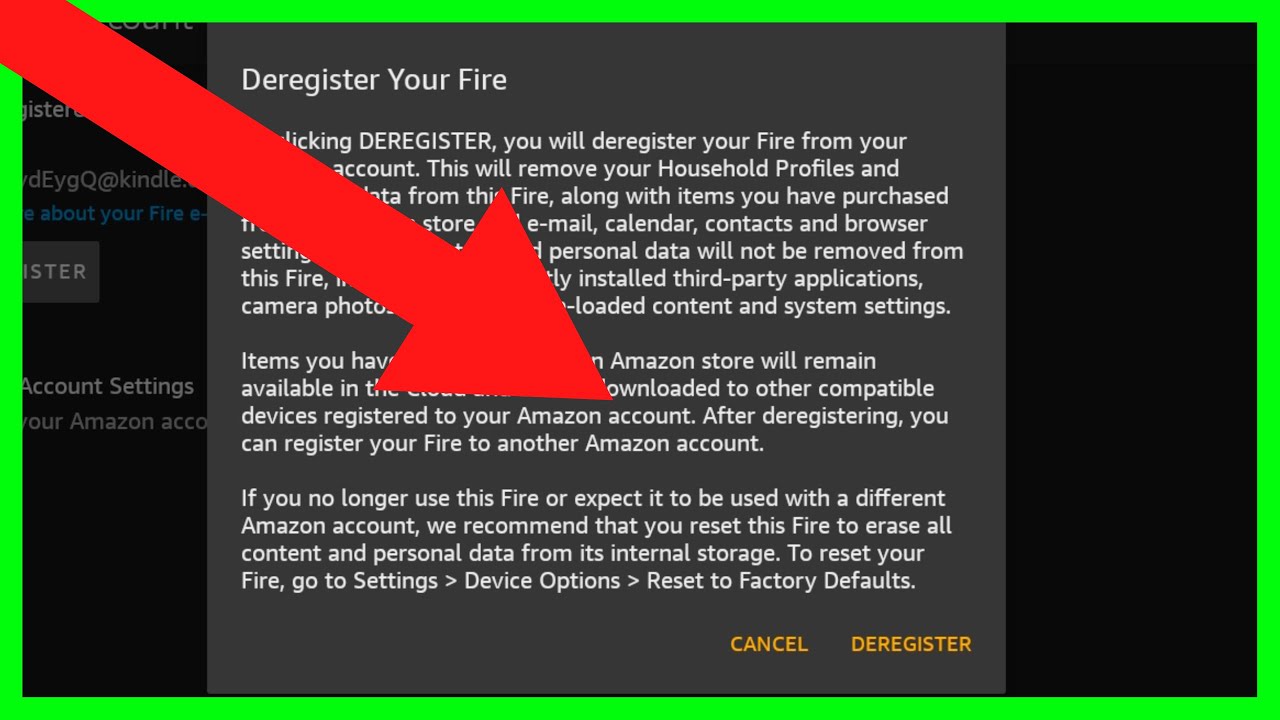
Step 4: Confirm the Deregistration
After resetting your Amazon Fire Tablet to its factory default settings, the next step in the deregistration process is to confirm the action and complete the removal of your device from your Amazon account. This step ensures that your tablet is no longer associated with your account and can be registered with a different Amazon account if desired.
Follow these instructions to confirm the deregistration:
- Once your tablet has finished resetting to its factory default settings, you will see the initial setup screen.
- Proceed through the setup screens until you reach the screen that asks you to register your device.
- On this screen, you will see the option to register your tablet with an Amazon account. However, since you want to deregister it, tap on the “Skip” or “Not Now” option.
By selecting the “Skip” or “Not Now” option, you are confirming that you do not want to associate your Amazon Fire Tablet with an Amazon account at the moment. This finalizes the deregistration process and ensures that your tablet is no longer linked to your previous account.
Once you have confirmed the deregistration, you will be able to use your Amazon Fire Tablet without being tied to any specific Amazon account. This allows you the flexibility to either register it with a new Amazon account or give it to someone else to register with their account.
Now that you have successfully confirmed the deregistration, we can move on to the optional step of setting up a new Amazon account if desired.
Step 5: Set Up a New Amazon Account (Optional)
After deregistering your Amazon Fire Tablet, you have the option to set up a new Amazon account if you wish to continue using the device with a different account. Setting up a new Amazon account allows you to access the full range of Amazon services, such as the Kindle Store, Amazon Appstore, and Prime Video.
If you want to set up a new Amazon account, follow these steps:
- On the initial setup screen, where you skipped the registration step in the previous step, tap on the option to register your device.
- On the “Sign-In” screen, tap on the “Create a new Amazon account” link.
- Follow the on-screen prompts to provide the necessary information, such as your name, email address, and password, to create a new Amazon account.
Make sure to read and agree to the terms of service and privacy policy before proceeding. It’s also recommended to provide a valid payment method during the registration process, as it will allow you to make purchases and access additional features on your Amazon Fire Tablet.
Once you have successfully set up a new Amazon account, you can start enjoying all the benefits that come with it. You can download apps, purchase eBooks, stream movies and TV shows, and much more from your new Amazon account on your Fire Tablet.
Remember that setting up a new Amazon account is optional. If you do not wish to register your tablet with a new account at this time, you can simply start using your Fire Tablet without an Amazon account. However, keep in mind that certain Amazon services and features may be limited without a registered Amazon account.
With the completion of this optional step, you have successfully learned how to deregister your Amazon Fire Tablet and the subsequent step to set up a new Amazon account if desired.
Conclusion
Congratulations! You have successfully learned how to deregister your Amazon Fire Tablet. Following the steps outlined in this guide, you were able to navigate to the Settings menu, select Device Options, reset your tablet to factory defaults, confirm the deregistration, and optionally set up a new Amazon account.
Deregistering your Amazon Fire Tablet allows you to remove it from your Amazon account and start fresh, whether you’re selling or giving away the device, or simply wanting to switch to a different account. By resetting your tablet to its factory default settings, you ensure that all personal data and customizations are erased, providing an added layer of privacy and security.
Remember to exercise caution when deregistering your Fire Tablet, as it will erase all data on the device. Make sure to back up any important files and consider resetting any connected accounts and services before proceeding with the deregistration process.
Setting up a new Amazon account is entirely optional, but it provides access to a wide range of Amazon services and features. If you choose to create a new account, you can enjoy the full benefits of your Amazon Fire Tablet, such as downloading apps, purchasing eBooks, and streaming content from Prime Video.
Thank you for following this guide on how to deregister your Amazon Fire Tablet. We hope this information has been helpful and that you can now confidently navigate the deregistration process. If you have any further questions or need additional assistance, feel free to refer to the official Amazon support documentation or contact Amazon customer support directly.