Introduction
Zoom has become a widely popular video conferencing platform, connecting millions of people around the world. However, if you no longer wish to use Zoom or have found an alternative service, you may want to delete your Zoom account. Deleting your Zoom account will permanently remove all your account information, meeting history, and recordings associated with the account. In this article, we will guide you through the process of deleting your Zoom account step-by-step.
It’s important to note that once you delete your Zoom account, you will lose access to all the features and benefits associated with it. Furthermore, any scheduled meetings or recurring meetings that you have organized will be canceled, and participants will no longer be able to join those meetings.
Before you proceed with deleting your Zoom account, ensure that you have backed up any important data or recordings that you may need in the future. Once your Zoom account is deleted, it cannot be recovered, and all associated data will be lost. So, it’s crucial to carefully consider your decision before proceeding.
In the following sections, we will provide a step-by-step guide on how to delete your Zoom account. We understand that the process can be daunting, especially for first-time users, but rest assured, we will make it as simple and straightforward as possible. So, without further ado, let’s get started with the first step – logging in to your Zoom account.
Step 1: Log in to your Zoom account
To delete your Zoom account, you first need to log in to the Zoom website using your credentials. Follow the steps below to log in to your Zoom account:
- Open your preferred web browser and visit the Zoom website (https://zoom.us).
- Click on the “Sign In” button located in the top right corner of the homepage.
- Enter your registered email address and password associated with your Zoom account in the provided fields.
- Click on the “Sign In” button to log in to your account. If you have enabled two-factor authentication, you may need to enter the verification code sent to your registered device.
Once you have successfully logged in to your Zoom account, you can proceed to the next step to access the Zoom Account Management page.
Step 2: Access the Zoom Account Management page
After logging in to your Zoom account, you need to navigate to the Zoom Account Management page, where you can manage various account settings, including deleting your account. Follow these simple steps to access the Account Management page:
- Once you are logged in to your Zoom account, you will be redirected to the Zoom dashboard, which displays an overview of your account.
- On the top right corner of the dashboard, click on your profile picture or initials. A drop-down menu will appear.
- From the drop-down menu, select “Profile” to proceed to your account profile page.
- In your account profile page, look for the “Account Management” section. This section contains various options to manage your Zoom account.
- Click on the “Account Management” option to access the Account Management page.
Once you have successfully accessed the Zoom Account Management page, you are one step closer to deleting your Zoom account. In the next step, we will guide you through navigating to the “Account Profile” section, where you can find the option to delete your account.
Step 3: Navigate to the “Account Profile” section
To proceed with deleting your Zoom account, you need to navigate to the “Account Profile” section on the Zoom Account Management page. Follow these steps to find the “Account Profile” section:
- After accessing the Zoom Account Management page, scroll down the page until you find the “Account Profile” section. This section contains important information and settings related to your Zoom account.
- Within the “Account Profile” section, you will see various options and settings that you can manage.
- Take a moment to review the information displayed in the “Account Profile” section. Ensure that you have considered all factors before proceeding with deleting your Zoom account.
- Once you have familiarized yourself with the information in the “Account Profile” section, you are ready to proceed to the next step – scrolling down to find the “Terminate My Account” option.
Navigating to the “Account Profile” section is an essential step in the process of deleting your Zoom account. It allows you to review your account details and make an informed decision before proceeding with deleting your account. In the next step, we will guide you through scrolling down the page to find the “Terminate My Account” option.
Step 4: Scroll down and click on “Terminate My Account”
Once you have reached the “Account Profile” section on the Zoom Account Management page, the next step is to locate the “Terminate My Account” option. Follow these steps to find and click on the option to delete your Zoom account:
- Scroll down the page until you reach the bottom of the “Account Profile” section.
- Continue scrolling until you see the “Terminate My Account” link. This link is located towards the bottom of the “Account Profile” section.
- Click on the “Terminate My Account” link to initiate the process of deleting your Zoom account.
By clicking on the “Terminate My Account” link, you are expressing your intention to permanently delete your Zoom account. This step is crucial, as it confirms your decision to proceed with deleting your account. Once you click on the link, a confirmation prompt will appear, requesting you to provide a reason for deleting your Zoom account. The next step will guide you through providing the reason and confirming the account termination.
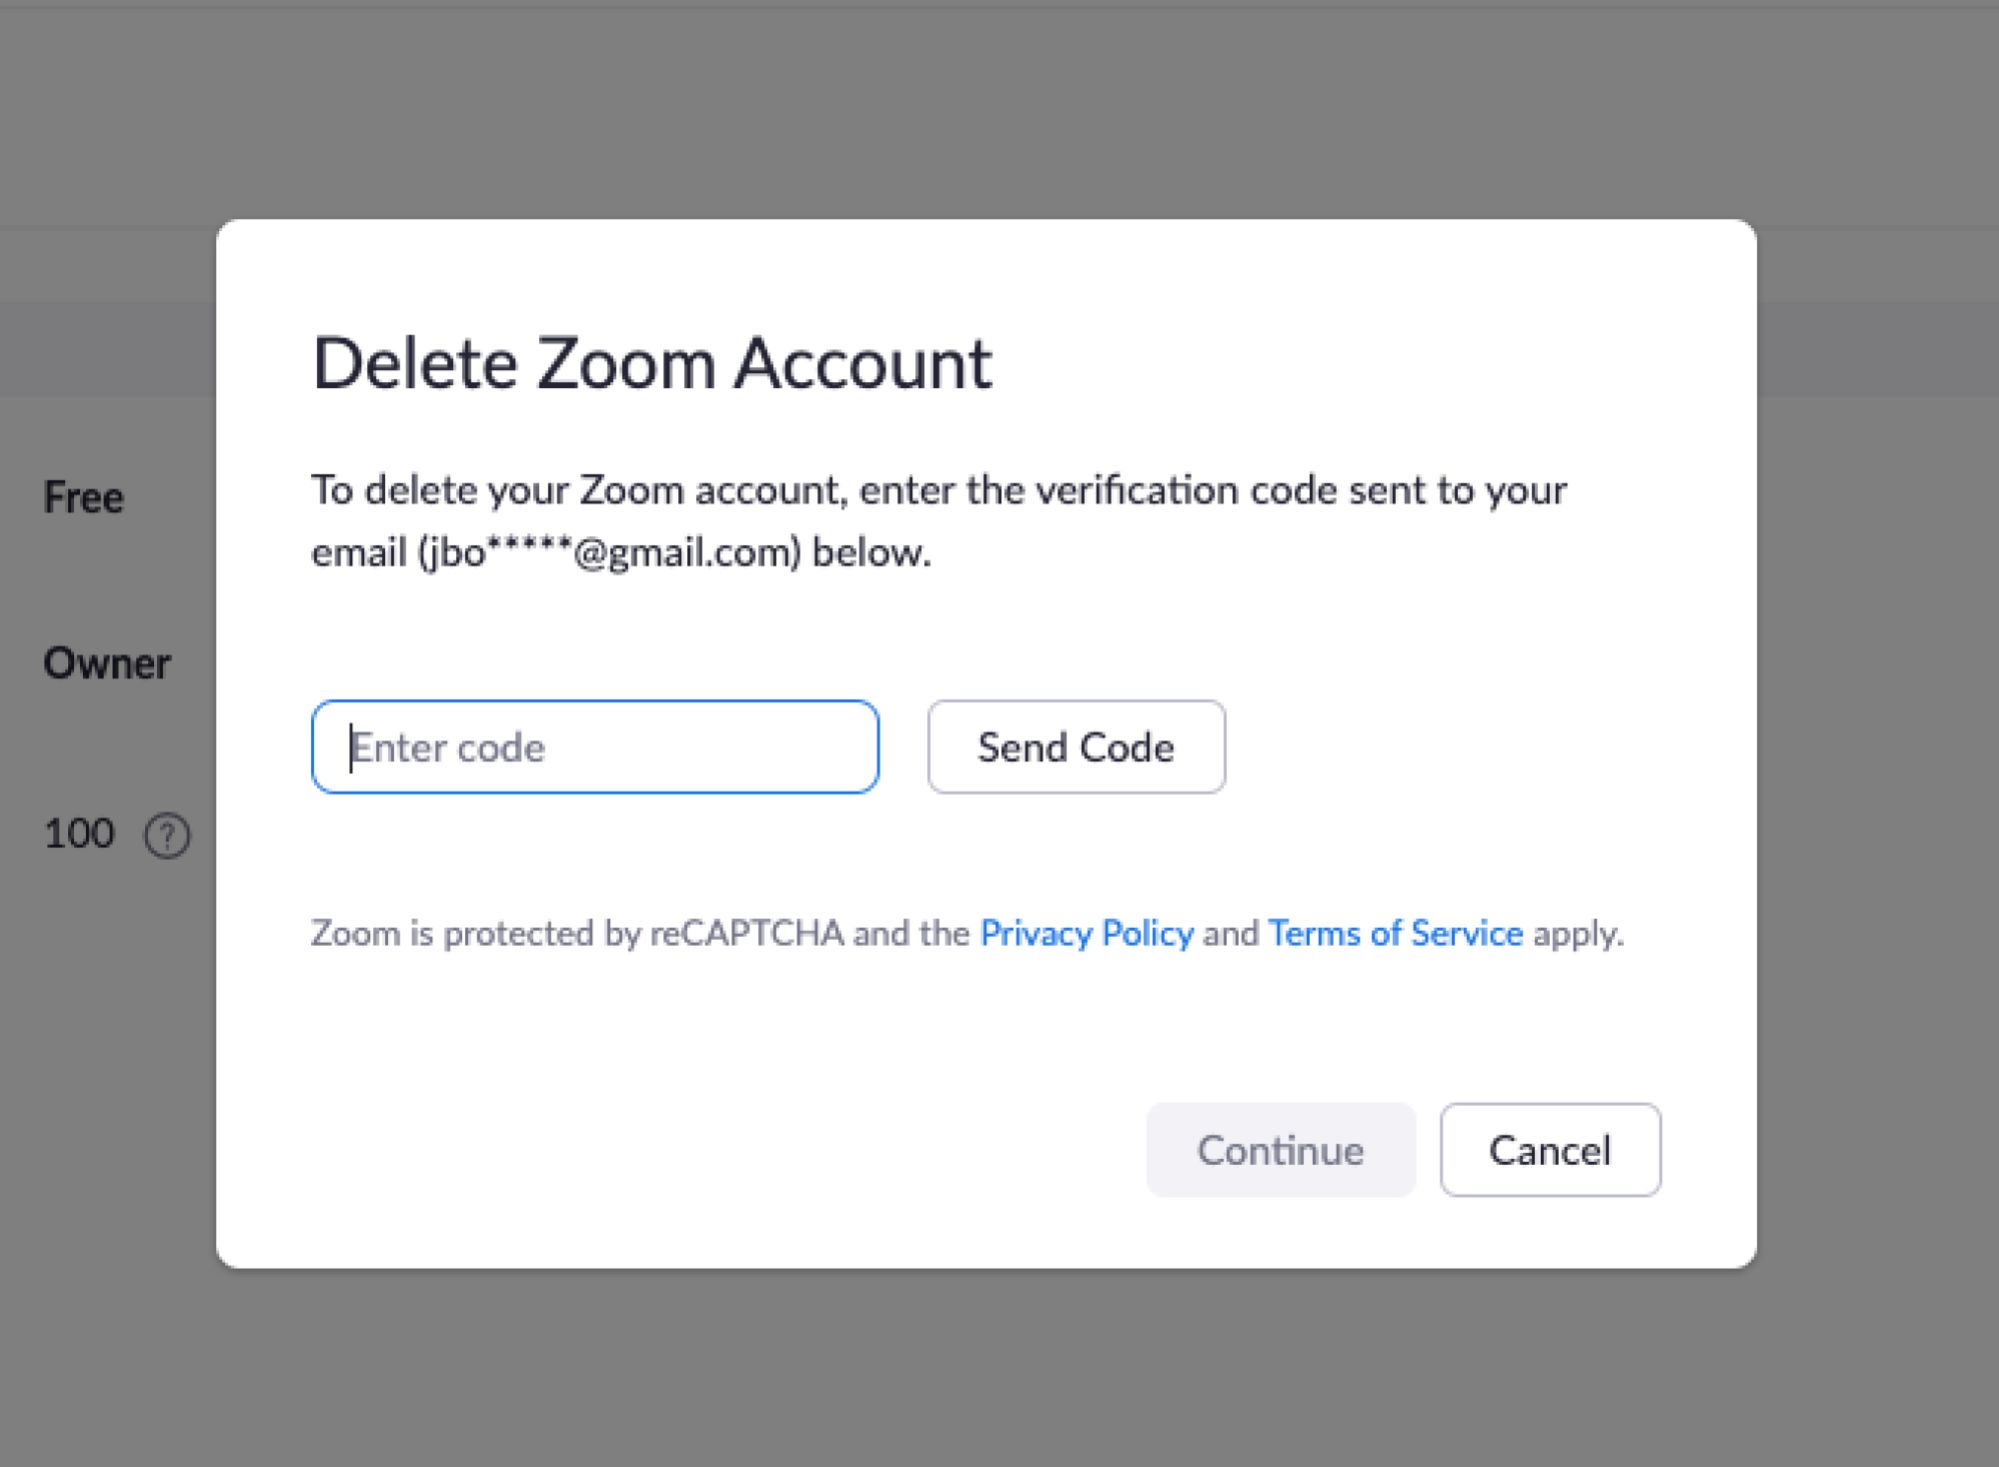
Step 5: Provide a reason for deleting your Zoom account
After clicking on the “Terminate My Account” link, a confirmation prompt will appear, asking you to provide a reason for deleting your Zoom account. Follow these steps to provide the reason for deleting your account:
- When the confirmation prompt appears, you will see a dropdown menu with different options for selecting a reason.
- Click on the dropdown menu and choose the reason that best matches your intention for deleting your Zoom account.
- If none of the listed reasons applies to your situation, you can select the “Other” option and provide a brief explanation in the provided text box.
- Take a moment to carefully consider your decision and select the most appropriate reason.
Providing a reason for deleting your Zoom account helps the Zoom team gather feedback and improve their services. It also ensures that you have carefully thought through your decision. Once you have selected a reason or provided an explanation, you are ready to proceed to the next step – confirming the account termination.
Step 6: Confirm the account termination
After providing a reason for deleting your Zoom account, the next step is to confirm the termination of your account. Follow these steps to confirm the deletion:
- Once you have selected the reason for deleting your account, review the information entered and ensure its accuracy.
- Double-check that you have considered all factors and made an informed decision.
- If you are ready to proceed with deleting your Zoom account, click on the “Yes” or “Confirm” button.
By confirming the account termination, you are giving your final consent to delete your Zoom account permanently. It is important to note that once your account is deleted, all associated data including meeting history, recordings, and account information will be irreversibly lost.
After confirming the account termination, you may receive a notification confirming that your Zoom account has been deactivated. You will no longer have access to any Zoom features or services associated with that account.
Once you have confirmed the deletion of your Zoom account, the process is almost complete. However, it’s important to note that there may be additional instructions or actions required depending on your specific account and circumstances. In the next step, we will provide some guidance on what to do if there are any additional instructions provided by Zoom.
Step 7: Follow additional instructions (if any)
After confirming the termination of your Zoom account, you may encounter additional instructions or actions that need to be followed. While not everyone will receive additional instructions, it’s important to be prepared in case they are provided. Follow these steps to navigate any additional instructions:
- Check for any notifications or messages on the Zoom website or in your email inbox associated with your Zoom account.
- If there are any additional instructions provided, carefully read and understand them.
- Follow the instructions precisely to ensure the account deletion process is completed successfully.
- If there are no additional instructions provided, you can consider the deletion process complete.
The additional instructions, if any, may include steps to take to secure your account or remove any linked devices. It’s important to follow these instructions to protect your privacy and ensure a seamless account termination process.
Once you have followed any additional instructions, if applicable, you have successfully completed the deletion process for your Zoom account. Congratulations! You have successfully deleted your Zoom account and all associated data.
It’s important to note that deleting your Zoom account is a final decision, and you will no longer have access to any features, services, or data associated with that account. Make sure you have considered all factors and backed up any important data before proceeding with the deletion.
We hope this step-by-step guide has been helpful in navigating the process of deleting your Zoom account. If you have any further questions or need assistance, it is recommended to reach out to the Zoom support team for further guidance.
Conclusion
Deleting your Zoom account can be a significant decision, and we understand that it might not be an easy choice to make. However, if you have decided that it is the best course of action for you, this step-by-step guide has provided you with the necessary instructions to successfully delete your Zoom account.
Throughout this guide, we have covered the essential steps:
1. Logging in to your Zoom account
2. Accessing the Zoom Account Management page
3. Navigating to the “Account Profile” section
4. Clicking on “Terminate My Account”
5. Providing a reason for deleting your account
6. Confirming the account termination
7. Following any additional instructions (if needed)
By following these steps, you have successfully completed the process of deleting your Zoom account.
Remember, deleting your Zoom account means that you will permanently lose access to all associated data, including meeting history, recordings, and account information. It is crucial to back up any important data before deleting your account.
If you have any further questions or need guidance during the process, do not hesitate to contact the Zoom support team for assistance. They are available to help you through any challenges you may encounter.
We hope that this guide has been helpful in navigating the process of deleting your Zoom account. Whether you are moving on to a different platform or simply no longer require Zoom’s services, we wish you all the best in your future endeavors.