Introduction
Welcome to the digital age, where almost everything we do is tracked and stored online. As we navigate through countless websites and apps on our Android devices, our browsing history tends to accumulate over time. This browsing history includes records of the websites we have visited, search queries we have made, and other online activities we have engaged in.
While browsing history can be convenient for quick access to previously visited websites, it can also compromise our privacy and security. Therefore, it’s important to know how to delete browsing history on your Android device.
In this article, we will guide you through various methods to clear your browsing history on popular browsers like Chrome, Firefox, Samsung Internet, Opera, Brave Browser, Microsoft Edge, and even the privacy-focused DuckDuckGo Privacy Browser. Additionally, we will explore a method to clear all app data on your Android device, ensuring a clean slate and safeguarding your privacy.
Deleting your browsing history not only enhances your privacy but also helps improve device performance by freeing up storage space. It can also prevent embarrassing or sensitive information from being accessed by others who may have physical access to your device.
So, without further ado, let’s dive into the step-by-step methods of clearing your browsing history on Android, ensuring your online activities remain private and secure.
Method 1: Clearing Browsing History in Chrome
Google Chrome is one of the most popular browsers for Android devices, known for its speed and user-friendly interface. Clearing your browsing history in Chrome is a straightforward process. Here’s how you can do it:
- Open the Chrome app on your Android device.
- Tap on the three-dot menu icon located in the top-right corner of the screen.
- From the menu, select “History.”
- You will be directed to a list of your browsing history. Swipe left on each entry or tap on the three-dot menu icon next to each entry, then select “Delete” to remove individual items.
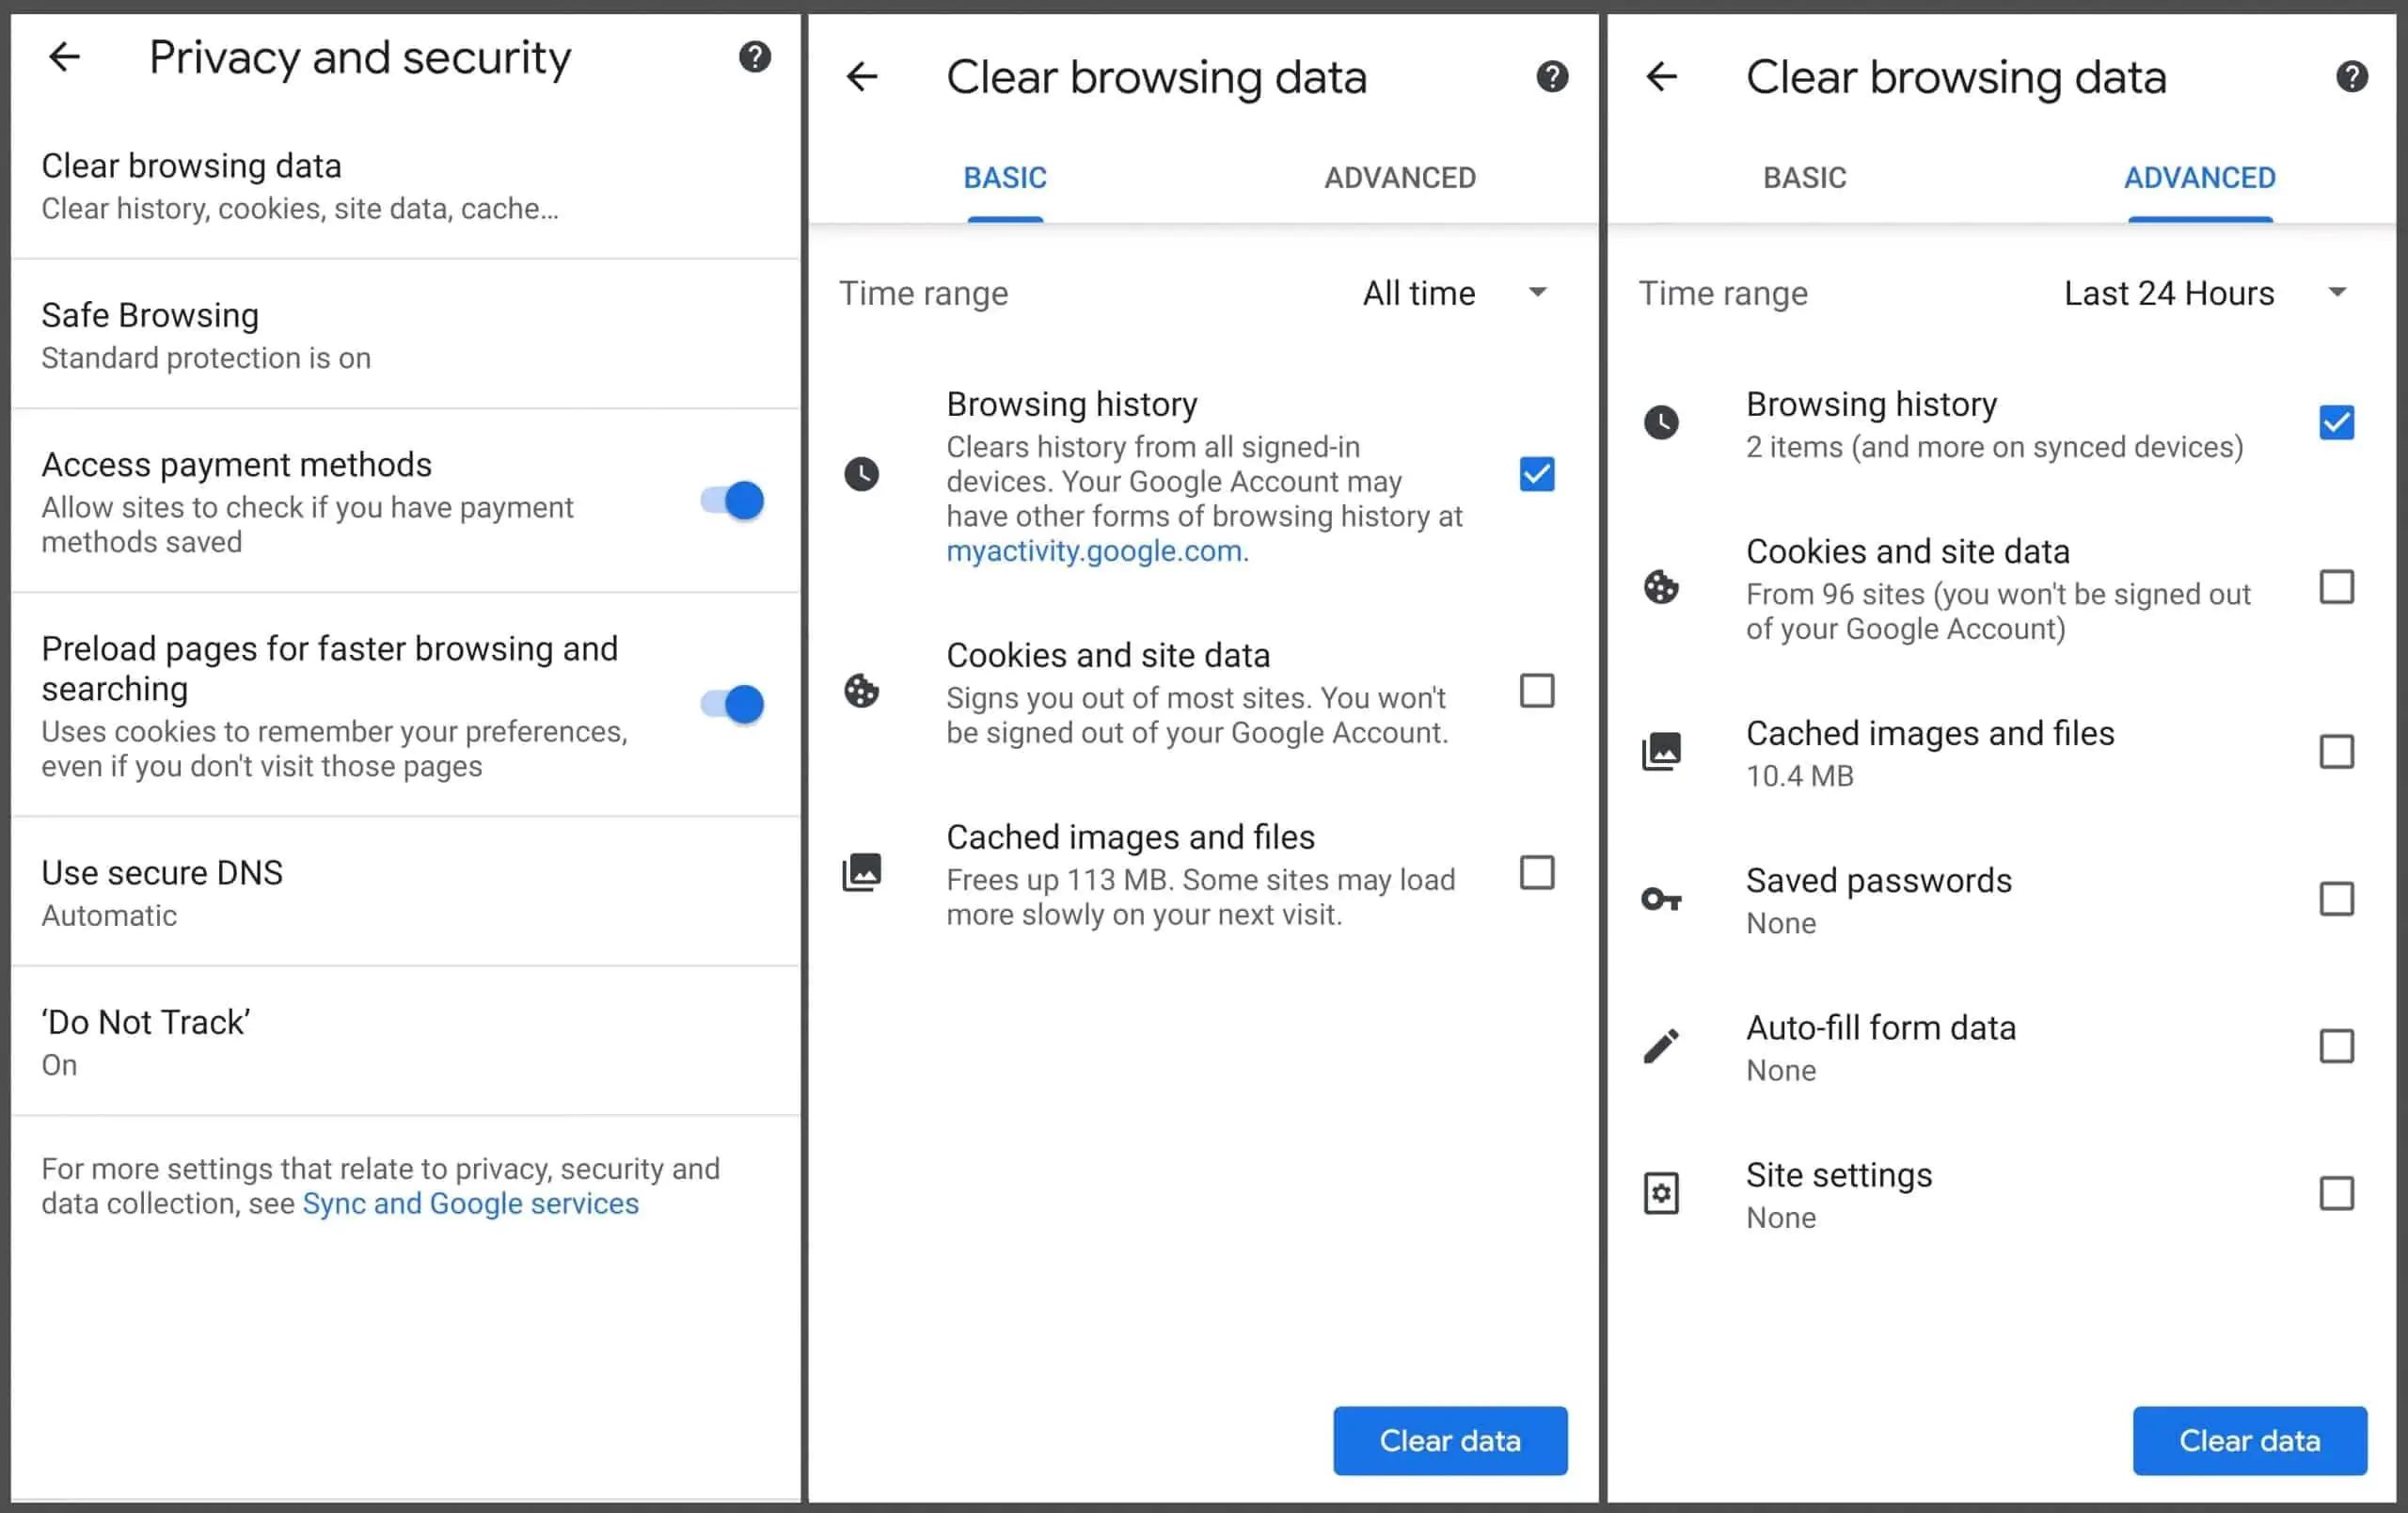
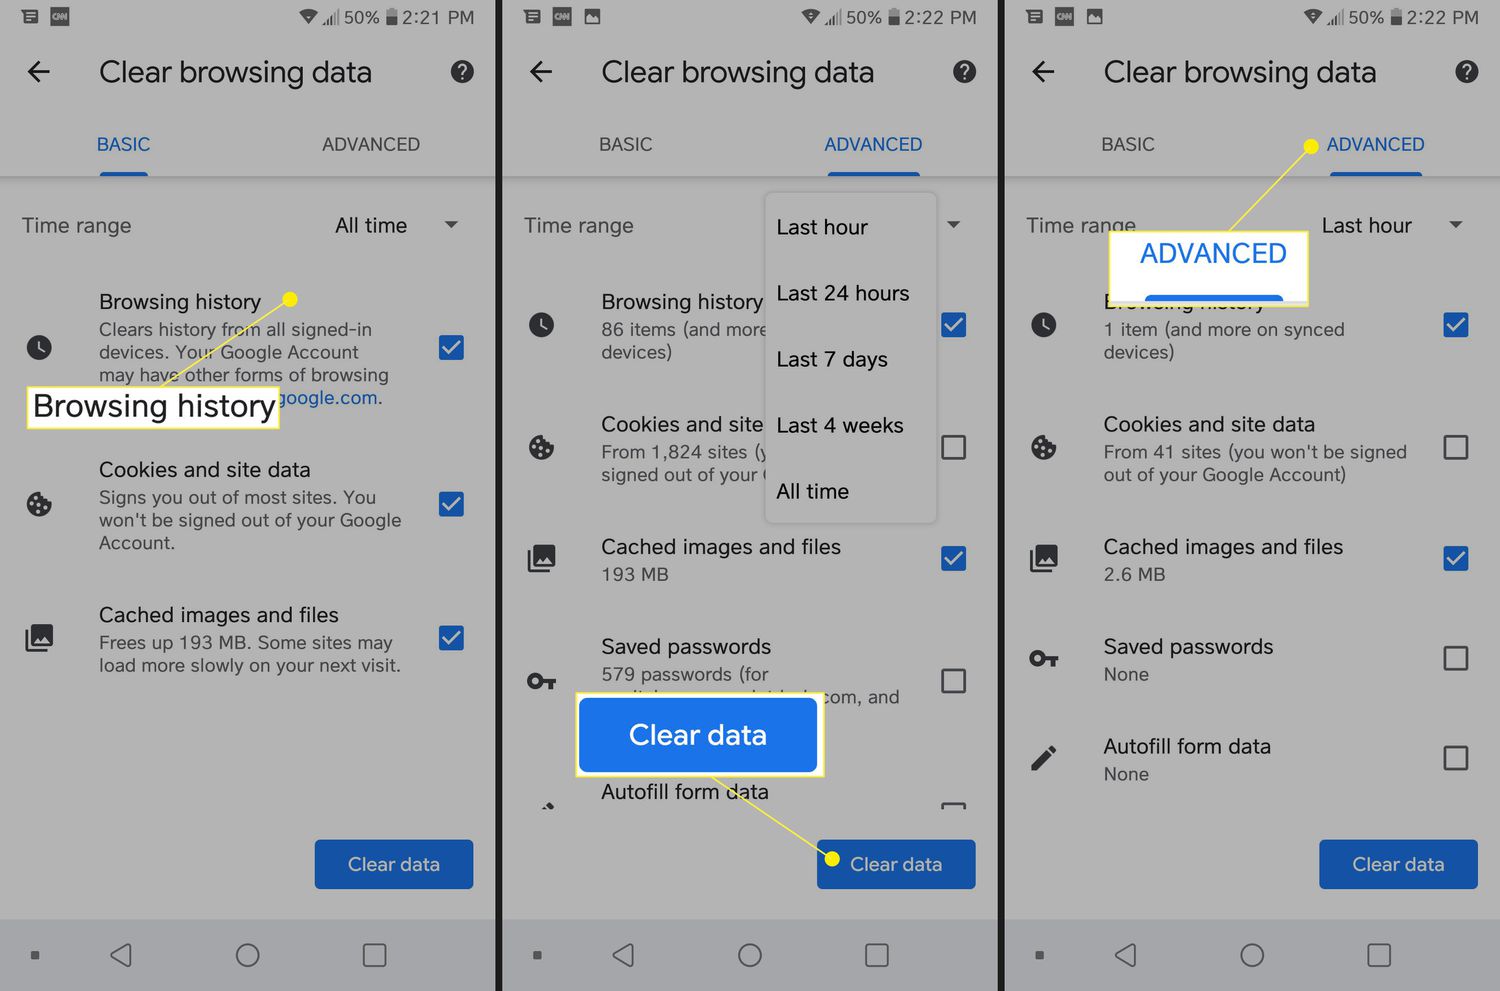
- If you want to clear your entire browsing history, tap on the “Clear browsing data” option at the bottom of the screen.
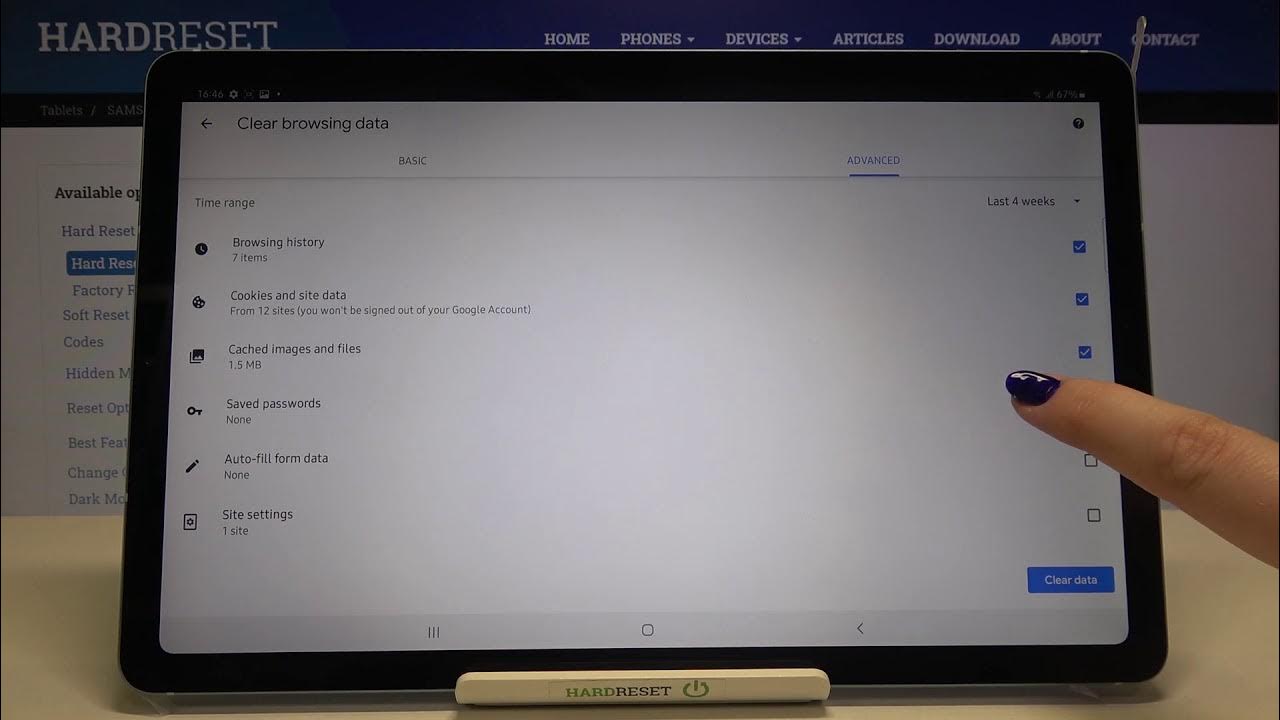
- In the next screen, you can choose the time range for which you want to delete the browsing data. Tap on “Time range” and select either “Last hour,” “Last 24 hours,” “Last 7 days,” “Last 4 weeks,” or “All time.”
- You can also select the types of data to delete, such as browsing history, cookies, cached images and files, and passwords.
- After making your selections, tap on the “Clear data” button to delete the browsing history.
By following these simple steps, you can clear your browsing history in Chrome and enjoy a clean slate while maintaining your privacy.
Method 2: Clearing Browsing History in Firefox
If you prefer using Firefox as your default browser on your Android device, you might want to know how to clear your browsing history for a fresh start. Here’s how you can do it:
- Launch the Firefox app on your Android device.
- Tap on the three-dot menu icon in the top-right corner of the screen.
- From the menu, select “Settings.”
- Scroll down and tap on “Privacy & Security.”
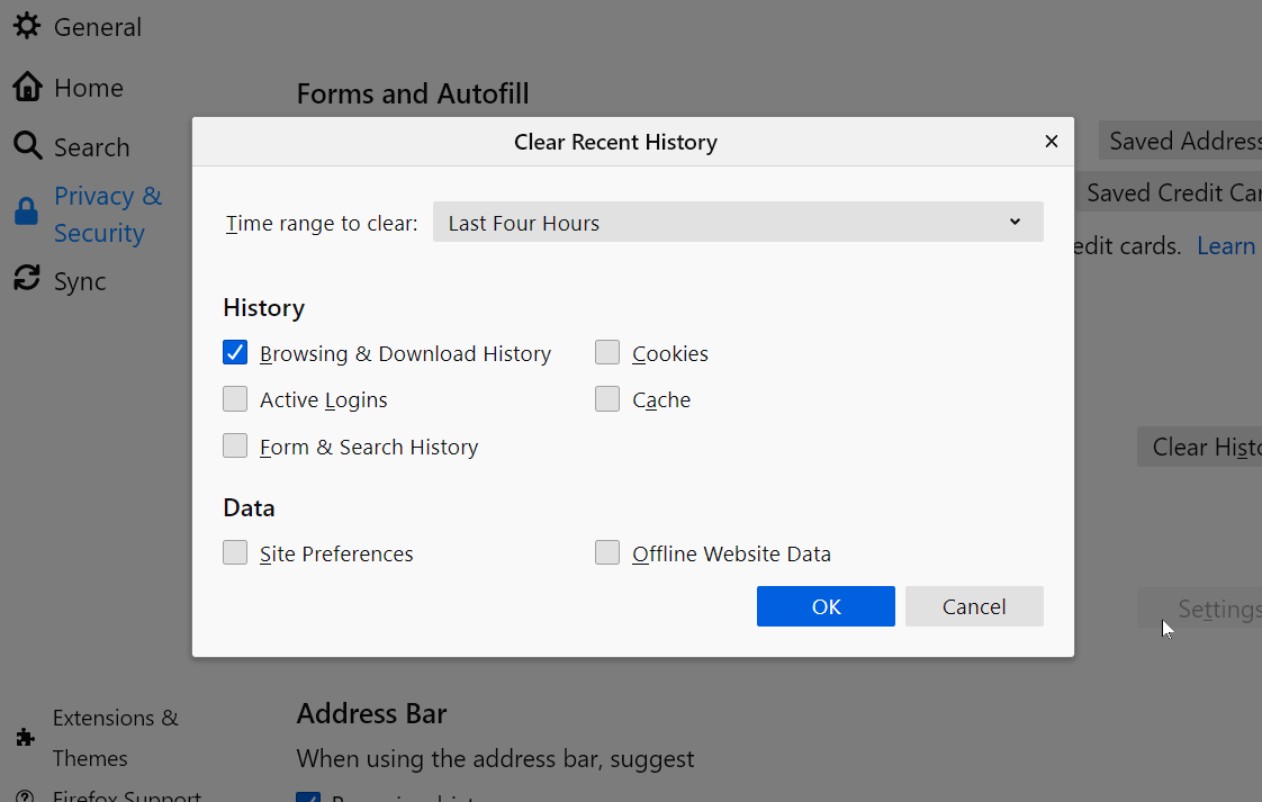
- Under the “Privacy” section, tap on “Clear Private Data.”
- You will be presented with a list of options to choose what data to clear. To clear your browsing history, make sure the “Browsing History” option is selected.
- If you want to clear other types of data as well, such as cookies or cache, you can enable those options as well.
- Once you have made your selections, tap on the “Clear Data” button.
Firefox will then proceed to clear your browsing history and any other data you have selected. It might take a few moments depending on the amount of data present.
With these simple steps, you can easily clear your browsing history in Firefox and enjoy a fresh browsing experience while protecting your privacy.
Method 3: Clearing Browsing History in Samsung Internet Browser
If you’re using the Samsung Internet browser on your Android device, clearing your browsing history is a breeze. Follow these steps to get it done:
- Open the Samsung Internet app on your Android device.
- Tap on the three-dot menu icon located in the bottom-right corner of the screen.
- From the menu, select “History.”
- You will be taken to a list of your browsing history, organized by date. Swipe left on each entry or tap on the three-dot menu icon next to each entry, then select “Delete” to remove individual items.
- If you want to clear your entire browsing history, tap on the “Delete” button at the bottom of the screen.
- In the confirmation dialogue box, tap on “Delete” once again to confirm the action.
And there you have it! Your browsing history in the Samsung Internet browser has been successfully cleared.
By regularly clearing your browsing history, you can maintain your privacy and clear up storage space on your device. Whether you want to delete specific entries or wipe your entire browsing history, the Samsung Internet browser makes it fast and easy.
Method 4: Clearing Browsing History in Opera
If you use the Opera browser on your Android device, you may be wondering how to clear your browsing history. Thankfully, Opera provides a straightforward method to accomplish this. Here’s what you need to do:
- Launch the Opera browser app on your Android device.
- Tap on the Opera logo, located in the bottom-middle part of the screen, to open the menu.
- From the menu, select “History.”
- You will be presented with a list of your browsing history, organized by date. To delete individual entries, swipe left on each item and tap on the “Delete” button that appears.
- If you want to clear your entire browsing history, tap on the “Clear browsing data” button at the bottom of the screen.
- In the next screen, you can select the time range for which you want to delete the browsing data. Choose between “Last hour,” “Last 24 hours,” “Last 7 days,” “Last 4 weeks,” or “All time.”
- Additionally, you can choose to clear other types of data, such as cookies and cache, by enabling the respective checkboxes.
- Once you have made your selections, tap on the “Clear data” button to delete your browsing history.
By following these straightforward steps, you can easily clear your browsing history in Opera and enjoy a fresh and private browsing experience on your Android device.
Method 5: Clearing Browsing History in Brave Browser
If you’re using the Brave browser on your Android device, you’re already benefiting from its privacy-focused features. However, if you need to clear your browsing history for any reason, Brave provides a simple method to do so. Here’s how:
- Open the Brave browser app on your Android device.
- Tap on the three-dot menu icon in the bottom-right corner of the screen.
- From the menu, select “History.”
- You will be taken to the browsing history page. To delete individual items, swipe left on each entry and tap on the “Delete” button that appears.
- If you want to clear your entire browsing history, tap on the trash can icon at the top-right corner of the screen.
- In the confirmation dialogue box, tap on “OK” to confirm the action.
By following these easy steps, you can quickly clear your browsing history in Brave and maintain your privacy.
The Brave browser is known for its focus on privacy and security. Along with clearing your browsing history, Brave’s built-in ad-blocking and tracker-blocking features help protect your online privacy. So, if you’re looking for a browser that prioritizes your security, Brave is a fantastic choice.
Method 6: Clearing Browsing History in Microsoft Edge
If you use Microsoft Edge as your browser on your Android device, you might want to know how to clear your browsing history. Microsoft Edge offers a user-friendly interface and a simple process to clear your browsing data. Here’s how:
- Launch the Microsoft Edge app on your Android device.
- Tap on the three-dot menu icon in the bottom-right corner of the screen.
- From the menu, select “Settings.”
- Scroll down and tap on “Privacy and security.”
- Under the “Clear browsing data” section, tap on “Choose what to clear.”
- You can now select the types of data you want to clear, such as browsing history, cookies, cached data, and more.
- If you want to clear your entire browsing history, ensure that the “Browsing history” option is selected.
- Once you have made your selections, tap on the “Clear” button to delete your browsing history.
By following these steps, you can easily clear your browsing history in Microsoft Edge on your Android device. This ensures that your online activities remain private, and you can enjoy a fresh start whenever you browse the web using Edge.
Additionally, Microsoft Edge offers various privacy features to enhance your browsing experience, including built-in password management, tracking prevention, and secure browsing modes. So, if you’re seeking a browser that prioritizes privacy and security, Microsoft Edge is an excellent choice.
Method 7: Clearing Browsing History in DuckDuckGo Privacy Browser
If privacy is a top priority for you, the DuckDuckGo Privacy Browser is a fantastic choice. It not only prioritizes user privacy but also makes it easy to clear your browsing history. Here’s how you can do it:
- Open the DuckDuckGo Privacy Browser app on your Android device.
- Tap on the three horizontal lines, also known as the hamburger menu icon, in the bottom-right corner of the screen.
- From the menu, select “Settings.”
- In the settings menu, scroll down and tap on “Privacy & Security.”
- Under the “Privacy” section, tap on “Clear browsing data.”
- You will be presented with options to choose the types of data to clear, such as browsing history, cookies, and cache.
- Tap on the checkboxes next to the data you want to clear.
- Once you have made your selections, tap on the “Clear data” button to remove the selected browsing data.
With DuckDuckGo Privacy Browser, you can browse the internet with peace of mind, knowing that your browsing activities are not being tracked. Clearing your browsing history regularly ensures that your online activities remain private and secure.
Besides offering robust privacy features, DuckDuckGo Privacy Browser also includes a built-in tracker blocker and encryption protection. So, if you’re looking for a browser that respects your privacy and provides additional security measures, DuckDuckGo Privacy Browser is an excellent option.
Method 8: Clearing All App Data on Android
Clearing all app data on your Android device can be an effective way to ensure a complete reset and remove any trace of browsing history or other data. This method is especially useful if you want to start fresh on a particular app or if you’re experiencing performance issues. Here’s how you can clear all app data on Android:
- Go to the “Settings” app on your Android device.
- Scroll down and tap on “Apps” or “Applications” (the label may vary depending on your device).
- You will see a list of all the apps installed on your device.
- Select the app for which you want to clear all data. For example, if you want to clear the browsing history for Chrome, tap on “Chrome” from the list.
- On the app info page, tap on “Storage.”
- You will find options to clear various types of data, such as cache, data, and more.
- To clear all app data, tap on the “Clear data” or “Clear storage” button.
- A confirmation prompt will appear, warning you that this action will delete all app data, including settings and accounts.
- Tap on “OK” to confirm and clear all app data.
It’s important to note that clearing all app data will remove all stored information and may require you to log back into the app and set it up again. Therefore, exercise caution and only perform this action if you are sure you want to delete all app data.
By following these steps, you can effectively clear all app data on your Android device, ensuring a fresh start for the selected app.
Remember to be selective and cautious when clearing app data, as this action cannot be undone. It’s always a good idea to back up any important data or settings before proceeding.
Conclusion
Clearing your browsing history on Android devices is an essential step in maintaining your privacy and security. With the various methods outlined in this article, you can easily clear your browsing history on popular browsers like Chrome, Firefox, Samsung Internet, Opera, Brave Browser, Microsoft Edge, and the privacy-focused DuckDuckGo Privacy Browser. Additionally, we explored the method of clearing all app data on Android for a complete reset.
Regularly clearing your browsing history not only helps protect your privacy but also improves device performance by freeing up storage space. Whether you want to delete individual entries or wipe your entire browsing history, the steps provided for each browser are simple and user-friendly.
Remember, your choice of browser can also play a significant role in maintaining your privacy. Browsers like Brave and DuckDuckGo Privacy Browser offer built-in privacy features like ad-blocking, tracker-blocking, and encryption protection to enhance your online security. Consider using these privacy-focused browsers for a more secure browsing experience.
While clearing your browsing history is an effective way to protect your privacy, it’s important to note that there are other steps you can take to enhance your online security. These include using a virtual private network (VPN), regularly updating your device and apps, and being cautious about the websites you visit and the information you share online.
By following the methods outlined in this article and adopting recommended security practices, you can maintain your privacy and enjoy a safe browsing experience on your Android device.