Introduction
Connecting a virtual machine to the internet is essential for accessing online resources, downloading software updates, and performing various tasks requiring an internet connection. Virtual machines provide a convenient way to run multiple operating systems on a single physical machine, enabling users to isolate their work environments and test software without interfering with their main system.
In this guide, we will explore the steps to connect a virtual machine to the internet, allowing you to browse the web, access cloud services, and connect to other devices on your network. Whether you are using a virtualization platform like VMware or VirtualBox, the process is similar across different software solutions.
Before we dive into the step-by-step instructions, it is essential to ensure that you have already set up a virtual machine and have basic knowledge of networking concepts. Additionally, check that you have administrative access to your virtualization software and the necessary network permissions on your host machine.
Connecting your virtual machine to the internet opens up a world of possibilities for testing applications, running server software, and developing websites. So, let’s begin exploring the steps to connect your virtual machine to the internet and unleash its full potential.
Step 1: Set up a virtual machine
Before connecting your virtual machine to the internet, you need to ensure that it is properly set up and configured. Here are the key steps to follow:
- Choose a virtualization platform: Select a virtualization platform that suits your needs, such as VMware, VirtualBox, or Hyper-V. Install the virtualization software on your host machine before proceeding.
- Create a new virtual machine: Launch the virtualization software and create a new virtual machine. Specify the operating system, allocate memory, and configure storage settings according to your requirements.
- Install the operating system: Install the operating system of your choice onto the virtual machine. This may involve mounting an ISO file or booting from a physical disk or USB drive. Follow the installation wizard and complete the setup process.
- Install virtual machine tools: After the operating system is installed, install the virtual machine tools provided by your virtualization software. These tools enhance the performance and functionality of the virtual machine.
- Configure hardware settings: Adjust the hardware settings of the virtual machine, such as network adapters, CPU allocation, and display resolution, to optimize its performance based on your requirements.
- Set up shared folders: If you need to share files between your host machine and the virtual machine, configure shared folders to enable seamless file transfer.
Once you have completed these steps, your virtual machine is ready to be connected to the internet. Proceed to the next section to learn how to configure the network settings.
Step 2: Configure the network settings
Before you can connect your virtual machine to the internet, you need to configure its network settings. Follow these steps to ensure proper network connectivity:
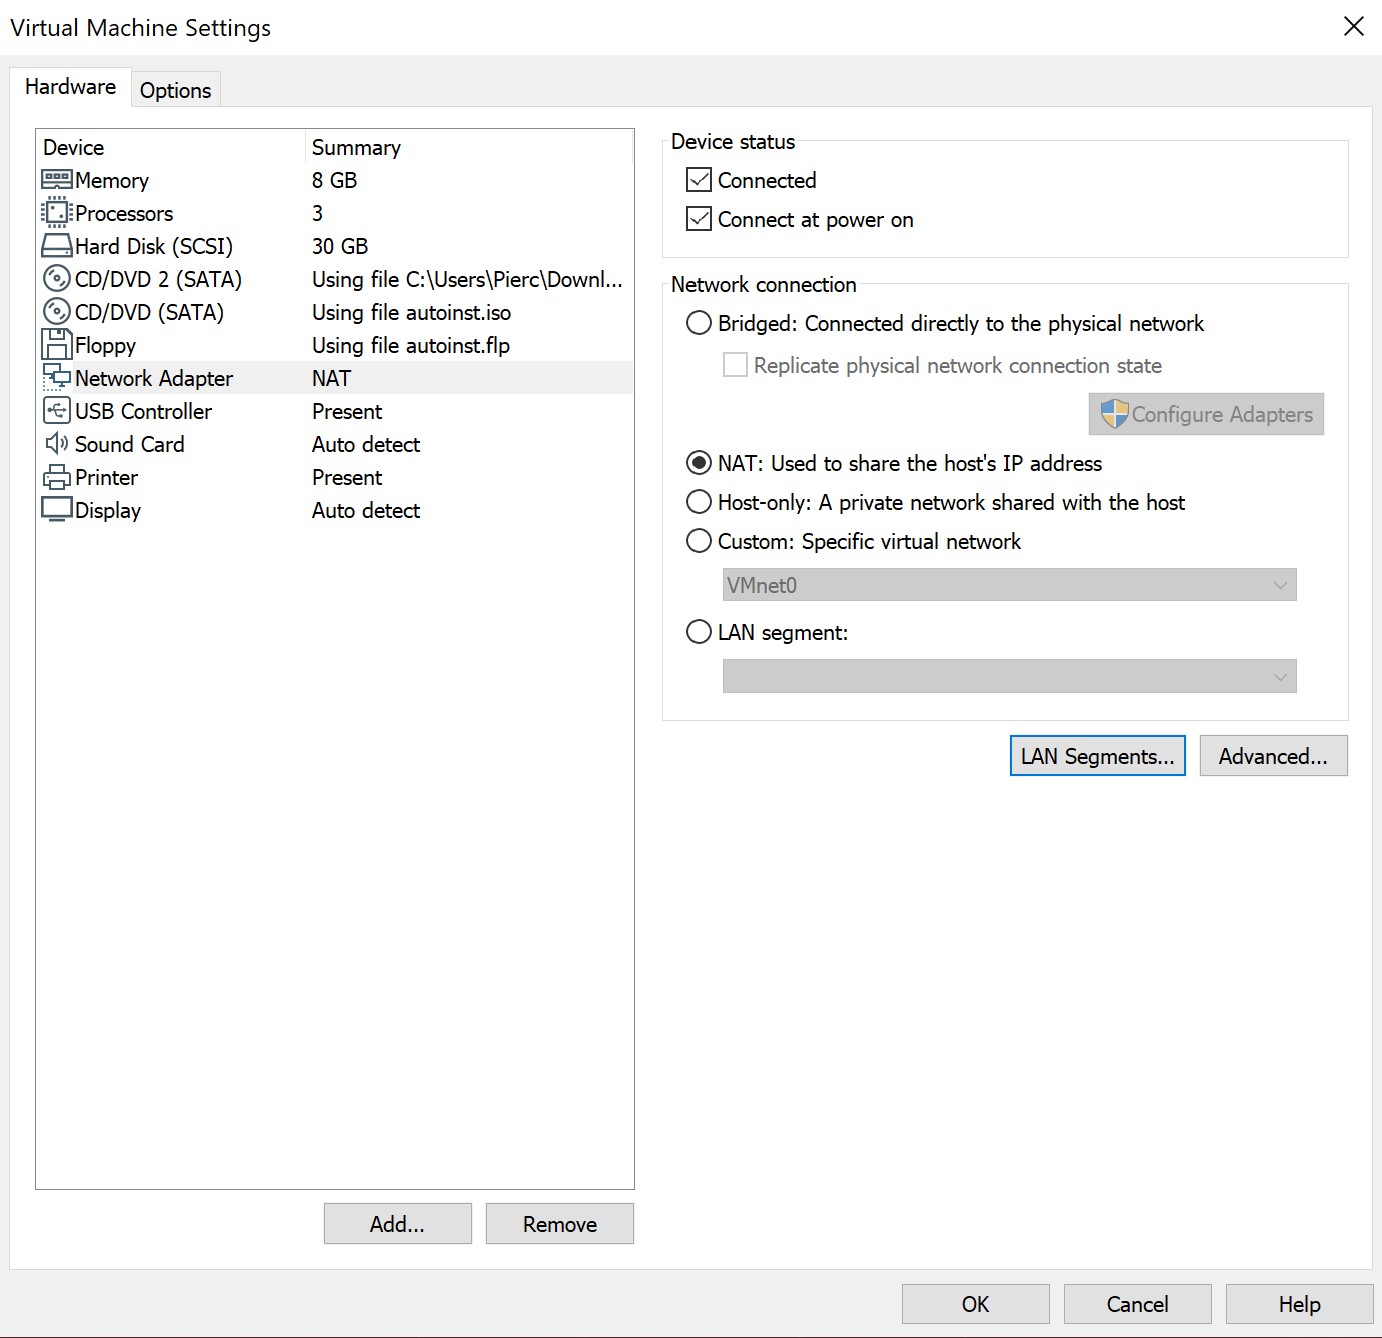
- Select the network adapter: Open the settings of your virtual machine and locate the network adapter section. Choose the appropriate network adapter option based on your virtualization software and network requirements.
- Choose the network mode: Determine the network mode for your virtual machine. The options typically include NAT (Network Address Translation), Bridged, Host-Only, or a custom network configuration. Each mode has its advantages and limitations, so choose the one that best suits your needs.
- Configure IP settings: Depending on the network mode, you may need to configure IP settings for your virtual machine. If you choose NAT, the virtual machine will obtain an IP address from the host machine. In the Bridged mode, the virtual machine will get its IP address from the network DHCP server. Host-Only mode allows communication only between the host and virtual machine.
- Enable network services: If your virtual machine requires specific network services, such as DNS or DHCP, ensure they are enabled. Some virtualization software provides options to enable or disable these services within the virtual machine settings.
- Apply the network changes: Save the network settings and apply the changes to your virtual machine. Restart the virtual machine if necessary to activate the new network configuration.
Once you have correctly configured the network settings, your virtual machine is ready to establish a connection to the internet. In the next section, we will explore how to connect the virtual machine to the internet.
Step 3: Connect the virtual machine to the internet
Now that you have set up and configured the network settings for your virtual machine, it’s time to establish a connection to the internet. Follow these steps:
- Power on the virtual machine: Start the virtual machine and wait for the operating system to load.
- Verify network connectivity: Check if the virtual machine has access to the local network. You can do this by pinging another device on the network or accessing a local website.
- Open the network settings: Go to the network settings of your virtualization software and ensure that the network adapter is connected and enabled for your virtual machine.
- Configure firewall settings: If you have a firewall enabled on your host machine, make sure it allows the virtual machine to access the internet. Adjust the firewall settings accordingly to grant necessary permissions.
- Check internet connection: Open a web browser within the virtual machine and attempt to visit a website to check if you have internet connectivity. If you encounter any issues, make sure your network settings are correct and that you have a stable internet connection on your host machine.
- Verify DNS settings: If your virtual machine is having trouble resolving domain names, ensure that the DNS settings are correctly configured. You can use public DNS servers like Google DNS (8.8.8.8) or Cloudflare DNS (1.1.1.1) for testing purposes.
- Update network drivers: If you are still facing connectivity issues, ensure that the network drivers within the virtual machine are up to date. Visit the manufacturer’s website or use the automatic driver update option provided by your operating system.
By following these steps, you should now have successfully connected your virtual machine to the internet. In the next section, we will perform a test to ensure that the internet connection is working correctly.
Step 4: Test the internet connection
After connecting your virtual machine to the internet, it’s crucial to perform a test to ensure that the internet connection is functioning correctly. Follow these steps to test the internet connection:
- Open a web browser: Launch a web browser within the virtual machine.
- Visit a website: Enter the URL of a well-known website, such as www.google.com, and press Enter. If the website loads successfully, it indicates that your virtual machine has internet connectivity.
- Check network-dependent applications: If you have specific network-dependent applications installed on the virtual machine, such as email clients or online collaboration tools, test their functionality to ensure they are working correctly.
- Perform a speed test: If you want to assess the performance of your internet connection within the virtual machine, you can run an online speed test. There are various websites available that can provide accurate information about your upload and download speeds.
- Verify network resources: Ensure that you can access network resources, such as shared folders, printers, or other devices on your local network. If these resources are accessible, it indicates that your virtual machine is fully connected to your network.
- Revisit network settings if necessary: If you encounter any issues during the test, double-check your network settings to ensure they are configured correctly. Make any necessary adjustments and retest the internet connection.
By performing these tests, you can ensure that your virtual machine has a stable and reliable internet connection. It allows you to now fully utilize your virtual machine for various online activities, such as web browsing, software downloads, remote access, and more.
Conclusion
Connecting your virtual machine to the internet opens up a world of possibilities for testing, development, and online activities. By following the steps outlined in this guide, you can successfully connect your virtual machine to the internet and enjoy seamless access to the online world. From browsing the web to accessing cloud services and connecting with other devices on your network, a connected virtual machine offers flexibility and convenience.
In the initial steps, we discussed setting up a virtual machine and configuring its network settings. This involved selecting a virtualization platform, creating a new virtual machine, installing the operating system, and adjusting hardware and network configurations. Once your virtual machine was properly set up, we moved on to configuring the network settings, such as choosing the network mode, configuring IP settings, and enabling necessary network services.
With the network settings in place, we then proceeded to connect the virtual machine to the internet. This involved verifying network connectivity, enabling the network adapter, configuring firewall settings, and checking the internet connection within the virtual machine. Troubleshooting steps, such as checking DNS settings and updating network drivers, were also provided to address any connectivity issues.
Finally, we performed a test to ensure that the internet connection was working correctly. By visiting websites, testing network-dependent applications, and checking network resources, we verified that the virtual machine had a stable and reliable internet connection. Any necessary adjustments to the network settings could be made based on the test results.
By successfully connecting your virtual machine to the internet, you can now enjoy the benefits of online access within your virtual environment. Whether you are a developer testing software, a web designer previewing websites, or a user exploring different operating systems, a connected virtual machine enhances your productivity and expands your capabilities. So, embrace the opportunities that a connected virtual machine provides and make the most of your virtual environment.


