Introduction
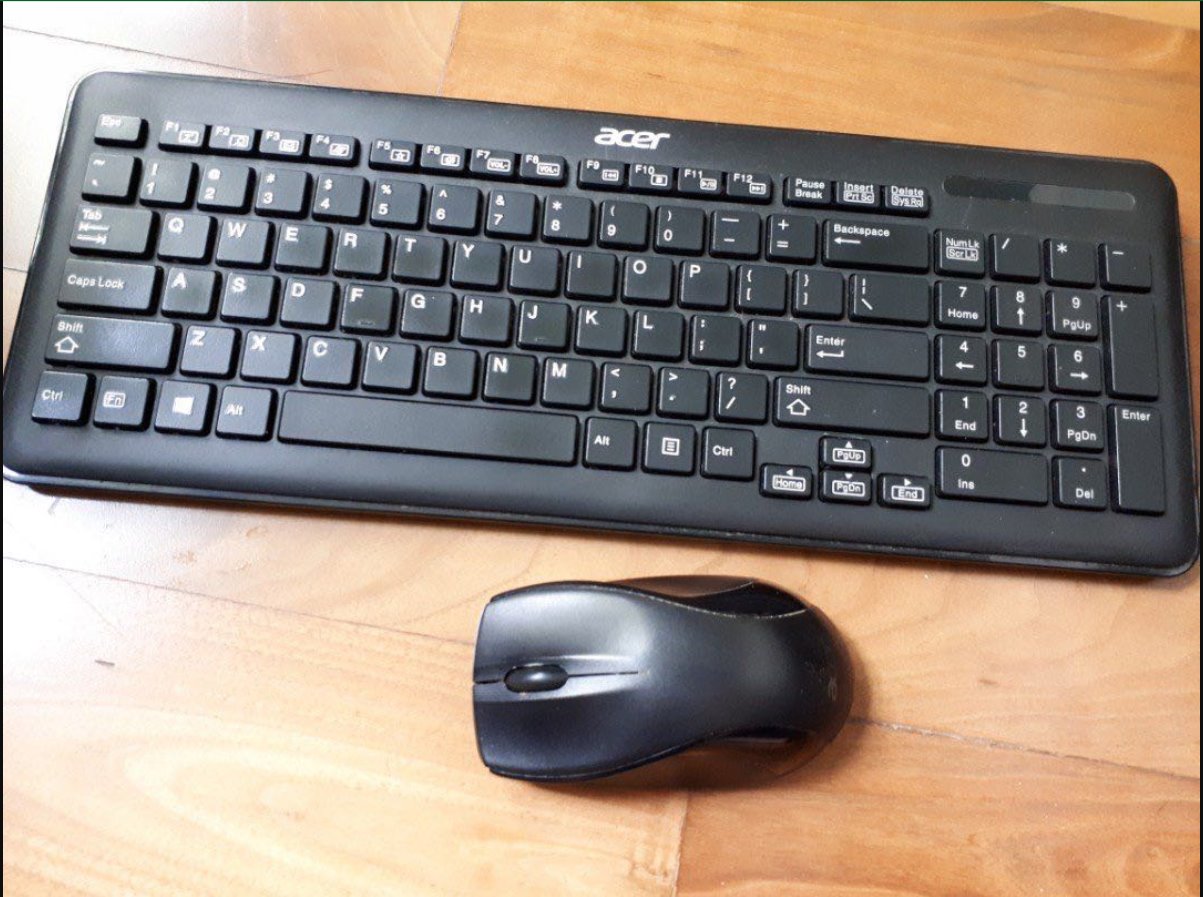
Welcome to our guide on how to connect your Acer wireless keyboard and mouse! Whether you’ve just purchased a new set or are simply looking to reconnect your existing peripherals, we’ve got you covered. Setting up your wireless keyboard and mouse is a straightforward process that only takes a few minutes to complete.
Acer offers a range of wireless keyboard and mouse combinations that provide convenience and flexibility for your computing needs. Gone are the days of tangled cords and limited mobility. With a wireless setup, you can enjoy a clutter-free workspace and the freedom to control your computer from a comfortable distance.
In this guide, we will walk you through the step-by-step process of connecting your Acer wireless keyboard and mouse. You’ll learn how to unpack and prepare your peripherals, insert batteries, connect the wireless receiver to your computer, pair the devices, and test the connection. Additionally, we will provide troubleshooting tips for common issues you may encounter along the way.
Whether you’re a tech-savvy individual or a beginner in the world of computer peripherals, you’ll find the instructions in this guide easy to follow. By the end of this process, you’ll be ready to fully enjoy the convenience and versatility of your Acer wireless keyboard and mouse.
So, without further ado, let’s dive into the steps and get your wireless keyboard and mouse up and running!
Step 1: Unpacking and preparing the wireless keyboard and mouse
Before we can begin the setup process, you’ll need to unpack your Acer wireless keyboard and mouse and ensure they are ready for use. Here are the steps to follow:
- Open the packaging and carefully remove the keyboard and mouse. Take a moment to inspect them for any visible damage or missing components.
- Locate the USB wireless receiver that is included with your keyboard and mouse set. Ensure that it is also in good condition and has no visible damage.
- Find a suitable location to set up your keyboard and mouse. Make sure it is within reach of your computer and provides enough space for comfortable use.
- Clear the area of any obstructions or clutter to create an optimal working environment. This will help prevent any interference with the wireless signal.
- If your keyboard and mouse require special software or drivers for full functionality, now is a good time to download and install them from the Acer website or the provided instruction manual.
By taking these preparatory steps, you’re ensuring that your Acer wireless keyboard and mouse setup goes smoothly. Now that you’ve unpacked and prepared your peripherals, it’s time to move on to the next step: inserting batteries.
Step 2: Inserting batteries
Now that you have your Acer wireless keyboard and mouse prepared, the next step is to insert the batteries. Follow these instructions to ensure your peripherals have power:
- Check the bottom or back of your keyboard and mouse for battery compartments. These compartments may have a small latch or slide mechanism that needs to be opened.
- Grab a set of fresh batteries that are compatible with your keyboard and mouse models. It’s always a good idea to use new batteries for optimal performance.
- Follow the indicated polarity (+/-) and insert the batteries into the corresponding slots of the keyboard and mouse. Ensure you align the positive and negative ends of the batteries correctly.
- Close the battery compartments securely. Double-check that they are properly sealed to prevent any accidental dislodging of the batteries during use.
- Now that the batteries are in place, you may find an on/off switch on your keyboard and mouse. If so, slide the switch to turn them on.
Inserting fresh batteries into your Acer wireless keyboard and mouse is crucial for maintaining a reliable connection. It ensures that your peripherals are powered and ready for use. With this step complete, we can move on to the next stage: connecting the wireless receiver to your computer.
Step 3: Connecting the wireless receiver to your computer
Now that your Acer wireless keyboard and mouse have batteries installed, it’s time to connect the wireless receiver to your computer. Follow these steps to establish a connection:
- Locate an available USB port on your computer. The USB port is typically found on the front, back, or side of your computer tower, or on the side of your laptop.
- Take the wireless receiver and insert it into the USB port. Ensure that it is inserted fully and securely to establish a reliable connection.
- Wait for a moment as your computer recognizes the new hardware. It may prompt you with an installation or setup message during this process. Follow any on-screen instructions if necessary.
- Once your computer has successfully recognized the wireless receiver, it will automatically install the necessary drivers and software for your Acer keyboard and mouse.
- After the installation is complete, you should see an indicator light on the receiver. This light confirms that the connection between your computer and the receiver is established.
By connecting the wireless receiver to your computer, you are establishing the link that allows your Acer wireless keyboard and mouse to communicate with your system. With this step complete, we can now move on to the exciting part – pairing the wireless keyboard and mouse with the receiver.
Step 4: Pairing the wireless keyboard and mouse with the receiver
Now that your wireless receiver is connected to your computer, it’s time to pair your Acer wireless keyboard and mouse with the receiver. Follow these steps to complete the pairing process:
- Locate the connect button on the wireless receiver. It is typically found on the bottom or back of the receiver.
- Press and hold the connect button on the receiver for a few seconds until the LED indicator starts to blink. This blinking light indicates that the receiver is in pairing mode.
- Next, locate the connect button on the bottom of your wireless keyboard. Press and hold this button until the LED light on the keyboard starts to blink. The blinking light indicates that the keyboard is now in pairing mode.
- Repeat the previous step for your wireless mouse. Locate the connect button on the bottom of the mouse and press and hold it until the LED light on the mouse starts to blink.
- Wait for a few seconds as the devices establish a connection with the wireless receiver. Once the LED lights stop blinking and remain solid, it means that your Acer wireless keyboard and mouse are successfully paired with the receiver.
Pairing your Acer wireless keyboard and mouse with the receiver ensures that the devices are synchronized and ready to be used. With this step complete, we can move on to the final step – testing the connection to ensure everything is working properly.
Step 5: Testing the connection
After successfully pairing your Acer wireless keyboard and mouse with the receiver, it’s important to test the connection to ensure that everything is working properly. Follow these steps to test the connection:
- Sit in front of your computer and make sure you’re within the range of the wireless signal. Typically, this range is around 10 meters or 30 feet.
- Start by testing the keyboard. Type a few characters into a text document or an online search bar to verify that the keystrokes are registering correctly. Pay attention to any lag or unresponsiveness.
- Next, check the functionality of the mouse. Move the mouse around and observe the movement on your computer screen. Try clicking and scrolling to confirm that the mouse is working smoothly.
- If you encounter any issues during the testing, check the battery levels of your keyboard and mouse. Low battery power can sometimes cause connectivity problems. Replace the batteries if needed.
- If the issues persist, try relocating the wireless receiver to a different USB port on your computer. Sometimes, a different port can provide a stronger connection.
By testing the connection, you can ensure that your Acer wireless keyboard and mouse are functioning properly and providing a seamless user experience. If everything is working as expected, congratulations – you’ve successfully connected and tested your wireless keyboard and mouse!
However, if you continue to experience connectivity issues or other problems, don’t worry. We’ve included a troubleshooting section in this guide to help you resolve common issues that may arise.
Troubleshooting common issues
While connecting your Acer wireless keyboard and mouse is generally a smooth process, you may still encounter some common issues along the way. Here are a few troubleshooting tips to help resolve them:
- No response from the keyboard or mouse: Ensure that the batteries are properly inserted and have sufficient charge. Try replacing the batteries if necessary. Additionally, check if there is any physical obstruction between the devices and the receiver that could be causing interference.
- Intermittent connection: If you’re experiencing intermittent connectivity, try moving the wireless receiver to a different USB port to establish a stronger connection. Also, make sure that there are no other wireless devices in close proximity that could be causing interference.
- Lag or delay: A lag or delay in the keyboard or mouse response can be caused by low battery power or interference from other wireless devices. Replace the batteries and ensure that the devices are within the recommended range of the receiver.
- Incompatible software or drivers: If your Acer wireless keyboard and mouse require software or drivers for full functionality, ensure that you have installed the correct versions from the Acer website or the provided instruction manual. Update the software or drivers if necessary.
- Receiver connection issue: If the receiver is not recognized by your computer, try restarting your computer and reconnecting the receiver. Verify that the receiver is securely inserted into a USB port. If the issue persists, try using a different USB port or connecting the receiver to another computer to determine if the problem lies with the receiver itself.
If you have tried these troubleshooting steps and still encounter difficulties, it may be beneficial to consult the user manual or contact Acer customer support for further assistance. They will be able to provide specific guidance tailored to your Acer wireless keyboard and mouse models.
By troubleshooting and resolving these common issues, you can ensure a smooth and enjoyable experience with your Acer wireless keyboard and mouse setup.
Conclusion
Congratulations! You have successfully connected and set up your Acer wireless keyboard and mouse. By following the step-by-step instructions in this guide, you have learned how to unpack and prepare your peripherals, insert batteries, connect the wireless receiver to your computer, pair the devices, and test the connection. You have also gained troubleshooting knowledge to address common issues that may arise during the setup process.
With your Acer wireless keyboard and mouse now connected, you can enjoy the convenience of a clutter-free workspace and the freedom to control your computer from a comfortable distance. Say goodbye to tangled cords and limited mobility.
Remember to keep your wireless keyboard and mouse within the recommended range of the receiver and periodically check the battery levels to ensure consistent performance. If you encounter any further issues or have specific questions, refer to the user manual that came with your Acer wireless keyboard and mouse or reach out to Acer customer support for assistance.
We hope this guide has been helpful in assisting you with the setup of your Acer wireless keyboard and mouse. Embrace the enhanced productivity and comfort they provide as you navigate your digital tasks. Happy computing!