Introduction
Welcome to this guide on how to check RAM in Ubuntu. RAM, also known as Random Access Memory, is an essential component of any computer system as it plays a crucial role in the overall performance and efficiency of the system. Monitoring the RAM usage can help you identify if your system is running low on memory or if certain applications are consuming excessive resources.
In this article, we will explore different methods to check the RAM usage in Ubuntu. Whether you are a beginner or an experienced user, these methods will enable you to easily monitor the RAM usage and make informed decisions about optimizing your system’s performance.
Ubuntu, being a popular Linux distribution, provides various tools and command-line utilities that can help you check the RAM usage. We will cover both graphical user interface (GUI) tools and terminal commands, giving you different options to choose from based on your preferences and requirements.
It’s important to check the RAM usage regularly, especially if you notice any unusual system slowdowns or if you are planning to run resource-intensive applications. By keeping an eye on your RAM usage, you can detect potential performance issues and take appropriate actions to improve your system’s responsiveness and stability.
Now, let’s dive into the different methods and tools that you can use to check your RAM in Ubuntu. Whether you prefer a GUI-based approach or are comfortable with terminal commands, you will find the right solution for your needs.
Method 1: Using System Monitor
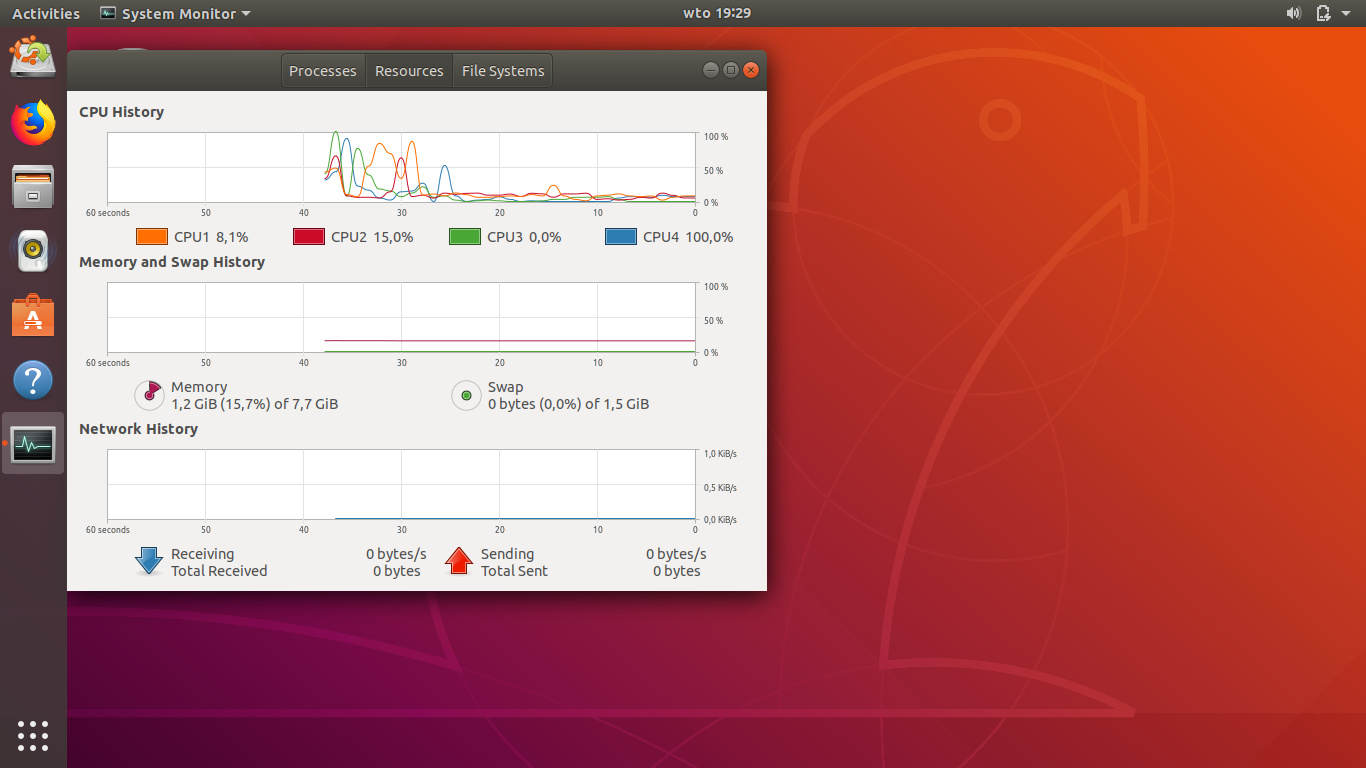
One of the easiest ways to check your RAM usage in Ubuntu is by using the System Monitor application. System Monitor provides a graphical interface that displays real-time information about your system’s resources, including CPU usage, memory usage, network activity, and more.
To access the System Monitor, you can follow these steps:
- Click on the “Activities” button at the top-left corner of your screen.
- Type “System Monitor” in the search bar and select the application from the results.
- The System Monitor window will open, displaying the overall memory usage on the “Resources” tab.
On the “Resources” tab, you can see the total amount of RAM installed on your system, as well as the percentage of memory currently in use. You can also view the memory usage of each running application, which can help you identify any processes that may be using a significant amount of memory.
In addition to the “Resources” tab, System Monitor provides several other tabs that offer more detailed information about your system’s performance. The “Processes” tab, for example, displays a list of all running processes along with their corresponding memory usage. This can be particularly useful if you want to track down specific applications or services that are consuming a large portion of your RAM.
Overall, System Monitor is a user-friendly and convenient tool for monitoring your RAM usage in Ubuntu. It provides a visual representation of your system’s memory usage, making it easy to identify any potential issues or bottlenecks that may be affecting your system’s performance. Whether you are a beginner or an advanced user, System Monitor offers a straightforward way to keep an eye on your RAM usage and ensure optimal system performance.
Method 2: Using Terminal Commands
If you prefer working with the command line interface, Ubuntu provides various terminal commands that allow you to check your RAM usage efficiently. These commands provide detailed information about your system’s memory, giving you a deeper understanding of how your system is utilizing its resources.
Here are a few terminal commands that you can use to check your RAM usage:
free -h: This command displays the total amount of RAM, used RAM, free RAM, shared memory, and memory buffers and cache in a human-readable format.htop: Htop is an interactive process viewer that provides real-time information about system resources, including RAM usage. It offers a more detailed and colorful interface compared to the standard “top” command.top: The top command shows a dynamic real-time view of system processes. It includes information about CPU usage, memory utilization, and other system statistics.
To execute these commands, simply open the terminal by pressing Ctrl + Alt + T or by searching for “Terminal” in the applications menu. Then, type in the desired command and hit enter.
When using terminal commands, you can monitor your RAM usage in real-time, making it easier to identify any sudden spikes or abnormalities. These commands offer a quick and efficient way to check your RAM usage without the need for a graphical interface.
Additionally, monitoring your RAM usage via terminal commands can be useful in script automation or remote server administration scenarios. You can utilize these commands to gather RAM usage data, store it in a file, or create custom scripts for monitoring and managing system resources.
Although terminal commands may seem intimidating to beginners, they provide a powerful and flexible approach to monitoring your RAM usage in Ubuntu. Whether you prefer a graphical interface or the command line, Ubuntu offers the flexibility to choose the method that suits your needs and level of comfort.
Method 3: Using GUI Tools
If you prefer a more visually appealing and comprehensive view of your system’s RAM usage, Ubuntu offers several GUI tools that provide detailed information about your memory usage. These tools provide a user-friendly interface that makes it easy to monitor and analyze your system’s resources.
Here are a few GUI tools that you can use to check your RAM usage in Ubuntu:
- GNOME System Monitor: GNOME System Monitor is a graphical tool that offers a comprehensive view of system resources, including CPU, memory, disk usage, and network activity. You can access it by searching for “System Monitor” in the applications menu.
- KSysGuard: KSysGuard is a system monitoring tool for KDE desktop environments. It provides real-time monitoring of various system resources, including CPU, memory, network, and more. You can launch it by searching for “System Monitor” in the applications menu for KDE.
- Indicator-multiload: Indicator-multiload is a system monitor panel applet that displays real-time CPU, memory, network, and disk usage in the top panel of your desktop. You can install it from the Ubuntu Software Center or by running
sudo apt-get install indicator-multiloadin the terminal.
These GUI tools offer intuitive interfaces with graphical representations of your RAM usage, making it easy to understand and interpret system resource information. They provide real-time monitoring and allow you to identify any memory-intensive processes or applications that may be affecting your system’s performance.
Furthermore, GUI tools often provide additional features, such as customizable notifications, historical data tracking, and the ability to kill or manage processes directly from the interface. These features can be particularly useful for advanced users who require more control over system resources or need to troubleshoot specific performance issues.
Whether you prefer the GNOME or KDE desktop environment, or if you simply want a lightweight panel applet to monitor your RAM usage, Ubuntu offers a variety of GUI tools to suit your needs. These tools provide an easy-to-understand visual representation of your system’s memory usage, allowing you to make informed decisions about system optimization and performance.
Method 4: Checking RAM Usage
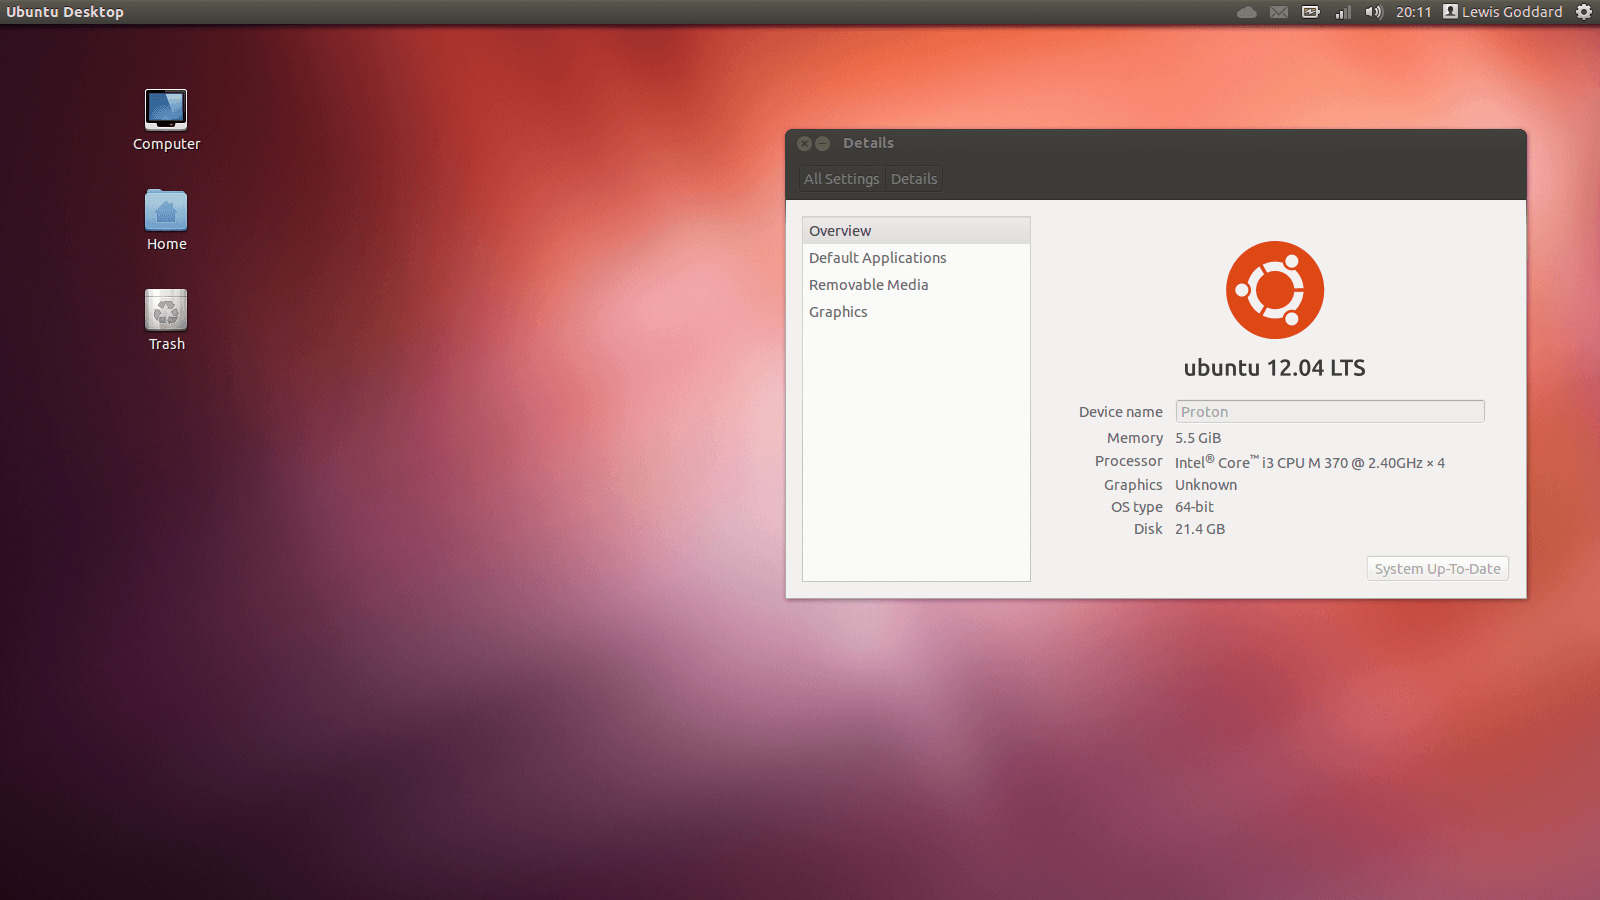
In addition to the methods mentioned above, you can also check your RAM usage directly through the Ubuntu System Settings. This method provides a quick and straightforward way to view your system’s memory usage without relying on third-party tools or command-line utilities.
Here’s how to check your RAM usage using the System Settings:
- Click on the “Activities” button at the top-left corner of your screen.
- Type “Settings” in the search bar and select the “Settings” application from the results.
- In the System Settings window, click on the “About” option.
- Scroll down and look for the “Graphics” section. Here, you will find information about your system’s RAM.
By following these steps, you can quickly and easily access information about your RAM, including the total installed memory and the amount of memory currently in use.
Another way to check your RAM usage in Ubuntu is to use the “free” command in the terminal. Simply open the terminal by pressing Ctrl + Alt + T and type in the command free -h. This will display detailed information about your system’s memory, including the total amount of RAM, used RAM, and free RAM.
It’s important to regularly check your RAM usage to ensure that your system has enough memory for smooth performance. Monitoring your RAM usage allows you to identify resource-intensive processes or applications that may be causing performance issues. If you notice consistently high RAM usage or if your system becomes slow and unresponsive, it may be beneficial to close unnecessary applications or upgrade your RAM capacity.
By frequently checking your RAM usage, you can optimize your system’s performance, minimize unexpected crashes, and ensure smooth multitasking and efficient resource allocation in Ubuntu.
Conclusion
Checking your RAM usage in Ubuntu is essential for monitoring and optimizing your system’s performance. By regularly monitoring your RAM usage, you can identify potential issues, ensure efficient resource allocation, and make informed decisions about system optimization.
In this guide, we explored several methods to check your RAM usage in Ubuntu. Whether you prefer a graphical interface like the System Monitor or terminal commands like “free” and “top,” Ubuntu provides a variety of tools to suit your needs and preferences.
We also discussed the importance of using GUI tools such as GNOME System Monitor, KSysGuard, and Indicator-multiload. These tools offer user-friendly interfaces with real-time monitoring and additional features for advanced system resource management.
Moreover, we learned how to check RAM usage through the Ubuntu System Settings and the “free” command in the terminal. These quick and simple methods provide basic insights into your system’s memory usage.
Remember, monitoring your RAM usage allows you to detect memory-intensive processes, optimize system performance, and ensure a smooth computing experience. It helps you identify potential bottlenecks, troubleshoot performance issues, and make informed decisions about resource allocation.
Whether you are a beginner or an experienced user, checking your RAM usage should be an integral part of maintaining a healthy and efficient Ubuntu system. Don’t overlook the significance of monitoring your RAM, as it directly impacts the overall performance and responsiveness of your system.
So, go ahead and choose the method that suits your preferences and get started with checking your RAM usage in Ubuntu. With the insights gained from monitoring your RAM, you can optimize your system’s performance and enjoy a smooth and efficient computing experience.