Introduction
When it comes to computer storage, two popular options are Solid State Drives (SSDs) and Hard Disk Drives (HDDs). Both serve the purpose of storing data, but they differ significantly in terms of performance, durability, and cost. If you’re curious about the type of storage drive your Windows 11 computer is using, you’re in the right place.
Knowing whether you have an SSD or HDD can be helpful for a variety of reasons. For example, understanding your storage drive’s technology can help you make informed decisions about upgrading your system or troubleshooting performance issues. Additionally, SSDs generally offer faster data transfer speeds and improved overall performance compared to HDDs.
In this article, we will explore several methods to check if your Windows 11 computer has an SSD or an HDD. Whether you’re a tech-savvy user wanting to confirm your system’s specifications or a curious individual looking to learn more about your computer, these methods will help you determine the type of storage drive in your device.
Method 1: Using File Explorer
One of the simplest ways to determine if you have an SSD or HDD on your Windows 11 computer is by using File Explorer. Here’s how:
- Open File Explorer by pressing the Windows key + E on your keyboard or by clicking on the File Explorer icon in the taskbar.
- In the left-hand navigation pane, locate “This PC” or “My Computer” and right-click on it.
- From the context menu, select “Properties”.
- A new window will appear, displaying information about your computer.
- Look for the “Device specifications” or “System” section, where you can find details about your storage drive.
- Under the “Device specifications” or “System” section, you should see information labeled as “Type” or “Model”. This will indicate whether you have an SSD or HDD.
If the information shows “Solid State Drive”, it means your computer is equipped with an SSD. Conversely, if it states “Hard Disk Drive”, then your system uses an HDD. Take note of this information as it will be useful in determining future upgrades or troubleshooting.
Using File Explorer to identify your storage drive type is a convenient method that doesn’t require any additional software or technical expertise. With just a few clicks, you can quickly find out if your system is using an SSD or HDD.
Method 2: Using Task Manager
Another way to determine the type of storage drive on your Windows 11 computer is by using Task Manager. Follow these steps to find out if you have an SSD or HDD:
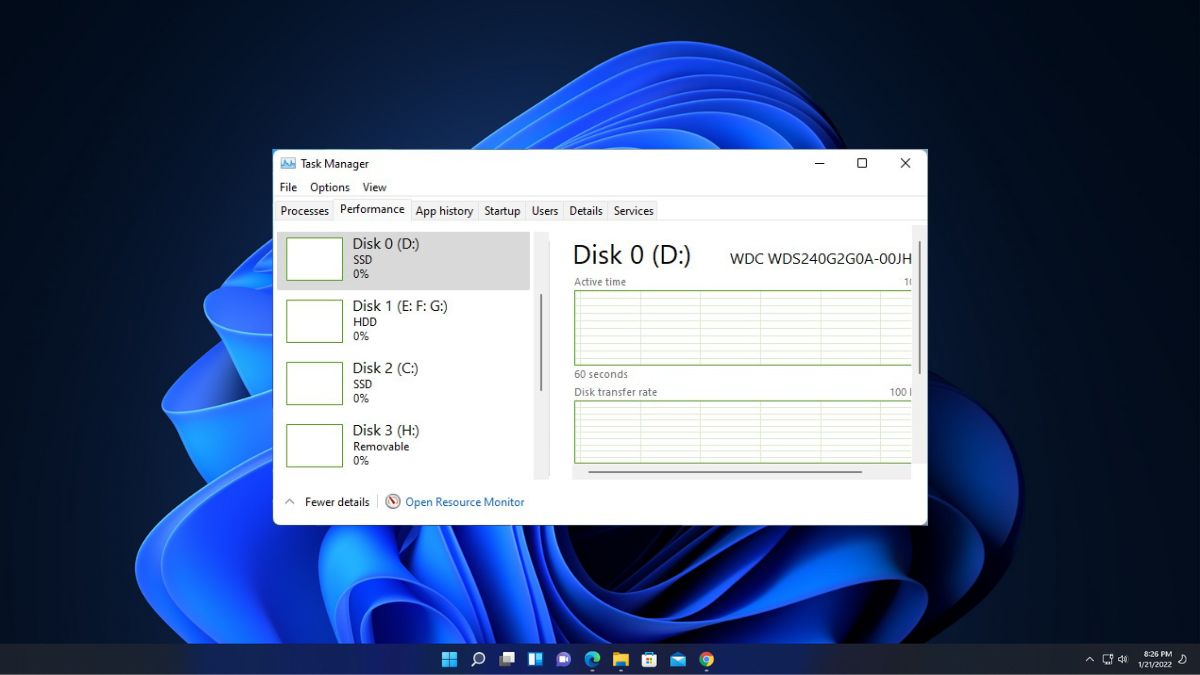
- Open Task Manager by pressing the Ctrl + Shift + Esc keys on your keyboard or by right-clicking on the taskbar and selecting “Task Manager”.
- Once Task Manager is open, click on the “Performance” tab at the top of the window.
- In the left-hand navigation pane, select “Storage”.
- You will now see a list of storage drives connected to your computer.
- Look for the drive labeled as your “System Drive” or “Boot Drive”.
- Under the “Media Type” column, you will find the information indicating whether it’s an SSD or HDD.
If the “Media Type” column shows “Solid State Drive”, it means your system is using an SSD. On the other hand, if it states “Hard Disk Drive”, then your computer has an HDD as the primary storage drive.
Using Task Manager provides a straightforward way to identify your storage drive type. This method allows you to view the media type quickly and conveniently, without the need for any external software.
Method 3: Using Command Prompt
If you prefer using the command line interface, you can also determine the type of storage drive on your Windows 11 computer using the Command Prompt. Here’s how:
- Open the Command Prompt by pressing the Windows key + R on your keyboard, typing “cmd” in the Run dialog box, and pressing Enter.
- Once the Command Prompt window opens, type the following command and hit Enter:
wmic diskdrive get model - A list with information about your disk drives will be displayed.
- Look for the drive that you want to check, which is usually the one with the Windows installation (the boot drive).
- The information displayed under the “Model” column will indicate whether it is an SSD or HDD.
If the Model name includes “SSD” in it, it means your computer is equipped with an SSD. If it doesn’t mention “SSD” and instead states “HDD” or any other variations, then your system is using an HDD as the primary storage drive.
Using Command Prompt provides a command-line approach to determine your computer’s storage drive type. It’s a useful method for those who prefer using command line tools or need to fetch this information programmatically.
Method 4: Using Windows Settings
Windows 11 provides an easy way to check the type of storage drive through the Windows Settings app. Follow these steps to find out if your computer has an SSD or HDD:
- Open Windows Settings by pressing the Windows key + I on your keyboard or by clicking on the Start button and selecting the gear icon.
- In the Windows Settings window, click on the “System” category.
- In the left-hand navigation pane, select “Storage”.
- On the right-hand side, under the “Storage” section, you will find information about your drives.
- Look for the drive labeled as your “System Drive” or “Boot Drive”.
- You will see the drive type listed next to it, indicating whether it is an SSD or HDD.
If the drive type states “Solid State Drive” next to your system drive, it means your computer is using an SSD. If it states “Hard Disk Drive”, then your system is equipped with an HDD as the primary storage drive.
Using Windows Settings is a user-friendly method that allows you to easily access information about your storage drive type. It’s a convenient option for those who prefer navigating through the Windows interface to check their system specifications.
Conclusion
Determining whether your Windows 11 computer has an SSD or HDD is essential for various purposes, including system optimization, troubleshooting, and planning for future upgrades. We’ve explored four methods to check your storage drive type: using File Explorer, Task Manager, Command Prompt, and Windows Settings.
In File Explorer, you can access your computer’s properties to find information about your storage drive type. Task Manager provides a quick and easy way to identify your system drive and view its media type. Command Prompt offers a command-line approach, allowing you to fetch this information using the wmic diskdrive get model command. Lastly, Windows Settings provides a user-friendly interface where you can check your storage drive type effortlessly.
By utilizing these methods, you can quickly determine if your Windows 11 computer is equipped with an SSD or HDD. Each method offers a different approach, catering to different user preferences and levels of technical expertise. Whether you prefer a graphical interface or a command-line tool, you can find the information you need.
Knowing your storage drive type enables you to make informed decisions about system upgrades, performance optimizations, and troubleshooting methods. SSDs generally offer faster data transfer speeds and improved performance compared to HDDs. Understanding the type of storage drive in your device empowers you to leverage its capabilities efficiently.
Next time you’re curious about the type of storage drive on your Windows 11 computer, refer to these methods to get the information you need. Whether you’re a tech enthusiast, a system administrator, or a casual user, having this knowledge is invaluable in maximizing the potential of your device.