Introduction
When it comes to gaming, graphic design, or even video editing, having a powerful and compatible graphics card is essential. It determines the quality of visuals and the overall performance of your computer. If you’re using Windows 10, checking your graphics card can help you ensure that you have the right drivers installed and that your system is capable of handling demanding tasks. In this article, we will guide you through various methods to check the graphics card in Windows 10.
Knowing the type and specifications of your graphics card is important for several reasons. Firstly, it allows you to update your drivers, ensuring that you have the latest enhancements and bug fixes. Secondly, it helps you determine if your current graphics card meets the requirements of new software or games you want to run. Lastly, it provides valuable information for troubleshooting graphics-related issues on your computer.
By using different built-in tools and third-party software, you can easily determine the graphics card model, manufacturer, driver version, and other important specifications. Whether you’re a novice computer user or a tech enthusiast, the following methods will assist you in accessing this information on your Windows 10 system.
Why Check Graphics Card in Windows 10?
Checking your graphics card in Windows 10 is crucial for several reasons. Understanding the significance of this task will help you make informed decisions about your computer’s performance and compatibility. Here are a few key reasons why you should check your graphics card on a Windows 10 system:
- Driver Updates: Keeping your graphics card drivers up to date is essential for optimal performance and compatibility. By checking your graphics card, you can determine if you need to update the drivers to the latest version. Updated drivers often offer bug fixes, performance improvements, and compatibility enhancements for newly released software and games.
- Hardware and Software Requirements: Different software applications and games have specific hardware requirements. By checking your graphics card, you can ensure that your system meets these requirements. If your current graphics card falls short of the necessary specifications, you may need to consider upgrading to a more powerful one to ensure smooth functioning.
- Troubleshooting Graphics Issues: If you are experiencing graphics-related problems like screen flickering, artifacts, or system crashes, checking your graphics card can help you identify the root cause. Knowing the details of your graphics card can assist in troubleshooting and finding appropriate solutions or seeking technical support.
- Performance Optimization: Checking your graphics card allows you to monitor its performance and identify any potential bottlenecks. By understanding the capabilities of your graphics card, you can optimize settings in games or software to strike a balance between performance and visual quality.
- Compatibility Testing: Before installing new software or games, it is essential to ensure that your graphics card is compatible. By checking your graphics card, you can compare its specifications to the recommended requirements provided by the developers. This helps you avoid compatibility issues that may lead to performance problems or software conflicts.
With these important reasons in mind, it becomes clear why checking your graphics card in Windows 10 is crucial. It not only allows you to keep your system up to date but also ensures that you get the most out of your hardware and software, providing a smooth and enjoyable computing experience.
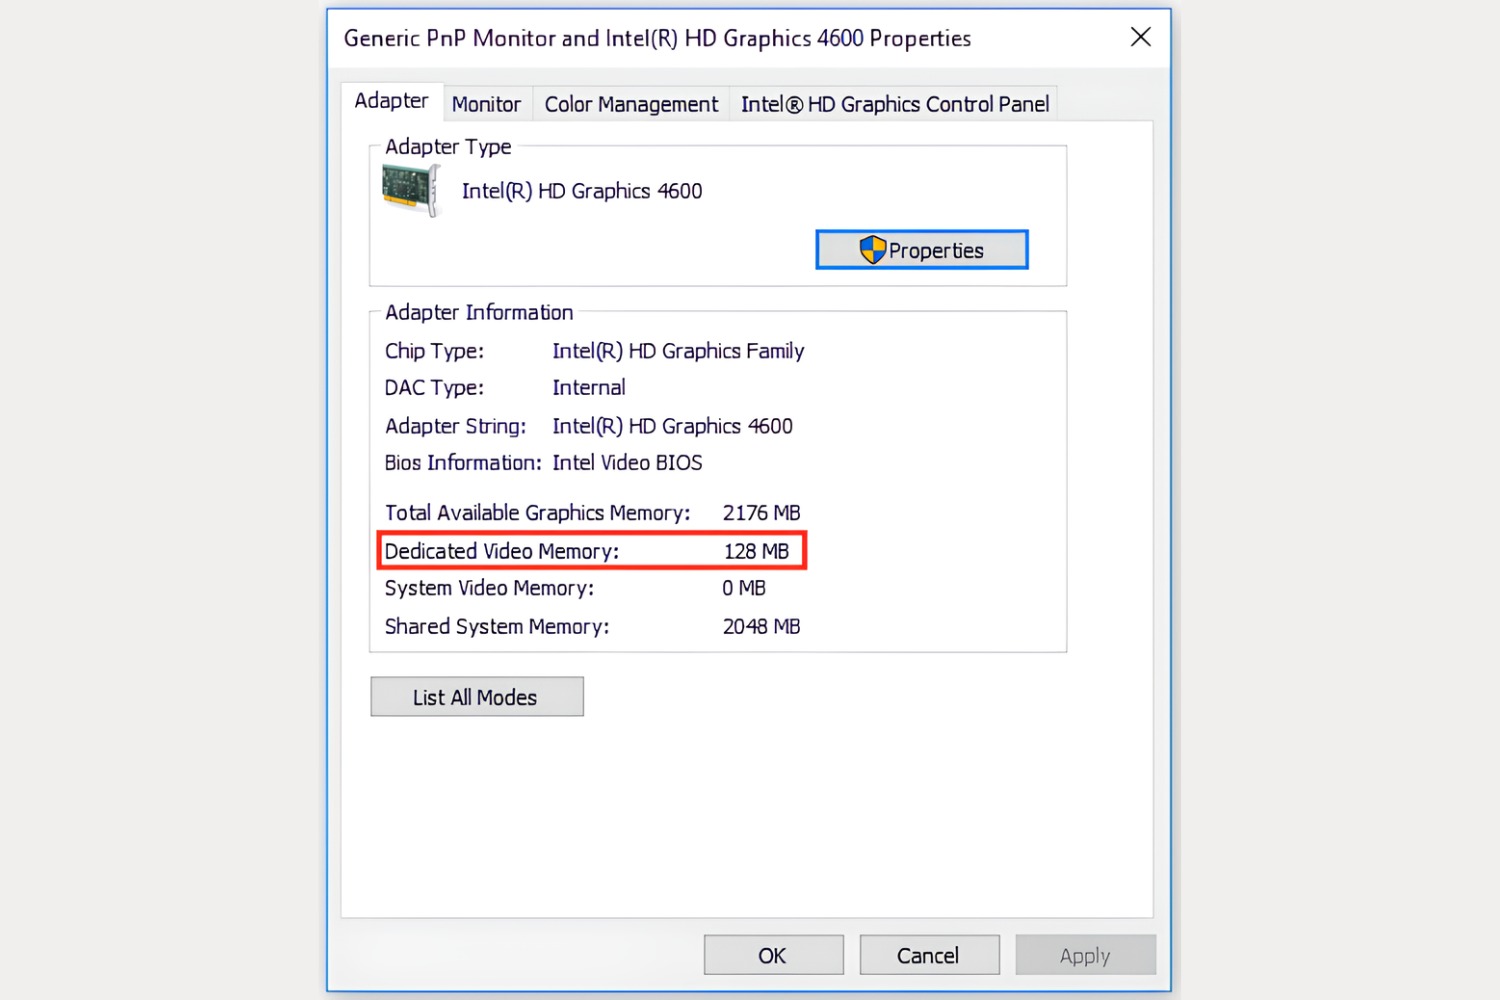
Method 1: Device Manager
Device Manager is a built-in Windows utility that allows you to view and manage the hardware devices installed on your computer. It provides a convenient method to check your graphics card in Windows 10. Here’s how you can do it:
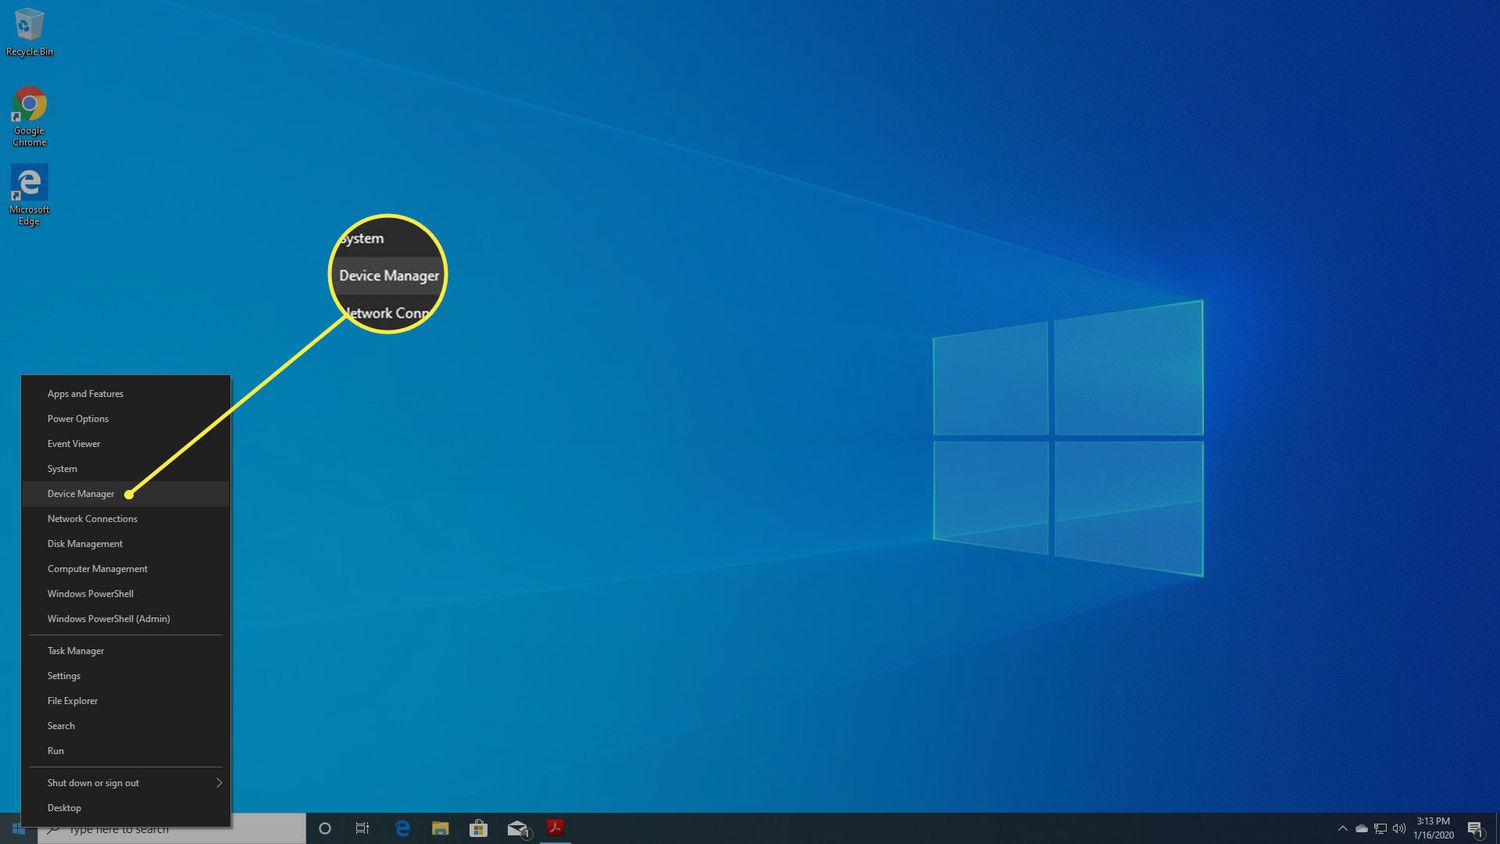
- Open the Start menu and type “Device Manager” in the search bar. Click on the search result to launch the Device Manager.
- In the Device Manager window, expand the “Display adapters” category by clicking on the arrow next to it. This will display the list of graphics devices installed on your system.
- You will see the name of your graphics card listed. Right-click on it and select “Properties” from the context menu.
- In the Properties window, go to the “Driver” tab. Here, you can find information about the driver version, date, and provider.
- To view more details about your graphics card, go to the “Details” tab. From the “Property” dropdown menu, select “Hardware Ids” to see the unique identifier for your graphics card.
Device Manager is a quick and straightforward method to check your graphics card in Windows 10. It provides essential details about the installed graphics device, including driver information and hardware identification. However, it might not provide comprehensive specifications about your graphics card, such as memory capacity or clock speed.
Keep in mind that the Device Manager method assumes that the graphics card drivers are properly installed and functioning correctly. If you encounter any issues or need more detailed information, you can explore other methods described in this article.
Method 2: DirectX Diagnostic Tool
The DirectX Diagnostic Tool is a powerful built-in utility in Windows that provides detailed information about your computer’s DirectX components, including your graphics card. Here’s how you can use it to check your graphics card in Windows 10:
- Press the Windows key + R on your keyboard to open the Run dialog box. Type “dxdiag” and press Enter. This will launch the DirectX Diagnostic Tool.
- In the DirectX Diagnostic Tool window, you will see several tabs at the top. Click on the “Display” tab.
- In the Display tab, you will see information related to your graphics card. The “Device” section provides details about the name, manufacturer, and approximate total memory of your graphics card.
- Under the “Drivers” section, you can find information about the driver version and date.
- Additionally, the DirectX Diagnostic Tool provides other details such as the current display mode, monitor information, and DirectX feature levels supported by your graphics card.
By using the DirectX Diagnostic Tool, you can obtain extensive information about your graphics card, including the manufacturer, model, driver version, and memory. This tool is particularly helpful if you need to provide detailed specifications to software developers or troubleshoot DirectX-related issues.
Remember that the DirectX Diagnostic Tool provides information specifically related to DirectX components, so it might not include certain hardware details, such as clock speed or specific features unique to your graphics card model. For a more comprehensive overview, you may need to explore other methods described in this article.
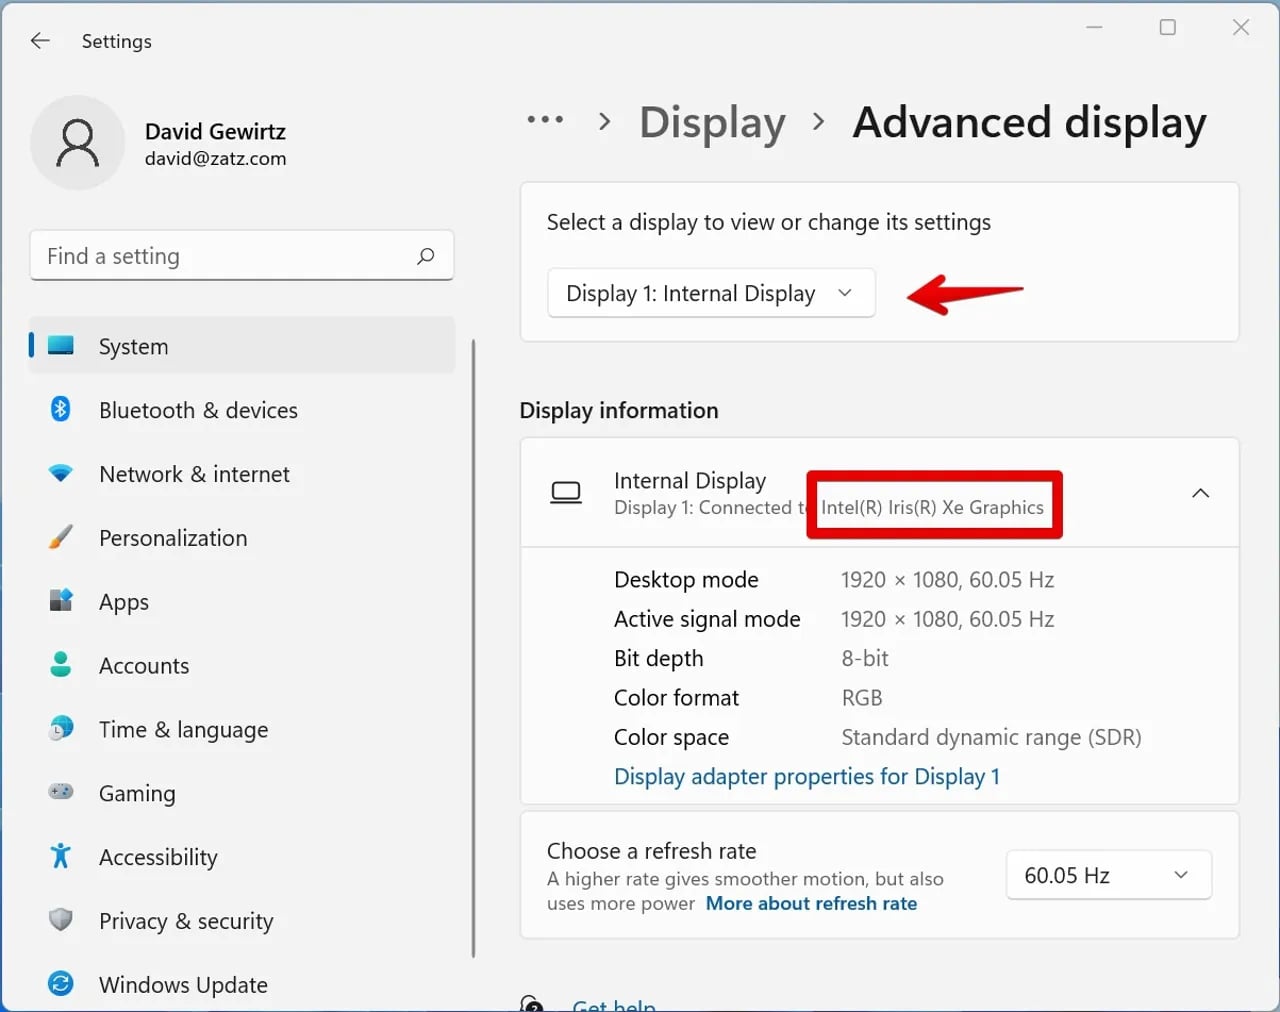
Method 3: System Information
System Information is a built-in utility in Windows that provides detailed information about various aspects of your computer, including your graphics card. Here’s how you can use it to check your graphics card in Windows 10:
- Open the Start menu and type “System Information” in the search bar. Click on the search result to launch the System Information utility.
- In the System Information window, you will see several categories on the left-hand side. Click on “Components” to expand it.
- Under the “Components” category, click on “Display”. This will display the details of your graphics card in the right-hand pane.
- You will find information about your graphics card, including the name, manufacturer, driver version, and video memory. Other details like the resolution, refresh rate, and DirectX version supported by your graphics card can also be found here.
- You can also access additional information by clicking on “Problem Devices” under the “System Summary” category. This section displays any issues related to your graphics card or other hardware components.
The System Information utility provides comprehensive information about your graphics card, including important specifications and driver details. It is particularly useful if you need to provide accurate information to support technicians or when troubleshooting system-related issues.
Although the System Information utility offers a wealth of information about your graphics card, it may not provide certain advanced details, such as clock speeds or specific features unique to your graphics card model. For more in-depth specifications, you may need to explore other methods mentioned in this article.
Method 4: Using Third-Party Software
If you want to access more detailed and comprehensive information about your graphics card, using third-party software can be a great option. There are various programs available that specialize in providing in-depth details about your hardware components, including your graphics card. Here’s how you can use third-party software to check your graphics card in Windows 10:
- Research and choose a reliable third-party software program specifically designed for checking hardware information. Some popular options include CPU-Z, GPU-Z, and Speccy. These programs are generally free to download and use.
- Visit the official website of the chosen software and download the latest version compatible with your operating system.
- Install the software by following the on-screen instructions.
- Launch the software once it is installed. You will find dedicated tabs or sections for displaying information about your graphics card.
- Explore the different tabs or sections to access specific details about your graphics card, such as model, manufacturer, driver version, clock speeds, and memory capacity.
Using third-party software provides you with more advanced and extensive information about your graphics card compared to built-in Windows utilities. These programs often offer real-time monitoring of temperatures, fan speeds, and other relevant data, allowing you to keep track of your graphics card’s performance.
However, it’s worth mentioning that relying on third-party software introduces an additional layer of dependency and potential security concerns. Ensure that you download software from trusted sources and stay vigilant about any potential risks.
By using specialized third-party software, you can delve into the comprehensive specifications and performance characteristics of your graphics card, making it an ideal choice for enthusiasts, gamers, and professionals who require detailed hardware insights.
Method 5: Command Prompt
Another way to check your graphics card in Windows 10 is by using the Command Prompt. The Command Prompt allows you to execute specific commands to access various system information, including details about your graphics card. Here’s how you can use the Command Prompt to check your graphics card:
- Open the Start menu and type “Command Prompt” in the search bar. Right-click on the Command Prompt app and select “Run as administrator”.
- In the Command Prompt window, type the following command:
wmic path win32_VideoController get nameand press Enter. - The Command Prompt will display the name of your graphics card, which indicates the model and manufacturer.
- You can also use additional commands to retrieve more information. For example, to see the driver version of your graphics card, type:
wmic path win32_VideoController get driverversionand press Enter. - Experiment with other commands, such as
wmic path win32_VideoController get statusto check the status of your graphics card orwmic path win32_VideoController get adapterRAMto view the video memory capacity.
The Command Prompt method provides a quick and straightforward way to access basic information about your graphics card, including the name, driver version, and video memory. However, it may not offer in-depth specifications or advanced details like clock speeds or specific features unique to your graphics card model.
Using the Command Prompt can be useful for users who prefer a command-line interface or need to gather specific information about their graphics card for troubleshooting purposes or scripting operations.
Conclusion
Checking your graphics card in Windows 10 is essential for ensuring optimal performance, compatibility, and troubleshooting any issues related to graphics. Whether you’re a gamer, graphic designer, or simply a computer enthusiast, knowing the details of your graphics card can help you make informed decisions and maximize your computing experience.
In this article, we explored five methods to check your graphics card in Windows 10. By using built-in utilities like Device Manager, DirectX Diagnostic Tool, and System Information, you can access valuable information such as the graphics card model, manufacturer, driver version, and memory capacity. These methods are convenient and suitable for most users.
For those seeking more advanced and comprehensive details, we also discussed using third-party software dedicated to hardware information. These programs provide in-depth specifications, real-time monitoring, and advanced features that cater to enthusiasts and professionals.
Lastly, we explored using the Command Prompt, which offers a command-line approach for obtaining basic information about your graphics card. This method is useful for users comfortable with the command-line interface or requiring specific information for troubleshooting or scripting purposes.
Remember, keeping your graphics card drivers up to date is crucial for optimal performance and compatibility. Regularly checking for driver updates and ensuring that your system meets the hardware and software requirements of new applications or games can help you stay ahead and enjoy a seamless computing experience.
With the variety of methods discussed in this article, you can easily check your graphics card in Windows 10 and have a deeper understanding of its capabilities and specifications. So, take the time to explore these methods and keep your graphics card up to date to unlock its full potential.