Introduction
Millions of people across the globe enjoy streaming movies and TV shows on Netflix. With its vast library of content and user-friendly interface, it has become the go-to platform for entertainment. However, sometimes the video quality on Netflix may not meet your expectations. Whether you’re experiencing buffering issues or simply want to enhance your streaming experience, being able to change the quality settings can make a significant difference.
In this article, we will guide you through the process of changing video quality on Netflix. You will learn how to check your current video quality on different devices and adjust it to suit your preferences. We will cover methods for desktop/laptop browsers, mobile devices, and smart TVs.
Understanding how the video quality works on Netflix is crucial to make informed decisions. Netflix offers different streaming quality options, including Standard Definition (SD), High Definition (HD), and Ultra High Definition (UHD). The video quality you experience depends on several factors, such as your internet connection and the device you’re using.
If you’re using a mobile device or have limited data, you may want to reduce the video quality to save data. On the other hand, if you have a high-speed internet connection and a large screen, you might want to enjoy the content in the highest quality available.
By changing the video quality settings, you can optimize your streaming experience on Netflix and ensure that you’re getting the best possible picture quality for your device and internet connection. So whether you’re watching a gripping series, an action-packed movie, or a captivating documentary, let’s dive into the process of changing the video quality on Netflix and make your streaming experience even better.
Understanding Streaming Quality on Netflix
When it comes to streaming on Netflix, understanding the different video quality options available is essential. Netflix offers three main video quality tiers: Standard Definition (SD), High Definition (HD), and Ultra High Definition (UHD).
Standard Definition (SD) is the most basic video quality option and requires the least amount of internet bandwidth. It typically has a resolution of 480p and is suitable for smaller screens or slower internet connections. The video quality in SD may not be as crisp or clear compared to higher quality options.
High Definition (HD) provides a much sharper and more detailed picture compared to SD. It has a resolution of 720p or 1080p, depending on your device and internet speed. HD streaming requires a faster internet connection and is optimal for larger screens or when you want to enjoy a more immersive viewing experience.
Ultra High Definition (UHD), also known as 4K, offers the highest level of video quality available on Netflix. With a resolution of 2160p, UHD delivers stunning picture clarity, vibrant colors, and incredible detail. However, streaming in UHD requires a fast and stable internet connection and a compatible device, such as a 4K-capable TV or monitor. It’s worth noting that not all content on Netflix is available in UHD.
Netflix uses adaptive streaming, which means the video quality will automatically adjust based on your internet connection and other factors. This ensures that you can still enjoy smooth playback even if your connection fluctuates. However, if you want more control over the video quality, you can manually adjust the settings.
It’s important to keep in mind that higher video quality requires more bandwidth, so if you have limited data or a slower internet connection, you may want to choose a lower quality option to avoid buffering or exceeding your data limits. Similarly, if you have a faster internet connection and a device that supports higher resolutions, you can take advantage of the best quality available.
Now that you have a better understanding of the different video quality options on Netflix, let’s move on to the next section and learn how to check your current video quality.
Checking Current Video Quality
Before you can make any changes to the video quality on Netflix, it’s essential to know what quality you’re currently streaming in. Fortunately, Netflix provides a simple way to check the current video quality while you’re watching a show or movie.
To check your current video quality on Netflix, follow these steps:
- Start playing a TV show or movie on Netflix.
- While the content is playing, hover your mouse over the screen to reveal the playback controls.
- Look for a small “gear” or “settings” icon in the lower-right corner of the screen. Click on it to access the playback settings.
- A menu will appear with various options. Look for an option that mentions “quality” or “video quality.”
- Once you select the quality option, a pop-up window will display the current video quality. It will mention the resolution or quality level, such as SD, HD, or UHD.
This method allows you to quickly check the current video quality and make adjustments if necessary. It’s worth noting that the options available may vary depending on the device and browser you’re using to stream Netflix.
By knowing your current video quality, you can compare it to the available options and decide whether you want to make any changes. If you’re experiencing buffering or playback issues, it’s a good idea to check the video quality to ensure that it’s not set to a higher level than your internet connection can handle.
Now that you know how to check your current video quality, let’s explore how to change the quality on different devices, starting with desktop/laptop browsers.
Changing Quality on Different Devices
Netflix allows you to change the video quality settings on a variety of devices, including desktop/laptop browsers, mobile devices, and smart TVs. Let’s explore how to adjust the video quality on each of these platforms.
Changing Quality on Desktop/Laptop Browsers
If you’re streaming Netflix on a desktop or laptop browser, follow these steps to change the video quality:
- Open your preferred browser and navigate to the Netflix website.
- Log in to your Netflix account if you haven’t already.
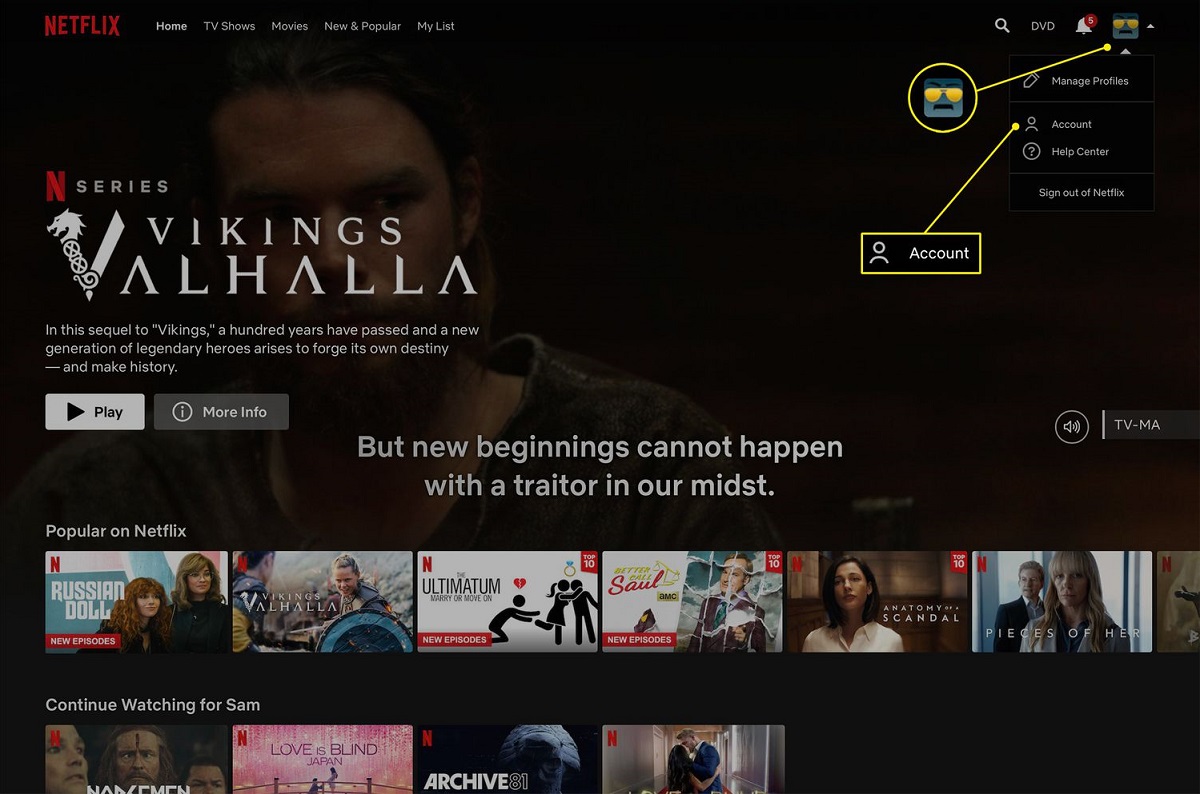
- Once you’re on the Netflix homepage, click on your profile icon in the top right corner and select “Account” from the dropdown menu.
- In the Account settings, scroll down to the “Profile & Parental Controls” section and click on the profile you want to adjust.
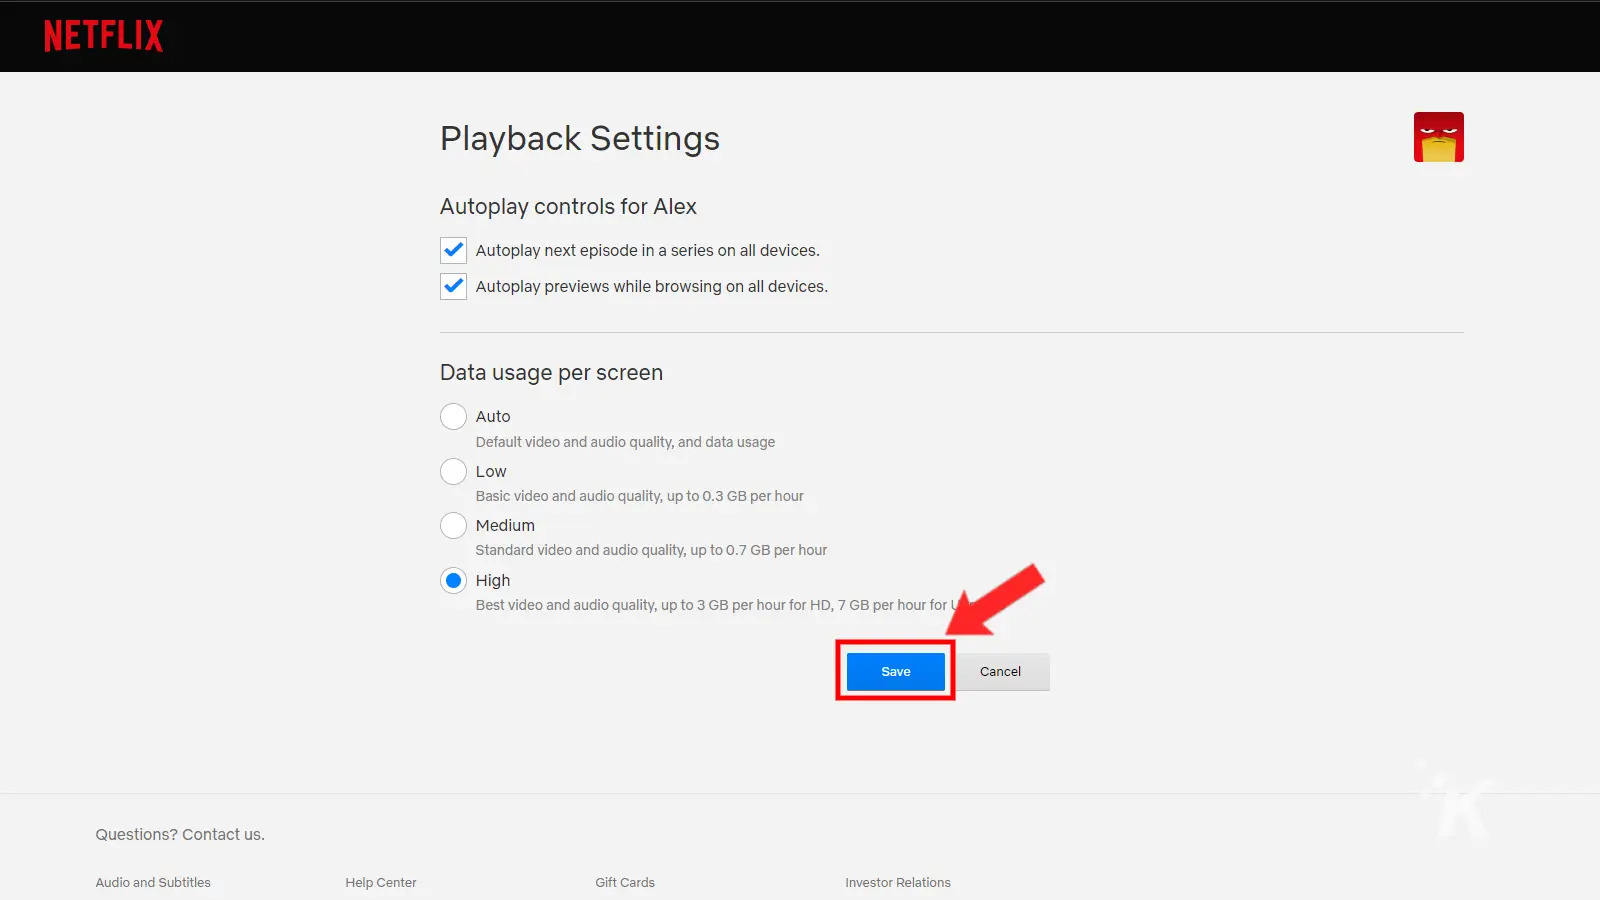
- Under the profile settings, click on “Playback settings.”
- You will see a list of video quality options. Select the desired video quality from the available choices: Auto, Low, Medium, or High.
- Click on “Save” to apply the changes.
By changing the playback settings on your Netflix account, you can adjust the video quality for all devices linked to that profile.
Changing Quality on Mobile Devices
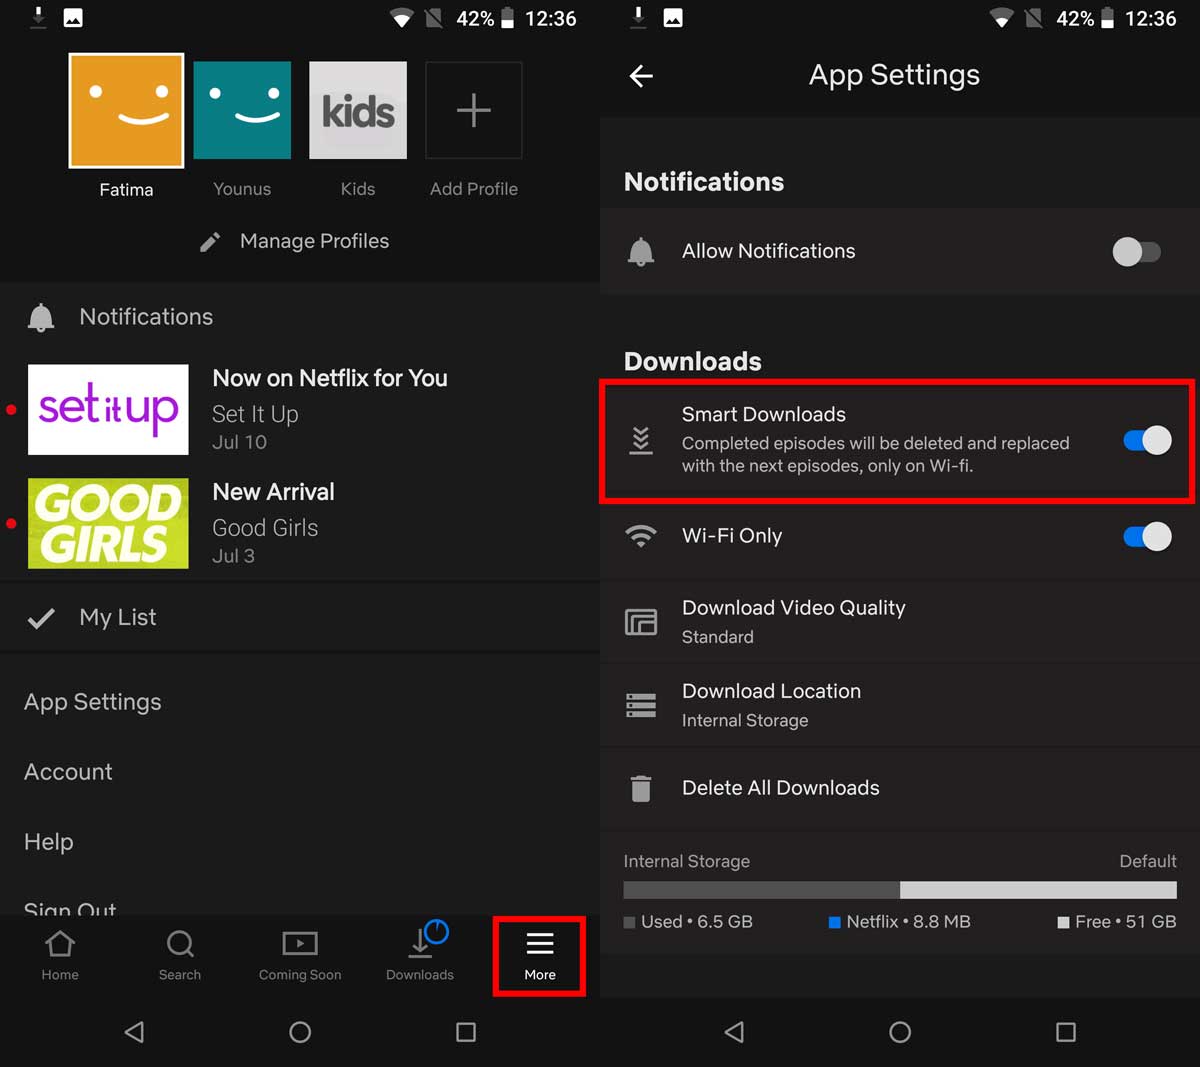
If you’re using the Netflix app on your mobile device, follow these steps to change the video quality:
- Open the Netflix app on your mobile device and sign in to your account.
- Tap on the “More” or “Menu” icon, usually located in the bottom navigation bar.
- Scroll down and tap on “App Settings” or “Settings.”
- In the settings menu, look for “Video Quality” or a similar option.
- Select the desired video quality from the available options: Auto, Low, Medium, or High.
- Exit the settings menu, and the changes will be applied immediately.
Depending on your device and app version, the steps may slightly vary. However, most Netflix apps provide an option to adjust the video quality within the settings menu.
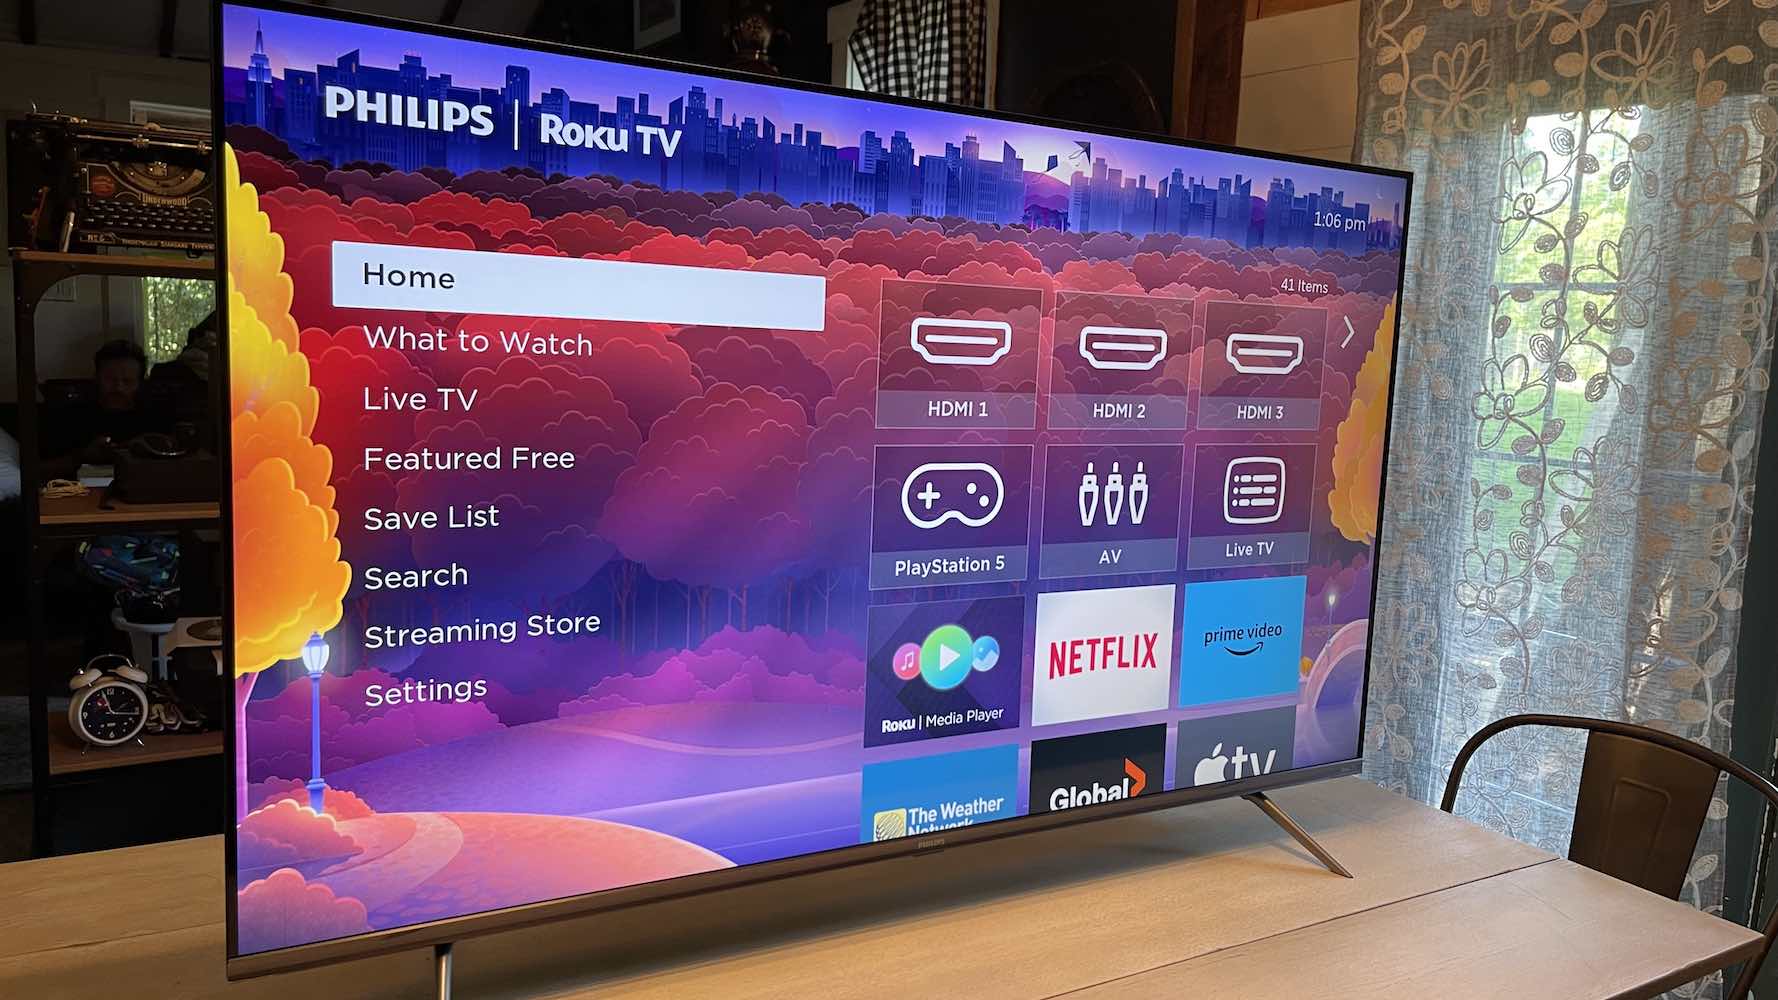
Changing Quality on Smart TVs
If you’re streaming Netflix on a smart TV, the process of changing the video quality may vary depending on the TV’s brand and model. Generally, you can follow these steps:
- Open the Netflix app on your smart TV and sign in to your account.
- Using your TV remote, navigate to the settings or options menu.
- Look for the “Video” or “Display” settings.
- Within the video settings, you should see an option to adjust the video quality. Select the desired quality level.
- Save the changes, and the video quality will be updated accordingly.
If you’re unsure about the specific steps for changing the video quality on your smart TV, consult the TV’s user manual or the manufacturer’s website for detailed instructions.
Now that you know how to change the video quality on different devices, let’s discuss how to adjust the quality for a better streaming experience.
Changing Quality on Desktop/Laptop Browsers
If you’re streaming Netflix on a desktop or laptop browser, you have the flexibility to change the video quality settings to suit your preferences. Here’s how you can adjust the video quality on desktop/laptop browsers:
- Open your preferred browser and navigate to the Netflix website.
- Log in to your Netflix account if you haven’t already.
- Once you’re on the Netflix homepage, click on your profile icon in the top right corner and select “Account” from the dropdown menu.
- In the Account settings, scroll down to the “Profile & Parental Controls” section and click on the profile you want to adjust.
- Under the profile settings, click on “Playback settings.”
- You will see a list of video quality options. They may be labeled as Auto, Low, Medium, or High depending on the settings available for your account.
- Choose the desired video quality by clicking on the respective option.
- Once you’ve selected the desired video quality, click on “Save” to apply the changes.
By following these steps, you can customize the video quality settings for your Netflix account while using a desktop or laptop browser. The changes made to the playback settings will be applied whenever you stream Netflix content on any device linked to that profile.
It’s important to note that there are a few considerations when changing the video quality:
- If you select “Auto,” Netflix will automatically adjust the video quality based on your internet connection and device capabilities.
- If you choose a specific quality level such as Low, Medium, or High, Netflix will stream content at that selected quality (if available) regardless of your internet connection or device capabilities.
- Selecting a lower video quality can help reduce data usage for those with limited internet data plans or slower internet connections.
- Choosing a higher video quality, such as High or Auto, provides the best possible streaming experience but requires a faster and more stable internet connection.
Keep in mind that the options available in the playback settings may vary depending on your Netflix subscription plan and the device you’re using. Additionally, not all content on Netflix is available in high-definition or ultra-high-definition formats, so the video quality may differ from one show or movie to another.
Now that you know how to change the video quality settings on desktop/laptop browsers, let’s move on to the next section and explore how to adjust the quality on mobile devices.
Changing Quality on Mobile Devices
If you’re using the Netflix app on your mobile device, you can easily adjust the video quality settings to optimize your streaming experience. Here’s how you can change the video quality on mobile devices:
- Open the Netflix app on your mobile device and sign in to your account.
- Tap on the “More” or “Menu” icon, usually located in the bottom navigation bar.
- Scroll down and tap on “App Settings” or “Settings.”
- In the settings menu, look for the option labeled “Video Quality.”
- Tap on “Video Quality” to access the available options.
- Depending on your device and Netflix app version, you will usually find options such as “Auto,” “Low,” “Medium,” or “High.”
- Select the desired video quality by tapping on the respective option.
- Exit the settings menu, and the changes will be applied immediately.
By following these steps, you can easily adjust the video quality settings on your mobile device while streaming content on the Netflix app. Choosing a specific video quality option allows you to control the streaming experience according to your preferences and internet connection capabilities.
It’s important to note that the available video quality options may vary depending on your device, screen size, and app version. Also, consider the following when changing the video quality on mobile devices:
- Setting the video quality to “Auto” allows Netflix to dynamically adjust the streaming quality based on your internet connection and device capabilities. This ensures smooth playback and minimizes buffering, especially when switching between different networks like home Wi-Fi and mobile data.
- Choosing a specific quality level, such as “Low,” “Medium,” or “High,” allows you to have a consistent streaming quality throughout, irrespective of changes in the internet connection. Selecting a lower quality can help save data usage, particularly when you are on a limited mobile data plan.
- Opting for a higher video quality, such as “High,” provides the best possible streaming experience, but it requires a stable and reliable internet connection to avoid buffering or interruptions.
Remember that not all content on Netflix is available in high-definition or ultra-high-definition formats, so the video quality may vary across different shows or movies.
Now that you know how to change the video quality settings on mobile devices, let’s move on to the next section and explore how to adjust the quality on smart TVs.
Changing Quality on Smart TVs
If you’re using a smart TV to stream Netflix, you may have the ability to adjust the video quality settings directly on your television. Although the process can vary depending on the TV’s brand and model, here are the general steps to change the video quality on smart TVs:
- Open the Netflix app on your smart TV and sign in to your Netflix account.
- Using your TV remote, navigate to the settings or options menu.
- Look for the “Video” or “Display” settings.
- Within the video settings, you should find an option to adjust the video quality.
- Select the desired quality level from the available options.
- Save the changes, and the video quality will be updated accordingly.
The exact terminology and location of the video settings may vary depending on your smart TV’s brand and model. If you’re unsure, consult your TV’s user manual or refer to the manufacturer’s website for specific instructions.
When changing the video quality on smart TVs, keep the following considerations in mind:
- Selecting the “Auto” option lets Netflix automatically optimize the video quality based on your internet connection and the capabilities of your smart TV.
- Choosing a specific quality level, such as “Low,” “Medium,” or “High,” allows you to manually set the video quality, providing a more consistent streaming experience.
- Opting for a higher video quality, such as “High,” delivers the best picture quality, but it requires a stable and fast internet connection along with a TV capable of displaying that level of resolution.
It’s important to note that while adjusting the video quality settings on your smart TV, you may also have the option to enable features like HDR (High Dynamic Range) or Dolby Vision, which can enhance the overall visual experience if your TV and content support these technologies.
Remember that not all TVs offer the same level of video quality options, and the available settings may vary across different brands and models. Additionally, the video quality may differ from one show or movie to another on Netflix, depending on the content’s availability in high-definition or ultra-high-definition formats.
Now that you know how to change the video quality settings on smart TVs, let’s move on to the next section, where we’ll discuss how to adjust the quality for a better streaming experience.
Adjusting Quality for a Better Streaming Experience
Having the ability to adjust the video quality on Netflix allows you to optimize your streaming experience and ensure a smooth playback. Here are some tips for adjusting the quality for a better streaming experience:
- Consider your internet connection: Your internet speed plays a crucial role in streaming video quality. If you have a slower internet connection, opting for a lower video quality setting, such as SD or Low, can help prevent buffering and ensure uninterrupted playback. On the other hand, if you have a fast and stable connection, you can enjoy high-definition or even ultra-high-definition video quality.
- Account for data usage: If you’re streaming Netflix on a mobile data plan or have a limited monthly data limit, selecting a lower video quality option can help conserve data usage. This is especially important if you often stream content on the go or have multiple devices connected to the same network consuming data simultaneously.
- Consider the device and screen size: Different devices and screen sizes may benefit from different video quality settings. For smaller screens like mobile phones or tablets, lower video quality settings may not significantly impact the viewing experience. However, for larger screens such as smart TVs, opting for higher video quality options like HD or UHD can offer a more immersive and detailed viewing experience.
- Find the right balance: Experiment with different video quality settings to determine the optimum balance between data usage, internet speed, and visual quality that suits your preferences. Remember that higher quality settings may require a stronger internet connection, while lower quality settings may result in a loss of detail and overall picture quality.
- Keep an eye on video quality: It’s a good practice to periodically check your video quality while streaming on Netflix, especially if you experience issues like buffering or playback interruptions. You can follow the steps mentioned earlier in this article to check the current video quality during playback and make adjustments as needed.
By considering these factors and adjusting the video quality settings accordingly, you can enhance your streaming experience on Netflix. Whether you’re enjoying your favorite TV shows, movies, or documentaries, finding the right balance between video quality and internet capabilities can make a notable difference in the overall enjoyment and performance of your streaming sessions.
Now that you’re equipped with the knowledge of adjusting video quality for a better streaming experience, let’s move on to the next section where we’ll discuss some troubleshooting tips to resolve video quality issues on Netflix.
Troubleshooting Video Quality Issues
While streaming on Netflix, you may encounter video quality issues that hinder your viewing experience. Here are some troubleshooting tips to help resolve common video quality issues:
- Check your internet speed: Slow internet speeds can lead to buffering or lower video quality. Run a speed test on your device to ensure that your internet connection meets the requirements for streaming Netflix. If the speed is below the recommended threshold, consider upgrading your internet plan or troubleshooting your connection.
- Restart your device and network equipment: Sometimes, simply restarting your device and network equipment can resolve temporary network issues that affect video quality. Restart your device, modem, router, or any other network devices you use to stream Netflix.
- Reduce network congestion: If you’re sharing your internet connection with multiple devices or other users, the network may become congested, leading to reduced video quality. Disconnect or limit the usage of other devices connected to the same network while streaming Netflix to improve video quality.
- Update your Netflix app: Outdated versions of the Netflix app may have bugs or compatibility issues that affect video quality. Check for updates on your device’s app store and install any available updates for the Netflix app.
- Disable VPN or proxy: If you’re using a VPN or proxy service while streaming Netflix, it may cause video quality issues. Disable any VPN or proxy services and try streaming without them to see if the video quality improves.
- Check your device’s video settings: Incorrect video display settings on your device can affect the quality of Netflix streaming. Make sure your device’s video settings, such as resolution and aspect ratio, are properly configured for optimal viewing.
- Clear your browser cache: If you’re streaming Netflix on a browser, clearing your browser’s cache can help resolve video quality issues caused by stored temporary data. Go to your browser’s settings, find the option to clear cache, and follow the prompts to clear the cache.
- Contact your internet service provider: If you’ve exhausted all troubleshooting steps and continue to experience video quality issues on Netflix, it may be worth contacting your internet service provider (ISP) for further assistance. They can help identify any network-related issues that may be affecting your video quality.
By following these troubleshooting steps, you can often resolve video quality issues on Netflix and ensure a smooth and enjoyable streaming experience. If the problem persists, you can reach out to Netflix’s customer support for additional help and guidance specific to your account and setup.
Now that you’re familiar with troubleshooting video quality issues, let’s conclude this guide on how to change the video quality on Netflix.
Conclusion
Being able to change the video quality on Netflix is a valuable feature that allows you to customize your streaming experience. Whether you’re looking to save data on mobile devices, enhance picture quality on larger screens, or troubleshoot video quality issues, adjusting the settings can make a noticeable difference.
In this article, we have explored the different aspects of changing video quality on Netflix. We started by understanding the streaming quality options available, including Standard Definition (SD), High Definition (HD), and Ultra High Definition (UHD). We then learned how to check the current video quality while streaming on different devices.
We dove into the step-by-step process of changing the video quality on desktop/laptop browsers, mobile devices, and smart TVs. By following these instructions, you can easily adjust the quality settings according to your preferences and internet connection capabilities.
We discussed the importance of finding the right balance between video quality, data usage, and internet speed. We explored tips for optimizing the streaming experience, such as considering the device and screen size, and keeping an eye on video quality during playback.
Additionally, we provided troubleshooting tips for resolving common video quality issues, including checking internet speed, restarting devices and network equipment, reducing network congestion, updating the Netflix app, and more.
By applying these techniques, you can ensure a smooth and enjoyable streaming experience on Netflix, tailored to your preferences and requirements.
Remember, the video quality options and settings may vary depending on your Netflix subscription plan, device, and internet connection. It’s essential to make the appropriate adjustments based on your specific needs.
Now that you’re equipped with the knowledge to change video quality on Netflix and troubleshoot any issues that may arise, you can enjoy your favorite shows and movies with the highest quality possible.