Introduction
Welcome to this helpful guide on how to change the keyboard language on your Android device. Whether you need to type in a different language for work, school, or personal use, Android offers a convenient way to switch between multiple keyboard languages. By following the simple steps outlined in this article, you’ll be able to seamlessly change the keyboard language on your Android device and communicate more effectively with friends, family, and colleagues.
Android provides users with a diverse selection of keyboard languages, allowing you to express yourself in various languages and dialects. Whether you’re bilingual, learning a new language, or simply prefer to communicate in a different language, Android has you covered. With just a few taps, you can access a wide range of keyboard languages, making it easier to type and communicate in the language you prefer.
Changing the keyboard language on Android is not only useful for multilingual individuals, but it can also come in handy during international travels. When visiting a foreign country, you may need to communicate in the local language, and being able to switch your keyboard language on the go can make navigating through language barriers much easier.
In this guide, we will walk you through the step-by-step process of changing the keyboard language on your Android device. Whether you have a Samsung, LG, Google Pixel, or any other Android device, the process remains relatively similar, ensuring that you can follow along regardless of your device’s make or model.
So, let’s dive into the steps and explore the various options available to change the keyboard language on your Android device. Whether you’re looking to add a new language, remove a language, or simply rearrange the order of your keyboard languages, this guide has got you covered.
Step 1: Open the Settings menu on your Android device
To begin the process of changing the keyboard language on your Android device, you’ll first need to access the Settings menu. The Settings menu acts as the control center for your device, allowing you to customize various aspects of your device’s functionality.
Here’s how you can open the Settings menu on your Android device:
- Unlock your Android device and navigate to the home screen.
- Look for the Settings app, which typically has an icon that resembles a gear or a set of sliders. It is commonly found in the app drawer or on the home screen. Tap on the icon to open the Settings menu.
- Alternatively, you can swipe down from the top of your device’s screen to reveal the notification panel, then tap on the gear icon to directly access the Settings menu.
Once you’ve successfully opened the Settings menu, you’re ready to move on to the next step in changing the keyboard language on your Android device. Keep in mind that the exact appearance and layout of the Settings menu may vary depending on your device’s manufacturer and Android version, but the general steps should remain consistent.
Step 2: Navigate to Language & Input
Now that you have accessed the Settings menu on your Android device, it’s time to navigate to the Language & Input settings. This section allows you to customize the display language, keyboard settings, and input methods on your device.
Follow these steps to find the Language & Input settings:
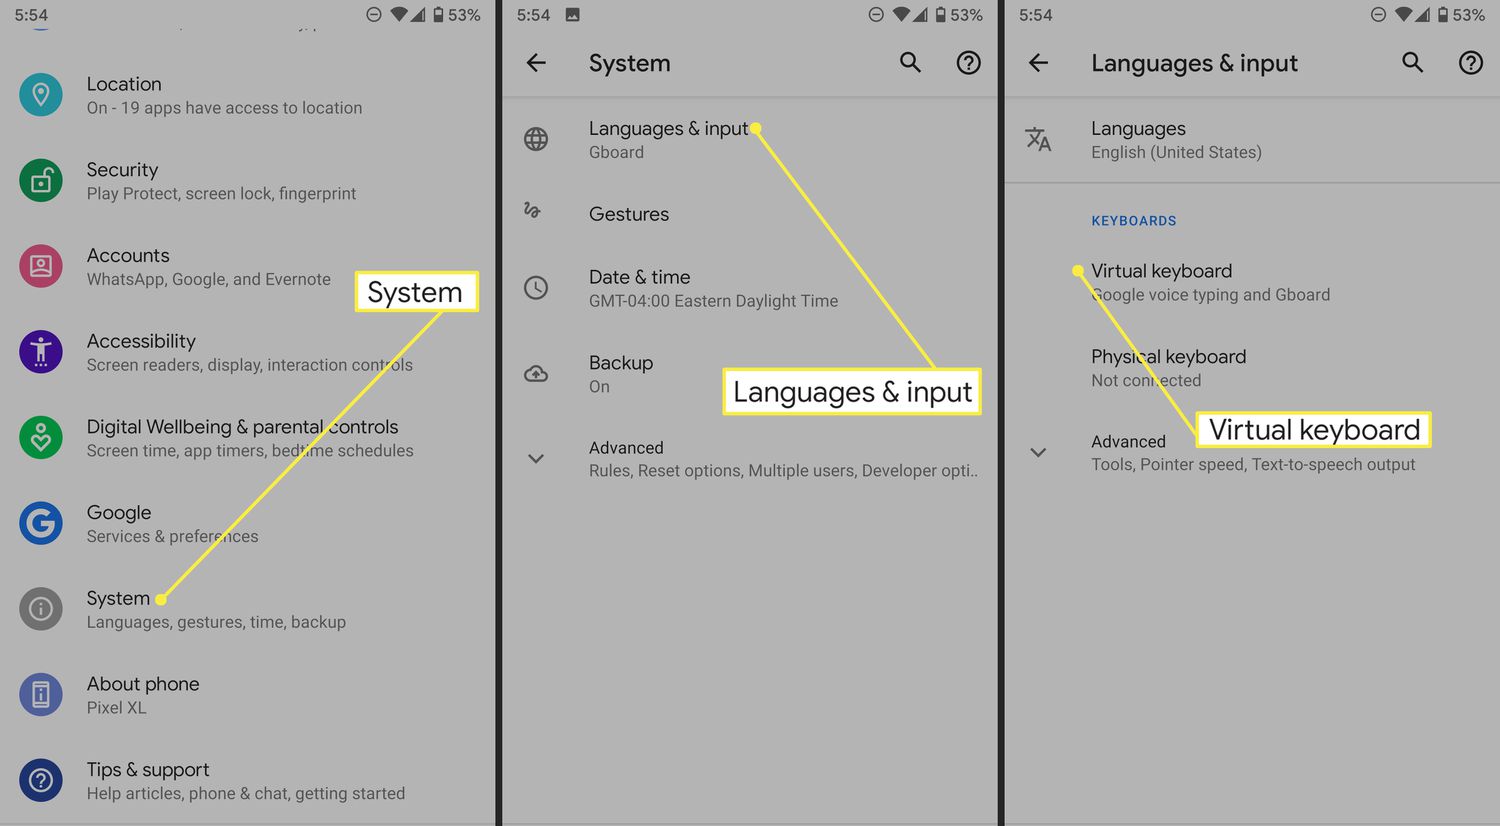
- Scroll down the Settings menu and look for the “System” or “System & Device” category. Tap on it to expand.
- Within the System category, locate and tap on the “Language & Input” option. This option may also be listed as “Language” or “Language & Keyboard” depending on your device.
Once you tap on Language & Input, you will be taken to the settings page where you can manage your language and input preferences. At this point, you’re just a few steps away from changing the keyboard language on your Android device.
Please note that the organization and naming of the settings can vary slightly depending on the Android version and device manufacturer. It’s always a good idea to explore different menus or categories within the Settings menu if you can’t directly locate Language & Input.
Now that you have successfully reached the Language & Input settings, let’s move on to the next step and proceed with changing the keyboard language on your Android device.
Step 3: Select Virtual Keyboard
After navigating to the Language & Input settings on your Android device, it’s time to select the virtual keyboard that you want to change the language for. This step allows you to access the settings and options specific to the keyboard you’re using.
Follow these simple steps to select the virtual keyboard:
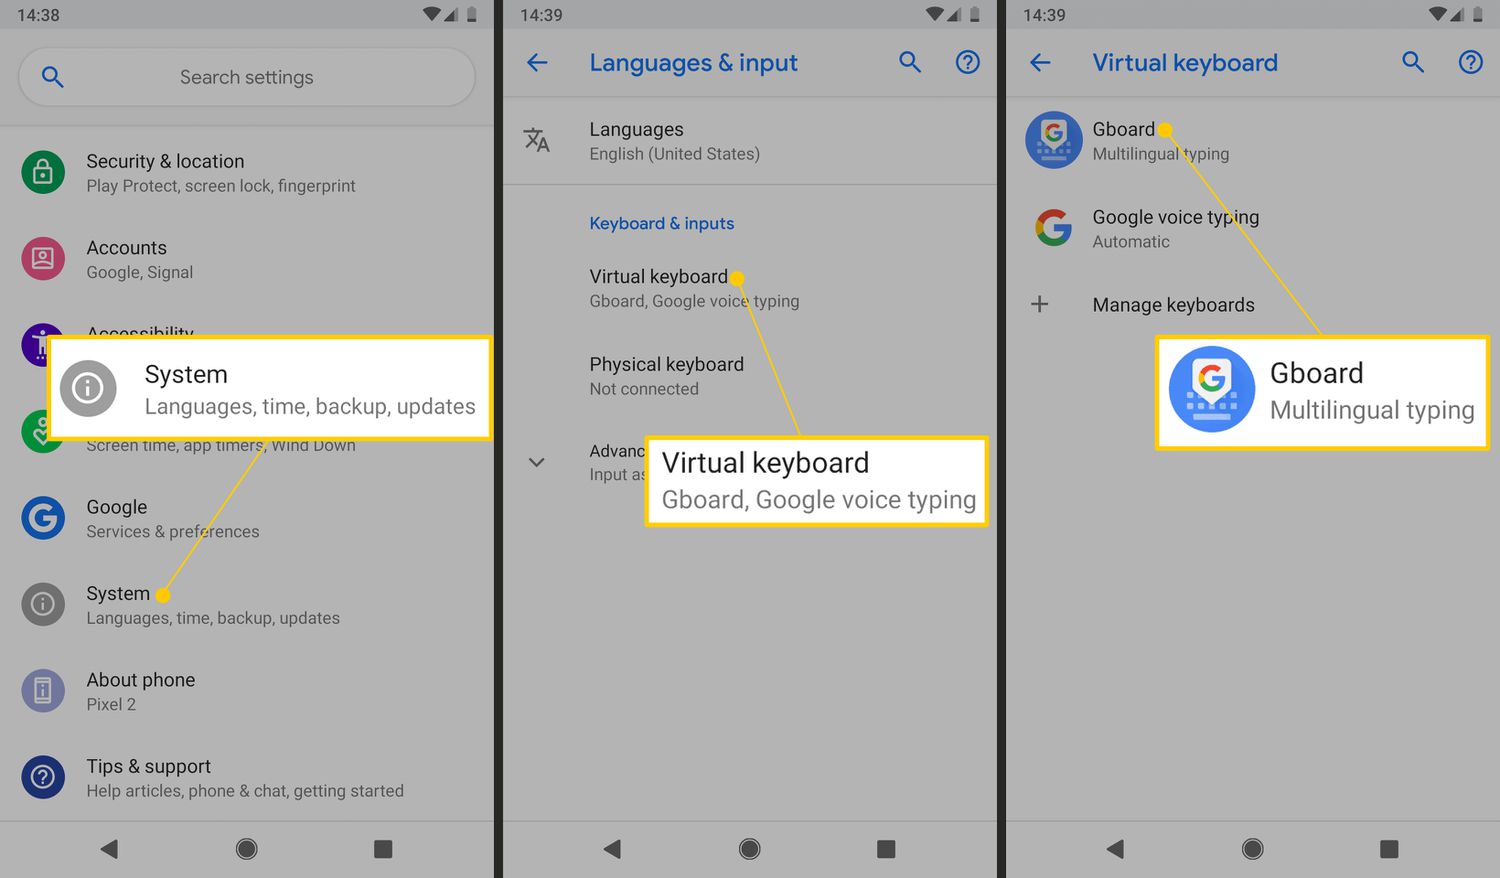
- Scroll through the list of options within the Language & Input settings until you find the “Virtual Keyboard” or “On-screen Keyboard” section. Tap on it to proceed.
- Next, you’ll see a list of virtual keyboards that are currently installed on your device. Tap on the keyboard that you are currently using or wish to change the language for. Commonly used virtual keyboards include Gboard, Samsung Keyboard, SwiftKey, and AnySoftKeyboard.
By selecting the virtual keyboard, you are now ready to access the settings specific to that particular keyboard and proceed to change the language settings.
It’s worth noting that the available virtual keyboards may vary depending on your device and the virtual keyboards you have installed. If you’re using a device from a specific manufacturer, such as Samsung or LG, you may have a virtual keyboard that is specifically designed for that brand of device.
Now that you have selected the virtual keyboard, let’s move on to the next step and explore how to change the language for that keyboard on your Android device.
Step 4: Choose the keyboard you want to change the language for
Now that you have selected the virtual keyboard in the Language & Input settings, it’s time to choose the specific keyboard that you want to change the language for. This step allows you to access the language settings for the selected keyboard and make the necessary changes.
Follow these steps to choose the keyboard you want to change the language for:
- In the virtual keyboard settings, you’ll see a list of options related to the selected keyboard. Look for the “Languages” or “Language” option and tap on it.
- A list of languages that are available for the selected keyboard will be displayed. This list may include the default language and any additional languages that you have already added. Tap on the language that you want to change or add a language if it’s not already listed.
Choosing the specific keyboard in the Language & Input settings allows you to access the language options directly, so you can customize the language settings to your preference.
It’s important to note that different virtual keyboards may have slightly different interfaces and options. Some keyboards may allow you to long-press the spacebar or use a specific shortcut to directly access the language settings without going through the Language & Input settings.
Now that you have chosen the keyboard that you want to change the language for, let’s move on to the next step and explore how to add a new language to your keyboard on your Android device.
Step 5: Tap on Languages
After selecting the specific virtual keyboard you want to change the language for, the next step is to tap on the “Languages” option. This will allow you to access the language settings for the chosen keyboard and make any necessary changes or additions.
Follow these steps to tap on Languages:
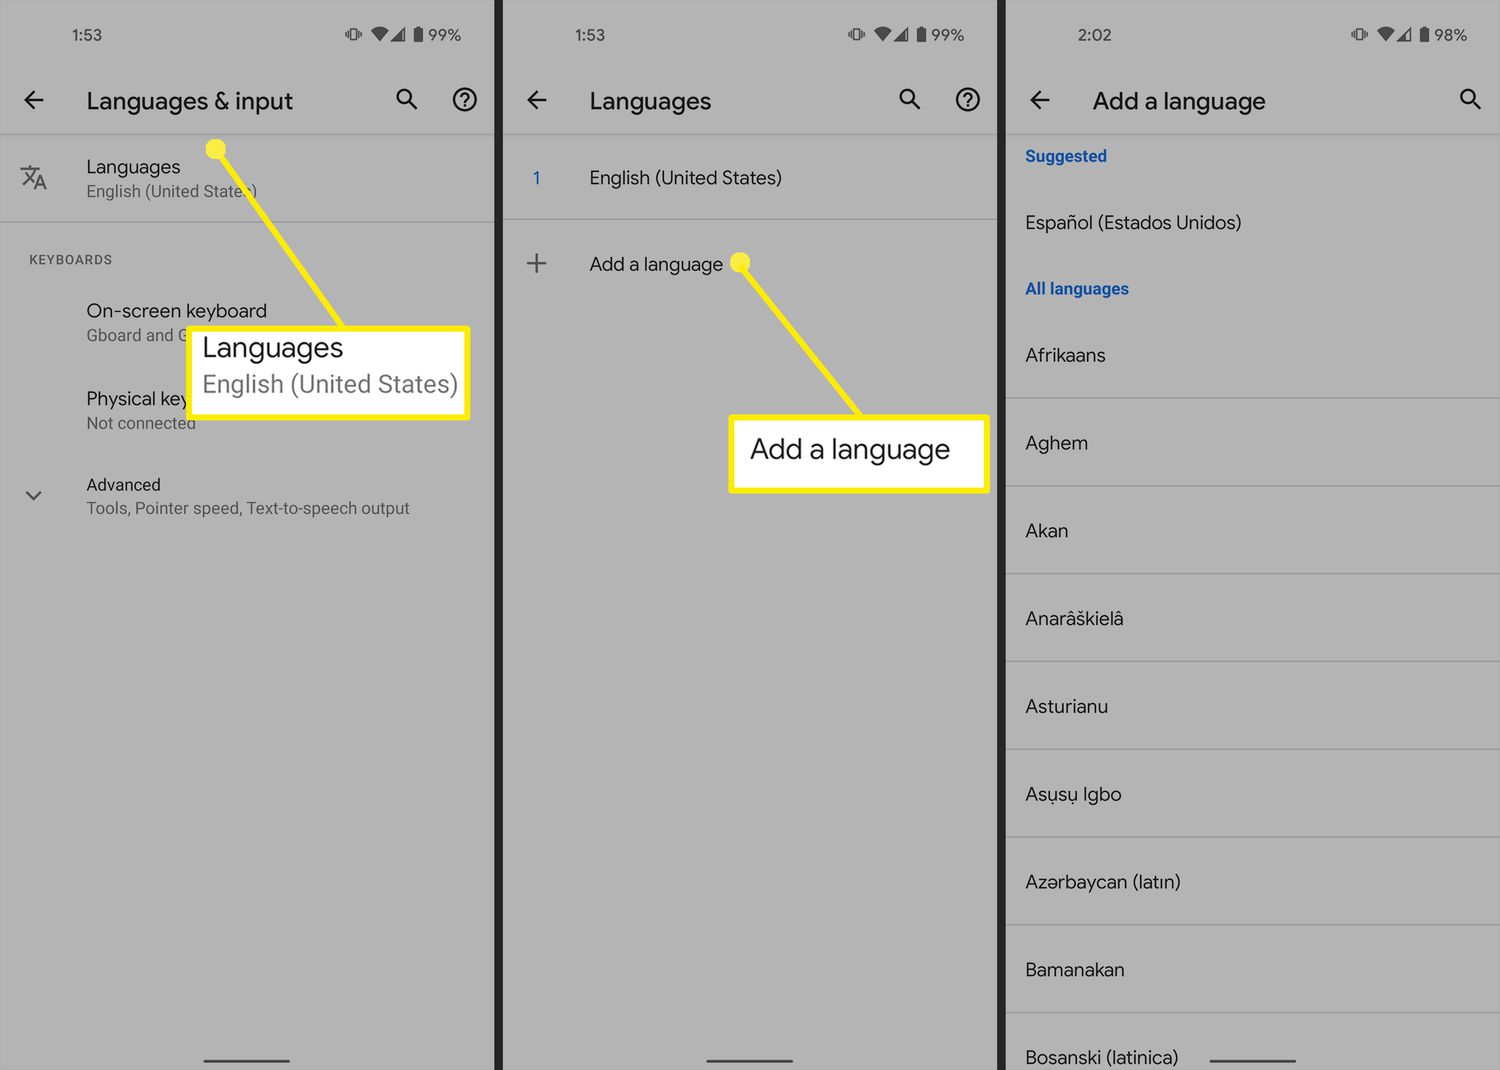
- Within the keyboard settings, look for the “Languages” option and tap on it. This option may also be labeled as “Language preferences” or “Input languages” depending on your device and keyboard.
- A list of languages that are currently available for the selected keyboard will be displayed. Here, you can add new languages, remove existing languages, or rearrange the order of the languages.
By tapping on the Languages option, you have now accessed the language settings for the selected virtual keyboard. This step allows you to make the necessary changes to the keyboard language or add new languages as per your requirement.
It’s important to note that the available options and layout may vary depending on the virtual keyboard you’re using. Some keyboards may have additional features or settings that allow for more customization of the language options.
Now that you have tapped on Languages, let’s move on to the next step and explore how to add a new language to your keyboard on your Android device.
Step 6: Add a new language to your keyboard
If you want to type in a language that is not currently available on your virtual keyboard, you can easily add a new language. Adding a new language to your keyboard will allow you to switch to that language and type in it effortlessly. Follow these steps to add a new language:
- Within the language settings of your selected virtual keyboard, look for the option to add a new language. This option is usually represented by a plus (+) icon or an “Add language” button. Tap on this option.
- A list of available languages will be displayed. You can navigate through the list and select the desired language by tapping on it.
- Once you have selected the language, it will be added to the list of languages for your virtual keyboard. You can then proceed to use the newly added language for typing.
Adding a new language to your virtual keyboard gives you the flexibility to switch between different languages effortlessly. You can easily communicate in multiple languages without having to toggle between different keyboards or language settings.
It’s important to note that the list of available languages may vary depending on the virtual keyboard you’re using. Some virtual keyboards offer a wide range of languages, while others may have a more limited selection.
Now that you have successfully added a new language to your keyboard, let’s move on to the next step and explore how to remove a language from your keyboard on your Android device.
Step 7: Remove a language from your keyboard
If you no longer need a certain language on your virtual keyboard or want to declutter the list of languages, you can easily remove a language. Removing a language from your keyboard will streamline your language options and make it easier to switch between the languages you frequently use. Follow these steps to remove a language:
- Within the language settings of your selected virtual keyboard, locate the language you want to remove from the list.
- Tap and hold on the language you want to remove until a menu or options appear.
- Select the option to remove or delete the language. This option is usually represented by a trash bin icon or a “Remove” button.
Once you confirm the removal, the selected language will be removed from the list of languages for your virtual keyboard. You will no longer see the removed language as an option when switching between languages.
Removing a language from your virtual keyboard allows you to keep your language options organized and relevant to your needs. It reduces clutter and ensures that you can easily access and switch between the languages you frequently use.
It’s important to note that some virtual keyboards may not allow you to remove certain default languages or languages that are essential for the keyboard’s functionality.
Now that you have successfully removed a language from your keyboard, let’s move on to the next step and explore how to arrange the order of languages on your virtual keyboard.
Step 8: Arrange the order of languages
Having the ability to arrange the order of languages on your virtual keyboard can be quite handy, especially if you frequently switch between multiple languages. This step allows you to prioritize the languages in a way that aligns with your usage and preference. Follow these steps to arrange the order of languages:
- Within the language settings of your selected virtual keyboard, look for the option to rearrange the languages. This option is usually represented by a handle or icon that allows you to drag and move the languages.
- Tap and hold on the language that you want to move until a handle appears.
- Drag the language up or down to the desired position in the list.
- Release your finger to drop the language in its new position.
Once you have arranged the order of the languages, the virtual keyboard will reflect the changes accordingly. The language that appears at the top of the list will typically be the default language when you open the keyboard.
Arranging the order of languages on your virtual keyboard allows you to have quick and convenient access to your most frequently used languages. You can prioritize the languages based on your needs, making it easier to switch between languages without having to navigate through a lengthy list.
It’s worth noting that not all virtual keyboards may have the option to rearrange the language order. Some keyboards may automatically prioritize the languages based on your usage, while others may have a fixed language order.
Now that you have successfully arranged the order of languages on your keyboard, let’s move on to the next step and explore how to enable or disable auto-correction for different languages.
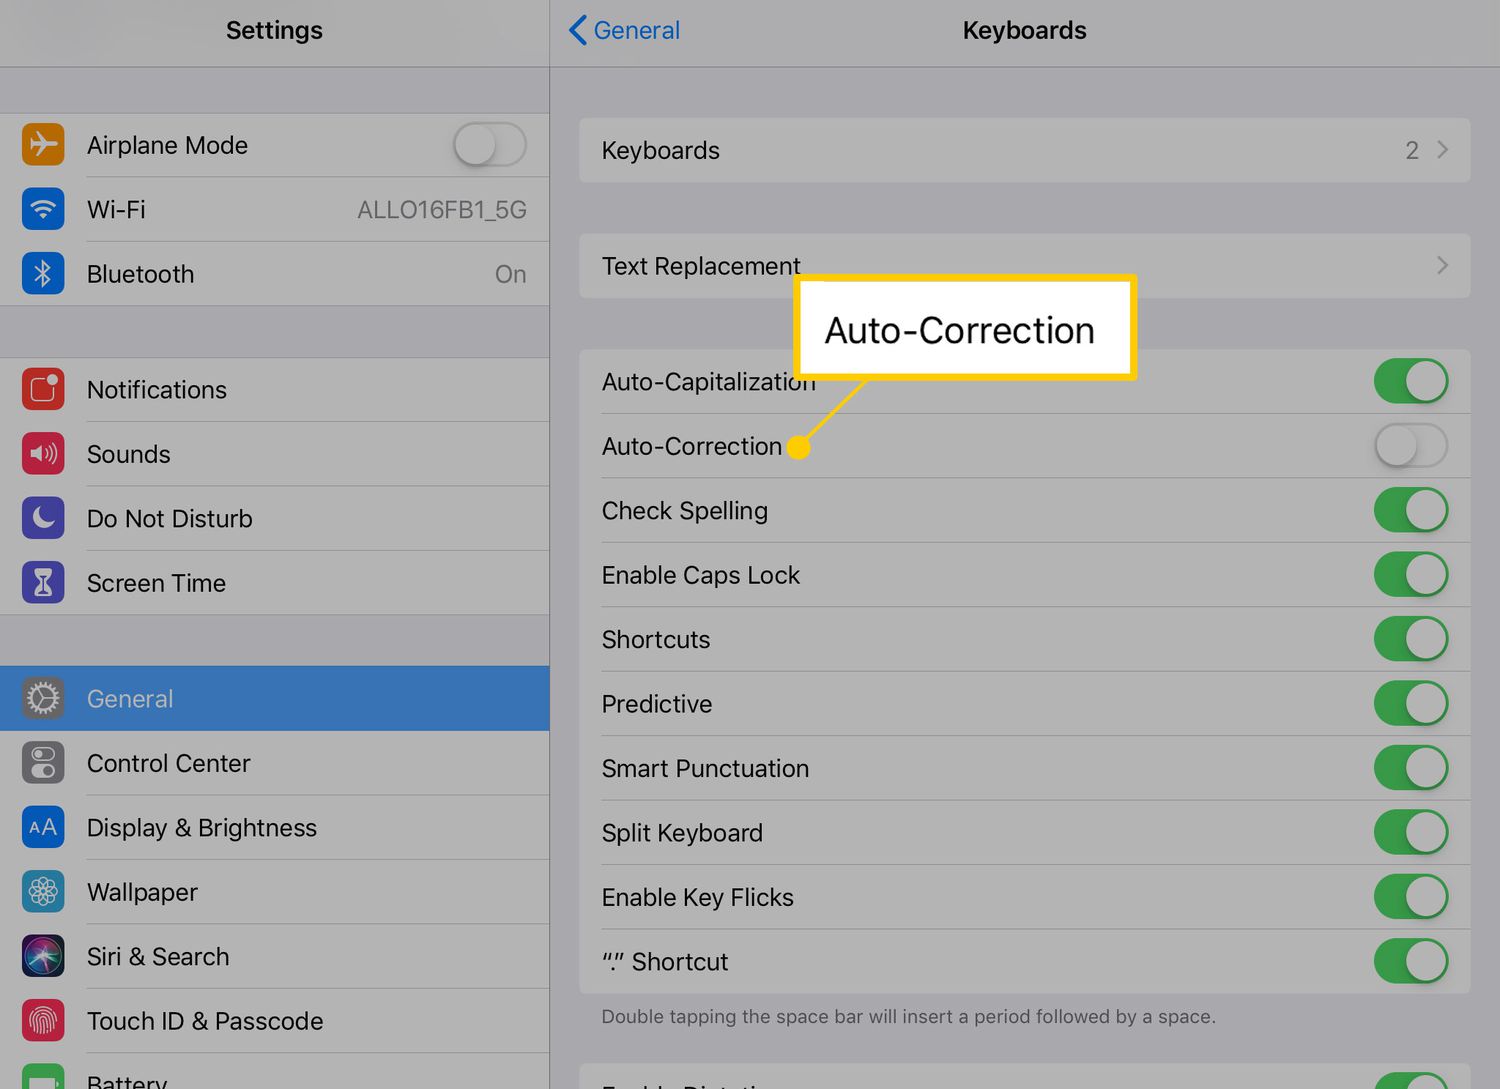
Step 9: Enable or disable auto-correction for different languages
Auto-correction is a useful feature that automatically suggests or corrects the words you type on your virtual keyboard. However, the auto-correction settings may vary for different languages. Enabling or disabling auto-correction for different languages allows you to have more control over how your keyboard behaves. Follow these steps to enable or disable auto-correction:
- Within the language settings of your selected virtual keyboard, locate the language for which you want to adjust the auto-correction settings.
- Tap on the language to access its specific settings and options.
- Look for the option related to auto-correction. It may be labeled as “Auto-correction,” “Text correction,” or something similar.
- Toggle the switch or checkbox to enable or disable auto-correction for the selected language.
Once you have configured the auto-correction settings for a specific language, the virtual keyboard will adjust its behavior accordingly. You can have auto-correction enabled for languages that you frequently use and rely on it for accurate typing, while disabling it for languages where you prefer more control over word suggestions.
It’s important to note that not all virtual keyboards may support language-specific auto-correction settings. In such cases, the auto-correction settings may be applied universally or based on the keyboard’s default behavior.
Now that you have successfully enabled or disabled auto-correction for different languages, you have customized your virtual keyboard to suit your typing preferences. The keyboard will now behave according to your language-specific auto-correction settings.
Conclusion
Changing the keyboard language on your Android device opens up a world of possibilities, allowing you to communicate effectively in different languages. With the simple steps outlined in this guide, you can easily switch between languages and type comfortably in the language of your choice.
By accessing the Settings menu, navigating to Language & Input, selecting the virtual keyboard, and tapping on Languages, you can not only add or remove languages but also rearrange their order according to your preference. Furthermore, adjusting the auto-correction settings for different languages gives you more control over your typing experience.
Whether you need to communicate in multiple languages for work, travel, or personal purposes, Android provides a user-friendly and customizable solution to meet your needs. Regardless of the make or model of your Android device, you can follow these steps to change the keyboard language and enhance your language capabilities.
Remember, adding a new language not only expands your language options but also facilitates seamless communication in different contexts. Removing unnecessary languages and rearranging their order ensures a clutter-free and efficient typing experience. Enabling or disabling auto-correction for different languages allows for accurate typing and personalized word suggestions.
Now that you have mastered the art of changing the keyboard language on your Android device, you can confidently navigate through language barriers, express yourself in various languages, and communicate more effectively with others.
So go ahead, explore new languages, and make the most of your Android device’s versatile keyboard language settings!


