Introduction
When you first set up your new Windows 11 computer, it may come with a default web browser pre-installed. However, you might prefer to use a different browser that better suits your needs and preferences. Changing the default browser on Windows 11 is a straightforward process that can be done in just a few simple steps.
By setting a different default browser, you can ensure that whenever you click on a link or open a web page, it will automatically open in your preferred browser instead of the default one. Whether you want to switch to a browser known for its speed, security, or customization options, Windows 11 provides multiple methods to help you make the change.
In this tutorial, we’ll guide you through the process of changing the default browser on your Windows 11 computer. We’ll explore different methods to accommodate various needs and preferences. So, whether you’re tech-savvy or just getting started with computers, don’t worry – we’ve got you covered.
Please note that Windows 11 allows you to choose from a wide range of popular web browsers, including Google Chrome, Mozilla Firefox, Microsoft Edge, and many others. You can choose the browser that you find most comfortable and enjoy a seamless browsing experience tailored to your liking.
Step 1: Open the Settings menu
The first step in changing the default browser on Windows 11 is to access the Settings menu. To do this, you can follow these simple instructions:
- Click on the “Start” button located in the bottom left corner of the taskbar. You can also press the Windows key on your keyboard to open the Start menu.
- From the Start menu, click on the “Settings” icon, which looks like a gear. Alternatively, you can press the Windows key + I on your keyboard to directly open the Settings menu.
- Once the Settings menu opens, you’ll see various categories of settings. Look for and click on the “System” category to proceed.
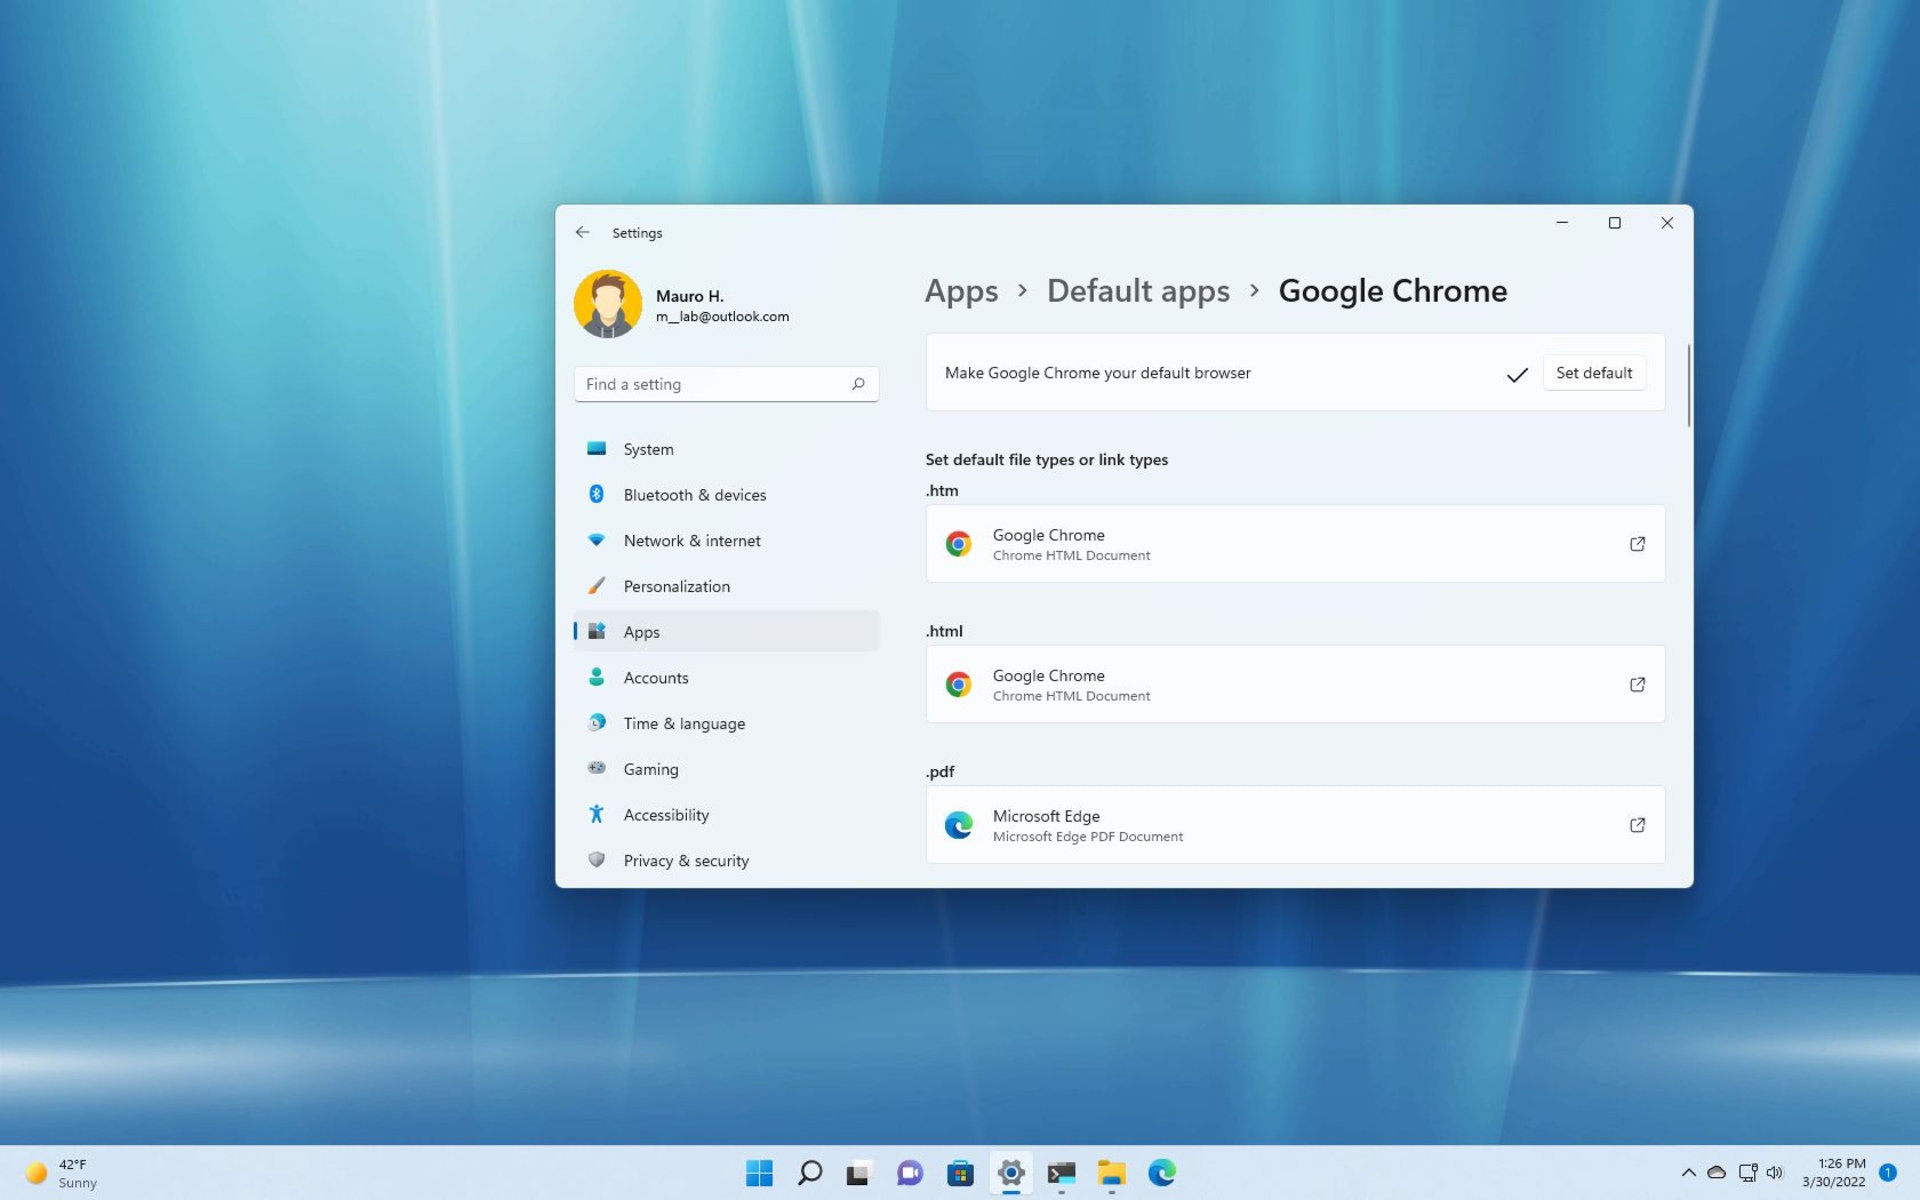
- In the left sidebar, click on the “Default apps” option. This will take you to the Default apps settings page.
By following these steps, you have successfully opened the Settings menu and navigated to the Default apps settings. Now you’re ready to proceed to the next step and set your default web browser.
Step 2: Access the Default apps settings
Once you have opened the Settings menu in Windows 11, the next step is to access the Default apps settings. This is where you can make changes to your default web browser. Follow these instructions to navigate to the Default apps settings:
- From the Settings menu, click on the “System” category if it is not already selected.
- In the left sidebar, you will find various options. Scroll down and click on “Default apps”.
By clicking on the “Default apps” option, you will now be able to access and modify your default app settings for different categories, including web browsers. This is where you’ll set your preferred browser as the default option for opening web links and pages.
In the Default apps settings, you can also customize defaults for other categories such as email, music, and photo viewers. However, for the purpose of this tutorial, we’ll focus specifically on changing the default web browser.
Now that you have successfully accessed the Default apps settings on your Windows 11 computer, you are ready to move on to the next step and set your preferred web browser as the default option.
Step 3: Set your default web browser
After accessing the Default apps settings in Windows 11, you can now proceed to set your preferred web browser as the default option. There are several methods to accomplish this, depending on your preferences and the browsers installed on your computer. Let’s explore three common methods:
Method 1: Choose from the available options
One of the easiest ways to set your default web browser is by choosing from the available options in the Default apps settings:
- In the “Web browser” section of the Default apps settings, click on the current default browser.
- A list of available browsers installed on your system will appear. Choose your preferred browser from the list.
By selecting your preferred browser from the available options, it will automatically become the default browser for opening web links and pages.
Method 2: Select a different browser from your system
If the browser you want to set as default is not listed in the available options, you can manually select it as your default browser from your system:
- Scroll down in the Default apps settings and click on “Choose default apps by file type”.
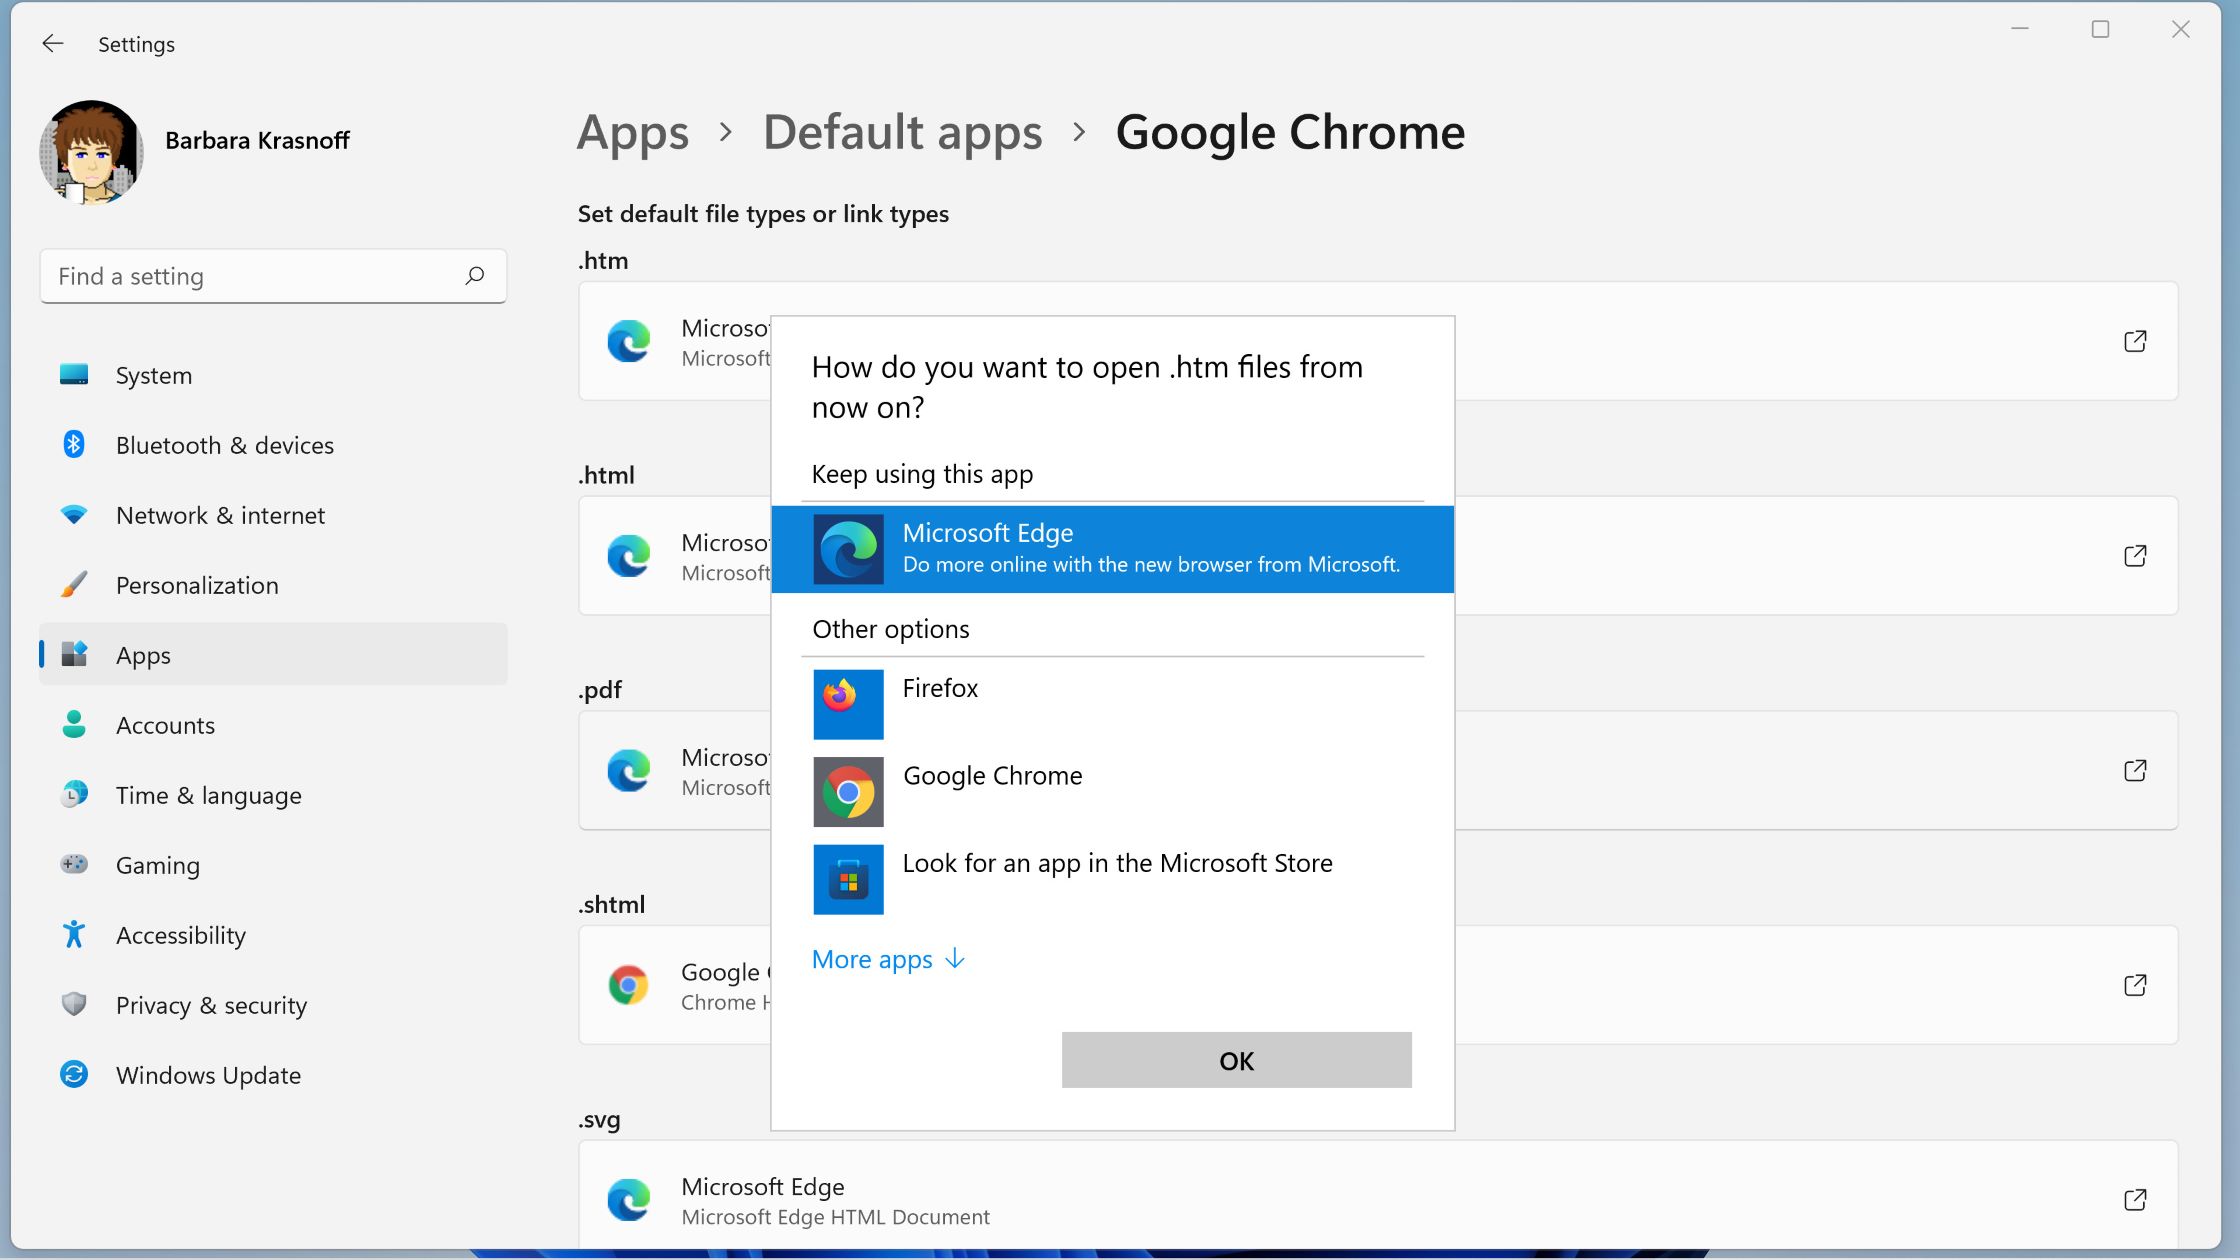
- Locate the file type associated with web browsing, such as “.html” or “.htm”.
- Click on the current default application for that file type, and a list of available browsers will appear.
- Select your preferred browser from the list to set it as the default for that file type.
By associating your preferred browser with the specific file type, it will be automatically opened whenever you access web links or files of that type.
Method 3: Use the “Web browser” setting
In addition to the previous methods, Windows 11 also provides a dedicated setting specifically for changing the default web browser. Here’s how to use it:
- Go back to the main “Default apps” settings page.
- Scroll down and locate the “Web browser” setting.
- Click on the current default browser, and a list of available browsers will appear.
- Choose your preferred browser from the list to set it as the default web browser.
By utilizing the “Web browser” setting, you can easily change the default web browser on your Windows 11 computer.
Congratulations! You have successfully set your preferred web browser as the default option on your Windows 11 computer. Now, whenever you click on a web link or open a web page, it will automatically open in your chosen browser.
Method 1: Choose from the available options
One of the easiest ways to set your default web browser on Windows 11 is by choosing from the available options within the Default apps settings. Here’s how you can do it:
- Within the Default apps settings page, navigate to the “Web browser” section.
- Click on the current default browser link to open the options menu.
- A list of available browsers installed on your Windows 11 computer will be displayed.
- Choose your preferred web browser from the list by clicking on it.
By selecting your preferred web browser from the available options, you are specifying that it should be used as the default browser for opening web links and pages. Windows 11 will automatically make the necessary adjustments, and your chosen browser will take over as the default option.
This method is quick and convenient, especially if your desired browser is already listed as an option in the Default apps settings. It allows you to set your preferred browser as the default with just a few clicks, ensuring that all web links and pages are automatically opened in your chosen browser.
It’s worth noting that the available options may vary based on the browsers you have installed on your Windows 11 computer. If your desired browser is not listed, don’t worry. There are alternative methods that can help you set it as the default browser, which we will explore in the next sections.
Now that you are familiar with the first method of choosing from the available options, you can proceed to the next section where we will discuss another approach for setting your default web browser on Windows 11.
Method 2: Select a different browser from your system
If your preferred web browser is not listed in the available options within the Default apps settings on Windows 11, you can manually select it as the default browser by following these steps:
- In the Default apps settings page, scroll down and find the “Choose default apps by file type” option.
- Click on “Choose default apps by file type” to access the file type associations.
- Look for the file type associated with web browsing, such as “.html” or “.htm”.
- Click on the current default application for that file type, and a list of available browsers will appear.
- Select your preferred web browser from the list.
By associating your preferred browser with the specific file type, Windows 11 will recognize it as the default application for opening web links and files of that particular type. This means that whenever you click on a web link or open an HTML file, your chosen browser will be launched automatically.
Choosing a different browser from your system using this method allows you to have more control over your default browser settings. It is especially useful when your preferred browser is not listed as an option in the Default apps settings. By manually assigning the browser to a specific file type, you can ensure that it is always used to handle web-related content on your Windows 11 computer.
Keep in mind that you can repeat this process for other file types associated with web browsing, to further customize your default browser settings. This method provides flexibility and enables you to tailor your browsing experience according to your preferences.
Now that you are familiar with the second method of manually selecting a different browser from your system, you can move on to the next section to explore another approach for changing the default web browser on Windows 11.
Method 3: Use the “Web browser” setting
Windows 11 provides a dedicated setting called “Web browser” that allows you to easily change the default web browser on your computer. Here’s how to use this method:
- Go back to the main “Default apps” settings page.
- Scroll down until you find the “Web browser” setting.
- Click on the current default browser to open the options menu.
- A list of available browsers installed on your Windows 11 computer will be displayed.
- Select your preferred web browser from the list by clicking on it.
By utilizing the “Web browser” setting, you can easily specify your preferred browser as the default option for opening web links and pages on your Windows 11 computer. Once you have selected your preferred browser, Windows 11 will automatically make the necessary changes to ensure that it is used as the default web browser.
This method offers a straightforward and convenient way to change the default web browser, especially if you prefer to use a specific browser for all your web browsing needs. It allows you to have complete control over your default browser settings, ensuring that whenever you click on a web link or open a web page, your chosen browser will be launched.
Furthermore, this method is particularly useful if your preferred browser is not listed as an option in the Default apps settings, giving you an alternative way to set it as the default browser on Windows 11.
Now that you are familiar with the third method of using the “Web browser” setting, you have learned multiple approaches to change the default web browser on your Windows 11 computer. These methods provide you with the flexibility to customize your browsing experience and ensure that you can use your preferred browser for all your online activities.
Conclusion
Changing the default web browser on your Windows 11 computer is a simple process that can be done through the Default apps settings. Whether you want to switch to a different browser known for its speed, security, or unique features, Windows 11 provides various methods to customize your default browser settings to meet your specific needs.
In this tutorial, we covered three methods to change the default web browser on Windows 11. The first method involved selecting your preferred browser from the available options within the Default apps settings. This method is convenient when your desired browser is already listed.
If your preferred browser is not listed, you can try the second method by manually associating it with the web browsing file types within the Default apps settings. This method gives you more control over your default browser settings and allows you to tailor your browsing experience.
Alternatively, you can use the dedicated “Web browser” setting in the Default apps settings to easily change the default browser. This method is particularly useful when your preferred browser is not listed in the available options, providing you with a direct way to set it as the default option.
With these methods, you have the flexibility to choose the web browser that suits your preferences, ensuring a seamless browsing experience on your Windows 11 computer. By setting your preferred browser as the default option, you can enjoy faster browsing, enhanced security features, and access to a range of customization options.
Now that you have successfully changed the default web browser on your Windows 11 computer, you’re ready to explore the internet in a way that aligns with your preferences and needs. Whether you prefer the sleek design of Microsoft Edge, the flexibility of Google Chrome, or the privacy features of Mozilla Firefox, Windows 11 allows you to make the web browser that best suits you the default choice.