Introduction
Welcome to the world of Windows 11! As you explore the exciting new features and capabilities of this operating system, you may find yourself wanting to set Chrome as your default browser. With its user-friendly interface, speedy performance, and wide range of extensions, Chrome has become a popular choice for internet browsing. By setting Chrome as your default browser, you can enjoy a seamless and personalized web experience every time you click on a link or open a web page.
In this guide, we will walk you through the step-by-step process of setting Chrome as your default browser in Windows 11. Whether you’re a long-time Chrome user or new to the browser, we’ve got you covered. Rest assured that by the end of this tutorial, you’ll be smoothly cruising the web with Chrome as your trusted default browser.
Setting a default browser is not only about personal preference but also about improving your browsing experience. With Chrome as your default browser, you can seamlessly sync your bookmarks, history, and passwords across devices, enabling you to access your favorite websites and online resources with ease.
Additionally, Chrome offers a wide array of extensions and customization options, allowing you to tailor your browsing experience to your exact preferences. From ad blockers to productivity tools, the Chrome Web Store is packed with extensions that can help enhance your productivity, security, and entertainment while navigating the internet.
Now that you understand the benefits of setting Chrome as your default browser, let’s dive into the practical steps to get it up and running on your Windows 11 device. Follow along as we walk you through each step, ensuring a smooth and hassle-free process.
Why Set Chrome as Default Browser
With a plethora of web browsers available, you may wonder why Chrome should be your go-to choice as the default browser in Windows 11. Here are a few compelling reasons to consider:
- Speed and Performance: Chrome is known for its lightning-fast speed and efficient performance. It utilizes advanced technologies like caching and rendering optimizations to provide a smooth browsing experience. Whether you’re loading web pages, streaming videos, or running web applications, Chrome ensures speedy and responsive performance.
- User-Friendly Interface: Chrome features a clean and intuitive interface that allows users to navigate effortlessly. Its minimalistic design puts the focus on the content while providing easy access to essential tools and features. With a familiar layout and user-friendly controls, Chrome ensures a seamless browsing experience for users of all levels of expertise.
- Sync Across Devices: Chrome offers convenient synchronization capabilities, allowing you to access your browsing data, including bookmarks, history, and even open tabs, across multiple devices. Whether you’re transitioning from your computer to your smartphone or switching between different computers, Chrome keeps your browsing experience consistent and accessible.
- Extensions and Customizability: Chrome boasts a vast library of extensions that add functionality and customization options to your browsing experience. From productivity tools to ad blockers, there is an extension for almost any need. The Chrome Web Store provides a wide range of options, allowing you to personalize your browser to match your preferences and streamline your online activities.
- Security and Privacy: Chrome incorporates various security features to protect your browsing sessions and personal information. It includes built-in protection against phishing and malicious websites, as well as automatic updates that ensure you have the latest security patches. Additionally, Chrome allows you to customize privacy settings, providing you with control over your online privacy.
By setting Chrome as your default browser in Windows 11, you can enjoy these benefits and more. From improved speed and performance to seamless synchronization and a vast selection of extensions, Chrome is designed to enhance your browsing experience and make your online activities more efficient and enjoyable. With these compelling reasons in mind, let’s move on to the step-by-step process of setting Chrome as your default browser in Windows 11.
Step 1: Download Google Chrome
The first step towards setting Chrome as your default browser in Windows 11 is to download the Chrome browser itself. Here’s how you can do it:
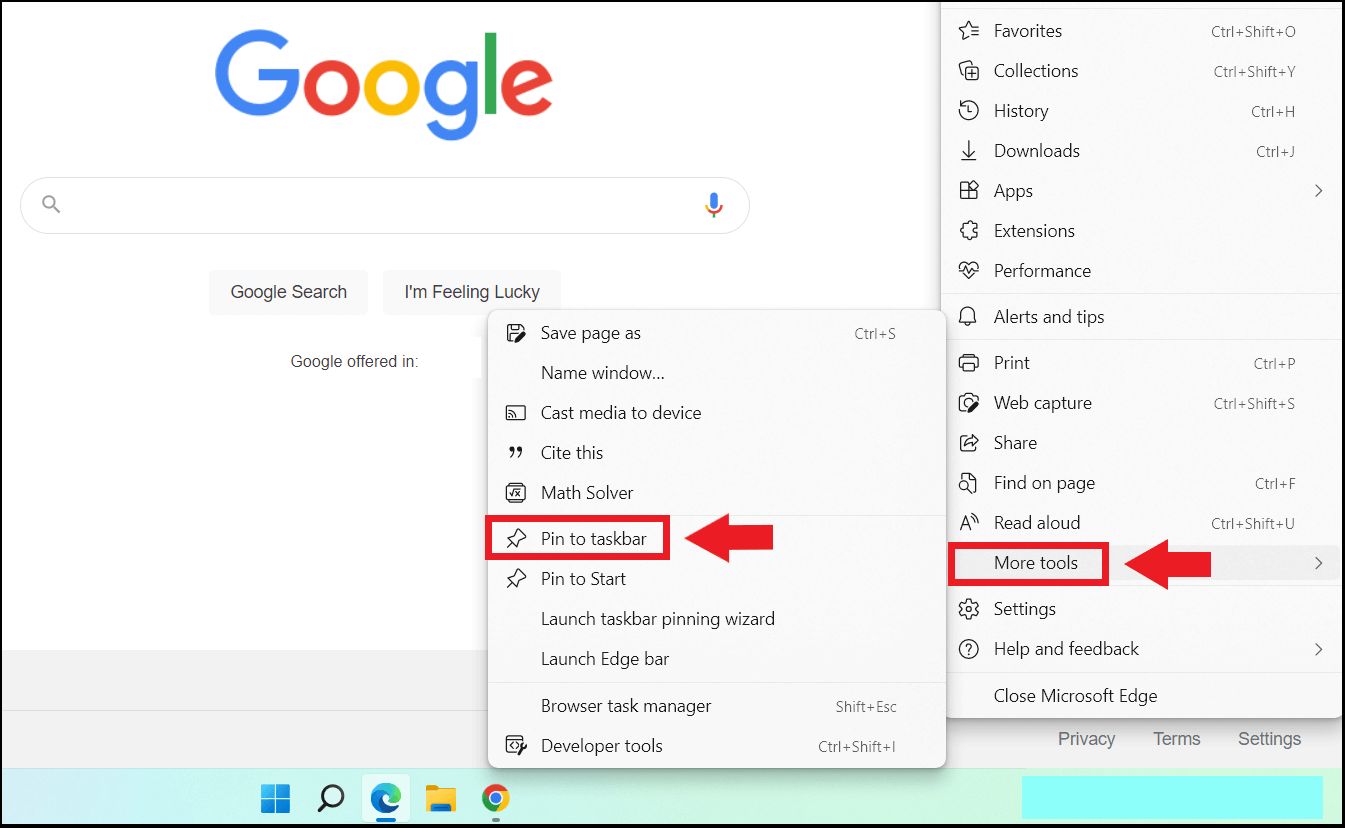
- Open your existing default browser or any browser of your choice.
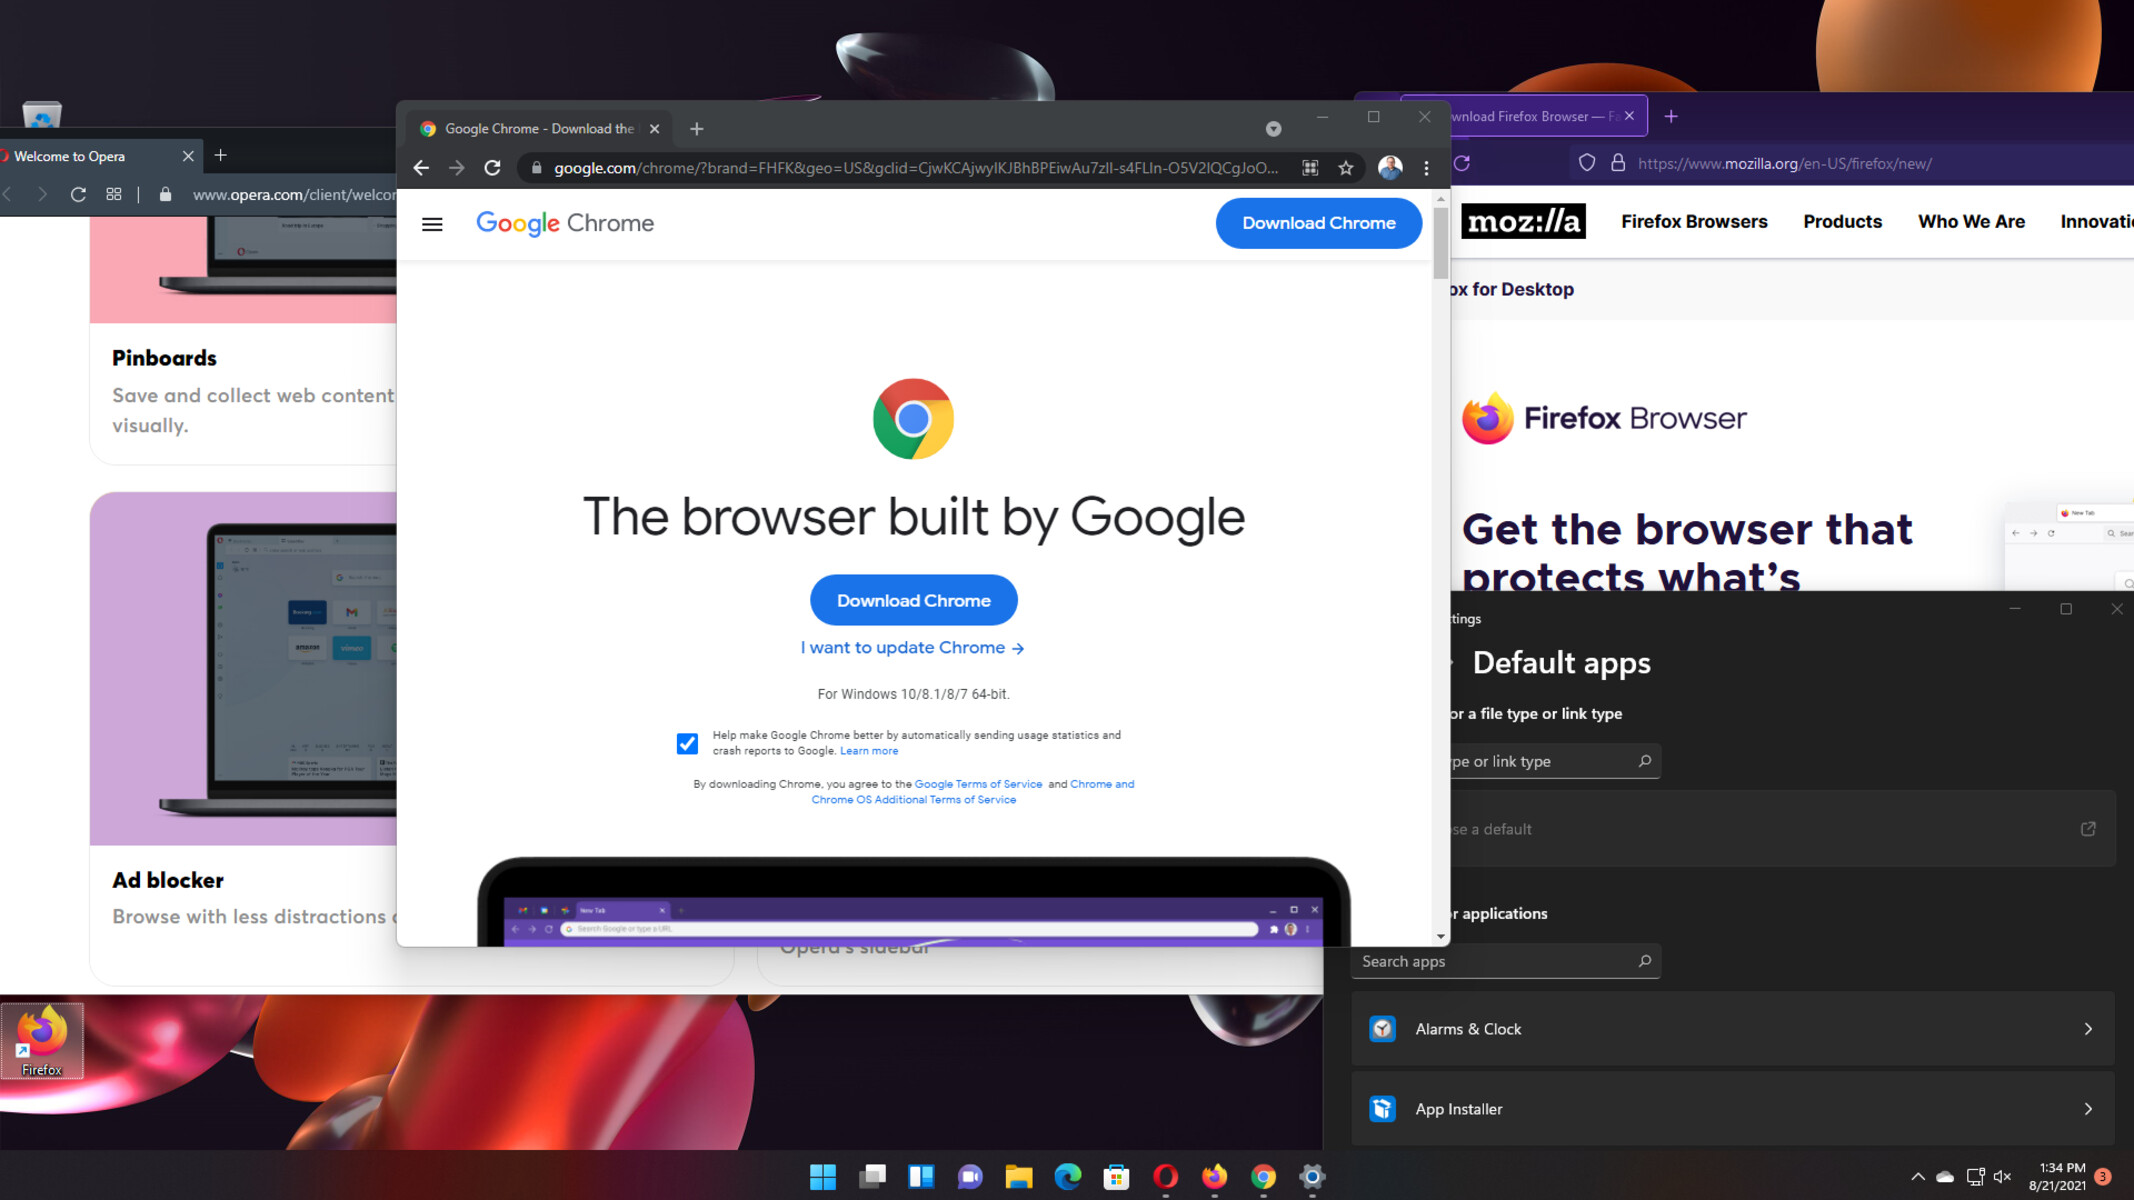
- In the address bar, type in https://www.google.com/chrome and press Enter.
- On the Google Chrome website, you will see a prominent “Download Chrome” button. Click on the button to initiate the download.
- The website will automatically detect your operating system as Windows and provide you with the appropriate download link. Click on the “Download” button again.
- A pop-up window may appear, asking for confirmation to download the file. Click on “Save File” to proceed with the download. Choose a location on your computer where you want to save the installation file.
- The download will begin, and you can monitor the progress in your browser’s download manager or the notification area of your operating system.
Once the download is complete, you are ready to move on to the next step and install Google Chrome on your Windows 11 device. Ensure that you have the installation file handy, as we will be using it in the following step.
Downloading the latest version of Google Chrome ensures that you have access to the newest features, security updates, and improvements. Google regularly releases updates to enhance the functionality and performance of the browser, making it essential to keep your browser updated for a seamless and secure browsing experience.
Step 2: Install Google Chrome
Now that you have downloaded the Google Chrome installation file, it’s time to proceed with the installation process. Follow the steps below to install Google Chrome on your Windows 11 device:
- Locate the downloaded installation file for Google Chrome. It is typically saved in the “Downloads” folder or the location you specified during the download process.
- Double-click on the installation file to start the installation process. If a User Account Control (UAC) prompt appears, asking for permission to make changes to your computer, click “Yes” to continue.
- The Google Chrome installer will launch and display the Chrome setup window. On the initial screen, you may have the option to customize your installation preferences. You can choose to make Google Chrome your default browser during the installation by checking the relevant checkbox. If this option is not available, don’t worry—we will set Chrome as the default browser in the later steps.
- Review the terms of service and privacy policy presented by Google and click on the “Accept and Install” button to continue.
- The installer will now proceed to install Google Chrome on your Windows 11 device. The process may take a few moments, so be patient.
- Once the installation is complete, you will see a confirmation message. You may also have the option to import your bookmarks, history, and other settings from your previous browser. Choose your preferred option and click on the “Start Google Chrome” button to launch the browser.
Congratulations! You have successfully installed Google Chrome on your Windows 11 device. However, to set it as your default browser, we need to proceed to the next steps. So, let’s move on to the Windows 11 Settings and make Chrome your trusted default browser.
Step 3: Open Windows 11 Settings
Before we can set Chrome as the default browser in Windows 11, we need to access the Windows 11 Settings. Follow the steps below to open the Settings:
- Click on the Start button at the bottom left corner of your screen or press the Windows key on your keyboard.
- In the Start menu, you will find an icon called Settings. Click on it to open the Windows 11 Settings.
- Another way to access Settings is by pressing the Windows key + I simultaneously. This keyboard shortcut will directly open the Windows 11 Settings.
Once you have opened the Windows 11 Settings, you are ready to proceed to the next step to set Chrome as the default browser on your Windows 11 device.
The Settings in Windows 11 provide access to various system configurations and personalization options. It’s a central hub where you can customize your device settings, manage accounts, and control various aspects of your Windows 11 experience. By navigating through the Settings, you can easily configure and customize different features to suit your preferences and needs.
Step 4: Select Apps
Now that you have opened the Windows 11 Settings, the next step is to navigate to the Apps section. Follow the steps below:
- In the Windows 11 Settings window, you will see several categories on the left-hand side. Click on the category labeled Apps. This will open the Apps settings page.
- Alternatively, you can also use the search bar at the top of the Settings window and type in “Apps.” From the search results, click on the Apps & Features option to access the Apps settings.
The Apps settings in Windows 11 allow you to manage and control the various applications installed on your device. From here, you can uninstall apps, manage app permissions, and customize app-related settings.
Once you have navigated to the Apps settings, you are ready to proceed to the next step and choose the default apps for specific categories, including the default web browser.
Windows 11 provides you with the flexibility to choose your preferred default apps for various tasks, ensuring a personalized computing experience. Whether it’s browsing the internet, viewing photos, or playing media files, you have the ability to set your preferred apps as default in Windows 11, allowing for a seamless and tailored experience.
Step 5: Choose Default Apps
With the Apps settings open in the Windows 11 Settings window, it’s time to choose the default apps for specific categories, including the default web browser. Follow the steps below:
- Scroll down on the Apps settings page until you find the section labeled Default Apps. Click on it to access the Default Apps settings.
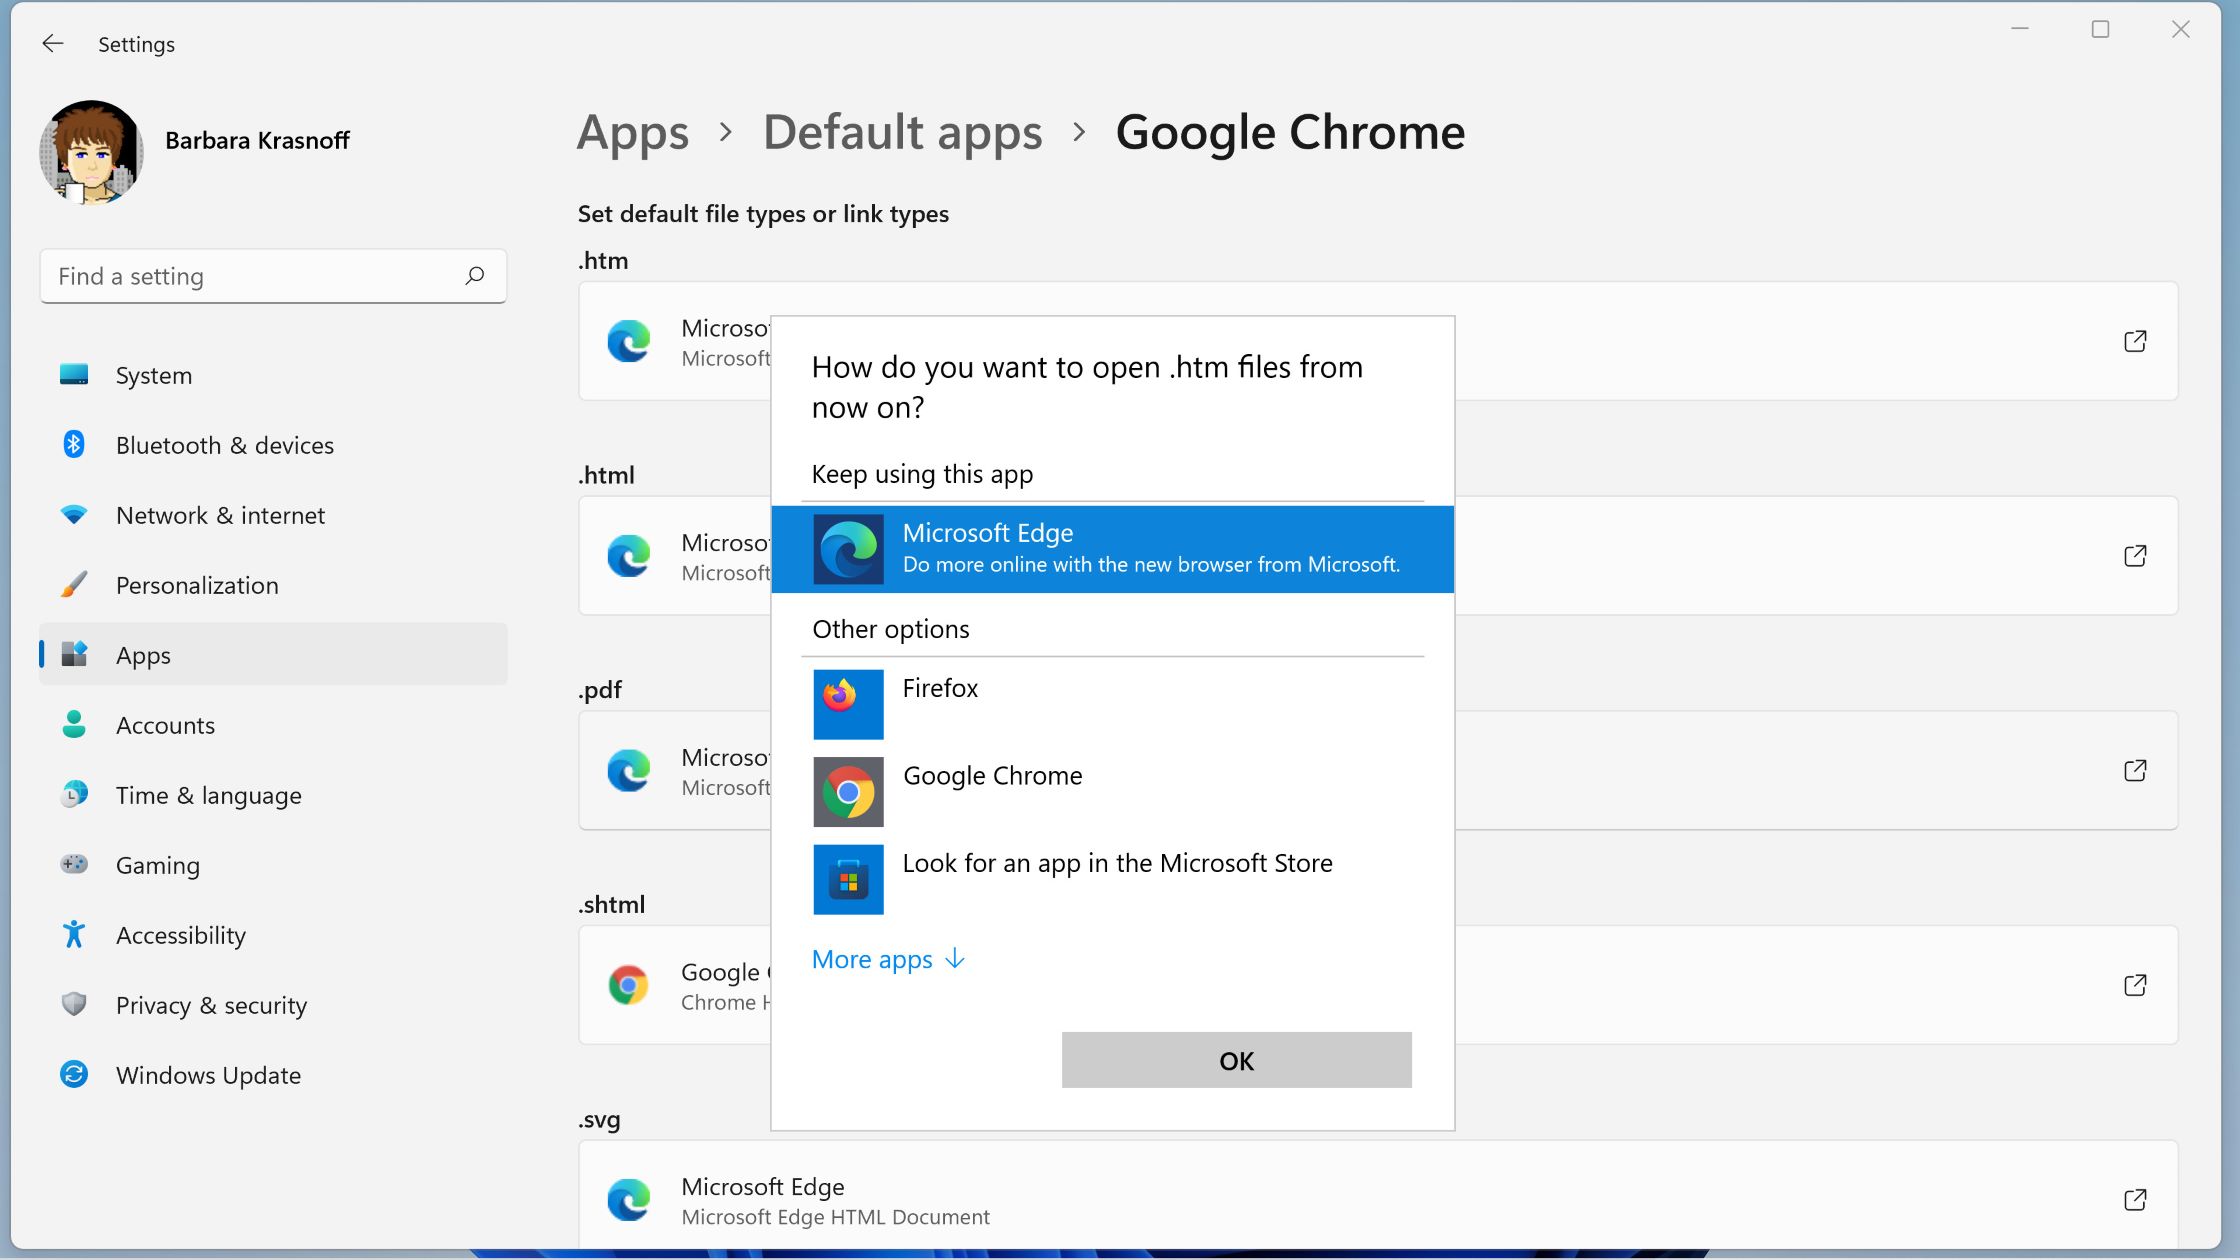
- Within the Default Apps settings, locate the category called Web browser.
- Click on the currently selected web browser. A list of available web browser options will appear.
- From the list, choose Google Chrome as your preferred default web browser.
By selecting Google Chrome as the default web browser, any link you click on or application that requires a web browser will automatically open in Chrome, providing a consistent browsing experience.
Windows 11 allows you to choose default apps for several other categories as well, such as email, maps, music, and more. You can explore these options in the Default Apps settings to customize your Windows 11 experience according to your preferences.
Now that you have successfully chosen Google Chrome as the default web browser in Windows 11, you are all set to enjoy a seamless browsing experience with Chrome.
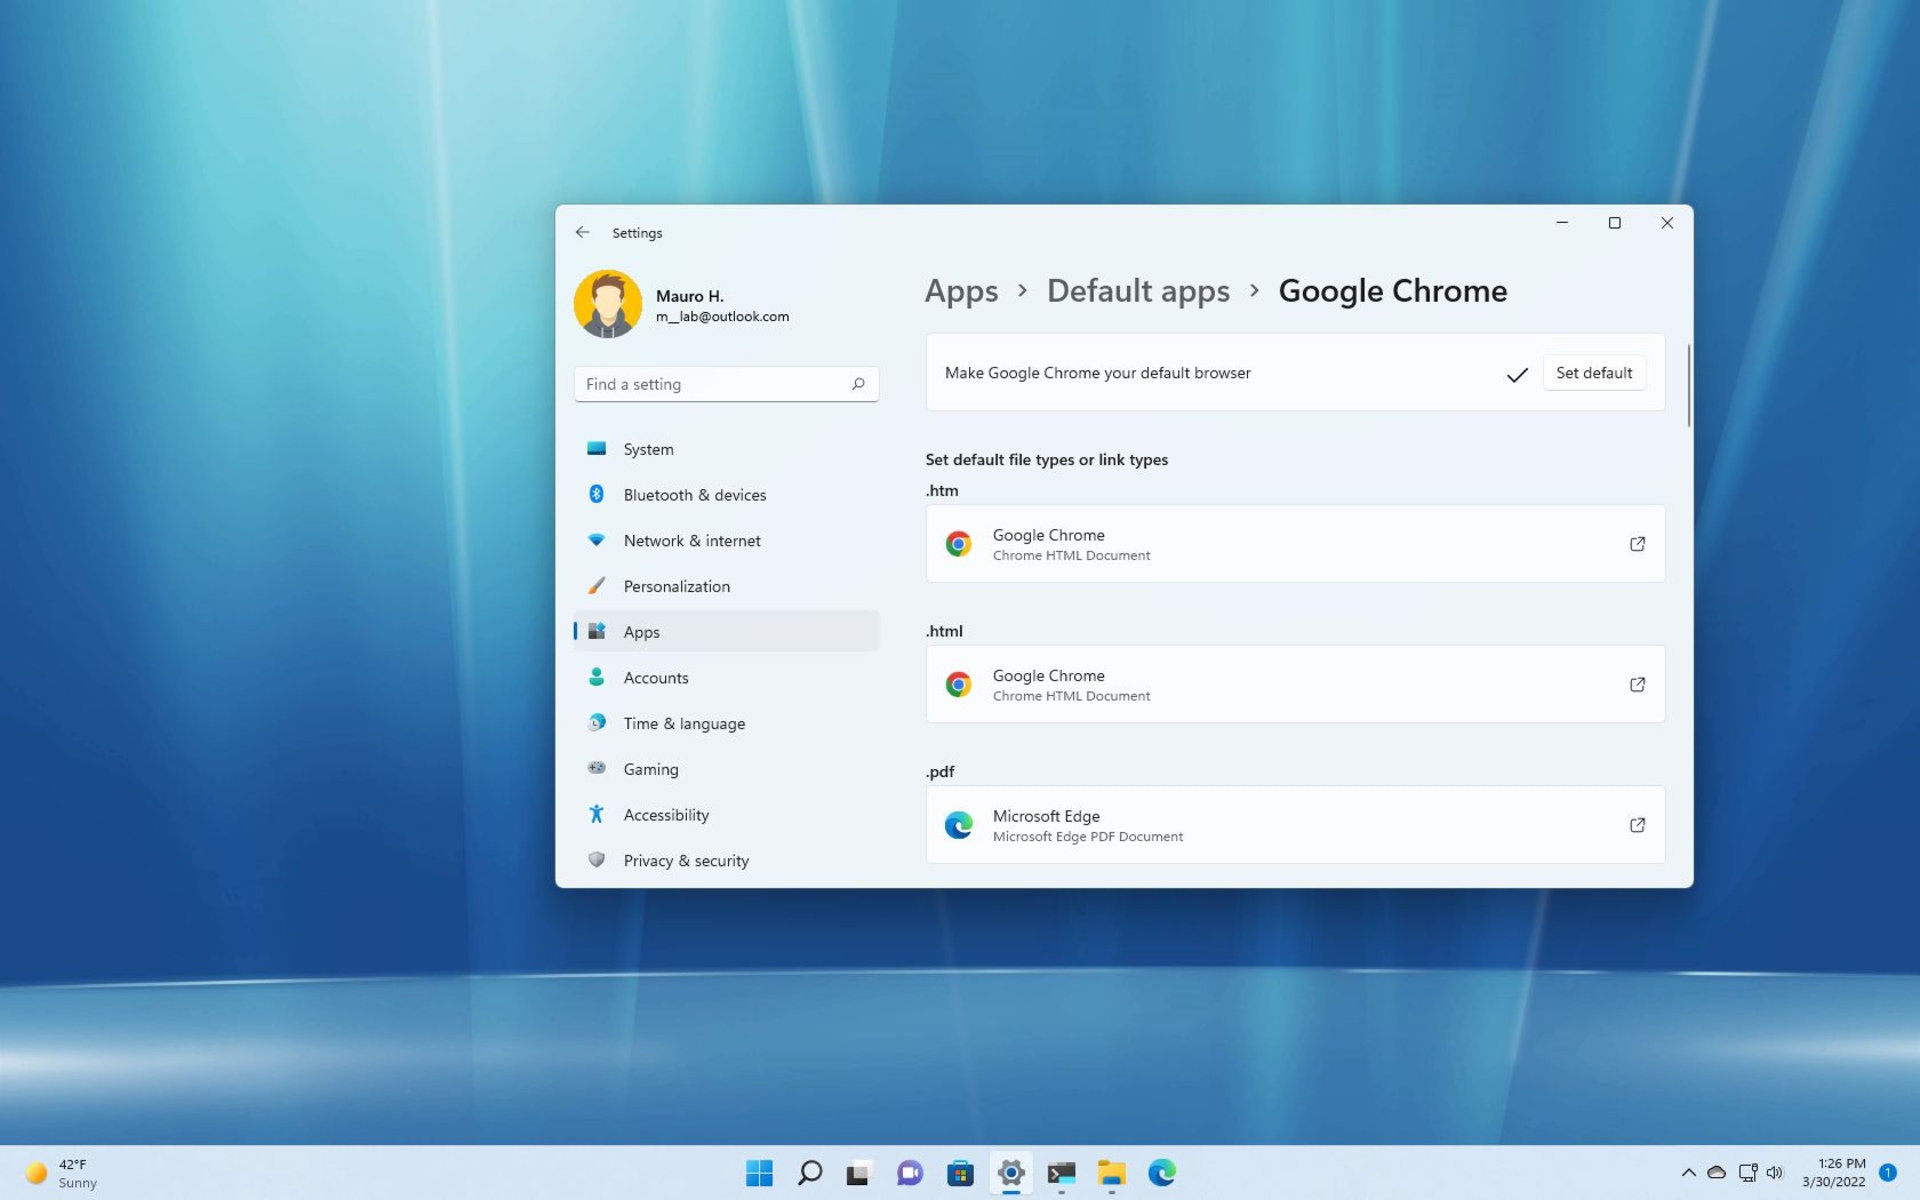
Step 6: Set Chrome as Default Browser
With Google Chrome installed and selected as the default web browser in the Windows 11 Settings, the next step is to verify and confirm that Chrome is set as the default browser. Follow these steps to ensure Chrome is your default browser:
- Close the Settings window if it is still open.
- Open any web link or click on any HTML file on your Windows 11 device. It could be a link from an email, a bookmark, or a file on your desktop.
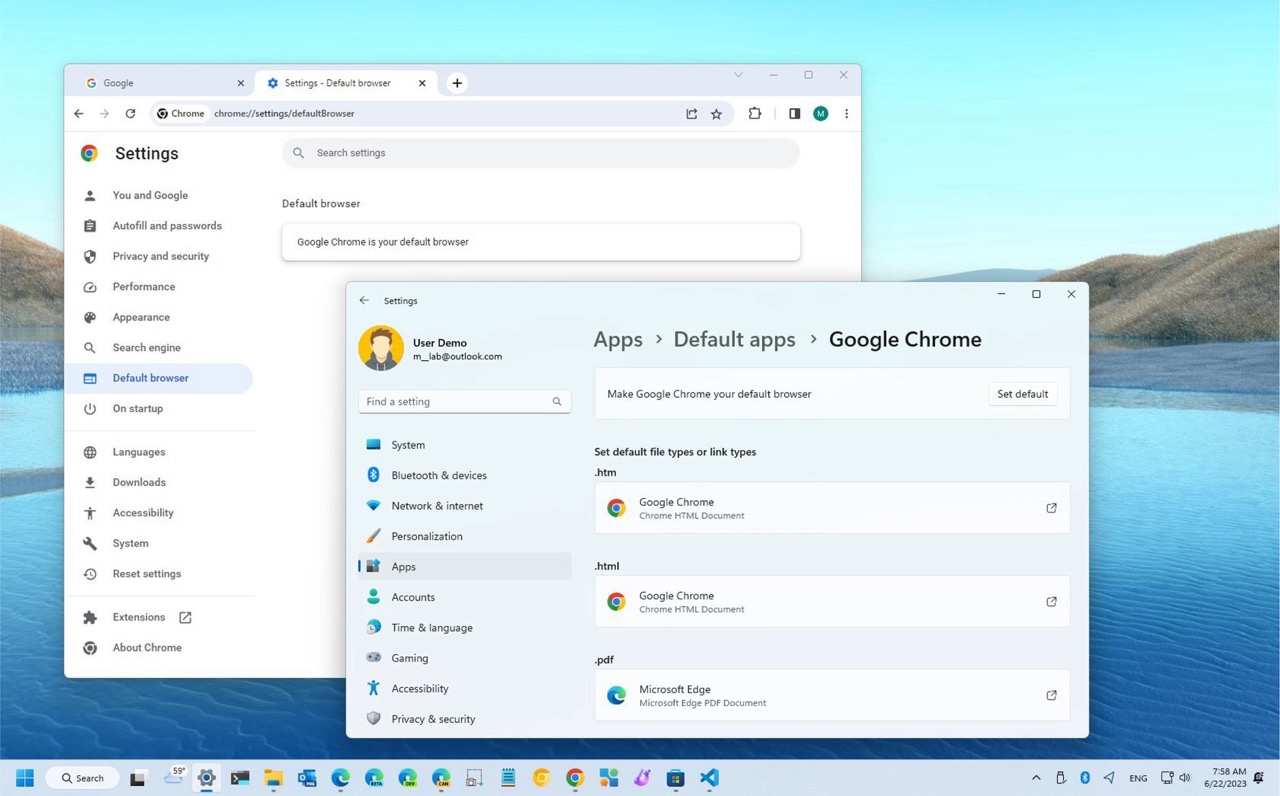
- Windows 11 will detect that you have set Google Chrome as the default browser and automatically open it to display the web page or file.
If Chrome opens and displays the webpage or file, congratulations! You have successfully set Chrome as the default browser in Windows 11. Any future web links or HTML files you open will automatically open in Google Chrome.
In case another browser opens instead of Chrome, it may mean that the default browser setting was not successfully changed. In such a case, you will need to revisit the Default Apps settings in the Windows 11 Settings and ensure that Google Chrome is selected as the default web browser.
Remember, setting Chrome as the default browser allows for a consistent and streamlined browsing experience. You can now enjoy the powerful features and performance of Chrome every time you access the web on your Windows 11 device.
Step 7: Verify the Changes
After setting Google Chrome as the default browser in Windows 11, it’s important to verify that the changes have been applied correctly. Follow these simple steps to confirm that Chrome is indeed your default browser:
- Close any open web browsers or applications on your Windows 11 device.
- Click on the Start button or press the Windows key on your keyboard to open the Start menu.
- Look for any shortcuts or tiles that represent a web browser. These could be icons for browsers like Microsoft Edge, Mozilla Firefox, or other browsers you may have installed.
- Click on the browser icon representing Google Chrome to launch it.
If Google Chrome opens as expected, it confirms that Chrome is now your default browser in Windows 11. You can proceed to enjoy the fast and feature-rich browsing experience that Chrome offers.
However, if a different browser opens or you encounter any issues, it may indicate that the default browser setting was not applied correctly. In such cases, follow the steps outlined in the earlier sections to ensure that Chrome is selected as the default browser in the Windows 11 Settings.
Verifying the changes is crucial to ensure that your web browsing activities proceed smoothly, with your preferred browser as the default option. By confirming that Chrome opens as the default browser, you can be confident in relying on its powerful features and customization options for your online activities.
Congratulations! You have successfully set Google Chrome as the default browser in Windows 11 and verified that the changes have taken effect. Enjoy the seamless browsing experience that Chrome provides, with its speed, security, and extensive range of extensions and features.
Conclusion
Congratulations on successfully setting Google Chrome as your default browser in Windows 11! By following the step-by-step guide outlined in this article, you have equipped yourself with the knowledge and tools to enjoy an enhanced browsing experience.
With Chrome as your default browser, you’ll benefit from its lightning-fast performance, user-friendly interface, and seamless synchronization across devices. The extensive library of extensions available in the Chrome Web Store allows you to further customize your browsing experience, making it tailored to your needs and preferences.
Remember, the process starts with downloading and installing Chrome, ensuring that you have the latest version and access to its newest features. Then, by navigating the Windows 11 Settings and choosing Google Chrome as your default browser, you ensure that all web links and HTML files automatically open in Chrome.
Lastly, it’s crucial to verify the changes by opening a link or HTML file to ensure that Chrome is indeed the browser that opens. By doing so, you can have peace of mind and enjoy the benefits of a seamless and consistent browsing experience.
Now that you have successfully set Google Chrome as your default browser, embrace the world of browsing with speed, security, and customization. Explore the web, sync your bookmarks and settings across devices, and make the most of the extensive Chrome ecosystem.
Thank you for following this guide, and we hope it has been helpful in your journey to set Chrome as your default browser in Windows 11. Happy browsing!