Introduction
Changing the administrator on your ASUS Ultrabook can be a simple and straightforward process. Whether you want to transfer the administrator role to another user or you simply need to update the current administrator account, this guide will walk you through the steps to accomplish this task.
Having administrative privileges allows you to manage user accounts, install programs, make system changes, and perform various tasks that require elevated permissions. It’s important to ensure that the administrator account is up-to-date and secure, especially if multiple users access the Ultrabook.
In this guide, we will show you how to change the administrator account on your ASUS Ultrabook. We will cover the essential steps, from logging into the current administrator account to selecting a new administrator, and applying the changes. Additionally, we will explore the option to transfer files and settings if needed.
Before proceeding, make sure you have the necessary credentials and permissions to perform administrative tasks. It is recommended to create a backup of important files or system settings to avoid any data loss during the process.
Note that the steps provided in this guide may vary slightly based on the Windows operating system version installed on your ASUS Ultrabook. However, the overall process remains similar across different versions.
Now, let’s dive into the step-by-step instructions to change the administrator on your ASUS Ultrabook and ensure a seamless transition to a new administrator account.
Step 1: Log in to the current administrator account
The first step in changing the administrator on your ASUS Ultrabook is to log in to the current administrator account. This is necessary to access the necessary settings and make any changes to the user accounts.
Follow these steps to log in to the current administrator account:
- Start your ASUS Ultrabook and wait for it to boot up.
- On the login screen, select the administrator account that you want to change. If you have multiple user accounts, choose the one with administrator privileges.
- Enter the password for the administrator account and press Enter or click on the login button to proceed.
Once logged in, you will have access to the account settings and can proceed with the next steps to change the administrator on your ASUS Ultrabook.
If you are unable to log in to the current administrator account due to forgotten passwords or other issues, you may need to use alternative methods to regain access. In such cases, you can try using password recovery tools or contact ASUS support for further assistance.
It’s important to ensure that you have administrative rights and privileges on the current account before proceeding to the next steps. Without the necessary permissions, you may encounter issues when trying to modify or change the administrator account.
Now that you have successfully logged in to the current administrator account on your ASUS Ultrabook, you are ready to proceed to the next step and open the Control Panel to make the desired changes to the user accounts.
Step 2: Open the Control Panel
After logging in to the current administrator account on your ASUS Ultrabook, the next step is to open the Control Panel. The Control Panel provides access to various system settings and allows you to manage user accounts.
Follow these steps to open the Control Panel:
- Click on the Start menu located at the bottom left corner of the screen.
- In the search bar, type “Control Panel” and press Enter.
- The Control Panel window will open, displaying a range of options to customize your computer’s settings.
Alternatively, you can access the Control Panel by right-clicking on the Start button and selecting “Control Panel” from the context menu.
Once the Control Panel is open, you will have access to various categories and settings. From here, you can make changes to user accounts, including altering the administrator account on your ASUS Ultrabook.
If you are using a newer version of Windows, such as Windows 10, you may notice that Microsoft has introduced the Settings app as a replacement for the Control Panel. In that case, you can still make the necessary changes by navigating to the user accounts settings within the Settings app.
Now that you have successfully opened the Control Panel on your ASUS Ultrabook, you are ready to move on to the next step and change the account type of the desired user account to set it as an administrator account.
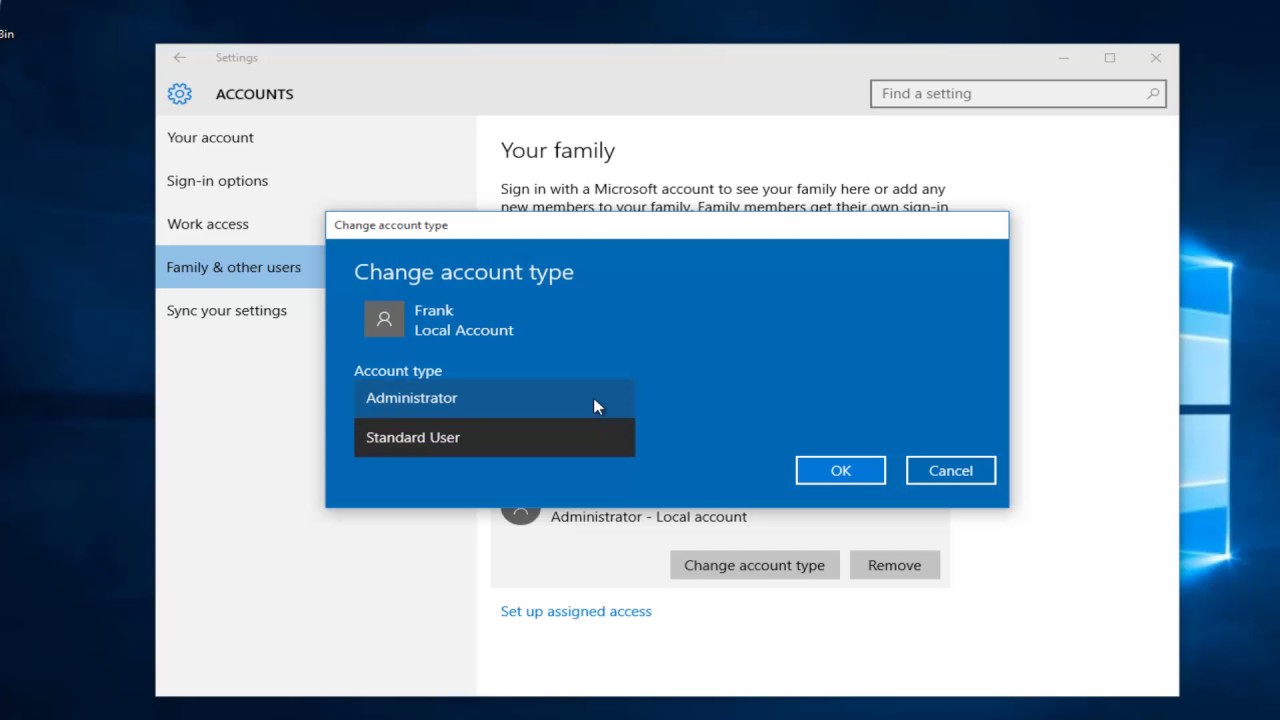
Step 3: Change account type
Once you have opened the Control Panel on your ASUS Ultrabook, the next step is to change the account type of the user account you want to set as the administrator account. This will grant the necessary privileges and permissions to that account.
Follow these steps to change the account type:
- In the Control Panel window, click on the “User Accounts” or “User Accounts and Family Safety” option, depending on your Windows version.
- Next, select the “User Accounts” option from the listed options.
- In the User Accounts window, click on the “Manage another account” link.
- A list of user accounts on your ASUS Ultrabook will be displayed. Locate the user account that you want to change to an administrator account and click on it.
- Click on the “Change the account type” option.
- You will see two account types: “Standard user” and “Administrator.” Select the “Administrator” option to elevate the account’s privileges.
- Click on the “Change Account Type” button to save the changes.
Once you have completed these steps, the selected user account will be changed to an administrator account, granting it the necessary administrative privileges.
It’s important to note that changing the account type of a user account to administrator should be done with caution. Administrator accounts have elevated privileges, and improper usage or modifications can potentially impact the stability and security of your ASUS Ultrabook.
Make sure to assign administrator privileges to user accounts only when necessary and ensure you are granting this privilege to trusted and responsible individuals.
Now that you have successfully changed the account type of the desired user account to an administrator account, you are ready to proceed to the next step and select a new administrator account if needed.
Step 4: Select a new administrator account
After changing the account type of the desired user account on your ASUS Ultrabook to an administrator account, you may want to designate a new user as the administrator. Follow these steps to select a new administrator account:
- In the User Accounts window of the Control Panel, click on the “Manage another account” link.
- From the list of user accounts displayed, choose the user account that you want to set as the new administrator.
- Click on the “Change the account type” option.
- Select the “Administrator” option to grant the selected user account administrative privileges.
- Click on the “Change Account Type” button to save the changes.
By following these steps, the selected user account will be assigned as the new administrator on your ASUS Ultrabook.
Take note that when selecting a new administrator account, it is essential to choose a user with the necessary skills, responsibility, and trustworthiness. The administrator account holds significant control over the system, including the ability to install software, modify system settings, and access sensitive information.
It is crucial to ensure that the new administrator account is managed securely and that the user understands the privileges and responsibilities associated with the role.
If you do not want to designate a new administrator at this time, you can continue using the current administrator account. However, it is recommended to periodically review and update the administrator account to maintain account security and system integrity.
Now that you have successfully selected a new administrator account on your ASUS Ultrabook, you are ready to proceed to the next step and apply the changes to finalize the process.
Step 5: Apply the changes
After selecting a new administrator account on your ASUS Ultrabook, the next step is to apply the changes and finalize the process. This will ensure that the new administrator privileges are correctly assigned and activated.
Follow these steps to apply the changes:
- Click on the “Back” or “Close” button in the User Accounts window of the Control Panel to return to the main Control Panel screen.
- Restart your ASUS Ultrabook. This step is necessary to fully apply the changes and activate the new administrator account.
- Once your Ultrabook has restarted, log in to the new administrator account using the username and password associated with the account.
- After logging in, verify that the user account is functioning as an administrator by attempting to perform tasks that require administrative privileges. For example, try installing a program or making system changes.
- If the user account is able to perform these administrative tasks without encountering any issues, it means that the changes have been successfully applied.
It’s a good practice to test the new administrator account thoroughly to ensure that it has all the necessary privileges and functions as expected. By doing so, you can identify any potential issues early on and address them promptly.
If you encounter any difficulties during this step, such as being unable to log in or experiencing errors with administrative tasks, double-check the settings and account type in the User Accounts section of the Control Panel. Ensure that you have correctly followed the previous steps and that the new administrator account has been set up properly.
Now that you have successfully applied the changes and verified the functionality of the new administrator account, you have completed the process of changing the administrator on your ASUS Ultrabook.
Step 6: Transfer files and settings (optional)
After successfully changing the administrator on your ASUS Ultrabook, you may want to transfer files and settings from the previous administrator account to the new one. This step is optional and can be useful if you want to retain important files, preferences, and customizations.
Here are some methods to transfer files and settings:
- Manual Transfer: You can manually copy the files and folders from the previous administrator account to the new one. This can be done by logging in to both accounts simultaneously or by using an external storage device to transfer the files.
- Windows Easy Transfer: If you are using Windows 7 or earlier versions, you can use the built-in Windows Easy Transfer tool to transfer files and settings to the new administrator account. This tool streamlines the process and ensures that important files, settings, and preferences are transferred correctly.
- Cloud Storage Services: Another option is to use cloud storage services like Dropbox, Google Drive, or OneDrive to upload the files from the previous administrator account and then download them into the new account. This method is convenient if you have a large amount of data to transfer.
- External Hard Drive: If you have an external hard drive, you can backup the files and settings from the previous administrator account and restore them in the new account. This method allows for easy transfer and ensures that all data is safely transferred.
Before transferring any files or settings, it’s important to review and sort through the data to determine which files are necessary and relevant for the new administrator account. This helps to avoid clutter and unnecessary duplication of data.
Remember to also transfer any specific settings, such as desktop wallpaper, browser bookmarks, and application preferences, if you want to maintain the same personalized experience in the new administrator account.
Once you have successfully transferred the files and settings to the new administrator account, make sure to test the functionality and accessibility of the transferred data. Verify that all files are intact, and settings are applied correctly.
Now that you have completed the optional step of transferring files and settings to the new administrator account, you have successfully finalized the process of changing the administrator on your ASUS Ultrabook.
Conclusion
Changing the administrator on your ASUS Ultrabook is a crucial task to ensure the smooth and secure operation of your device. With the step-by-step guidance provided in this guide, you can easily change the administrator account, assign new administrative privileges, and transfer files and settings if necessary.
By following the outlined steps, you have learned how to log in to the current administrator account, open the Control Panel, change the account type, select a new administrator account, and apply the changes. These steps help you establish a new administrator account and ensure that it has the necessary privileges to manage your Ultrabook effectively.
Remember to exercise caution and select responsible individuals when designating new administrator accounts. Administrators hold significant control over the system, and granting this privilege to trustworthy individuals helps maintain the security and integrity of your ASUS Ultrabook.
If you choose to transfer files and settings, you have discovered various methods, including manual transfer, using Windows Easy Transfer, utilizing cloud storage services, or using an external hard drive. These methods allow you to retain important files and preferences from the previous administrator account in the new one, ensuring a seamless transition.
As with any changes to system settings, it is crucial to back up your data beforehand and proceed with caution. Double-check the steps and settings to avoid encountering any issues during the process.
By successfully changing the administrator on your ASUS Ultrabook, you have taken an important step in maintaining your system’s security and organization. Remember to periodically review and update the administrator account to adapt to evolving needs and to maintain the integrity of your Ultrabook.
Now that you are equipped with the knowledge and guidance to change the administrator on your ASUS Ultrabook, you can confidently manage user accounts, ensure proper system administration, and enjoy a smooth and secure computing experience.