Introduction
An iPhone is not just a phone, but also a powerful device for capturing and storing precious memories in the form of photos. When you want to share these photos with family and friends, one of the most convenient ways is to attach them to an email directly from your iPhone. But how do you attach a picture to an email on an iPhone? Don’t worry, it’s easier than you think!
In this article, we will guide you through the step-by-step process of attaching a picture to an email on an iPhone. Whether you have a recent model like the iPhone 11 or an older version, the steps remain largely the same. This means that no matter what iPhone you have, you’ll be able to follow along and share your favorite photos with ease.
No technical expertise is required for this task. With just a few taps, you can attach your pictures to an email and send them off in no time. It’s a great way to share vacation snapshots, cute pet pictures, or any other photo that you want to send to someone through email.
So, if you’re ready to learn how to attach a picture to an email on your iPhone, let’s get started with the step-by-step process. By the end of this guide, you’ll be able to confidently send emails with picture attachments, ensuring that your cherished memories reach the intended recipients.
Step 1: Open the Mail app
The first step in attaching a picture to an email on your iPhone is to open the Mail app. The Mail app is the default email client on iOS devices and comes pre-installed on your device.
To open the Mail app, locate the icon on your home screen. The icon resembles a white envelope against a blue background. Once you find the Mail app icon, simply tap on it to launch the application.
If it’s the first time you are using the Mail app, you may need to set up your email account. Follow the on-screen instructions to enter your email address and password. If you already have an email account set up, the app will display your inbox as soon as it opens.
Opening the Mail app gives you access to all the essential features needed to send and receive emails. With the app open, you can proceed to the next step to compose a new email.
Step 2: Compose a new email
Once you have opened the Mail app on your iPhone, the next step is to compose a new email. Composing a new email allows you to start a fresh message where you can enter the recipient’s email address, subject line, and the body of the email.
To compose a new email, look for the “Compose” or “New Email” button, typically represented by a pencil or a square with a pencil icon. The exact location of this button may vary slightly depending on the version of the Mail app you have and your device’s screen size.
Tap on the “Compose” button to open a new email composition window. This will bring up a blank email template where you can enter the necessary details.
First, enter the recipient’s email address in the “To” field. You can enter individual email addresses or separate multiple addresses using commas. If you have the recipient’s email saved in your contacts, you can start typing their name or email address, and the app will suggest matches for you.
Next, enter a subject line for your email. The subject line briefly summarizes the content of your email and helps the recipient understand what the email is about before opening it. Make it concise and descriptive to catch the recipient’s attention.
Once you have entered the recipient’s email address and subject line, you’re ready to proceed to the next step and add an attachment – in this case, a picture – to your email.
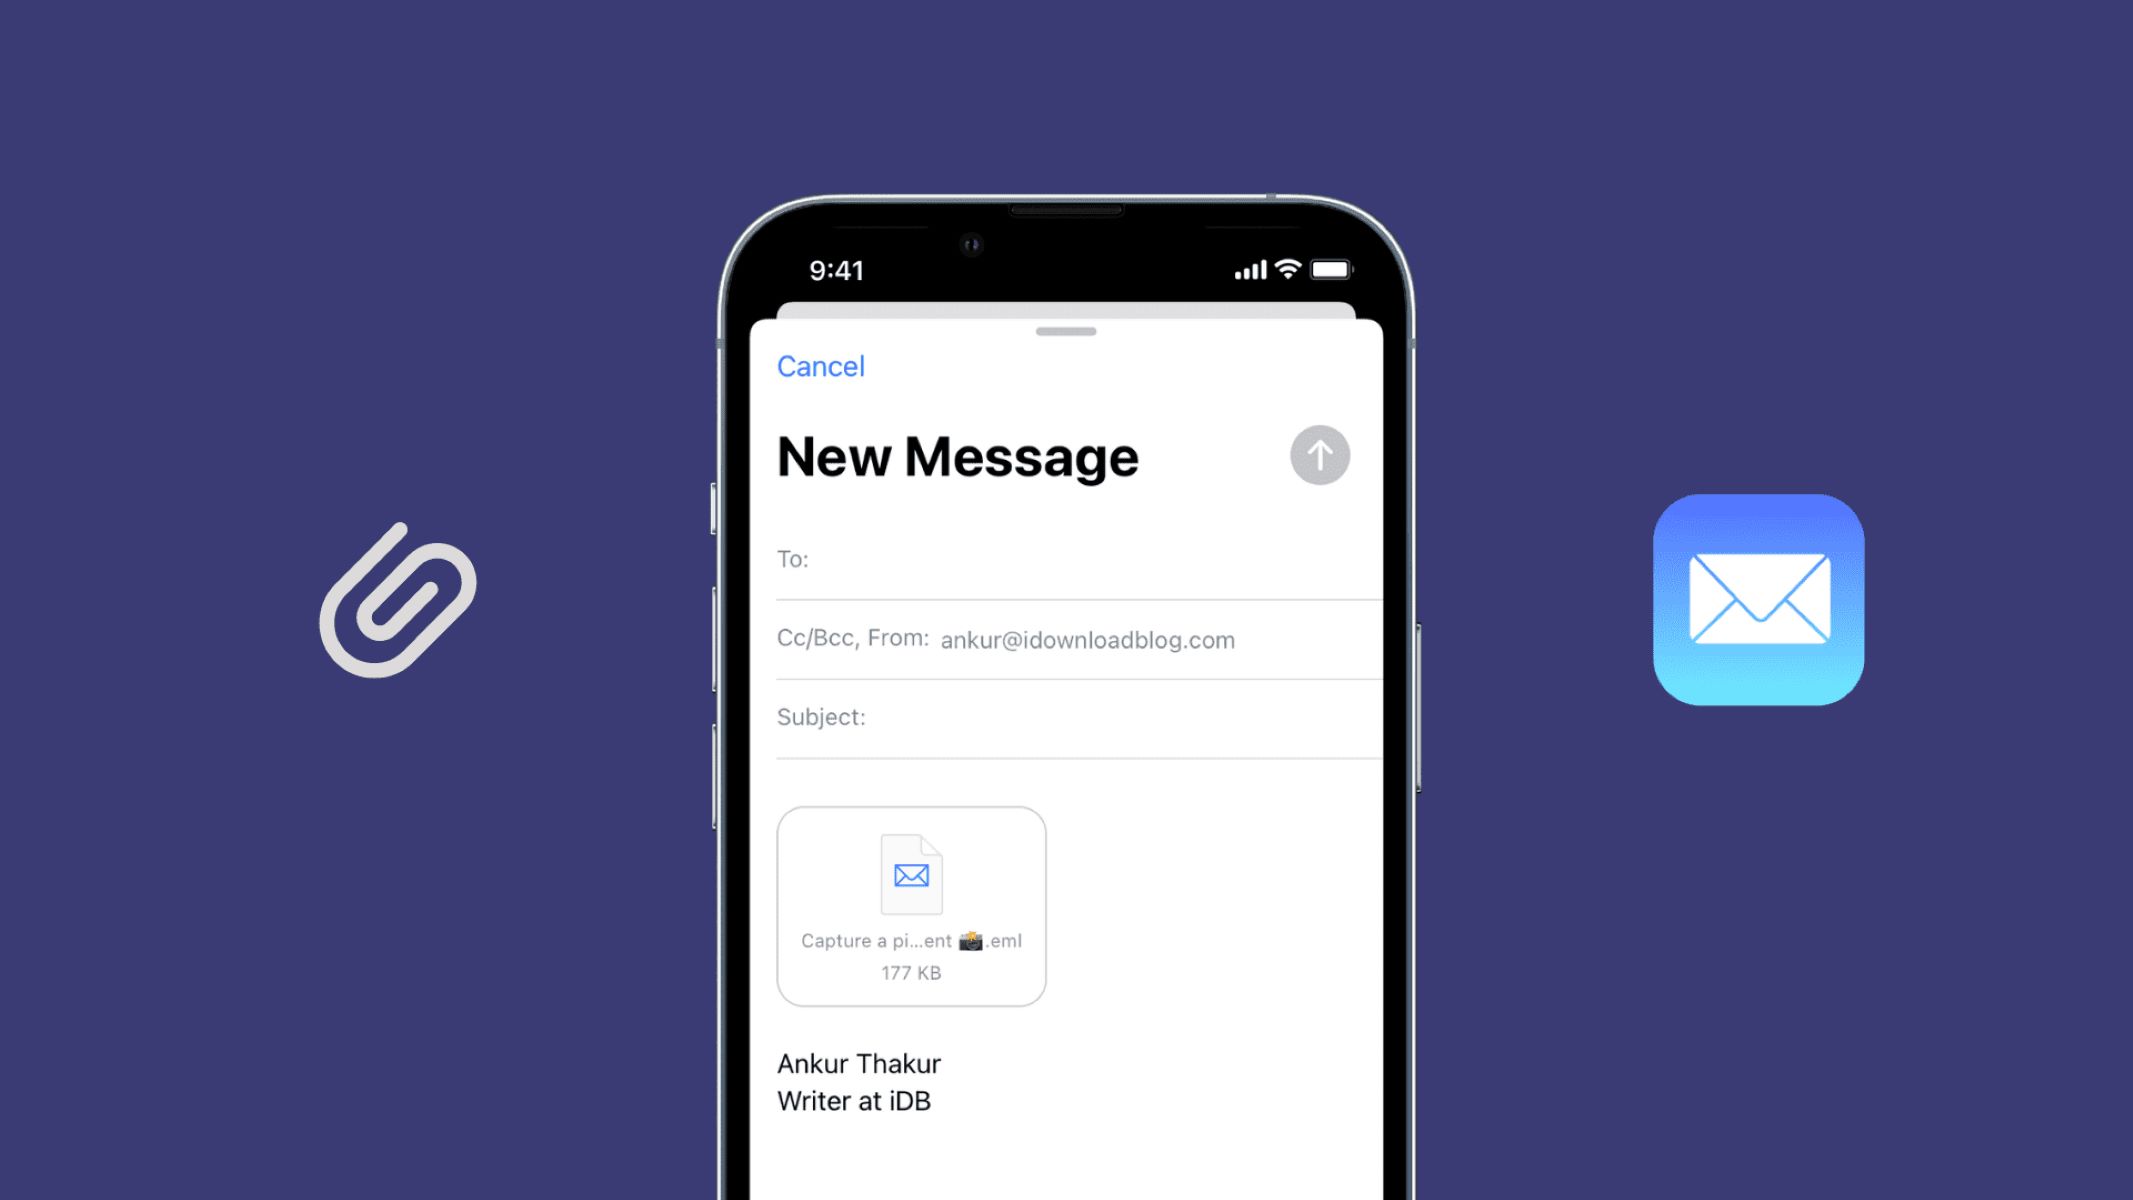
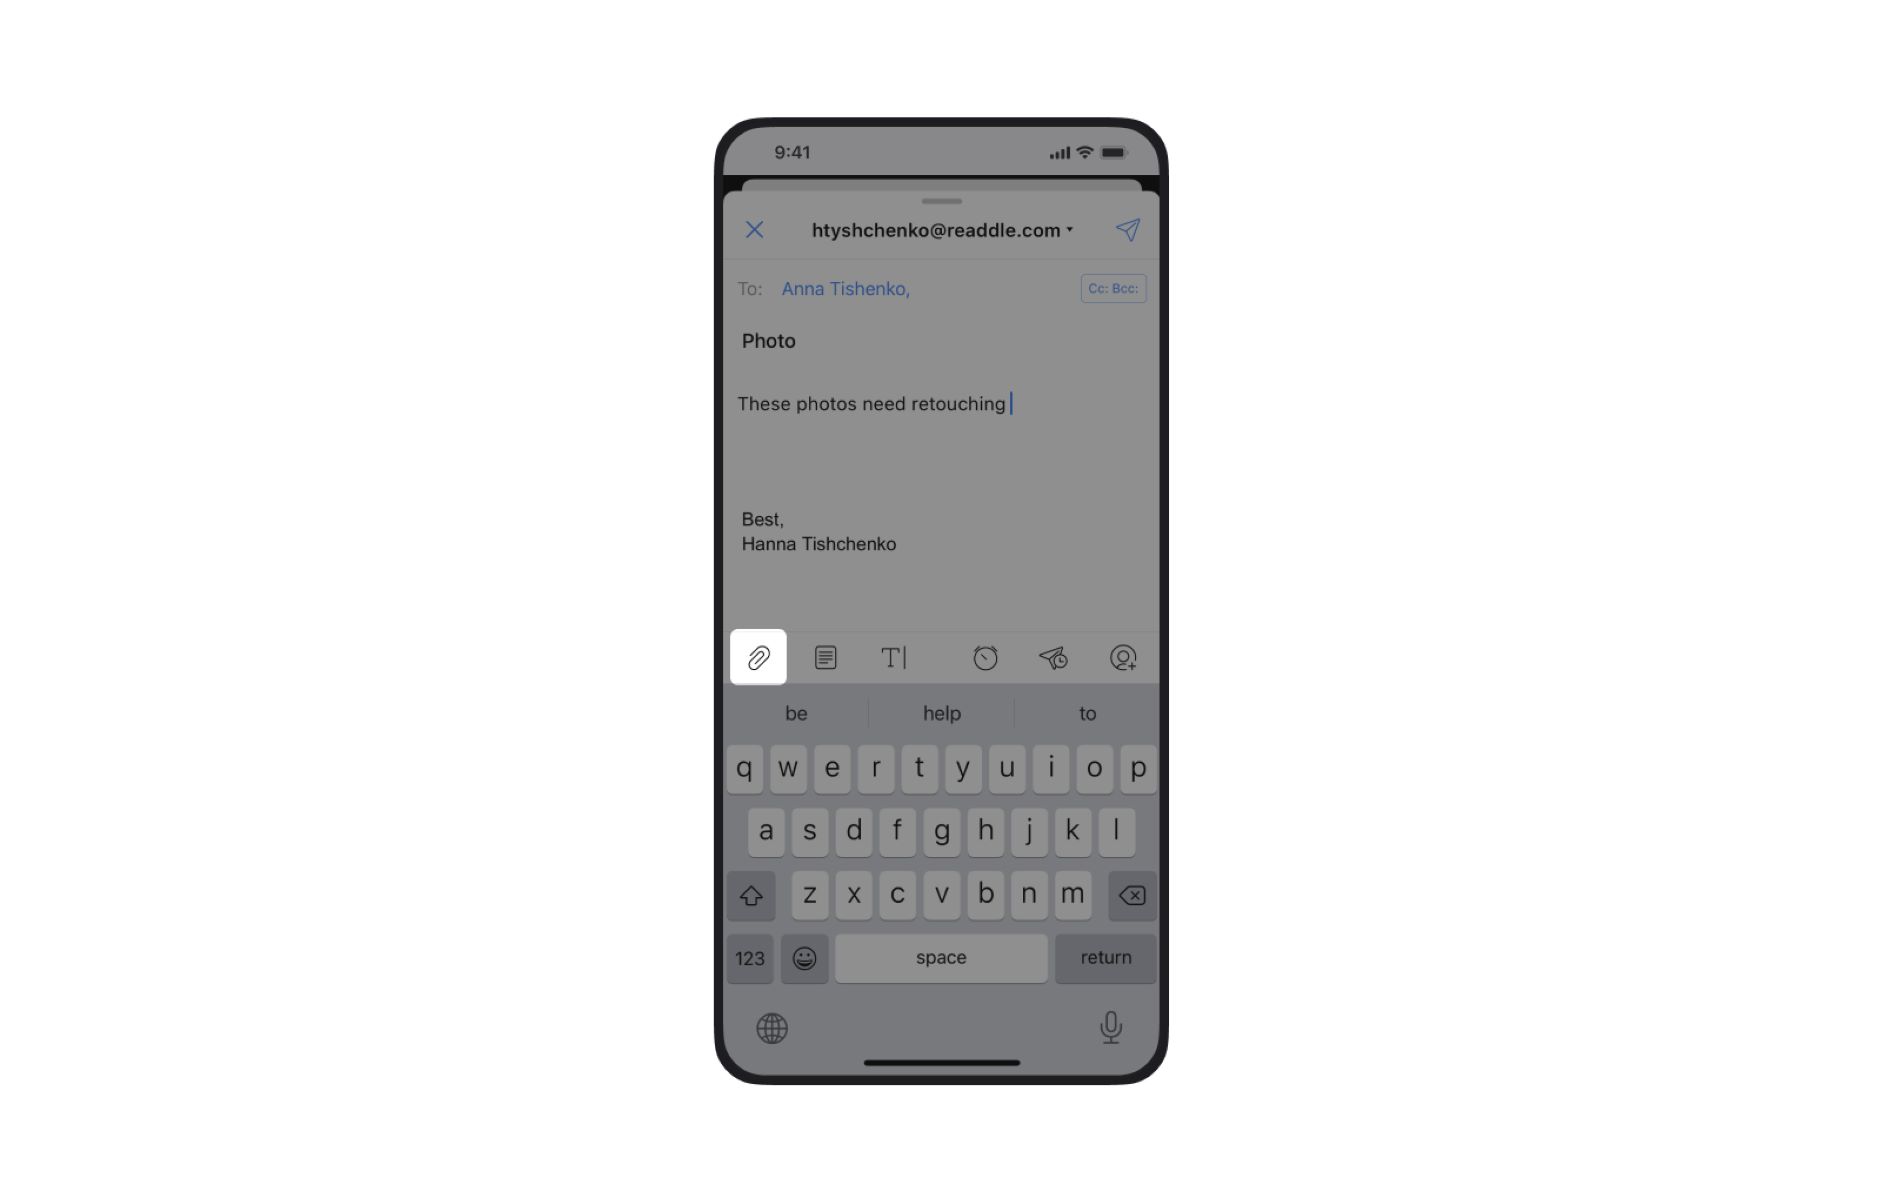
Step 3: Add an attachment
Adding an attachment to your email is the crucial step in sending a picture from your iPhone. To attach a picture, you need to locate the attachment button within the email composition window.
In the Mail app, the attachment button is usually represented by a paperclip icon. Look for this icon, which is typically located at the top or bottom of the email composition screen. Tap on the attachment button to proceed.
When you tap on the attachment button, a menu will appear with various options for attaching files. Choose the option that allows you to select a photo from your iPhone’s photo library or camera roll. The specific wording of this option may vary, but it is usually labeled “Photos” or “Photo Library”.
By selecting the “Photos” or “Photo Library” option, you will be able to access your iPhone’s photo albums and choose the picture you want to attach to the email. The photos will be organized by albums such as Camera Roll, Favorites, or specific albums you have created on your device.
Tap on the appropriate album to navigate to the desired picture. Once you have found the picture you want to attach, tap on it to select it. You will see a checkmark or a visual indicator to confirm that the picture has been selected.
Now that you have successfully added a picture as an attachment, you have the option to customize the size of the picture before sending it. This step is covered in the next section, so let’s move on to the next step.
Step 4: Select a picture from your iPhone
After you have accessed your iPhone’s photo library or camera roll, it’s time to select the specific picture you want to attach to your email. Selecting a picture is a simple task and can be done with just a few taps.
Scroll through the albums and locate the picture you wish to attach. You can swipe left or right to navigate through the photos within each album. If you have a large collection of photos, you can use the search bar at the top of the screen to find specific pictures by entering keywords or dates.
When you find the picture you want to attach, tap on it to select it. The selected photo will be highlighted, and you will see a checkmark or a visual indicator to confirm your selection.
If you want to attach multiple pictures to your email, you can repeat this process for each additional photo. Simply tap on each photo to select it, and they will all be added to your email as attachments.
It’s worth noting that the Mail app allows you to attach a maximum number of photos in a single email. This limit may vary depending on the device model and email service provider. If you exceed this limit, you may need to send multiple emails or consider reducing the number of photos you want to attach.
With the picture(s) selected, you are now ready to move on to the next step, where you can choose the size of the attached picture(s).
Step 5: Choose the picture size
Once you have selected the picture(s) you want to attach to your email, you have the option to choose the size of the attached picture(s) before sending them. This step is important, as it allows you to control the file size and resolution of the picture(s) you are sending.
When you tap on a picture to select it, you may be presented with a menu that provides different options for the picture size. The available options may vary depending on your device’s settings and the email service you are using.
Typically, you will have options such as “Small”, “Medium”, “Large”, or “Actual Size”. Selecting a smaller size reduces the file size, which is useful if you want to save on data usage or if you are sending the email over a slower internet connection. Choosing a larger size preserves the original resolution and quality of the picture, but it may result in a larger file size.
Consider the recipient’s device and internet connection when selecting the picture size. If you know that the recipient has limited data or an older device, it may be best to choose a smaller size to ensure smooth transmission and quick opening of the email.
Additionally, if the email service you are using has a file size limit for attachments, choosing a smaller size may help you stay within that limit and avoid any issues with sending the email.
Take a moment to select the picture size that suits your needs and preferences. Once you have made your selection, you can proceed to the next step and add any additional pictures you want to attach.
Step 6: Add additional pictures (optional)
If you have more than one picture you want to attach to your email, the Mail app allows you to add additional pictures to the email. This step is entirely optional and not required if you have already attached all the desired pictures in the previous steps.
If you still have more pictures to attach, you can easily add them to the email by following a similar process to the one described earlier. In the email composition window, tap on the attachment button again, usually represented by a paperclip icon.
From the menu that appears, select the option to choose photos from your iPhone’s photo library or camera roll. This will open up your photo albums, allowing you to navigate to the additional pictures you want to attach.
Simply tap on each picture to select it, just like you did in the previous steps. Each selected picture will be added to the email as an attachment. You can add as many additional pictures as you like, keeping in mind any file size limits or the total size of the email you are sending.
It’s important to note that each additional picture you attach will increase the size of the email. If you are attaching a large number of pictures or if they have high resolution, it may be a good idea to consider resizing the pictures or sending multiple emails to avoid any issues.
Once you have attached all the desired pictures to the email, you can move on to the final step: sending the email with the attached picture(s).
Step 7: Send the email with the attached picture(s)
After you have attached all the desired picture(s) to your email, it’s time to send it off to the recipient(s). Sending the email is a straightforward process that allows you to ensure that your attached picture(s) reach their intended destination.
First, review the email content to ensure that you have entered the correct recipient’s email address, subject line, and any additional text you want to include in the body of the email. Double-checking everything helps to avoid any mistakes or oversights.
Once you are satisfied with the email, tap on the send button, typically represented by an arrow or envelope icon at the top or bottom of the email composition window. When you tap the send button, the Mail app will begin the process of sending the email.
The sending process may take a few moments, depending on the file size of the attached picture(s) and the speed of your internet connection. During this time, you may see a progress indicator or a message indicating that the email is being sent.
Once the email has been successfully sent, you will typically see a confirmation message. You can also check your email’s sent folder to ensure that the email is listed there. This confirms that the email has been sent and is now in the recipient’s inbox.
It’s important to note that sending emails with large attachments may take longer or could encounter issues if the recipient’s email service has file size restrictions. In such cases, consider reducing the picture size or sending multiple emails if necessary.
With the email successfully sent, your picture(s) are now on their way to the recipient(s). Congratulations! You have successfully completed the process of attaching a picture to an email on your iPhone.
Now you can continue sharing your favorite memories, capturing beautiful moments, and sending them to your loved ones with ease using your iPhone’s Mail app.
Conclusion
Attaching a picture to an email on your iPhone is a simple yet powerful way to share your favorite moments with others. By following the step-by-step process outlined in this guide, you can easily attach pictures to your emails and send them off to family, friends, or colleagues.
Opening the Mail app, composing a new email, and adding attachments are the initial steps to take. Selecting a picture from your iPhone’s photo library or camera roll allows you to choose the specific image you want to attach. Additionally, you have the option to customize the size of the attached picture(s) before sending them.
If you have multiple pictures to send, you can add additional attachments to the email. However, remember to consider file size limits and email size restrictions to ensure smooth transmission.
The final step is to send the email with the attached picture(s). Review the email content, double-check the recipient’s email address, and then tap the send button to initiate the sending process. After a few moments, your email will be successfully sent, and your picture(s) will be on their way to the recipient(s).
Now that you have mastered the art of attaching pictures to emails on your iPhone, you can easily share precious memories, funny moments, or exciting adventures with just a few taps.
So, embrace the convenience of technology, unleash your creativity, and continue spreading joy through the power of pictures in your emails.