Introduction
Welcome to our guide on how to adjust case fan voltage. If you are experiencing excessive noise or inconsistent cooling performance from your computer’s case fans, adjusting the fan voltage may be the solution. Fan voltage adjustment allows you to control the speed at which the fans operate, enabling you to find the optimal balance between cooling efficiency and noise levels.
When computer case fans run at high speeds, they can generate unnecessary noise, which can be distracting and bothersome, especially if you use your computer for extended periods. On the other hand, running fans at lower speeds may lead to inadequate cooling, potentially causing your computer’s internal components to overheat. By adjusting the fan voltage, you can effectively control the fan speed and strike the perfect balance between optimum cooling and an acceptable noise level.
In this guide, we will walk you through the step-by-step process of adjusting case fan voltage. We will discuss the benefits of fan voltage adjustment, the tools and equipment you will need, and the necessary steps to adjust the fan voltage. By the end of this guide, you will be able to fine-tune your case fans to achieve the desired cooling performance while keeping noise levels in check.
So, if you’re ready to take control of your computer’s fan speed and optimize its cooling performance, let’s dive into the details of adjusting case fan voltage and get started!
What is Fan Voltage Adjustment?
Fan voltage adjustment refers to the process of modulating the voltage supplied to computer case fans in order to control their rotational speed. The voltage supplied to a fan determines its RPM (revolutions per minute) or the speed at which the fan spins. By adjusting the voltage, you can effectively increase or decrease the fan speed, which directly affects the airflow and noise levels produced by the fan.
Fan voltage adjustment can be done through the motherboard’s BIOS (Basic Input/Output System), fan controller software, or physical voltage adjustment dials on certain fans. The level of control and adjustability may vary depending on the specific fan and motherboard or fan controller being used. Some motherboards and software allow for fine-tuned adjustments, while others offer preset fan speed profiles or limited voltage ranges.
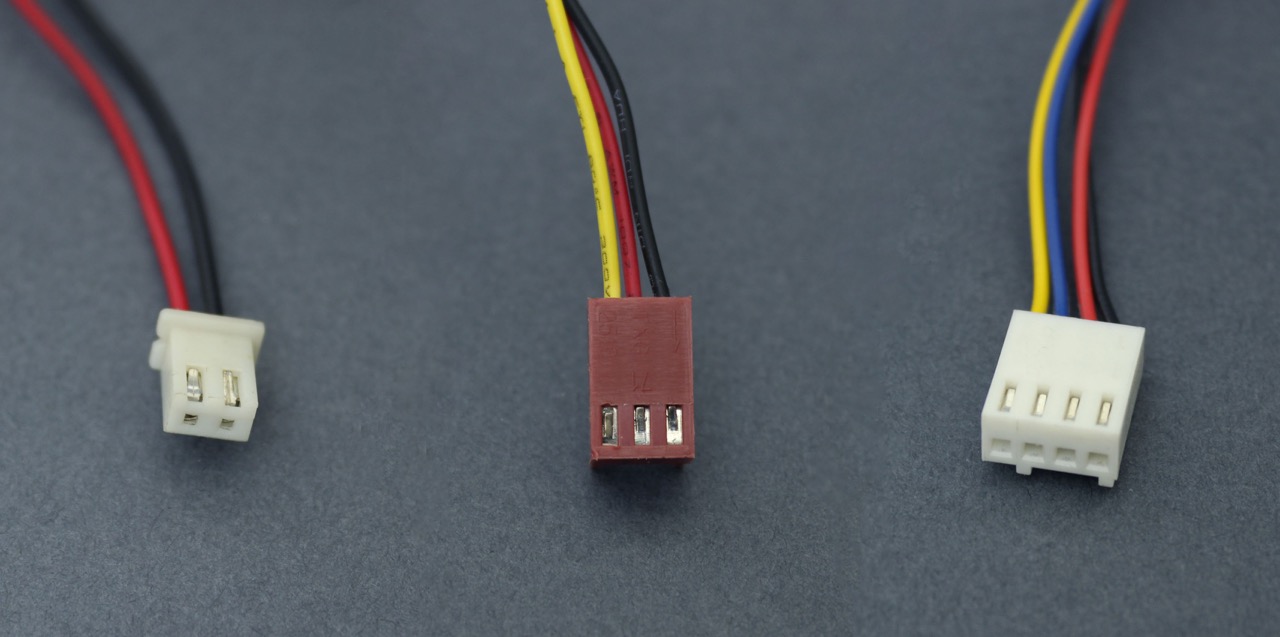
It is important to note that not all computer fans are voltage controllable. Fans with a 3-pin connector are typically voltage-controlled, while fans with a 4-pin connector, also known as PWM (Pulse Width Modulation) fans, are speed-controlled through the motherboard or fan controller software. Fan voltage adjustment is primarily applicable to voltage-controlled fans.
The voltage supplied to the fan affects the electrical current passing through its motor, determining the rotational speed and therefore the amount of airflow generated. By reducing the voltage, the fan spins at a slower speed, resulting in reduced noise production and lower airflow. Conversely, increasing the voltage boosts the fan’s RPM and increases both airflow and noise.
Fan voltage adjustment provides a means to achieve a balance between cooling performance and noise levels. By fine-tuning the fan speed to match your specific requirements, you can optimize the cooling efficiency inside your computer while keeping noise at an acceptable level.
Now that we have a clear understanding of what fan voltage adjustment entails, let’s explore the benefits it offers and why it is worth considering for your computer’s case fans.
Benefits of Adjusting Fan Voltage
Adjusting the voltage of your computer’s case fans can bring several benefits that improve the overall performance and user experience. Let’s explore some of the advantages of fan voltage adjustment:
- Improved Cooling Efficiency: By adjusting the fan voltage, you can fine-tune the fan speed to optimize the cooling performance inside your computer. Overclocked systems or computers running resource-intensive tasks generate more heat, and increasing the fan voltage helps to increase the airflow, reducing temperatures and providing better cooling.
- Noise Reduction: Fans running at high speeds can be a major source of noise in your computer system. Adjusting the fan voltage enables you to reduce the fan speed, which will subsequently lower noise levels. This is particularly beneficial if you use your computer in quiet environments, or if you find excessive noise distracting during your work or gaming sessions.
- Energy Efficiency: Running fans at lower speeds not only reduces noise but also helps conserve energy. By adjusting the fan voltage to match the cooling requirements of your system, you can minimize power consumption while still maintaining adequate cooling performance. This can be beneficial for both environmental reasons and lowering electricity costs in the long run.
- Extended Fan Lifespan: High-speed fan operation puts additional strain on the fan motor, leading to wear and tear over time. By reducing the voltage and subsequently the RPM, you can enhance the longevity of your fans, as they will experience less stress and heat buildup during operation.
- Customizable Fan Control: Fan voltage adjustment provides you with the ability to customize the fan speed according to your specific requirements and preferences. Whether you prioritize silent operation, maximum cooling performance, or a balance between the two, adjusting the fan voltage allows you to achieve the desired result.
Overall, adjusting fan voltage offers flexibility and control over your computer’s cooling system, resulting in improved cooling efficiency, reduced noise levels, energy savings, and prolonged fan lifespan. Now that we understand the benefits of fan voltage adjustment, let’s proceed to the next section, where we will discuss the tools and equipment you will need for this process.
Tools and Equipment Needed
Adjusting the voltage of your computer’s case fans requires a few essential tools and equipment. Here’s a list of what you will need before you begin:
- Screwdriver: Depending on your computer case, you may need a Phillips or flathead screwdriver to open the case and access the fans. Make sure you have the appropriate screwdriver on hand.
- Thermal Paste (optional): If you plan to remove and reseat your CPU cooler during the process, you may need thermal paste to ensure proper heat transfer between the CPU and the cooler.
- Motherboard Manual: Familiarize yourself with your motherboard’s manual, as it contains valuable information on fan headers, voltage control options, and other relevant settings specific to your motherboard model.
- Fan Controller (optional): If your motherboard lacks extensive fan control features, you can consider purchasing a fan controller. A fan controller provides additional control and flexibility over your case fans, allowing for more precise voltage adjustment.
- Software or BIOS Access: Depending on your motherboard and fan control options, you may need access to the BIOS or fan control software to adjust the fan voltage. Ensure that you have the necessary software installed or familiarize yourself with the BIOS settings related to fan control.
It’s important to note that some newer motherboards and cases have built-in fan voltage control options or support for PWM (Pulse Width Modulation) fans, which allow for more advanced and granular fan speed control without the need for additional hardware or software.
Before proceeding with adjusting the fan voltage, it’s a good idea to gather all the required tools and equipment to ensure a smooth and hassle-free process. Once you have everything ready, you can move on to the next section, where we will walk through the step-by-step process of determining the required fan speed.
Step 1: Determine the Required Fan Speed
Before adjusting the fan voltage, it’s important to determine the required fan speed for your computer’s cooling needs. This will depend on factors such as the components inside your computer, the ambient temperature in your environment, and the level of noise you are comfortable with. Here’s how you can determine the appropriate fan speed:
- Assess your computer’s cooling requirements: Consider the type of components in your computer, such as the CPU and GPU, and their cooling requirements. High-performance or overclocked components typically require more cooling power, while standard components may not need as much airflow.
- Consider the ambient temperature: If your computer is in an environment with high ambient temperatures, you may need higher fan speeds to maintain optimal temperatures. If the ambient temperature is moderate or cool, you may be able to lower the fan speeds without compromising cooling efficiency.
- Determine your noise tolerance: Think about the level of noise you are comfortable with. If you prefer a quieter system, you may want to aim for lower fan speeds, even if it means sacrificing a bit of cooling performance. On the other hand, if noise is not a concern, you can opt for higher fan speeds to maximize cooling effectiveness.
- Do some research: Look up recommended fan speeds for your specific components or seek advice from online forums or communities dedicated to computer cooling. This can provide valuable insights into optimal fan speeds for different setups and help you make an informed decision.
By considering these factors and doing some research, you can determine the desired fan speed that strikes a balance between cooling efficiency and noise levels. Remember that the goal is to achieve adequate cooling for your components while keeping noise at an acceptable level.
Once you have determined the required fan speed, we can move on to the next section, where we will locate the fan voltage control option in your computer. This will vary depending on your specific motherboard or fan controller setup.
Step 2: Locate the Fan Voltage Control Option
After determining the desired fan speed, the next step is to locate the fan voltage control option in your computer. The location and availability of this option will depend on your motherboard model and BIOS version. Here’s how you can locate the fan voltage control option:
- Access the BIOS: Restart your computer and press the designated key (often Del, F2, or F10) during the boot process to enter the BIOS. Refer to your motherboard’s manual for the specific key or combination of keys to access the BIOS.
- Navigate to the fan control settings: Once you are in the BIOS, look for the fan control or hardware monitoring section. This section may be named differently depending on your motherboard’s manufacturer and BIOS version.
- Find the voltage control options: Within the fan control or hardware monitoring section, search for the options related to fan voltage adjustment. Depending on your motherboard, this may be labeled as “Fan Voltage Control,” “Fan Speed Control,” or similar. You may have separate voltage control options for different fan headers.
- Enable or adjust the voltage: Once you have located the fan voltage control option, you can either enable it if it’s disabled by default or adjust the voltage levels. Some motherboards provide presets for different fan speeds, while others allow you to enter specific voltage values. Refer to your motherboard’s manual or on-screen instructions for guidance on adjusting the voltage.
It’s important to note that not all motherboards have extensive fan voltage control options. Some motherboards might only offer basic fan control settings without voltage adjustment capabilities. In such cases, you may need to rely on fan control software or consider purchasing a separate fan controller to adjust the voltage.
Once you have located and adjusted the fan voltage control option, it’s time to move on to the next step: adjusting the fan voltage itself. In the next section, we will guide you through the process of adjusting the fan voltage to achieve your desired fan speed.
Step 3: Adjusting the Fan Voltage
Now that you have located the fan voltage control option, it’s time to adjust the fan voltage to achieve your desired fan speed. The process may vary slightly depending on your motherboard model and BIOS version. Follow these general steps to adjust the fan voltage:
- Select the fan to adjust: If you have multiple case fans connected to your motherboard, choose the specific fan you want to adjust. Some motherboards provide individual control over each fan header, while others may have a single setting that applies to all fans.
- Set the voltage level: Depending on your motherboard’s options, you may have the choice to select between preset fan speed profiles or adjust the voltage level manually. If preset profiles are available, choose the one closest to your desired fan speed. If manual adjustment is possible, enter the desired voltage value corresponding to the fan speed you determined in the previous step.
- Save and exit the BIOS: After adjusting the fan voltage, navigate to the option to save and exit the BIOS. Select this option to save your changes and restart your computer.
Once your computer has restarted, the fan voltage adjustments should take effect. Monitor the fan speed and system temperatures to ensure that the adjustments meet your cooling requirements. If necessary, you can go back to the BIOS and make further adjustments to achieve the desired balance between cooling performance and noise levels.
If your motherboard lacks extensive fan control options or you prefer a more intuitive software-based approach, you can explore third-party fan control software. Such software provides additional flexibility and often includes features like fine-tuned fan speed curves, temperature-based control, and graphical user interfaces for easier adjustment.
Now that you have adjusted the fan voltage, let’s move on to the final step: testing the adjusted fan speed to ensure it meets your expectations.
Step 4: Testing the Adjusted Fan Speed
After adjusting the fan voltage to your desired level, it’s crucial to test the adjusted fan speed to ensure that it meets your expectations. Testing allows you to verify whether the fan is operating at the desired speed and achieving the desired balance between cooling performance and noise levels. Here’s how you can test the adjusted fan speed:
- Run resource-intensive tasks: To put your computer under load, run resource-intensive tasks such as rendering a high-resolution video, playing graphically demanding games, or running a stress test utility. These tasks will generate heat and push your components to their limits, allowing you to test the cooling effectiveness of the adjusted fan speed.
- Monitor system temperatures: Use monitoring software or BIOS temperature readings to monitor the temperatures of your CPU, GPU, and other critical components. Ensure that the temperatures remain within safe limits during these resource-intensive tasks. If the temperatures exceed safe limits, you may need to increase the fan speed by adjusting the voltage accordingly.
- Listen for noise levels: Pay attention to the noise levels produced by the fans. If the noise is too loud or bothersome, you may need to reduce the fan speed by lowering the voltage. On the other hand, if the noise is acceptable and the cooling performance is adequate, you have likely found the optimal fan speed for your system.
- Make further adjustments if necessary: Based on your observations during testing, you may need to fine-tune the fan speed further. Return to the BIOS or fan control software to make adjustments to the fan voltage if required. Iteratively test and adjust until you achieve the balance between cooling performance and noise levels that suits your needs.
It’s important to consider that the testing process may require some time and experimentation to find the optimal fan speed for your specific system and preferences. Don’t hesitate to make multiple adjustments and retest to ensure that you achieve the desired results.
Once you are satisfied with the tested fan speed and its impact on temperature and noise levels, you can enjoy the benefits of your adjusted case fan voltage. Remember that regular monitoring of system temperatures is essential to ensure that your computer remains thermally stable under varying workloads and ambient conditions.
Congratulations! You have successfully adjusted the fan voltage and optimized your case fans for improved cooling efficiency and noise control. By following these steps and making careful adjustments, you can achieve an optimal balance for your specific computer setup.
Conclusion
Adjusting the fan voltage of your computer’s case fans allows you to have better control over cooling performance and noise levels. By following the steps outlined in this guide, you can achieve an optimized fan speed that meets your specific requirements. Let’s recap the key points we’ve covered:
We started by understanding what fan voltage adjustment is and why it is beneficial. Adjusting the fan voltage offers improved cooling efficiency, noise reduction, energy efficiency, extended fan lifespan, and customizable fan control.
We then discussed the tools and equipment needed for the adjustment process, including a screwdriver, thermal paste (optional), motherboard manual, fan controller (optional), and access to software or BIOS settings for fan control.
The step-by-step process began with determining the required fan speed based on your system’s cooling needs, ambient temperature, and noise tolerance. Next, we located the fan voltage control option in the BIOS and adjusted the voltage levels accordingly.
After adjusting the fan voltage, we emphasized the importance of testing the adjusted fan speed. By running resource-intensive tasks and monitoring system temperatures and noise levels, you could assess whether the adjusted fan speed meets your expectations. Further adjustments can be made if necessary.
Now that you have gained a comprehensive understanding of adjusting case fan voltage, you can optimize your computer’s cooling performance and noise levels according to your specific requirements.
Remember, finding the perfect balance between cooling and noise is a process that may require some experimentation. Regularly monitor system temperatures and noise levels to ensure that your computer remains thermally stable and acoustically comfortable.
So, don’t hesitate to delve into the process of adjusting your case fan voltage and enjoy the benefits of a well-cooled and quiet computing experience!