Introduction
Welcome to this guide on how to add the Bluetooth icon to the taskbar. Bluetooth technology allows for seamless wireless communication between devices, making it convenient to connect various devices such as headphones, speakers, keyboards, and more. By adding the Bluetooth icon to the taskbar, you can easily access and manage your Bluetooth settings without having to dig through multiple menus. Whether you want to connect a new device or check the status of your current connections, having the Bluetooth icon readily available in the taskbar can save you time and effort.
In this article, we will walk you through the step-by-step process of adding the Bluetooth icon to the taskbar on a Windows device. The instructions provided will work across different versions of Windows, including Windows 10, Windows 8, and Windows 7. So, regardless of the specific Windows edition you are using, you’ll be able to follow along and customize your taskbar with the Bluetooth icon.
With the Bluetooth icon in the taskbar, you won’t have to navigate through the Settings app or Control Panel every time you want to manage your Bluetooth connections. Instead, you can simply click on the Bluetooth icon right from the taskbar, allowing you to quickly access your Bluetooth settings and perform necessary tasks. Adding the Bluetooth icon to the taskbar is a small but valuable customization that can enhance the usability of your Windows device, especially if you frequently use Bluetooth-enabled devices.
So, without further ado, let’s dive into the step-by-step process of adding the Bluetooth icon to the taskbar on Windows.
Step 1: Open the Windows Settings
The first step to adding the Bluetooth icon to the taskbar is to open the Windows Settings. There are various ways to access the Windows Settings, but we will cover the most common methods:
- Click on the Start button located in the bottom left corner of your screen. From the Start menu, click on the Settings icon, represented by a gear symbol.
- Alternatively, you can use the keyboard shortcut “Windows key + I” to directly open the Windows Settings.
Once you have opened the Windows Settings, you will be greeted with a plethora of options and settings to customize your Windows device. The Windows Settings provide a centralized location where you can tweak various aspects of your system, including network settings, privacy options, personalization, and much more.
Now that you have successfully opened the Windows Settings, you’re ready to move on to the next step in our guide.
Step 2: Go to the “Devices” section
After opening the Windows Settings, the next step is to navigate to the “Devices” section. This is where you can manage all the devices connected to your Windows device, including Bluetooth devices. Follow the steps below to access the “Devices” section:
- Within the Windows Settings, you will see various categories. Look for the category named “Devices” and click on it. The “Devices” category typically has an icon resembling a keyboard, mouse, and printer.
- Alternatively, you can use the search bar at the top of the Windows Settings window. Type “Devices,” and the search results will display the relevant category. Click on the search result for “Devices” to access the section directly.
Once you have reached the “Devices” section, you will find a range of options related to devices and peripherals. This is where you can manage and configure settings for your Bluetooth devices as well.
Now that you have successfully navigated to the “Devices” section, let’s move on to the next step in our guide.
Step 3: Click on “Bluetooth & other devices”
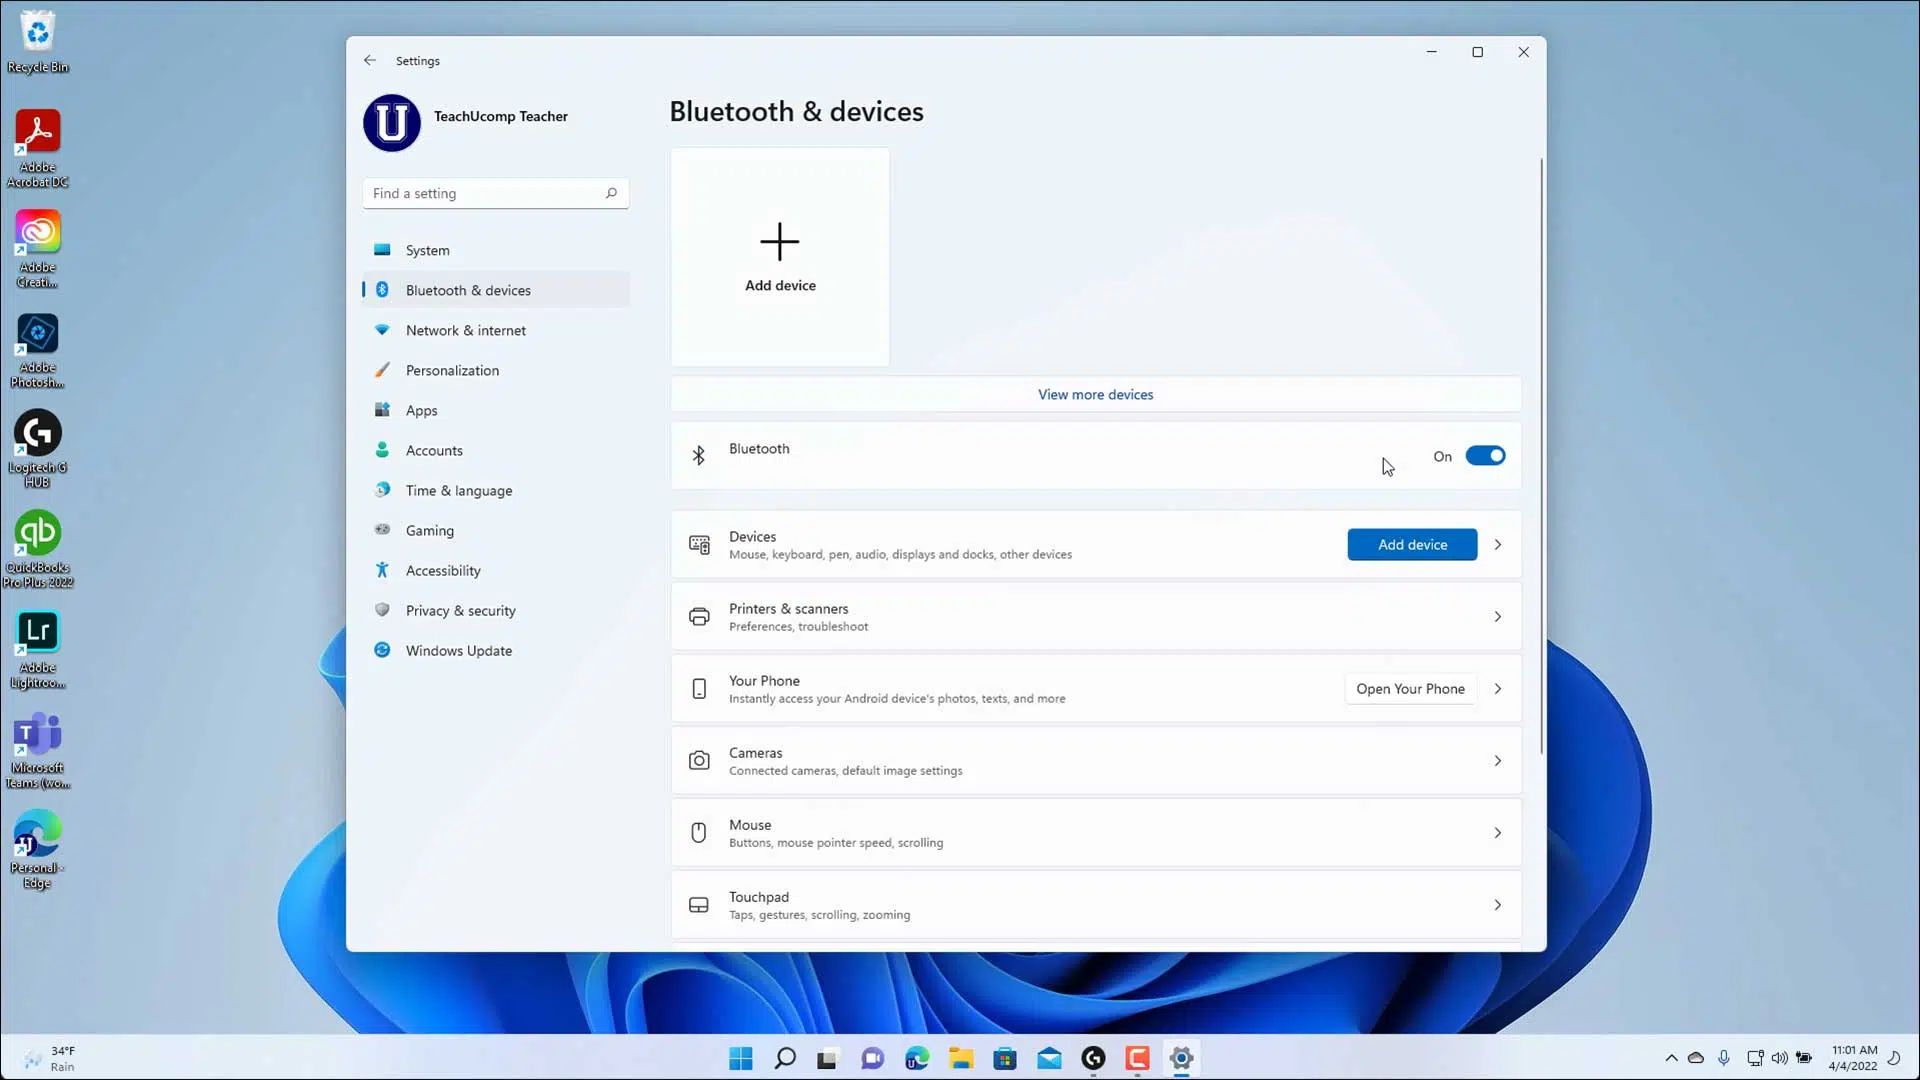
Once you are in the “Devices” section of the Windows Settings, the next step is to click on the “Bluetooth & other devices” option. This is where you can manage and configure your Bluetooth connections and settings. Follow the steps below to access the “Bluetooth & other devices” section:
- Within the “Devices” section, you will find a list of categories on the left-hand side of the window. Look for the category labeled “Bluetooth & other devices” and click on it.
- Alternatively, you can use the search bar at the top of the “Devices” section. Type “Bluetooth” or “Bluetooth & other devices,” and the search results will display the relevant option. Click on the search result for “Bluetooth & other devices” to access the section directly.
Clicking on the “Bluetooth & other devices” option will open up a new section where you can manage and view your Bluetooth devices. This is where you can add new devices, remove existing devices, and modify Bluetooth settings.
Now that you have successfully accessed the “Bluetooth & other devices” section, let’s move on to the next step in our guide.
Step 4: Enable Bluetooth if it’s not already enabled
If your Bluetooth is not already enabled on your Windows device, you will need to enable it before proceeding further. Enabling Bluetooth will allow your device to discover and connect to other Bluetooth-enabled devices. Follow the steps below to enable Bluetooth:
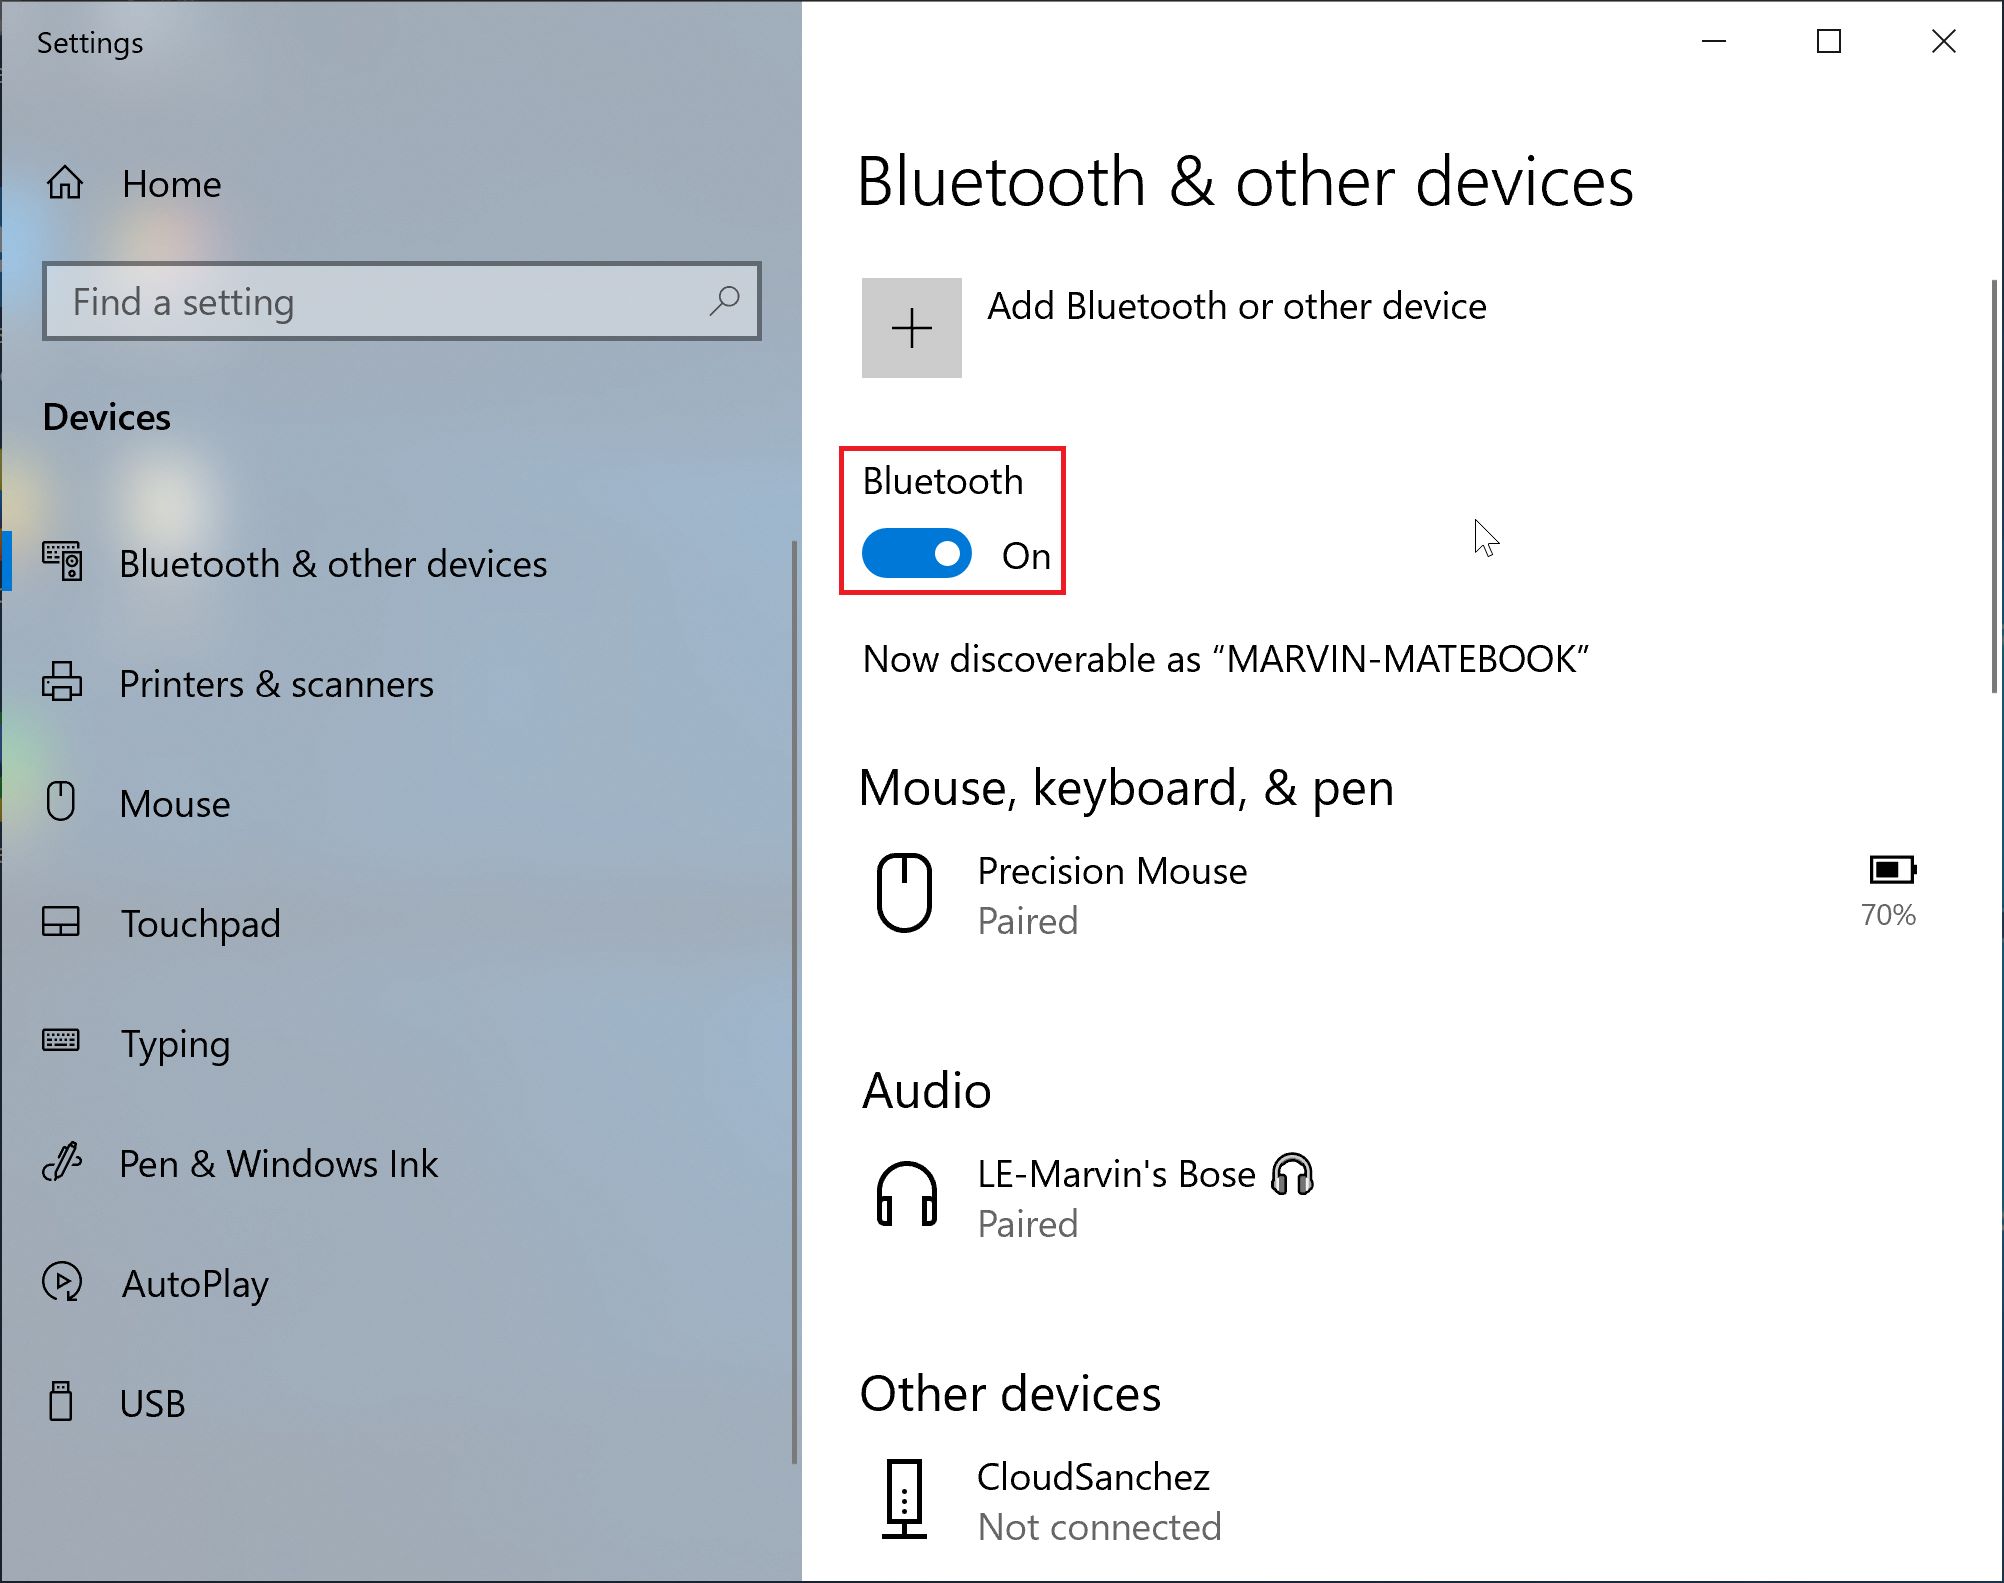
- Within the “Bluetooth & other devices” section of the Windows Settings, locate the “Bluetooth” option.
- If the Bluetooth option is turned off (indicated by the switch being in the “Off” position), click on the switch to toggle it to the “On” position.
Enabling Bluetooth will activate the Bluetooth functionality on your device, allowing it to search for and connect to other devices. If you do not see the Bluetooth option in the “Bluetooth & other devices” section, it could mean that your device does not have built-in Bluetooth capabilities or that the Bluetooth driver is not installed.
Once you have successfully enabled Bluetooth on your Windows device, you can proceed to the next step in our guide.
Step 5: Click on “More Bluetooth options”
Now that you have enabled Bluetooth on your Windows device, the next step is to click on “More Bluetooth options.” This will give you access to additional Bluetooth settings and customization options. Follow the steps below to access “More Bluetooth options”:
- Within the “Bluetooth & other devices” section of the Windows Settings, you will see a section titled “Related settings.”
- Click on the “More Bluetooth options” link located at the bottom of the “Related settings” section.
Clicking on “More Bluetooth options” will open the Bluetooth settings window, where you can further configure Bluetooth-related settings. This window provides more advanced options for managing your Bluetooth connections, devices, and services. It allows you to control how your device interacts with Bluetooth devices and adjust specific Bluetooth parameters.
By accessing “More Bluetooth options,” you can fine-tune your Bluetooth experience and tailor it to your specific needs and preferences.
Now that you have successfully accessed “More Bluetooth options,” let’s move on to the next step in our guide.
Step 6: Check the box next to “Show the Bluetooth icon in the notification area”
In order to have the Bluetooth icon appear in the taskbar, you need to check the corresponding option in the Bluetooth settings. Follow the steps below to enable the Bluetooth icon:
- In the “Bluetooth settings” window, navigate to the “Options” tab.
- Under the “Options” tab, you will find a checkbox that says “Show the Bluetooth icon in the notification area.” Click on the checkbox to enable it.
By checking this box, you are indicating that you want the Bluetooth icon to be visible in the taskbar’s notification area, also known as the system tray. This will make it easier for you to access Bluetooth settings and perform actions related to your Bluetooth devices with just a single click.
Enabling the Bluetooth icon in the notification area will provide you with quick access to important Bluetooth functions, such as connecting or disconnecting devices, toggling Bluetooth on or off, and adjusting Bluetooth settings.
After checking the box to show the Bluetooth icon, you can proceed to the next step to apply the changes.
Step 7: Apply the changes
After enabling the option to show the Bluetooth icon in the notification area, you need to apply the changes for the Bluetooth icon to appear in the taskbar. Follow the steps below to apply the changes:
- Once you have checked the box next to “Show the Bluetooth icon in the notification area,” click on the “Apply” or “OK” button at the bottom right corner of the Bluetooth settings window.
- This will save the changes you made and update the taskbar to display the Bluetooth icon.
Applying the changes ensures that the system registers your selection to display the Bluetooth icon. After applying the changes, you will notice the Bluetooth icon appearing in the taskbar’s notification area alongside other system icons.
It’s important to note that each time you make changes to the settings, such as adding or removing devices or modifying Bluetooth options, you may need to reapply the changes for the Bluetooth icon to reflect the updated settings.
Now that you have applied the changes, you can proceed to the final step where you will find the Bluetooth icon displayed in the taskbar.
Step 8: The Bluetooth icon will now appear in the taskbar
Congratulations! By following the previous steps and applying the changes, you have successfully added the Bluetooth icon to the taskbar of your Windows device. Now, whenever you need to access your Bluetooth settings or perform tasks related to your Bluetooth devices, you can do so with just a click on the Bluetooth icon in the taskbar’s notification area.
With the Bluetooth icon readily available in the taskbar, you can easily connect or disconnect Bluetooth devices, adjust Bluetooth settings, and monitor the status of your Bluetooth connections. This convenient access eliminates the need to navigate through multiple menus or settings windows, saving you time and effort.
The Bluetooth icon will be displayed alongside other system icons in the taskbar’s notification area, which is located in the bottom right corner of the screen. It may appear as a small Bluetooth symbol or as a square icon with the Bluetooth logo, depending on your Windows version or theme.
Having the Bluetooth icon in the taskbar ensures that you have quick and easy access to manage your Bluetooth connections and settings whenever you need them. Whether you’re connecting wireless headphones, transferring files, or pairing your device with a Bluetooth keyboard, the Bluetooth icon in the taskbar provides a convenient shortcut to access your Bluetooth functionality.
Now that you have successfully added the Bluetooth icon to the taskbar, you can enjoy a seamless Bluetooth experience and make the most out of your wireless devices.