Introduction
Welcome to this guide on how to add Zoom to Outlook! In today’s fast-paced world, virtual meetings and video conferencing have become an integral part of our professional and personal lives. Zoom, a popular video conferencing software, offers a seamless and user-friendly platform for connecting with colleagues, clients, and friends from anywhere in the world.
By incorporating Zoom into your Outlook email client, you can easily schedule and join Zoom meetings directly from your Outlook calendar. This integration streamlines the process, providing a convenient and efficient way to manage your virtual meetings.
In this guide, we will walk you through the step-by-step process of adding Zoom to Outlook. We will cover everything from downloading and installing the Zoom plugin to scheduling and joining Zoom meetings using Outlook. Additionally, we will provide tips for customizing meeting options and troubleshooting common issues that may arise.
Whether you are a professional looking to improve your remote collaboration or an individual wanting to stay connected with loved ones, this guide will equip you with the knowledge and skills to seamlessly integrate Zoom into your Outlook experience.
So, let’s get started with the first step – downloading the Zoom plugin for Outlook!
Downloading the Zoom Plugin
In order to integrate Zoom with Outlook, you will first need to download the Zoom plugin. The plugin allows for seamless communication between the two platforms, making it easy to schedule and join Zoom meetings directly from your Outlook calendar.
Here’s how you can download the Zoom plugin:
- Open your web browser and navigate to the Zoom website.
- Click on the “Resources” or “Downloads” section.
- Look for the option to download the Zoom plugin for Outlook.
- Choose the appropriate version based on your operating system (Windows or Mac).
- Click on the download link to start the download process.
Once the download is complete, you can proceed to the next step of installing the plugin.
It’s important to note that the availability of the Zoom plugin may depend on your organization’s policies and permissions. If you do not have the necessary permissions to download and install the plugin, reach out to your IT department or system administrator for assistance.
Downloading the Zoom plugin is a critical first step in integrating Zoom with Outlook. It sets the foundation for a seamless experience, enabling you to harness the full power of both platforms in one unified interface.
Installing the Zoom Plugin
Once you have successfully downloaded the Zoom plugin for Outlook, the next step is to install it on your computer. The installation process is straightforward and only takes a few minutes to complete.
Follow these steps to install the Zoom plugin:
- Locate the downloaded Zoom plugin file on your computer. It is usually saved in the “Downloads” folder, unless you chose a different destination during the download.
- Double-click on the plugin file to begin the installation process.
- Follow the on-screen instructions provided by the installer.
- Read and accept the terms and conditions if prompted.
- Choose the installation location for the plugin or leave it as the default location.
- Click on the “Install” button to start the installation process.
- Wait for the installation to complete. This may take a few moments.
Once the installation is finished, you will receive a confirmation message indicating that the Zoom plugin has been successfully installed. At this point, you are ready to move on to the next step of accessing the Zoom plugin within Outlook.
It’s worth mentioning that during the installation process, you may be prompted to close any open instances of Outlook. Make sure to save your work and close Outlook before proceeding with the installation.
Installing the Zoom plugin is a crucial step in the integration process. It establishes the connection between Zoom and Outlook, enabling you to seamlessly switch between the two platforms and access all the features and functionalities they provide.
Accessing the Zoom Plugin in Outlook
Now that you have successfully installed the Zoom plugin for Outlook, you can begin accessing its features directly within the Outlook interface. The Zoom plugin integrates seamlessly with Outlook, offering a convenient way to schedule and manage your Zoom meetings.
Here’s how you can access the Zoom plugin in Outlook:
- Launch Microsoft Outlook on your computer.
- You will notice a new tab or section in the Outlook ribbon specifically dedicated to Zoom. Look for the “Zoom” tab or a similar label.
- Click on the “Zoom” tab to access the Zoom plugin options.
Upon clicking on the Zoom tab, you will be presented with a range of options and features that the plugin provides. These options may include:
- Schedule a Zoom Meeting: This option allows you to create and schedule a new Zoom meeting directly from Outlook.
- Join a Zoom Meeting: This option allows you to join an existing Zoom meeting by entering the meeting ID and password.
- Settings and Preferences: This option allows you to customize your Zoom plugin settings and preferences, such as default meeting settings, notifications, and more.
By accessing the Zoom plugin within Outlook, you can streamline your workflow and avoid the need to switch between multiple applications. The integration provides a centralized hub for managing your Zoom meetings, improving efficiency and productivity.
Now that you know how to access the Zoom plugin in Outlook, let’s move on to the next section, where we will explore how to schedule a Zoom meeting using the plugin.
Scheduling a Zoom Meeting in Outlook
One of the key benefits of integrating Zoom with Outlook is the ability to schedule Zoom meetings directly from your Outlook calendar. This makes it convenient to plan and organize your virtual meetings without having to switch between different applications.
Here’s how you can schedule a Zoom meeting in Outlook:
- Open Microsoft Outlook on your computer.
- Click on the “Zoom” tab or section in the Outlook ribbon to access the Zoom plugin options.
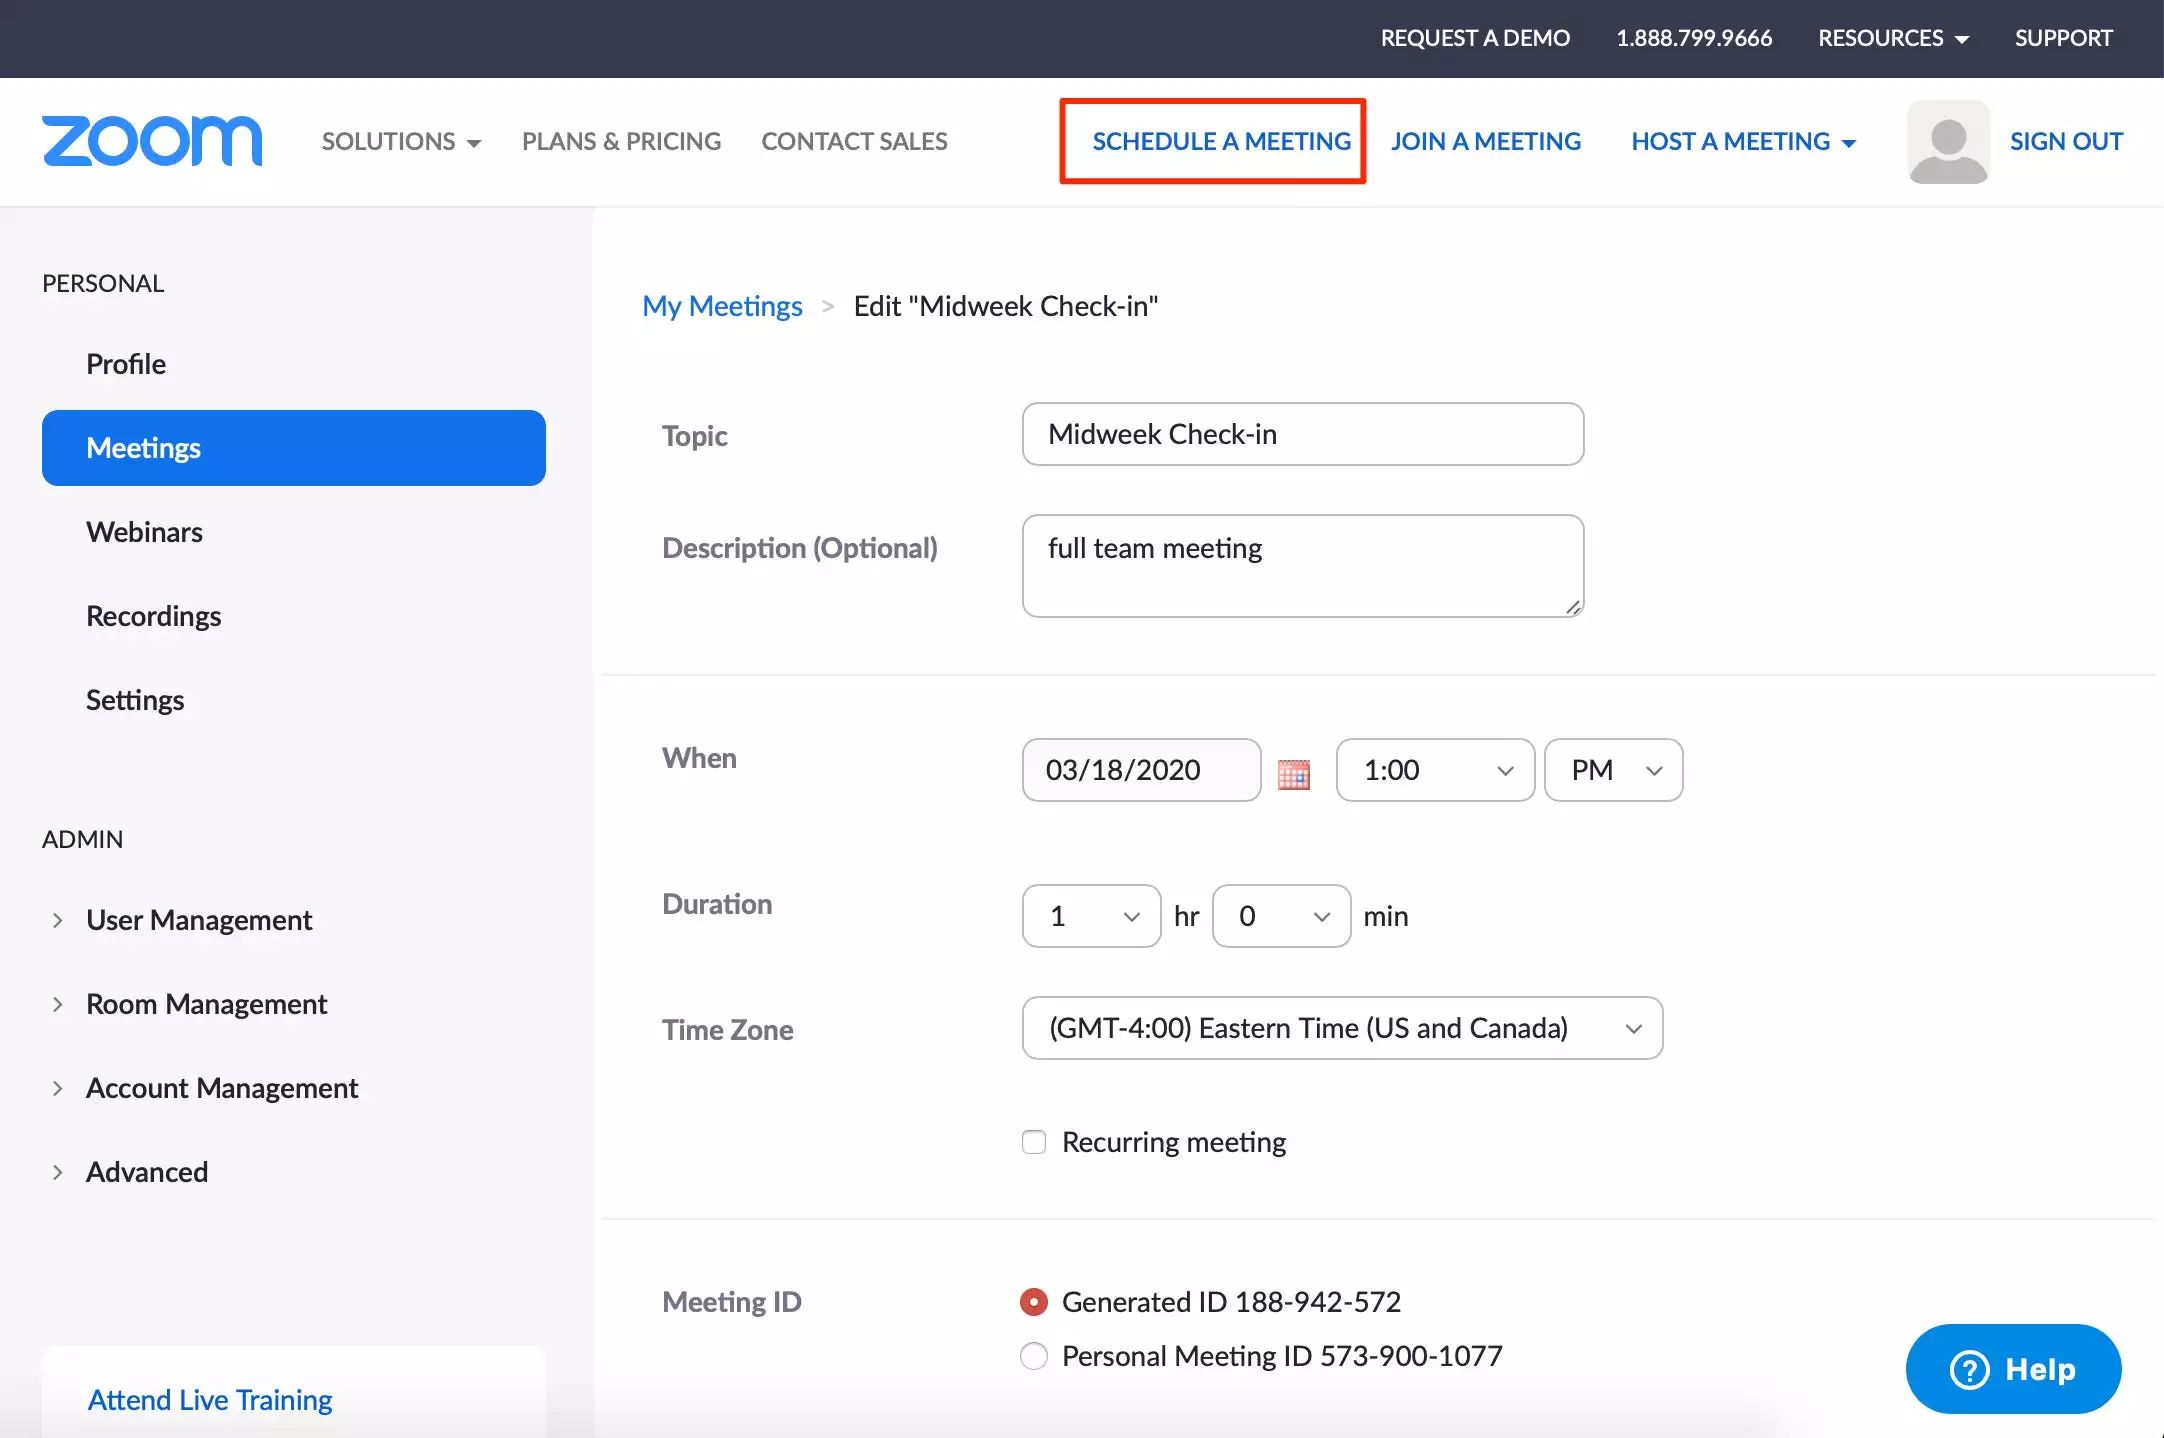
- Click on the “Schedule a Meeting” option. A new meeting window will appear.
- In the meeting window, enter the necessary details for your Zoom meeting, such as the title, date, time, and duration.
- Specify the required participants by adding their email addresses in the “Invite Attendees” field.
- Customize the meeting settings according to your preferences. You can choose to enable video, audio, and screen sharing options, as well as set password requirements and other advanced settings.
- Once you have entered all the required information and adjusted the settings, click on the “Schedule” button to save the Zoom meeting.
After scheduling the Zoom meeting, it will be added to your Outlook calendar. Participants will receive an email invitation with the meeting details, including the Zoom meeting link and any other necessary information.
By scheduling Zoom meetings directly within Outlook, you can seamlessly manage your calendar and ensure that all your important appointments and meetings are in one place. This integration simplifies the process of coordinating virtual meetings and makes it easier for participants to join at the designated time.
Now that you know how to schedule Zoom meetings in Outlook, let’s explore how you can customize Zoom meeting options to suit your specific requirements.
Customizing Zoom Meeting Options in Outlook
When scheduling a Zoom meeting in Outlook, you have the flexibility to customize various meeting options to meet your specific needs. These options allow you to tailor the meeting settings, such as video and audio preferences, security measures, and additional features.
Here are some of the key Zoom meeting options that you can customize within Outlook:
- Video Settings: You can choose whether to enable or disable video for participants when they join the meeting. You can also specify whether to start the meeting with video on or off for the host and participants.
- Audio Settings: You can decide whether to use computer audio, telephone dial-in, or a combination of both for audio connectivity. You can also choose to automatically join the meeting with your computer audio muted.
- Screen Sharing: You can enable or disable screen sharing for participants. You can also specify whether participants can share their screen simultaneously or only one person at a time.
- Password Protection: You can set a password for your Zoom meeting to enhance security and prevent unauthorized access.
- Meeting Recording: You can choose whether to allow meeting recording or restrict it to specific participants. You can also determine if the recording should be saved locally or to the Zoom cloud.
- Advanced Meeting Settings: You have the option to configure advanced meeting settings, such as enabling waiting rooms, enabling or disabling chat features, and defining alternative host permissions.
To customize these options, follow these steps:
- When scheduling a Zoom meeting in Outlook, click on the “Schedule a Meeting” option in the Zoom plugin.
- In the meeting window, navigate to the desired setting, such as Video, Audio, or Screen Sharing.
- Adjust the settings according to your preferences by selecting the appropriate options.
- Continue customizing other settings as necessary.
- Click on the “Schedule” button to save the meeting with the customized options.
By customizing Zoom meeting options within Outlook, you can ensure that the meeting environment aligns with your specific requirements and enhances collaboration and productivity. These options allow you to tailor the meeting experience and create a seamless virtual communication environment.
Now that you know how to customize Zoom meeting options in Outlook, let’s move on to the next section, where we will explore how to join Zoom meetings directly from Outlook.
Joining a Zoom Meeting in Outlook
Once you have scheduled a Zoom meeting in Outlook, joining the meeting is a simple process. The Zoom plugin integration allows you to join meetings directly from your Outlook calendar with just a few clicks.
Here’s how you can join a Zoom meeting in Outlook:
- Open Microsoft Outlook on your computer.
- Navigate to your Outlook calendar.
- Locate the scheduled Zoom meeting that you want to join.
- Double-click on the meeting to open its details.
- In the meeting details window, you will find the “Join Zoom Meeting” button.
- Click on the “Join Zoom Meeting” button to launch the Zoom application or web client.
- If prompted, enter the meeting ID and password provided by the meeting organizer.
- Choose your audio and video preferences, and then click on the “Join” button to enter the meeting.
Once you have joined the Zoom meeting, you can participate in discussions, share your screen, collaborate with other participants, and make the most out of the Zoom features available.
The integration between Zoom and Outlook provides a seamless transitioning experience, allowing you to effortlessly move from scheduling the meeting in Outlook to joining the meeting in Zoom.
It is important to note that joining a Zoom meeting from Outlook requires the Zoom application to be installed on your computer. If you do not have the Zoom application installed, you will be prompted to download and install it before joining the meeting.
Joining a Zoom meeting directly from Outlook simplifies the process and eliminates the need to search for meeting invitations or manually enter meeting details. It saves time and provides a convenient way to connect with colleagues and participate in virtual meetings.
Now that you know how to join Zoom meetings in Outlook, let’s move on to the next section, where we will explore some common troubleshooting tips for resolving any issues that may arise.
Troubleshooting Common Issues
While integrating Zoom with Outlook is generally a smooth process, there may be times when you encounter common issues. These issues can hinder your experience and disrupt your ability to schedule or join Zoom meetings in Outlook. However, with some troubleshooting techniques, you can quickly resolve these issues and get back on track.
Here are some common issues you may encounter when using Zoom with Outlook:
- Unable to download the Zoom plugin: If you are unable to download the Zoom plugin for Outlook, ensure that you have the necessary permissions and check your internet connection. If the issue persists, contact your IT department or system administrator for assistance.
- Installation error: If you encounter errors during the installation process, try running the installation file as an administrator. You can also temporarily disable any antivirus or security software that may be blocking the installation.
- Missing Zoom tab in Outlook: If you cannot find the Zoom tab or section in your Outlook ribbon, ensure that the plugin is installed correctly. Try closing and reopening Outlook, or check the add-ins section in Outlook settings to ensure that the Zoom plugin is enabled.
- Joining meeting issues: If you are unable to join a scheduled Zoom meeting from Outlook, double-check the meeting ID and password. Ensure that you have the latest version of the Zoom application installed on your computer. If the issue persists, try joining the meeting using the Zoom web client or reach out to the meeting organizer for further assistance.
- Audio/video problems: If you are experiencing audio or video issues during a Zoom meeting, check your microphone and speaker settings in the Zoom application. Make sure they are properly configured and that you have selected the correct audio and video devices. Restarting your computer or reconnecting to the meeting may also help resolve the issue.
If you encounter any other issues or errors while using Zoom with Outlook, it is recommended to visit the Zoom support website or reach out to their customer support for further assistance. They have comprehensive resources and a dedicated support team to help resolve any technical or operational issues you may encounter.
By troubleshooting common issues, you can resolve any obstacles that may arise during the integration of Zoom with Outlook. This ensures a seamless and efficient experience when scheduling and joining Zoom meetings through Outlook.
With the troubleshooting techniques in your toolkit, you can quickly overcome obstacles and make the most out of Zoom and Outlook integration for your virtual communication needs.
Conclusion
Integrating Zoom with Outlook offers a seamless and convenient solution for managing virtual meetings and video conferencing. By following the steps outlined in this guide, you can successfully add Zoom to Outlook and take advantage of the combined features and functionalities of these powerful platforms.
From downloading and installing the Zoom plugin to accessing it within Outlook, scheduling and customizing Zoom meetings, and troubleshooting common issues, you now have the knowledge and skills to make the most out of Zoom and Outlook integration.
Integrating Zoom with Outlook enhances productivity and efficiency by providing a centralized hub for managing your virtual meetings. With the ability to schedule and join Zoom meetings directly from your Outlook calendar, you can seamlessly navigate between the two applications and streamline your workflow.
Remember to customize your Zoom meeting options according to your preferences, enabling features such as video, audio, screen sharing, and password protection. These customizations enhance security, collaboration, and communication during your Zoom meetings.
If you encounter any difficulties or have specific issues while integrating Zoom with Outlook, don’t hesitate to seek assistance from Zoom’s support team. They are equipped with resources and expertise to address any technical or operational challenges you may face.
So, what are you waiting for? Start adding Zoom to Outlook and unlock the full potential of these versatile platforms for your virtual communication needs.